When you click on links to various merchants on this site and make a purchase, this can result in this site earning a commission. Affiliate programs and affiliations include, but are not limited to, the eBay Partner Network.
Re: How To: Quick/Easy Civic/Integra Trailing arm bushing replacement (also ES Poly V
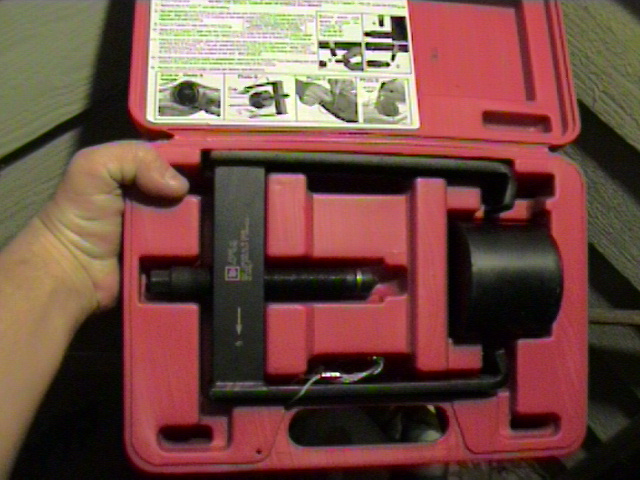
Originally Posted by rmcdaniels
I'm glad I bought this tool because of threads like this and the posts above me. trying to freeze it, bang it out, burn it was just out of the question. now I'm stuck with a specialty tool. I guess I can rent it out or sale it.
Re: How To: Quick/Easy Civic/Integra Trailing arm bushing replacement (also ES Poly V
Keeping mine. I have another Civic to work on. After that. Maybe sell dirt cheap. I've seen people try to rent these out and no one really bites but everyones thinks it's a good idea. Problem being, if you don't have the money to buy the tool, you sure don't have the money for the deposit.
Re: How To: Quick/Easy Civic/Integra Trailing arm bushing replacement (also ES Poly V
Originally Posted by veks
I'm glad I bought this tool because of threads like this and the posts above me. trying to freeze it, bang it out, burn it was just out of the question. now I'm stuck with a specialty tool. I guess I can rent it out or sale it.
I need to replace bushings on my '99 CR-V. Does anyone have this tool that they would be willing to rent to me?
Re: How To: Quick/Easy Civic/Integra Trailing arm bushing replacement (also ES Poly V
I ended up picking up the factory driver set from a vendor on eBay. Great if you are already doing the rest of the bushings and/or have a press, has the adapter for DA bushings too.
Re: How To: Quick/Easy Civic/Integra Trailing arm bushing replacement (also ES Poly V
Back on this old thread.
What if I have no bushings in it? Is there any angle or indicator to point the bushings? OEM trailing arms comes with the bushing in it. I know that with lowering springs the car sits "lower" and the bushings are twisted farther than with OEM springs, but any angle or place to point it?
I have a del Sol with H&R #51864 springs (blue).
Also, bushings themself are offset. Which side points outward and inward?
Re: How To: Quick/Easy Civic/Integra Trailing arm bushing replacement (also ES Poly V
This helped me allot because needed to get the bushings clocked correctly. I used a Hard Race brand bushing. They say it's 150% harder than stock and it really looks like it! 80$ for the bushings and 300$ for a complete bushing kit! Got one this evening will do the other tomorrow and try em out on the road. Also I took the whole spindle off and beat the bushing out with a hammer. It works that way, puts some marks on the bushing but not too bad. Woulda definitely been faster and easier with the tool but it can be done without it. Bushing beats out easier from the back of the control arm as well.
Last edited by DanimalJames; 11-07-2016 at 03:16 PM.
Reason: Added information
Re: How To: Quick/Easy Civic/Integra Trailing arm bushing replacement (rmcdaniels)
Originally Posted by .RJ
FYI - when removing the TA from the Upper Arm, I'd remove the single bolt from the trailing arm, not the 2 in the chassis - the bolts going into the chassis are prone to being cross threaded with teh weight of the TA/brakes on them.
If you pay attention to nothing else on this thread, pay attention to that comment. Re-attaching the suspension through the upper arm can place a great deal of strain on the bolts, easily leading to cross-threading. If those bolts don't go in all the way, stop and consider your options. One of them is to chase out the threads, re-attaching the upper arm without the trailinging arm attached.
Although it appears the two upper arm bolt holes are threaded through solid metal, what you see is rather two nuts factory welded on the inside of the rear frame rail. Should the weld on a nut break, the nut will spin freely and the bolt will not tighten. If you examine the reverse side, you'll see nothing but smooth metal with no place to grip the lose nut. In other words, the nut sits inside the frame with no obvious way to extract it.
The misery of broken welds on the upper arm nuts is apparent from several posts which I've collected here:
Since the special tool costs $160 shipped (no used one on ebay or local craigslist available), and I only intend to have this repair done once, it makes sense I pay a mechanic with the tool to do it for me. Is 1 hour labor by an auto shop to have both sides done a fair expectation?
A user here, claimed to have to engineered his own removal tool using a block of wood, incase anyone's interested.
Re: How To: Quick/Easy Civic/Integra Trailing arm bushing replacement (also ES Poly V
Originally Posted by k3ntegra
Is 1 hour labor by an auto shop to have both sides done a fair expectation?.
Not likely, unless said mechanic is your neighbor/best friend/wife and/or you show up with the arms removed from the car and/or you are an amazing negotiator. I'm gonna take a SWAG and say at least 3 hours.
Re: How To: Quick/Easy Civic/Integra Trailing arm bushing replacement (also ES Poly V
Originally Posted by spAdam
Not likely, unless said mechanic is your neighbor/best friend/wife and/or you show up with the arms removed from the car and/or you are an amazing negotiator. I'm gonna take a SWAG and say at least 3 hours.
OP said it took him about an hour and he wasn't using power tools.
I've replaced front struts, and I assume a mechanic with an impact wrench to compress the springs would take 1.5 hours max.
Re: How To: Quick/Easy Civic/Integra Trailing arm bushing replacement (also ES Poly V
Mechanics don't bill based on how long they think it might take (unless they are hooking you up), they bill based on a published book time for the job. When I was wrenching, the de facto standard was the Chilton guide. I'm confident that it's done online now, but that it's the same process.
Re: How To: Quick/Easy Civic/Integra Trailing arm bushing replacement (also ES Poly V
Thank you for providing the helpful response spadam. I'm leaning towards performing this repair myself since I have to get new set of rear LCAs, as a result of the bolts being sized in the LCA bushing which resulted in a bolt head snapping.
I know for a fact that my driver side rear toe adjustment bolt is seized since 2 different alignments shops were unable to get that toe in proper range and one of the shops wrote "frozen" on the alignment result sheet next to it. Heating it up with a propane torch and applying is beeswax, is a must before I attempt to loosen that with a breaker bar.
My other concern is the trailing arm bushing bolts as seen in 3:16 of the video i linked. Would it be rational to go ahead and heat those bolts up? Since they are facing the ground, using beeswax or any other lubricant would be likely pointless. In the picture of the first post of this thread, there appears to be an emergency brake line near one of the bolt. How time consuming would it be to remove/re-route that line?
Also is the angle/pivot degree of the TA bushing when the tires are resting on the ground, the same as if one (and only 1) LCA is jacked up high enough that cars jack point is not in contact with the jack stand (eg 1cm away from the stand)? [Update: I did this my self, and noticed a 5 to 10 degree TAB pivot angle difference, when LCA was in "heavy contact" with the floor jack, and when the car was resting on the jack stand.]
I would advise getting ramps or lay the car's rear tires on block of wood (Non particle/non-fiber board) to get a proper clock angle.
Thanks to OP and an additional thanks to "Honda Lioness", & "Del Solid" for providing installation tips.
Additional tips:
When removing the two rear UCA bolts it is vital to jack up the LCA to relieve pressure and minimize cross-threading.
Also putting the new trailing arm bushing in the freezer overnight, should help make installation easier; as this can cause it to shrink similar to a balloon in cold air.
Edit: All the 4 bolts connecting the trailing arm bushing to the car's under body were all able to come loose; only one of them needed a breaker bar to be loosened. Also note, I periodically doused them in penetrating fluid in more than 1 occasion. One of the toe adjustment bolt is seized to the compensator arm bushing.
Originally Posted by subby
For those trying to hammer it out you need to hammer it from inside out.The hole is tapered. Works fine if u do it like this.
Re: How To: Quick/Easy Civic/Integra Trailing arm bushing replacement (also ES Poly V
Originally Posted by 94eg!
<TABLE WIDTH="90%" CELLSPACING=0 CELLPADDING=0 ALIGN=CENTER><TR><TD>Quote, originally posted by chrisw85 »</TD></TR><TR><TD CLASS="quote">
52385-S21-003 is the newest honda part number. $25 each at http://www.magauto.com</TD></TR></TABLE>
You can also get them directly from a Honda dealership for $25 each at HondaPartsDeals.com. They even have a $10 off honda tech coupon code (you'll have to search for it). It's really only $5 off since they charge you an addidtion $5 handling fee on every order. They still have the best on-line Honda parts prices...
Thanks for this great How-To!
I'm trying to find confirmation that 52385-S21-003 do fit on a 2000 Civic Ex.
I've seen a couple versions of service bulletins, both claiming 52385-SR3-000 as the failed part. And yet my dealer says it's the only part in existence unless of course I mention the S21 part number, he then says it's a special order item for less $$$ but not less than HondaPartsDeals or Magauto, they both now want $35.
Re: How To: Quick/Easy Civic/Integra Trailing arm bushing replacement (also ES Poly V
To successfully extract and install, I had things in the following configuration, including blocks of wood. For clearance, I had to additionally remove the strut's LCA bolt; note that these are prone to snapping off, you've been warned.
The part of the upper control arm that was loosened from the car's chassis was tucked into the wheel well, to help the keep the trailing arm up right.
As I put the new bushing in only one side of it wanted to go in. I fixed this problem, by re-positioning the bolt to the left or right of the cups hole, around 10-20mm away. Using an impact to put it in the first time, can cause the bushing to turn into an oval/egg shape; so you've been warned.
My additional suggestion is, once there's 16mm of exposure at the bottom edge of the trailing arm bushing from the trailing while installing, I recommend going back under the car and see if you can fit the trailing arm 17mm bolt back in place, then then turn 1/4 with the breaker bar if needed; otherwise you may have to push the bushing all the way out and start over with the insertion. I placed the trailing arm in the freezer for 12 hours and used wheel bearing grease.
I'll likely need to re-do this again, due to improper clocking; in which case I'll use poly bushings that come pre-installed with sleeves.
Car is much smoother at cornering and less "metallic" noise over heavy bumps.
There's a tool with an alternative design, which allows one use it on the outside AND inside of the trailing arm bushing. A common problem the 1st and second time of doing this, the bushing is pressed to far in. Also with this alternative tool (Model # CT4862 on eBay), you're less likely to warp/damage the trailing arm which could lead to failure of inspection, in some states.
Re: How To: Quick/Easy Civic/Integra Trailing arm bushing replacement (also ES Poly V
I did this job on a good shape eg in 2010. Easy job. Never thought much about it.
now I�m doing it in 2024 on a rusty eg. The easy job has become rear ended restoration. Most bolts don�t come out. They break, spin or round out. Basically it�s a cutting, welding, fabbing job.
EG fan forever but couldn�t Honda have left the mechanic some way of accessing the inner nut areas?

 06-10-2014, 08:18 AM


 - D-series.org


