

my project

Thread Starter
Honda-Tech Member
Joined: Apr 2004
Posts: 2,785
Likes: 1
From: phoenix, az
Originally Posted by junior40er
this thread is awesome. I wish I had a garage.
Originally Posted by cbp_crx
great job, the car looks awsome, one question, how much clearance do you have with that header, it looks like it sits pretty low? Anyway, nice job man
Originally Posted by crazykamper
that is one awesome project! keep up the good work, that car is beautiful!!!
Originally Posted by La-Quiete
Man that car is coming along sweet, i think it would look nice with a 91 bumper.
Originally Posted by Bob_760
Awesome project, it inspires me to get to work fixing the bodywork on my CRX
Noooooooooooooo non-facelift ftw!
It could use an oem lip though...
Noooooooooooooo non-facelift ftw!
It could use an oem lip though...
Originally Posted by harmonator84
eda if you ever want to convert your interior over to crx interior let me know.

update-haven't done much since the car has been up and running.
i tried the diy car freshener trick. https://honda-tech.com/zero...age=1. didn't work for me.
seafoamed the motor. 1/4 bottle through the brake booster check valve. i thought the motor was pretty clean internally but it smoked like crazy. another 1/4 bottle into the brake booster check valve. 1/4 bottle in the tank and another 1/4 in the oil. replaced oil and added a magnetic drain plug. before seafoam i'd get code 1 after 10 miles of driving. put the car through 100 miles of hell. didn't burn any oil and code 1 hasn't returned.
replaced the oil the next day and the filter was a bitch. didn't feel like using a screwdriver and hammer for removal. didn't feel like driving to get a tool to remove it. i'm surprised i had the clearance to fit an 18" pipewrench on the oil filter.
checked spark plugs and replaced the wires. installed my center vent so i could have a clock. cluster cover is still set in place and i still don't have any carpet or door panels. basically it has the bare essentails for now. windsheild moulding was too hard to reinstall, so i have made a temporary one out of masking tape. reinstalled the f/r wipers. ziptied my clutch cable to the strut tower bar.
one of my goals was rattle reduction. car rattles only when driving over rough road transitions and railroad tracks. I've pinpointed all the rattling to the doors and seats. Needs new plastic clips and the gray pad that fits over the linkages for the door. still need to disassemble the seats to find out what needs replacement.
Modified by eda6 at 10:32 PM 10/31/2006


Member
Joined: Sep 2002
Posts: 1,215
Likes: 0
From: Sylmar, Cali to Austin, TX, USA
Damn. This is the definitive DIY paint thread. I was looking at some other thread and saw your sig about your project so I clicked it. That was like 2 hours ago and now I don't even remember what thread I was reading before. Haha. Anyways good job. You've answered most of the questions I had about DIY paint. Thank you.

Banned
Joined: Jan 2006
Posts: 195
Likes: 0
From: Murfreesboro, Tennessee, United States
just checking back in since i last read thru the 15 pages of stuff. nice progress. keep it up. one day maybe i'll have the patience, resources and cash you do to do this to my DA integra. im probably just doin a Maaco job. The maaco here is really god. If any of you knoe Team Evolution of Mid-Tennesse almost all of their cars are done their.

Thread Starter
Honda-Tech Member
Joined: Apr 2004
Posts: 2,785
Likes: 1
From: phoenix, az
all comments appreciated.
<TABLE WIDTH="90%" CELLSPACING=0 CELLPADDING=0 ALIGN=CENTER><TR><TD>Quote, originally posted by joeny12985 »</TD></TR><TR><TD CLASS="quote">any updates?</TD></TR></TABLE>
ever since i registered it and started it up i've just been enjoying it. took it on a 400 mile road trip last weekend and as of tonight it's undrivable once again LOl.
still working on rattle reduction. new lock rod clips, lock rod cushions and rack end bushing have arrived and will reduce rattles.
bought an 89 si front spoiler and 11 clips from http://www.bernardiparts.com. found an 88 acura legend at the junkyard and got 11 bolts. installed the spoiler on the new bumper and had fitment issues. test fitted the spoiler on my old bumper and all the holes lined up and the 1/2 gap was gone. my new bumper is useless and i'm rocking the old one.
removed steering rack tonight. bought new dust boots, lock washers, rack end bushing for the rack. bought new bearing for the pinion.


Thread Starter
Honda-Tech Member
Joined: Apr 2004
Posts: 2,785
Likes: 1
From: phoenix, az
made some progress
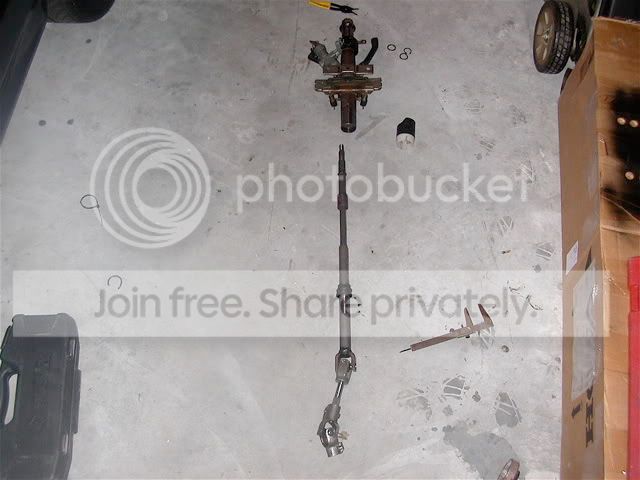
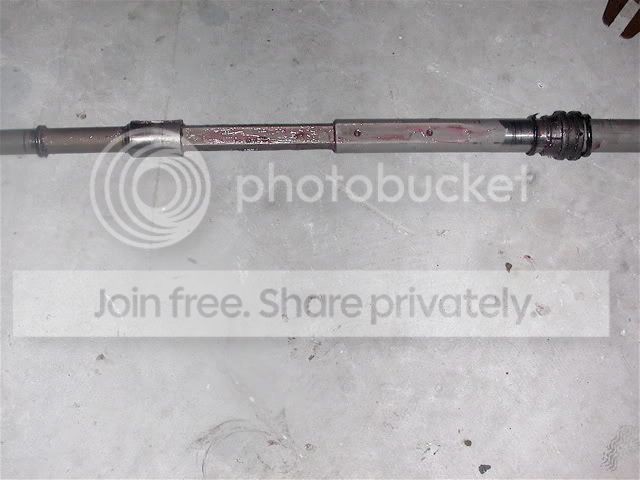
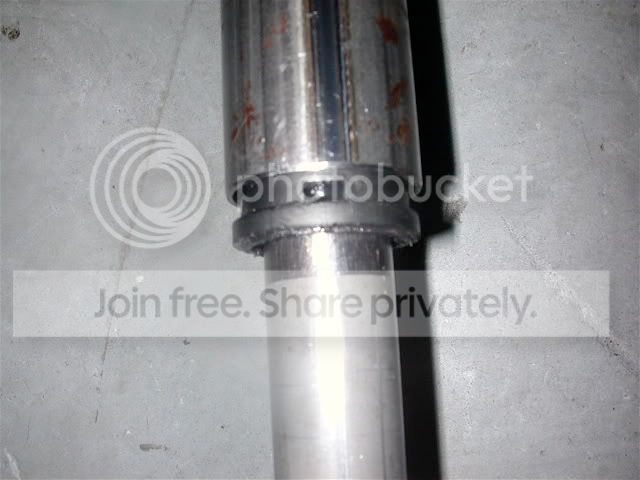
here's a pic of the rack. looks heat damaged to me but the shaft is smooth. I planned on replacing the rack, rack guide, pinion gear and bearing because i thought the rack was heat damaged. Unable to get the pinion assembly out because it's pressed in, I visited a machine shop. The machine shop says that the rack was heat treated from the factory, there's nothing wrong with it and that's why it looks like that. i'm going to put it back together and see what happens.
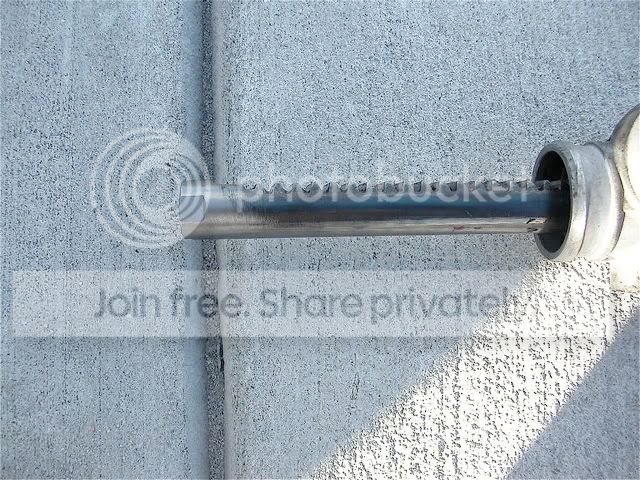
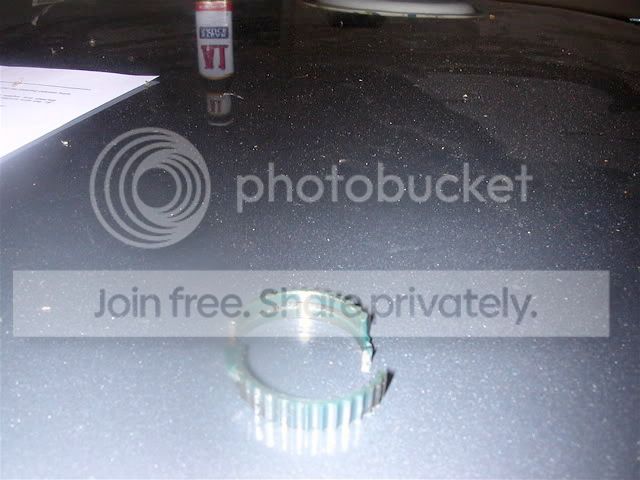
notice the uneven wear on the rack guide. new one ordered.
while waiting for ups to deliver parts i sat in the drivers seat and pretended that i was going to drive it somewhere LoL. grabbed the wheel and noticed it had some up and down play and some front to back as well. read the small print under "steering column" and "hanger bushing". decided to try to save it before i bought another one.
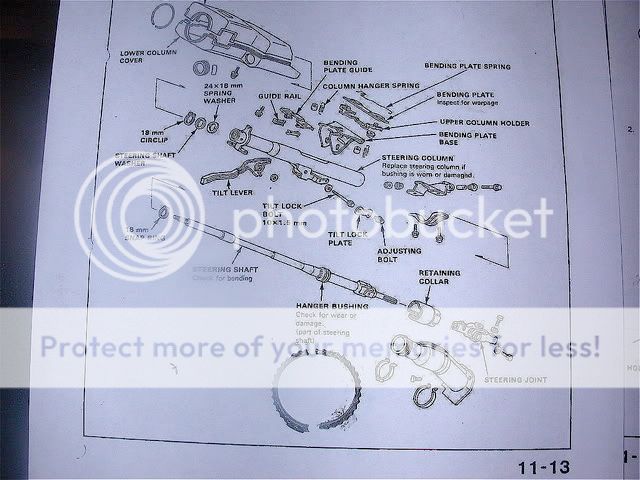
after removing the retaining collar from the steering column, 2 pieces of rubber fell out.
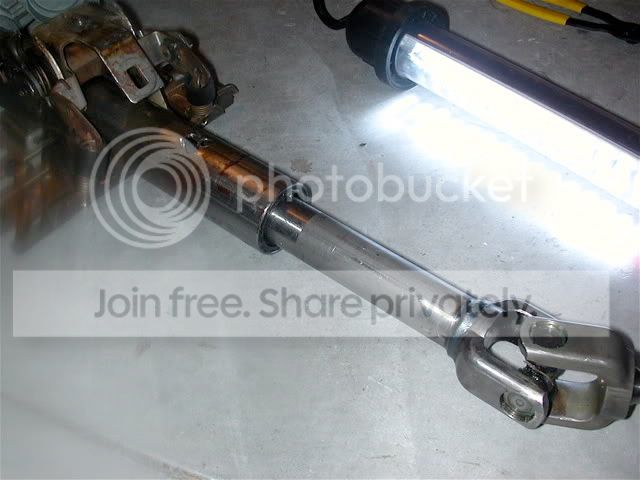
removed the steering wheel, turn signal switch cancel cam, and combo switch, disconnected the electical from the ignition, then removed an 18mm circlip, shaft washer and spring washer from behind the steering wheel. the steering shaft dropped and hit the firewall. column had to be removed to proceed. figured out that the two pieces of rubber should be between the hanger bushing and steering column.
installed 3 o-rings on the shaft. The left o ring (betwwen 18mm snap and bearing in the column)got rid the front to back play. the middle o ring replaces the clip on the tapered/notched part of the hanger bushing. This o ring wasn't tight enough so it was replaced it with a 4" ziptie. the o ring on the right is 1/8 thick ( twice as thick as the oem rubber) and will be crammed into the bottom of the hanger bushing to eliminate up/down and left/right play.
i had to force this o-ring into the hanger bushing.

pic after the o-ring install.
hanger bushing reinstalled.
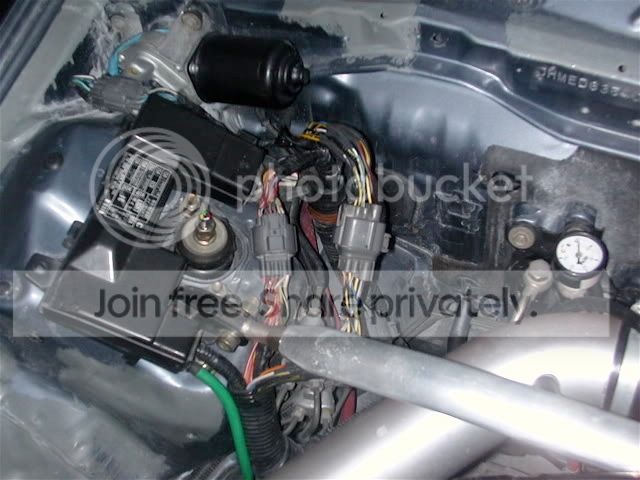
speedo cable greased. also greased the steering shaft, back of the steering wheel, u-joints, and turn switch cancel cam.

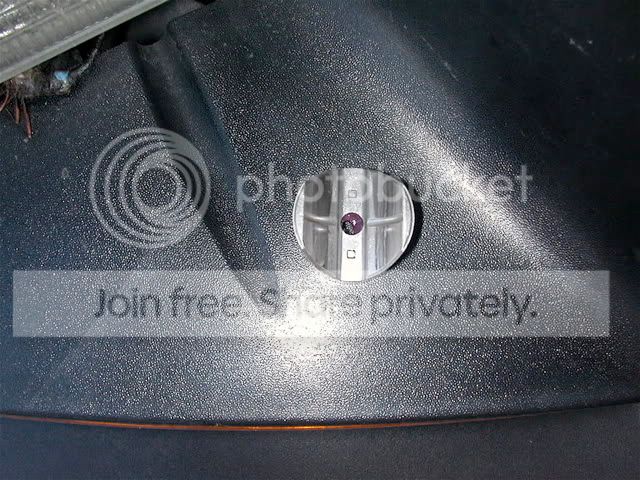
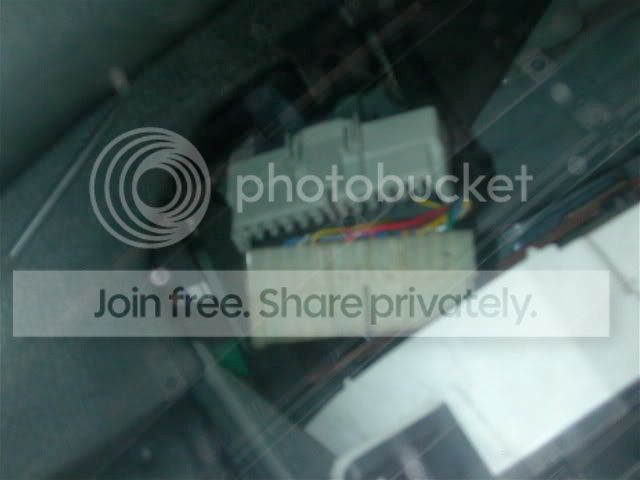
replaced the plug behind the cluster because the clip broke.
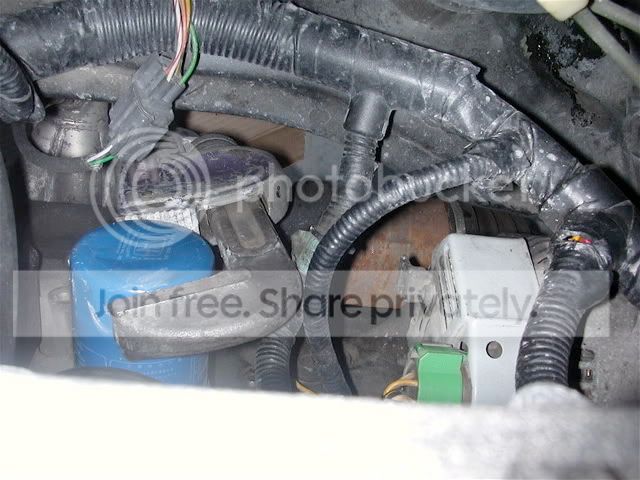
also removed the iacv and used a whole can of brake fluid to clean it out. replaced the o ring between the iacv and IM.
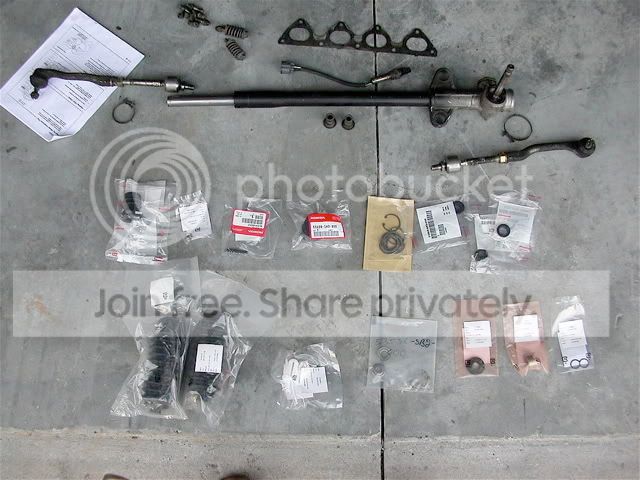
top row from l to r- shift boot, nut to connect the header to the cat, bitch pins, rack support bushing, 35mm snap rings for the pinion gear, rack mount bushings.
bottom row- tie rod dust boots, rack end bushing, lock washers, pinion dust seal, rack guide, gasket for iacv. installed every thing except the shift boot last night.
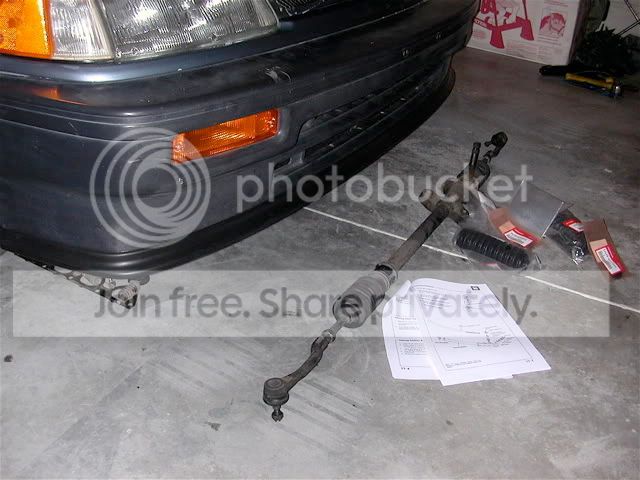
planned on getting an alignment today but at the last minute i decided i wanted new tie rod ends .
I dropped the shift linkage and inspected. extension end bushing and shift lever ball seat are worn out. thrust washers and o rings are nowhere to be found at the bottom of the shifter.
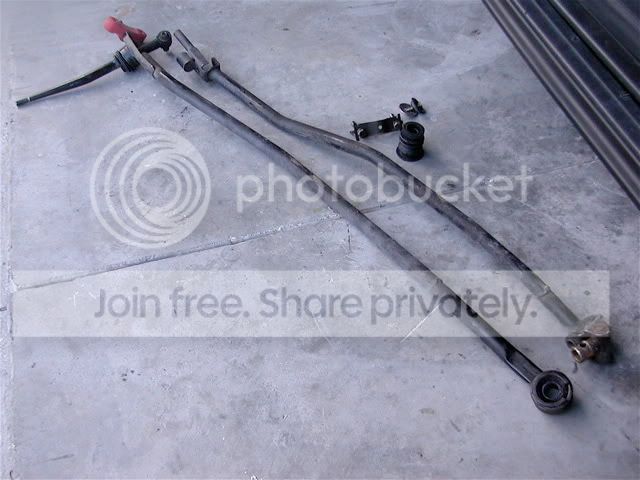
waiting for shift linkage parts and new tie rod ends.
here's a pic of the rack. looks heat damaged to me but the shaft is smooth. I planned on replacing the rack, rack guide, pinion gear and bearing because i thought the rack was heat damaged. Unable to get the pinion assembly out because it's pressed in, I visited a machine shop. The machine shop says that the rack was heat treated from the factory, there's nothing wrong with it and that's why it looks like that. i'm going to put it back together and see what happens.
notice the uneven wear on the rack guide. new one ordered.
while waiting for ups to deliver parts i sat in the drivers seat and pretended that i was going to drive it somewhere LoL. grabbed the wheel and noticed it had some up and down play and some front to back as well. read the small print under "steering column" and "hanger bushing". decided to try to save it before i bought another one.
after removing the retaining collar from the steering column, 2 pieces of rubber fell out.
removed the steering wheel, turn signal switch cancel cam, and combo switch, disconnected the electical from the ignition, then removed an 18mm circlip, shaft washer and spring washer from behind the steering wheel. the steering shaft dropped and hit the firewall. column had to be removed to proceed. figured out that the two pieces of rubber should be between the hanger bushing and steering column.
installed 3 o-rings on the shaft. The left o ring (betwwen 18mm snap and bearing in the column)got rid the front to back play. the middle o ring replaces the clip on the tapered/notched part of the hanger bushing. This o ring wasn't tight enough so it was replaced it with a 4" ziptie. the o ring on the right is 1/8 thick ( twice as thick as the oem rubber) and will be crammed into the bottom of the hanger bushing to eliminate up/down and left/right play.
i had to force this o-ring into the hanger bushing.
pic after the o-ring install.
hanger bushing reinstalled.
speedo cable greased. also greased the steering shaft, back of the steering wheel, u-joints, and turn switch cancel cam.
replaced the plug behind the cluster because the clip broke.
also removed the iacv and used a whole can of brake fluid to clean it out. replaced the o ring between the iacv and IM.
top row from l to r- shift boot, nut to connect the header to the cat, bitch pins, rack support bushing, 35mm snap rings for the pinion gear, rack mount bushings.
bottom row- tie rod dust boots, rack end bushing, lock washers, pinion dust seal, rack guide, gasket for iacv. installed every thing except the shift boot last night.
planned on getting an alignment today but at the last minute i decided i wanted new tie rod ends .
I dropped the shift linkage and inspected. extension end bushing and shift lever ball seat are worn out. thrust washers and o rings are nowhere to be found at the bottom of the shifter.
waiting for shift linkage parts and new tie rod ends.
Member
Joined: Feb 2006
Posts: 1,278
Likes: 0
From: Portland, OR, USA
I was looking at a front end shot of your car, and you could definitely adjust your hood latch (the spring latch in the center) and get your hood gap thinner. This will not only look better, but you won't have to shim your fenders as high (or at all). Just my $.02. Great project btw.

Thread Starter
Honda-Tech Member
Joined: Apr 2004
Posts: 2,785
Likes: 1
From: phoenix, az
<TABLE WIDTH="90%" CELLSPACING=0 CELLPADDING=0 ALIGN=CENTER><TR><TD>Quote, originally posted by snowseeker »</TD></TR><TR><TD CLASS="quote">Curious how much you have invested so far?</TD></TR></TABLE>
it's getting close to $2000. half of that paid for the compressor, pneumatic tools and my exhaust fan. probably another $1000 for paint, parts, various oem clips, grommets, mouldings, etc..
<TABLE WIDTH="90%" CELLSPACING=0 CELLPADDING=0 ALIGN=CENTER><TR><TD>Quote, originally posted by djphonics »</TD></TR><TR><TD CLASS="quote">I was looking at a front end shot of your car, and you could definitely adjust your hood latch (the spring latch in the center) and get your hood gap thinner. This will not only look better, but you won't have to shim your fenders as high (or at all). Just my $.02. Great project btw. </TD></TR></TABLE>
i'm able to push to hood down but then the L side of the hood is too low. I'll experiment with some of those adjustable rubber pieces (either on the hood or bulkhead) and go from there. thanks.
<TABLE WIDTH="90%" CELLSPACING=0 CELLPADDING=0 ALIGN=CENTER><TR><TD>Quote, originally posted by N_A_is_best »</TD></TR><TR><TD CLASS="quote">im wowed by this build for doin it all yourself</TD></TR></TABLE>
thanks.
replaced es shock mount bushings with oem.
attempted to roll the car into the driveway to bleed the cooling system. too much negative toe prevented that. Loosened the tie rod boots, broke out the tape measure to find center and spun the inner tie rods to straighten the wheels. after a few attemps it was streetable. got to the alignment shop and it was -1.3 deg off center.
Feels like a different car now. Loosened the rack guide adjustment bolt and test drove it about 5 times around the block and dialed that in. steering wheel vibrates at 90 mph so i'll get the wheels rebalanced and go from there.
dropped shift linkage again. installed oem shifter. replaced the extension end rubber and the shifter ball seat. ripped the bottom dust cover during the process. added factory thrust washers a and b and o rings.
The new junkyard by house has a scale and the owner was cool and let me weigh the car. weighs 2020 lbs.
i've never cared for the brown cover on the harness so i cut it off.

found a replacement plug on an ej6 sedan. after soldering an heat shrinking i'm happy.
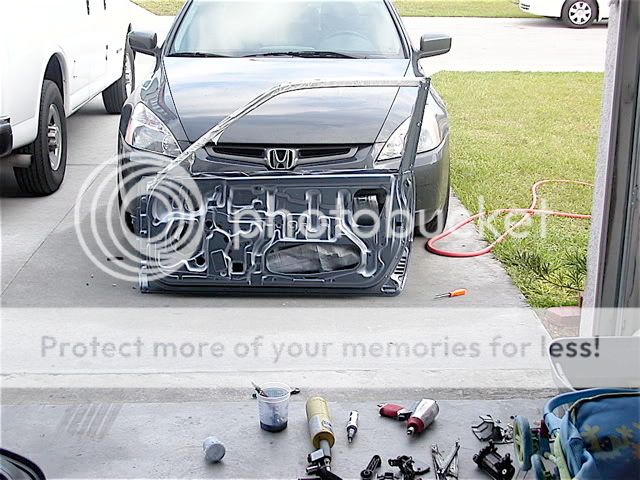
removed all the weatherstripping from the doors and painted the inside. ended up putting a couple dents in the door during the process.
while waiting for the owner of the 94 toyota pickup in the background to get parts and unhappy with my last paint job i said expletive it wetsanded the car with 220.
i replaced all three radiator hoses , t-stat, flushed and bled the cooling system which paid for this.
should have charged him more because the truck has 225,000 miles and this is it's second coolant change. after it was all done the lower hose collapsed and the motor tried to overheat. after this truck is fixed i'll continue working on the hatch.
I've been reading lots of threads on http://autobody101.com. also been doing my homework for the diy b18c build i'm going to do after this paint job.
tomorrow i'm going to fix the dents again and basically start over.
it's getting close to $2000. half of that paid for the compressor, pneumatic tools and my exhaust fan. probably another $1000 for paint, parts, various oem clips, grommets, mouldings, etc..
<TABLE WIDTH="90%" CELLSPACING=0 CELLPADDING=0 ALIGN=CENTER><TR><TD>Quote, originally posted by djphonics »</TD></TR><TR><TD CLASS="quote">I was looking at a front end shot of your car, and you could definitely adjust your hood latch (the spring latch in the center) and get your hood gap thinner. This will not only look better, but you won't have to shim your fenders as high (or at all). Just my $.02. Great project btw. </TD></TR></TABLE>
i'm able to push to hood down but then the L side of the hood is too low. I'll experiment with some of those adjustable rubber pieces (either on the hood or bulkhead) and go from there. thanks.
<TABLE WIDTH="90%" CELLSPACING=0 CELLPADDING=0 ALIGN=CENTER><TR><TD>Quote, originally posted by N_A_is_best »</TD></TR><TR><TD CLASS="quote">im wowed by this build
for doin it all yourself</TD></TR></TABLE>thanks.
replaced es shock mount bushings with oem.
attempted to roll the car into the driveway to bleed the cooling system. too much negative toe prevented that. Loosened the tie rod boots, broke out the tape measure to find center and spun the inner tie rods to straighten the wheels. after a few attemps it was streetable. got to the alignment shop and it was -1.3 deg off center.
Feels like a different car now. Loosened the rack guide adjustment bolt and test drove it about 5 times around the block and dialed that in. steering wheel vibrates at 90 mph so i'll get the wheels rebalanced and go from there.
dropped shift linkage again. installed oem shifter. replaced the extension end rubber and the shifter ball seat. ripped the bottom dust cover during the process. added factory thrust washers a and b and o rings.
The new junkyard by house has a scale and the owner was cool and let me weigh the car. weighs 2020 lbs.
i've never cared for the brown cover on the harness so i cut it off.
found a replacement plug on an ej6 sedan. after soldering an heat shrinking i'm happy.
removed all the weatherstripping from the doors and painted the inside. ended up putting a couple dents in the door during the process.
while waiting for the owner of the 94 toyota pickup in the background to get parts and unhappy with my last paint job i said expletive it wetsanded the car with 220.
i replaced all three radiator hoses , t-stat, flushed and bled the cooling system which paid for this.
should have charged him more because the truck has 225,000 miles and this is it's second coolant change. after it was all done the lower hose collapsed and the motor tried to overheat. after this truck is fixed i'll continue working on the hatch.
I've been reading lots of threads on http://autobody101.com. also been doing my homework for the diy b18c build i'm going to do after this paint job.
tomorrow i'm going to fix the dents again and basically start over.
Joined: May 2006
Posts: 327
Likes: 0
From: wichita, ks, us
<TABLE WIDTH="90%" CELLSPACING=0 CELLPADDING=0 ALIGN=CENTER><TR><TD>Quote, originally posted by JapJunkie »</TD></TR><TR><TD CLASS="quote"> </TD></TR></TABLE>
most def. major props man
</TD></TR></TABLE>most def. major props man
Thread Starter
Honda-Tech Member
Joined: Apr 2004
Posts: 2,785
Likes: 1
From: phoenix, az
bump because I made some progress.
A clean dry air supply is essential when painting so I decided to hang copper piping in the garage. Hot air leaves the compressor travels through 40' of piping and has a chance to cool down. As it cools down, moisture in the line condenses and collects in the series of traps. after the piping air travels thru a receiver (modified refrigerant recovery tank), thru the oil/water seperator and exits at the regulator.
Piping consists of 7/8 acr then tapers to 5/8 acr. After each cut i deburred the pipes and then brazed the joints. copper straps and tapcon concrete screws were used to secure it to the wall. all pneumatic fittings have been upgraded from 1/4 NPT to 3/8 NPT to ensure more air volume. plumbing is almost complete. still need to plumb the tanks, oil/water filter and regulator then pressure test.
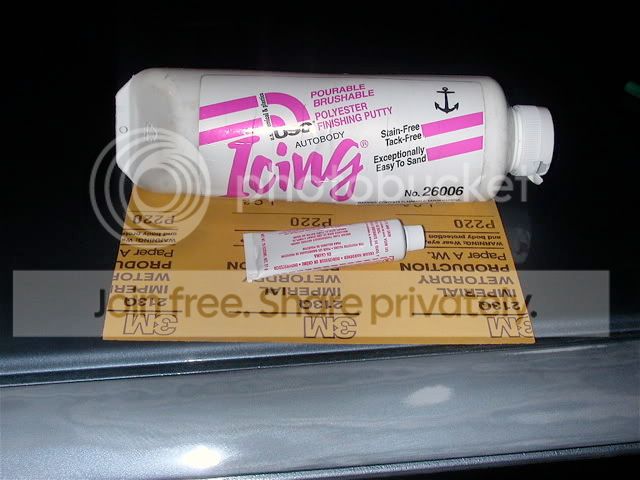
I blocked the car and found high and lows spots in the doors and L 1/4 panel. knocked down the high spots and filled the low spots with icing. after it hardened i knocked the icing down with 100 followed by 180. covered the icing with black spray paint after it was feathered.
hoping to primer the car this weekend.
A clean dry air supply is essential when painting so I decided to hang copper piping in the garage. Hot air leaves the compressor travels through 40' of piping and has a chance to cool down. As it cools down, moisture in the line condenses and collects in the series of traps. after the piping air travels thru a receiver (modified refrigerant recovery tank), thru the oil/water seperator and exits at the regulator.
Piping consists of 7/8 acr then tapers to 5/8 acr. After each cut i deburred the pipes and then brazed the joints. copper straps and tapcon concrete screws were used to secure it to the wall. all pneumatic fittings have been upgraded from 1/4 NPT to 3/8 NPT to ensure more air volume. plumbing is almost complete. still need to plumb the tanks, oil/water filter and regulator then pressure test.
I blocked the car and found high and lows spots in the doors and L 1/4 panel. knocked down the high spots and filled the low spots with icing. after it hardened i knocked the icing down with 100 followed by 180. covered the icing with black spray paint after it was feathered.
hoping to primer the car this weekend.
Joined: Nov 2004
Posts: 1,265
Likes: 0
From: iowa, USA
Damn painting it again? I am really happy you made this thread, as soon as I can get my 4dr drivable I am going to start doing body work, and I am going to repaint it myself, so I will be checking out your thread quite a bit.
Thread Starter
Honda-Tech Member
Joined: Apr 2004
Posts: 2,785
Likes: 1
From: phoenix, az
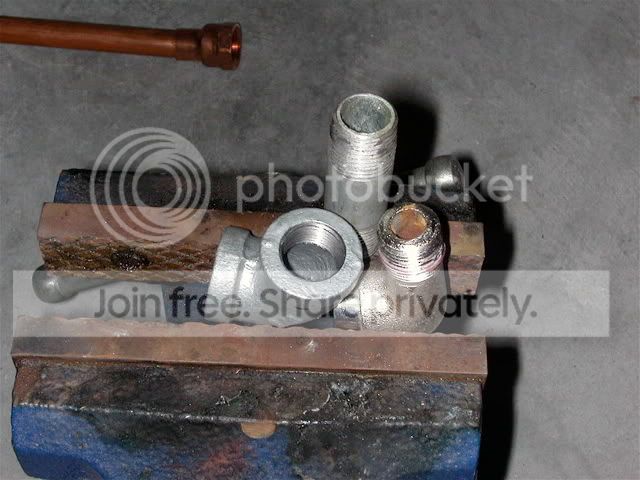
piping is done. black or galvanized steel piping can be used instead of copper but they'll eventually develop rust. <FONT COLOR="red">NEVER USE PVC </FONT>because the pressure could cause it to explode like a grenade.
old setup
stock regulator setup wih 1/4 NPT fittings.
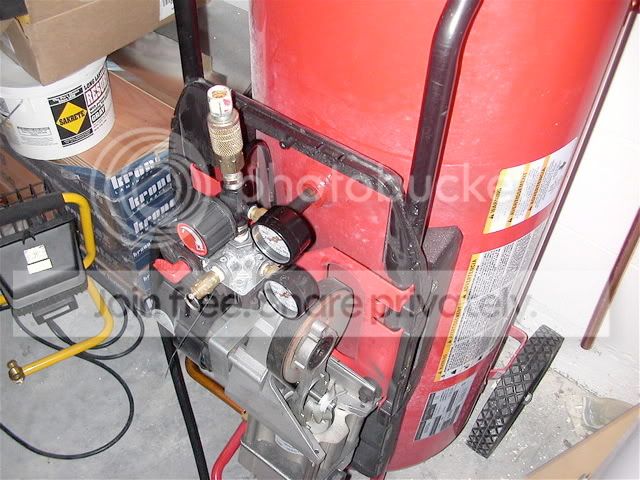
1/4 NPT fittings are even more restrictive once you take a look inside.
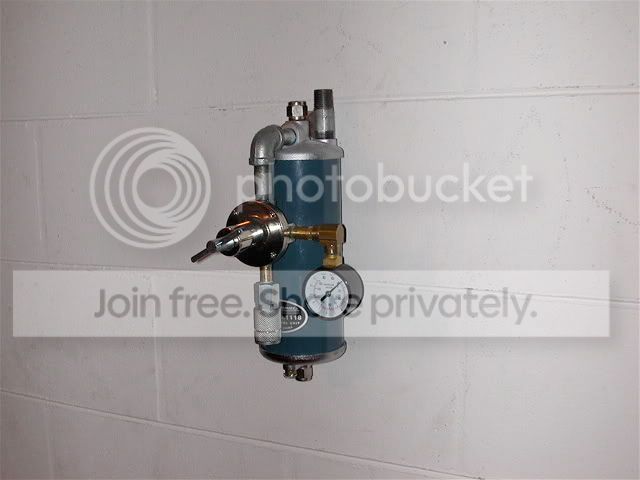
new setup
replaced the drain with a 1 1/2 NPT to 1 1/4 NPT reducer then reduced the 1 1/4 NPT to 3/4 NPT.
used rubber washer hose as a vibration eliminator to connect the tank to the piping.
removed the old regulator and plugged the port.
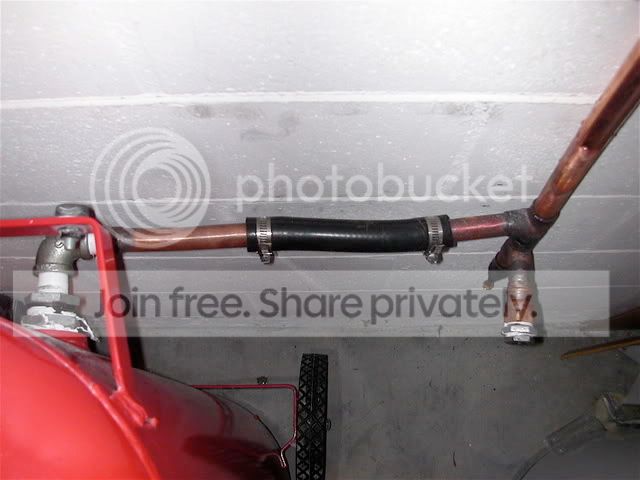
the piping has a negative slope so that this will never see any water. Installed an oil/water seperator just in case. Regulator fittings were also restrictive so i fixed that.
3/8 NPT street elbow was replaced with a 3/8 NPT elbow and nipple.
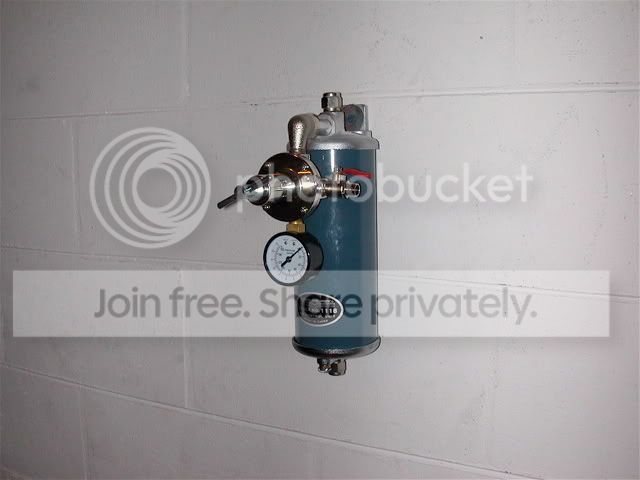
new regulator setup
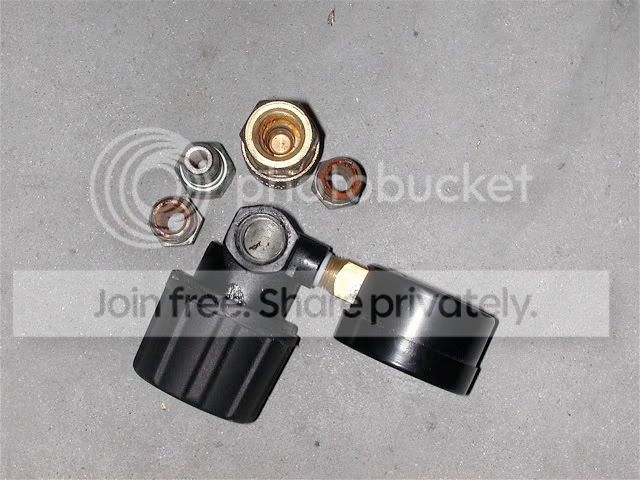
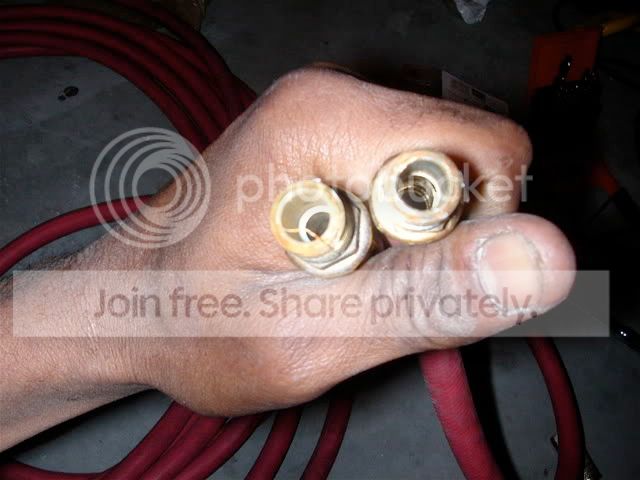
The hose has 1/4 npt fittings connected to a 3/8" hose. The 1/4" npt fittings were restrictive too so i opened them up with a 5/16" drill bit.

left side is stock and the right side has been bored out.
also replaced all 1/4" quick connects and couplings with 3/8".
the compressor is supposed to shut off at 135 psi but now it shuts off at 140 psi. Found 4 air leaks and fixed them all.
works well so far. most of the moisture is caught in the first trap. a drop made it to the second trap. Third trap and water/oil seperator is dry. after removing all the choke points I now have mass amounts of air at the end of my hose now. should help atomize the paint better and make it lay down smoother.
<TABLE WIDTH="90%" CELLSPACING=0 CELLPADDING=0 ALIGN=CENTER><TR><TD>Quote, originally posted by cbp_crx »</TD></TR><TR><TD CLASS="quote">Damn painting it again? I am really happy you made this thread, as soon as I can get my 4dr drivable I am going to start doing body work, and I am going to repaint it myself, so I will be checking out your thread quite a bit. </TD></TR></TABLE>
yep. it's good to hear that you'll be referring to this thread for your build. good luck with your 4 door.
<TABLE WIDTH="90%" CELLSPACING=0 CELLPADDING=0 ALIGN=CENTER><TR><TD>Quote, originally posted by bgangsta180 »</TD></TR><TR><TD CLASS="quote">wow ur basically back on page 1 with the exterior but i love ur dedication</TD></TR></TABLE>
thanks. i'd like to finish what i started even though people keep telling me to save up and let a professional do it.
old setup
stock regulator setup wih 1/4 NPT fittings.
1/4 NPT fittings are even more restrictive once you take a look inside.
new setup
replaced the drain with a 1 1/2 NPT to 1 1/4 NPT reducer then reduced the 1 1/4 NPT to 3/4 NPT.
used rubber washer hose as a vibration eliminator to connect the tank to the piping.
removed the old regulator and plugged the port.
the piping has a negative slope so that this will never see any water. Installed an oil/water seperator just in case. Regulator fittings were also restrictive so i fixed that.
3/8 NPT street elbow was replaced with a 3/8 NPT elbow and nipple.
new regulator setup
The hose has 1/4 npt fittings connected to a 3/8" hose. The 1/4" npt fittings were restrictive too so i opened them up with a 5/16" drill bit.
left side is stock and the right side has been bored out.
also replaced all 1/4" quick connects and couplings with 3/8".
the compressor is supposed to shut off at 135 psi but now it shuts off at 140 psi. Found 4 air leaks and fixed them all.
works well so far. most of the moisture is caught in the first trap. a drop made it to the second trap. Third trap and water/oil seperator is dry. after removing all the choke points I now have mass amounts of air at the end of my hose now. should help atomize the paint better and make it lay down smoother.
<TABLE WIDTH="90%" CELLSPACING=0 CELLPADDING=0 ALIGN=CENTER><TR><TD>Quote, originally posted by cbp_crx »</TD></TR><TR><TD CLASS="quote">Damn painting it again? I am really happy you made this thread, as soon as I can get my 4dr drivable I am going to start doing body work, and I am going to repaint it myself, so I will be checking out your thread quite a bit. </TD></TR></TABLE>
yep. it's good to hear that you'll be referring to this thread for your build
. good luck with your 4 door.<TABLE WIDTH="90%" CELLSPACING=0 CELLPADDING=0 ALIGN=CENTER><TR><TD>Quote, originally posted by bgangsta180 »</TD></TR><TR><TD CLASS="quote">wow ur basically back on page 1 with the exterior but i love ur dedication</TD></TR></TABLE>
thanks. i'd like to finish what i started even though people keep telling me to save up and let a professional do it.