

my project

Thread Starter
Honda-Tech Member
Joined: Apr 2004
Posts: 2,785
Likes: 1
From: phoenix, az
sorry i didn't get pix of the antennae install but it has the potential to be difficult. There's a hole in the chassis in front of the left side of the steering column support. Dash and fresh air duct must be removed to get a visual. if you can feel the duct, the hole is right behind it. using metal fishtape, send it through the hole and once you see the other end use needle nose pliers to pull the fishtape out of the pillar. ziptie the antennae to the fishtape and pull it through carefully. To avoid this problem tie a piece of string to your anteannae before removal. Once the antennae is out push the string into the pillar until you're ready to reinstall.
new parts are here.
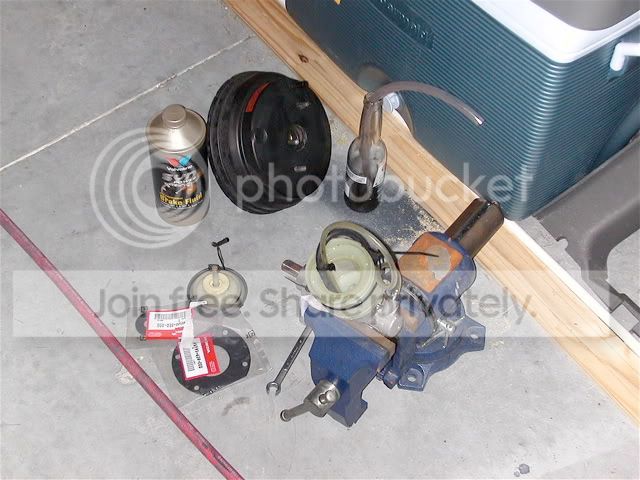
46185-SE0-003=gasket between non abs DA booster and mc.
46191-634-000=gasket between booster and firewall.
79722-sk7-000=45 deg coolant hose between heater valve and heater core.
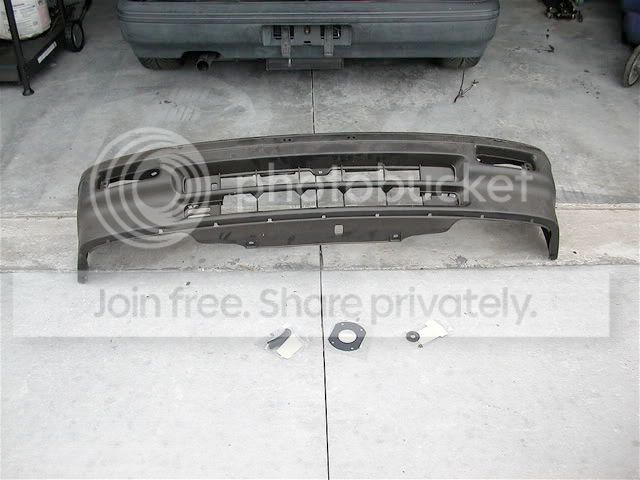
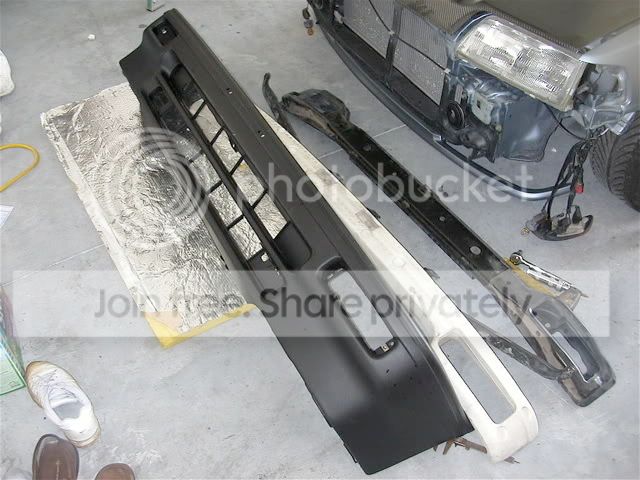
I'd like to thank HT member DREID (formerly boosteddef) for a good deal on the new oem bumper.
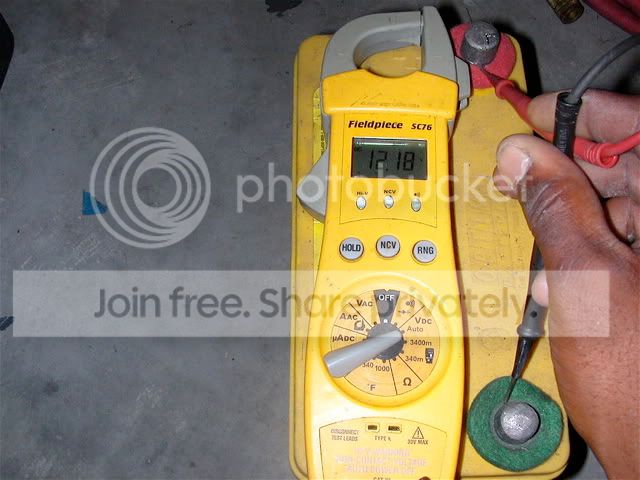
The battery has been sitting on concrete for the past 6 months. I was expecing less than 5VDC but 12.18VDC is even better.
I have lots of work to do now...
new parts are here.
46185-SE0-003=gasket between non abs DA booster and mc.
46191-634-000=gasket between booster and firewall.
79722-sk7-000=45 deg coolant hose between heater valve and heater core.
I'd like to thank HT member DREID (formerly boosteddef) for a good deal on the new oem bumper.
The battery has been sitting on concrete for the past 6 months. I was expecing less than 5VDC but 12.18VDC is even better.
I have lots of work to do now...
Honda-Tech Member
Joined: Aug 2003
Posts: 19,768
Likes: 0
From: gold rust on my mugen rims
<TABLE WIDTH="90%" CELLSPACING=0 CELLPADDING=0 ALIGN=CENTER><TR><TD>Quote, originally posted by Squallie »</TD></TR><TR><TD CLASS="quote">good to see a fellow brotha doing big things around here  this build seriously reminds me of imolared's teggie build up(what happend to that), can wait to see it finished man </TD></TR></TABLE>
it even better to see a brotha show love for a ED/EF
I wish I could rebuild mine as extent as yours
good stuff mang
this build seriously reminds me of imolared's teggie build up(what happend to that), can wait to see it finished man </TD></TR></TABLE>it even better to see a brotha show love for a ED/EF
I wish I could rebuild mine as extent as yours
good stuff mang
Thread Starter
Honda-Tech Member
Joined: Apr 2004
Posts: 2,785
Likes: 1
From: phoenix, az
update-i need a set of clips for the door mouldings. Once i get the clips i can temporarily install the door moulding and I'll be able to reposition the doors and fenders. I already installed the side mouldings but they popped off when i opened the door. After these clips arrive i can reassemble the front end.
before pics of the headliner.
my wife cleaned it with a mr.clean sponge and cleaned it again with windex. she did an excellent job saving it.

a couple weeks before i started this project i installed a lighted ashtray/cig lighter from a Si. Used wirenuts and spliced into the wiring for the hvac control for power. Removed wirenuts and found another power source in the dash harness. Installed heatshrink tubing, soldered the two wires and finished it with a heat gun.
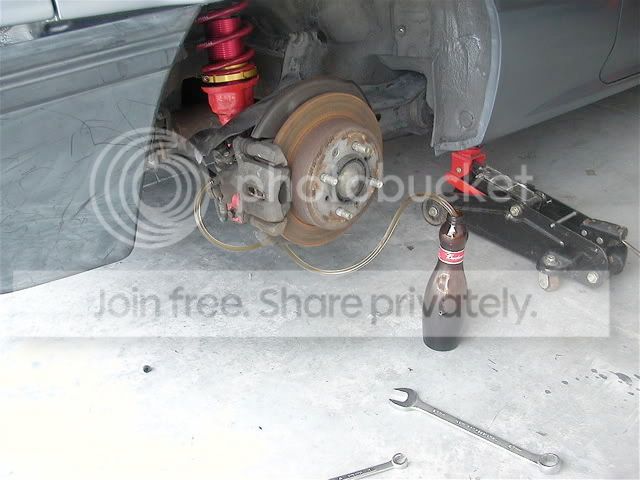
Installed DA bb/mc. I found some zerk fittings (1/4" 28 tpi) and used a grinder to remove the check valve. The zerk fittings threaded into the mc perfectly and then i rigged up some vacuum hoses to bench bleed the mc. One problem after another during the install. I have a p30 IM and the install was difficult. after removing the pushrod yoke, compressing the pushrod, scratching up some paint in the bay the booster was finally installed. I mounted the mc and then tried to reinstall the yoke. didn't have enough clearance between the pedal and pushrod. I didn't feel like removing the mc so i pulled the whole assembly forward about 2" and i was able to install the yoke. Looked at the dx booster and did my best install it in the same position. fluid needs to be changed and the brakes still need to be bled. Torque specs for the 4 nuts on the bb=9 ft.lbs.
Torque specs for the 2 mc nuts=11 ft.lbs.
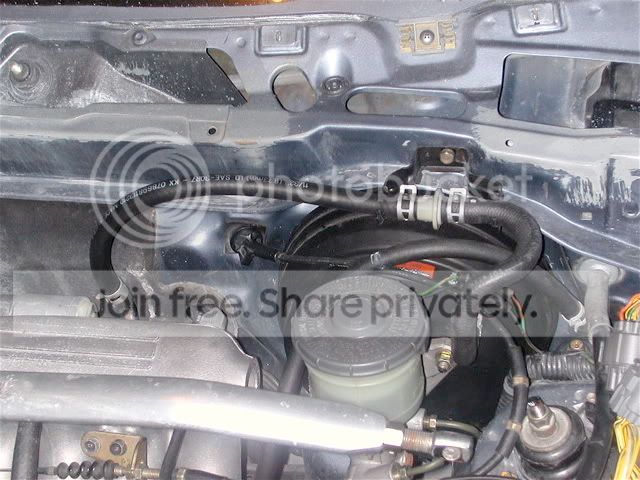
the booster hose was too short.
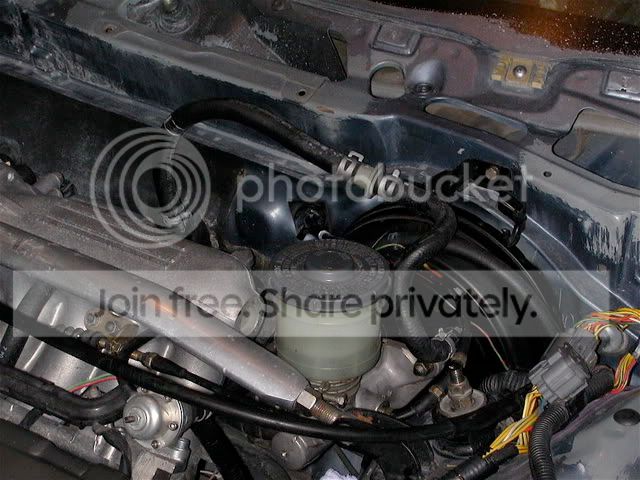
went to advance auto parts and bought some 11/32" vacuum hose.
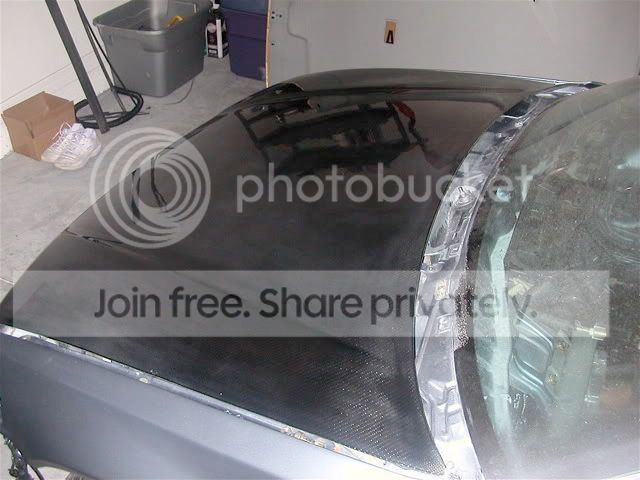
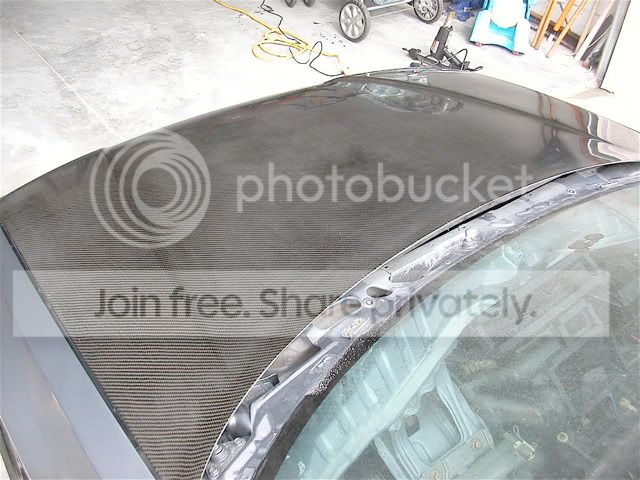
I finished wetsanding the hood. burned through an edge, touched it up and wetsanded it. left the hood leaned up against my van to dry. went in the house to get some food and when i went outside i found the hood laying face down on the ground. Wetsanded the nasty scratches away with 400 and touched it up again. wetsanded it with 1200, 1500, and 2000 and finally handbuffed it.

wife comes into the garage and asks "is it wet?" Lol. The hood still has minimal oxidation but the pics make it look worse than it really is.
<TABLE WIDTH="90%" CELLSPACING=0 CELLPADDING=0 ALIGN=CENTER><TR><TD>Quote, originally posted by gen2fanatic »</TD></TR><TR><TD CLASS="quote"> i want to see this bitch finished!!!
</TD></TR></TABLE>
It going to be a while before it's finished, but as i progress i'll post it up.
All comments appreciated
before pics of the headliner.
my wife cleaned it with a mr.clean sponge and cleaned it again with windex. she did an excellent job saving it.
a couple weeks before i started this project i installed a lighted ashtray/cig lighter from a Si. Used wirenuts and spliced into the wiring for the hvac control for power. Removed wirenuts and found another power source in the dash harness. Installed heatshrink tubing, soldered the two wires and finished it with a heat gun.
Installed DA bb/mc. I found some zerk fittings (1/4" 28 tpi) and used a grinder to remove the check valve. The zerk fittings threaded into the mc perfectly and then i rigged up some vacuum hoses to bench bleed the mc. One problem after another during the install. I have a p30 IM and the install was difficult. after removing the pushrod yoke, compressing the pushrod, scratching up some paint in the bay the booster was finally installed. I mounted the mc and then tried to reinstall the yoke. didn't have enough clearance between the pedal and pushrod. I didn't feel like removing the mc so i pulled the whole assembly forward about 2" and i was able to install the yoke. Looked at the dx booster and did my best install it in the same position. fluid needs to be changed and the brakes still need to be bled. Torque specs for the 4 nuts on the bb=9 ft.lbs.
Torque specs for the 2 mc nuts=11 ft.lbs.
the booster hose was too short.
went to advance auto parts and bought some 11/32" vacuum hose.
I finished wetsanding the hood. burned through an edge, touched it up and wetsanded it. left the hood leaned up against my van to dry. went in the house to get some food and when i went outside i found the hood laying face down on the ground. Wetsanded the nasty scratches away with 400 and touched it up again. wetsanded it with 1200, 1500, and 2000 and finally handbuffed it.
wife comes into the garage and asks "is it wet?" Lol. The hood still has minimal oxidation but the pics make it look worse than it really is.
<TABLE WIDTH="90%" CELLSPACING=0 CELLPADDING=0 ALIGN=CENTER><TR><TD>Quote, originally posted by gen2fanatic »</TD></TR><TR><TD CLASS="quote"> i want to see this bitch finished!!!
</TD></TR></TABLE>
It going to be a while before it's finished, but as i progress i'll post it up.
All comments appreciated


B*a*n*n*e*d
Joined: Jun 2004
Posts: 705
Likes: 0
From: Nova
<TABLE WIDTH="90%" CELLSPACING=0 CELLPADDING=0 ALIGN=CENTER><TR><TD>Quote, originally posted by joeny12985 »</TD></TR><TR><TD CLASS="quote">it's great to hear that your wife in now helping i bet that save you more money. instead of trying to find her a friend to go away for a weekend with lol</TD></TR></TABLE>
LOL
anywho, i've been following this thread since day one and all i can say is that hood looks a lot better after wetsanding. I heard buffing with Scratch X gets the job done.
LOL
anywho, i've been following this thread since day one and all i can say is
that hood looks a lot better after wetsanding. I heard buffing with Scratch X gets the job done.
Thread Starter
Honda-Tech Member
Joined: Apr 2004
Posts: 2,785
Likes: 1
From: phoenix, az
I've taken measures to reduce rattles. oem damper mounting rubber will replace the es parts currently installed. i went through the L side of the car and insulated/ziptied all wire loom and cables that touched the chassis. ziptied the 2 raceways next to the drivers seat to the brake lines.
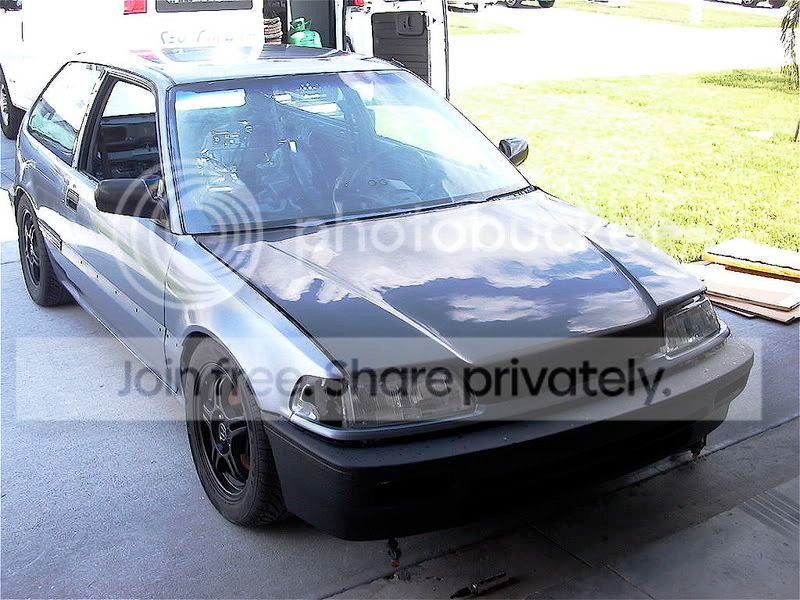
swapped over front bumper support to the new bumper cover. As usual a 15-20 minute job took 3 hours. had to lose the styrofaom and 2 corner bolts on the support for the bumper to line up with the arch in the fender. removed the rubber from the screws and painted the heads black.
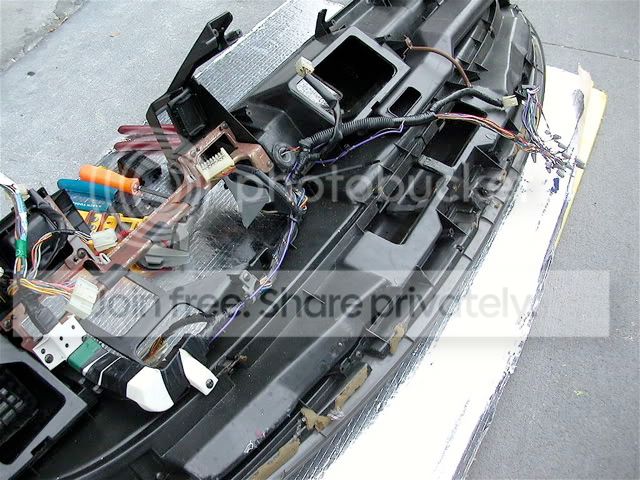
repaired the hvac control wiring that i spliced into for my si cig lighter/ashtray. secured license plate wiring harness to the rear bumper support. when i was pulling the harness into the cabin the wire seperated. The previous owner cut the harness, twisted up the wires and wrapped it in electrical tape. I installed heatshrink tubing, soldered the wires, and heated up the tubing.
oxidation is still noticable from this angle.
out of 150+ pics i took so far, this is my favorite...
<TABLE WIDTH="90%" CELLSPACING=0 CELLPADDING=0 ALIGN=CENTER><TR><TD>Quote, originally posted by Tippyman »</TD></TR><TR><TD CLASS="quote">
And props for getting your wife to clean ur ****! </TD></TR></TABLE>
<TABLE WIDTH="90%" CELLSPACING=0 CELLPADDING=0 ALIGN=CENTER><TR><TD>Quote, originally posted by joeny12985 »</TD></TR><TR><TD CLASS="quote">it's great to hear that your wife in now helping i bet that save you more money. instead of trying to find her a friend to go away for a weekend with lol</TD></TR></TABLE>
thanks. it was pretty cool watching her clean it, especially when she was cleaning the passenger side of the headrest
<TABLE WIDTH="90%" CELLSPACING=0 CELLPADDING=0 ALIGN=CENTER><TR><TD>Quote, originally posted by jdmazm »</TD></TR><TR><TD CLASS="quote">I heard buffing with Scratch X gets the job done. </TD></TR></TABLE>
thanks for the info. was it handbuffed or was a variable speed buffer used?
stay tuned....
swapped over front bumper support to the new bumper cover. As usual a 15-20 minute job took 3 hours. had to lose the styrofaom and 2 corner bolts on the support for the bumper to line up with the arch in the fender. removed the rubber from the screws and painted the heads black.
repaired the hvac control wiring that i spliced into for my si cig lighter/ashtray. secured license plate wiring harness to the rear bumper support. when i was pulling the harness into the cabin the wire seperated. The previous owner cut the harness, twisted up the wires and wrapped it in electrical tape.
I installed heatshrink tubing, soldered the wires, and heated up the tubing.oxidation is still noticable from this angle.
out of 150+ pics i took so far, this is my favorite...
<TABLE WIDTH="90%" CELLSPACING=0 CELLPADDING=0 ALIGN=CENTER><TR><TD>Quote, originally posted by Tippyman »</TD></TR><TR><TD CLASS="quote">
And props for getting your wife to clean ur ****! </TD></TR></TABLE>
<TABLE WIDTH="90%" CELLSPACING=0 CELLPADDING=0 ALIGN=CENTER><TR><TD>Quote, originally posted by joeny12985 »</TD></TR><TR><TD CLASS="quote">it's great to hear that your wife in now helping i bet that save you more money. instead of trying to find her a friend to go away for a weekend with lol</TD></TR></TABLE>
thanks. it was pretty cool watching her clean it, especially when she was cleaning the passenger side of the headrest
<TABLE WIDTH="90%" CELLSPACING=0 CELLPADDING=0 ALIGN=CENTER><TR><TD>Quote, originally posted by jdmazm »</TD></TR><TR><TD CLASS="quote">I heard buffing with Scratch X gets the job done. </TD></TR></TABLE>
thanks for the info. was it handbuffed or was a variable speed buffer used?
stay tuned....
B*a*n*n*e*d
Joined: Jun 2004
Posts: 705
Likes: 0
From: Nova
i've done it both ways, and it can't get any better after having a buffer. I tried hand buffing first, it removed some oxidation and swirls, after using a buffer it is superb nearly all the oxidation/swirls/scratches were gone. I picked up pads from Ace Hardware.
Honda-Tech Member
Joined: Nov 2002
Posts: 2,659
Likes: 0
From: Maricopa County
<TABLE WIDTH="90%" CELLSPACING=0 CELLPADDING=0 ALIGN=CENTER><TR><TD>Quote, originally posted by eda6 »</TD></TR><TR><TD CLASS="quote">
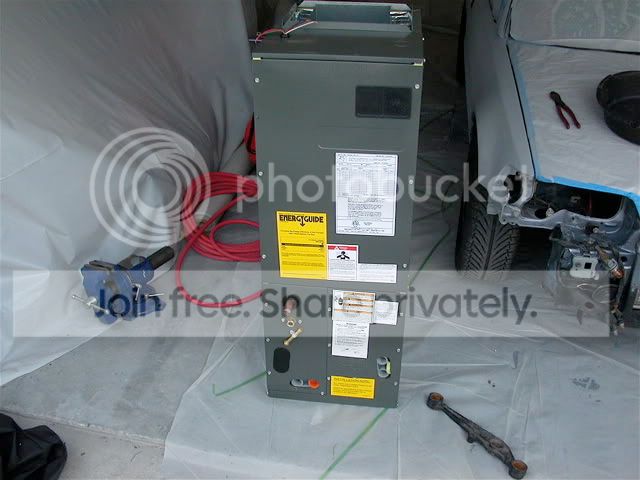
update-went shopping for exhuast fans today at lowes. biggest one i could find was 180 cfm and that wasn't enough for me. came home with a 2 ton air handler capable of moving 800 cfm. should be more than enough exhaust.
tonight i'm going to make a plenum, wire it up and run the ducts. going to finish taping up the inside of the car this evening as well.</TD></TR></TABLE>
Couldnt you have bought one without an evaporative coil in it?
Thread Starter
Honda-Tech Member
Joined: Apr 2004
Posts: 2,785
Likes: 1
From: phoenix, az
picked up a 1/4x4x12 piece of steel, gasket material, a pack of m6x1x20 bolts and 2 ft of 5/16" heater hose. removed fitv and fabbed up a block off plate.

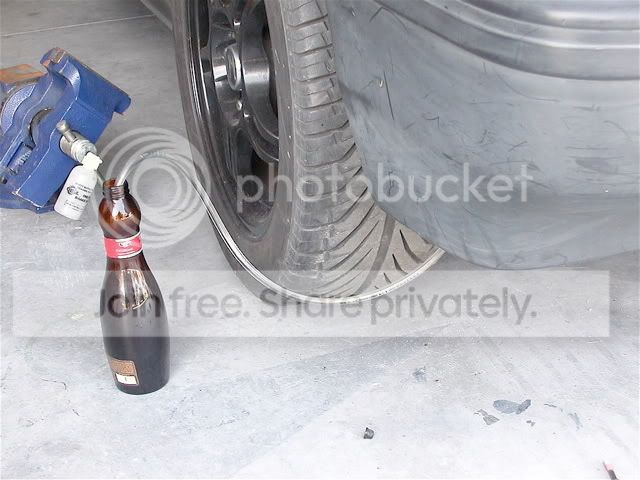
flushed the brake lines today. Installed 3 ft of 3/16" clear tubing over the bleeder nipple, filled the bottle 1/4 full with brake fluid. opened bleeder valve and pressed the pedal until the fluid resembled the fluid in the mc. lr,rr, rf,lf was the bleeding order. i did this twice and used 32 fl. oz. of brake fluid.
before. Most likely the factory fluid installed by honda in 88.
after
jdmazm: Thanks for the info. A buffer will be my next purchase.
Lynx Bus Type R: I could have purchased one with a heat exchanger. This air handler was intended for ac, but when the supply is vented to the attic/outside it acts as an exhaust fan.
an exhaust fan capable of 180 cfm costs $180 at lowes/home depot. this 2 ton Goodman air handler cost $260 and handles 600-800 cfm. It was the most bang for the buck.
Modified by eda6 at 11:14 PM 9/16/2006
Honda-Tech Member
Joined: Nov 2005
Posts: 3,394
Likes: 0
From: My Garage
Hey eda been awhile since I have been on here. I see you still keeping up the good work. Just wanted to stop by and say hey.
I still havent got my CRX. The guy I was supposed to get it off of is now missing..haha
Ahh I am now thinking about fixing my fox body mustang back up. IDK. Well keep up the good work dude and if you need anything you know Im here.
I still havent got my CRX. The guy I was supposed to get it off of is now missing..haha
Ahh I am now thinking about fixing my fox body mustang back up. IDK. Well keep up the good work dude and if you need anything you know Im here.
Honda-Tech Member
Joined: Aug 2003
Posts: 19,768
Likes: 0
From: gold rust on my mugen rims
<TABLE WIDTH="90%" CELLSPACING=0 CELLPADDING=0 ALIGN=CENTER><TR><TD>Quote, originally posted by eda6 »</TD></TR><TR><TD CLASS="quote">update-i need a set of clips for the door mouldings. Once i get the clips i can temporarily install the door moulding and I'll be able to reposition the doors and fenders. I already installed the side mouldings but they popped off when i opened the door. After these clips arrive i can reassemble the front end.
</TD></TR></TABLE>
ooohhhh yeah I hate those things...lose them on the floor or brake them = spending $5 at Honda for one
how much did you pay for yours??
</TD></TR></TABLE>
ooohhhh yeah I hate those things...lose them on the floor or brake them = spending $5 at Honda for one
how much did you pay for yours??
Thread Starter
Honda-Tech Member
Joined: Apr 2004
Posts: 2,785
Likes: 1
From: phoenix, az
harmonator84: glad you're back. i figured you'd be at the crx meet in ohio. you didn't go?
vega_box: p/n 75328-SH3-A01 $1.67 at http://www.bernardiparts.com.
vega_box: p/n 75328-SH3-A01 $1.67 at http://www.bernardiparts.com.