

My Build-up

Joined: Nov 2007
Posts: 49
Likes: 0
From: Jacksonville Beach, Florida, US
Wow... your progress is truely inspiring. 
I've got all of my parts and tools, i'm just a bit lazy when it comes to setting aside the time to work on it, but after reading this start to finish i feel like headin to the garage to start work on it.
Great work and Keep it up, your car looks amazing and i'm sure it will run just as good.
I've got all of my parts and tools, i'm just a bit lazy when it comes to setting aside the time to work on it, but after reading this start to finish i feel like headin to the garage to start work on it.
Great work and Keep it up, your car looks amazing and i'm sure it will run just as good.
Honda-Tech Member
Joined: Feb 2004
Posts: 1,592
Likes: 0
From: not riding any bandwagons in, massachusetts, usa
<TABLE WIDTH="90%" CELLSPACING=0 CELLPADDING=0 ALIGN=CENTER><TR><TD>Quote, originally posted by ef92b »</TD></TR><TR><TD CLASS="quote">another weekend progress...
those piston pin spiro locks were a pain to install but it made me think after looking at this expensive special lock-in tool.
http://www.lockintool.com/how-to-use/
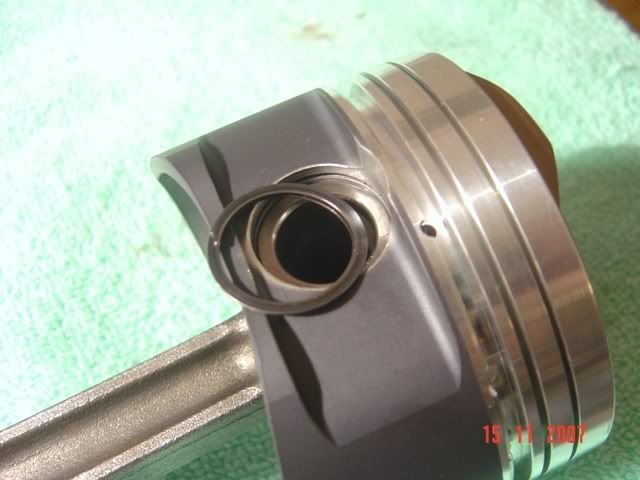
it's fun installing them btw, after i got the hung of it the third time, installing them was a breeze, took me 2-3 minutes per lock using just a shorty flat screw driver. no mess, i was totally astonished it's that easy, no need for that expensive tool
</TD></TR></TABLE>
just wait till you need to take those ******* out!
those piston pin spiro locks were a pain to install but it made me think after looking at this expensive special lock-in tool.
http://www.lockintool.com/how-to-use/
it's fun installing them btw, after i got the hung of it the third time, installing them was a breeze, took me 2-3 minutes per lock using just a shorty flat screw driver. no mess, i was totally astonished it's that easy, no need for that expensive tool
</TD></TR></TABLE>
just wait till you need to take those ******* out!
Thread Starter
Honda-Tech Member
Joined: Oct 2004
Posts: 1,073
Likes: 1
From: Mid East Deserts
<TABLE WIDTH="90%" CELLSPACING=0 CELLPADDING=0 ALIGN=CENTER><TR><TD>Quote, originally posted by ThatGuy(SW) »</TD></TR><TR><TD CLASS="quote">Wow... your progress is truely inspiring.
I've got all of my parts and tools, i'm just a bit lazy when it comes to setting aside the time to work on it, but after reading this start to finish i feel like headin to the garage to start work on it.
Great work and Keep it up, your car looks amazing and i'm sure it will run just as good. </TD></TR></TABLE>
<TABLE WIDTH="90%" CELLSPACING=0 CELLPADDING=0 ALIGN=CENTER><TR><TD>Quote, originally posted by B_Something »</TD></TR><TR><TD CLASS="quote">Amazing build. Your skills, patience, and craftsmanship are inspiring.
</TD></TR></TABLE>
thank you sirs!
<TABLE WIDTH="90%" CELLSPACING=0 CELLPADDING=0 ALIGN=CENTER><TR><TD>Quote, originally posted by mike_belben@yahoo.com »</TD></TR><TR><TD CLASS="quote">
just wait till you need to take those ******* out! </TD></TR></TABLE>
LOL Thanks for dropping by Mike. Yeah, i hope i won't be taking them out that soon. I know it's a PITA 
I've got all of my parts and tools, i'm just a bit lazy when it comes to setting aside the time to work on it, but after reading this start to finish i feel like headin to the garage to start work on it.
Great work and Keep it up, your car looks amazing and i'm sure it will run just as good.
</TD></TR></TABLE><TABLE WIDTH="90%" CELLSPACING=0 CELLPADDING=0 ALIGN=CENTER><TR><TD>Quote, originally posted by B_Something »</TD></TR><TR><TD CLASS="quote">Amazing build. Your skills, patience, and craftsmanship are inspiring.
</TD></TR></TABLE>
thank you sirs!
<TABLE WIDTH="90%" CELLSPACING=0 CELLPADDING=0 ALIGN=CENTER><TR><TD>Quote, originally posted by mike_belben@yahoo.com »</TD></TR><TR><TD CLASS="quote">
just wait till you need to take those ******* out! </TD></TR></TABLE>
LOL Thanks for dropping by Mike.
Yeah, i hope i won't be taking them out that soon. I know it's a PITA
Thread Starter
Honda-Tech Member
Joined: Oct 2004
Posts: 1,073
Likes: 1
From: Mid East Deserts
another weekend for me and so i did some DIY hot tanking the cyl head before the final test and assembly.
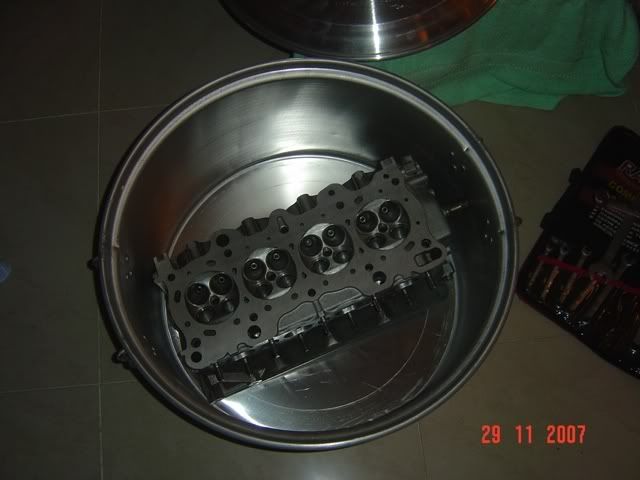
want some hot soup? LOL
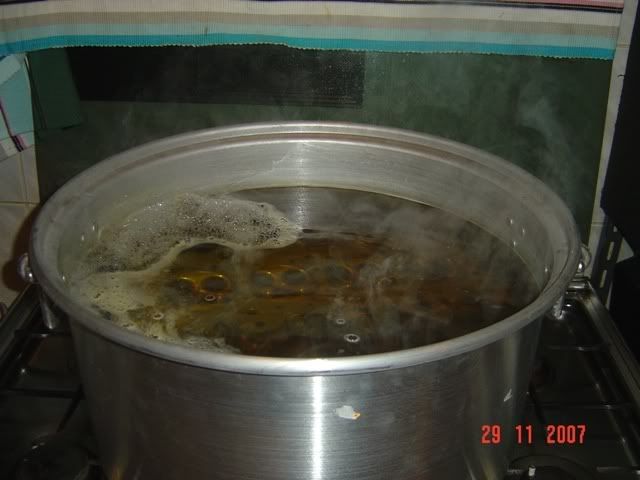
after hours of boiling the head, lol
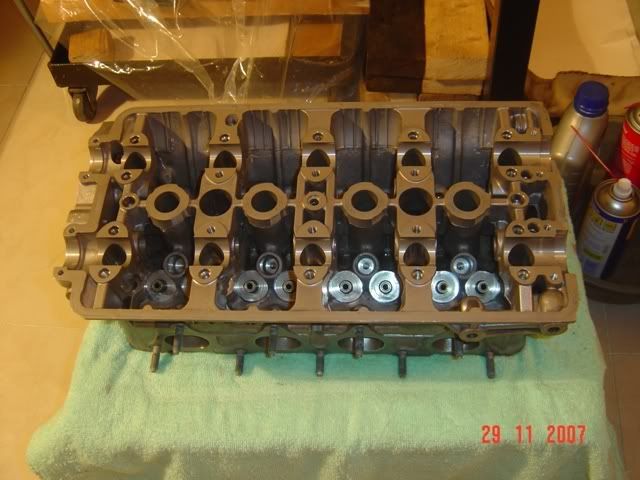
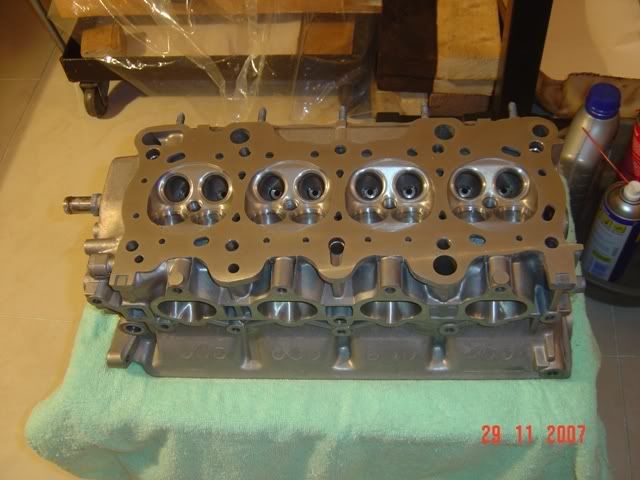
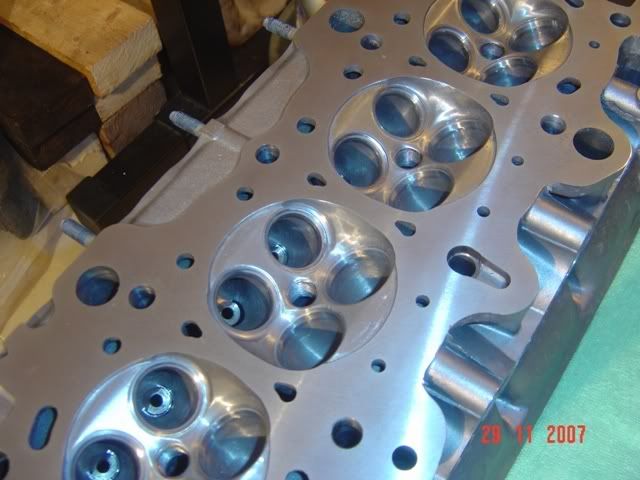
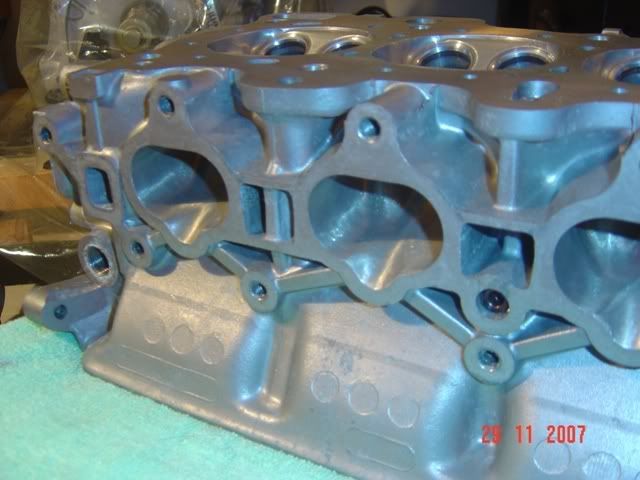
shiny and clean results!
Modified by ef92b at 3:37 PM 11/30/2007
want some hot soup? LOL
after hours of boiling the head, lol
shiny and clean results!
Modified by ef92b at 3:37 PM 11/30/2007
Honda-Tech Member
Joined: May 2003
Posts: 1,328
Likes: 0
From: r4, mars
<TABLE WIDTH="90%" CELLSPACING=0 CELLPADDING=0 ALIGN=CENTER><TR><TD>Quote, originally posted by ef92b »</TD></TR><TR><TD CLASS="quote">LOL, from some old carby guy ^^^ posting above this lines 
 </TD></TR></TABLE>
me? haha...
</TD></TR></TABLE>me? haha...
Thread Starter
Honda-Tech Member
Joined: Oct 2004
Posts: 1,073
Likes: 1
From: Mid East Deserts
<TABLE WIDTH="90%" CELLSPACING=0 CELLPADDING=0 ALIGN=CENTER><TR><TD>Quote, originally posted by d15Beta »</TD></TR><TR><TD CLASS="quote">passwordjdm i think... he a cf ***** haha
i think the skirts, chin and hood wer from the same place.. either pJdm or jhp</TD></TR></TABLE>
lol, i'm not a CF *****. it's so happen that these pieces(hood) are far lighter to ship than stock.
yep, they're all from passwordjdm. unfortunately, the front lip and skirts are no longer available.
i think the skirts, chin and hood wer from the same place.. either pJdm or jhp</TD></TR></TABLE>
lol, i'm not a CF *****.
it's so happen that these pieces(hood) are far lighter to ship than stock.yep, they're all from passwordjdm. unfortunately, the front lip and skirts are no longer available.
Joined: Mar 2007
Posts: 5
Likes: 0
From: Dubai, Dubai, UAE
[QUOTE=ef92b]another weekend for me and so i did some DIY hot tanking the cyl head before the final test and assembly.
want some hot soup? LOL
yup yup
nice to see desertstorm's progress ....but i would say....get something on your new aquarium and plunge them in your new recipe.......the weather is getting colder now....that soup would be perfect then....
everybody is askin you here in Dubai....btw...there will be another Redline Challenge on the 14th.......
have the engine set up done and "break in" all the way to Autodrome...
good luck JRW king......

Honda-Tech Member
Joined: Feb 2004
Posts: 1,592
Likes: 0
From: not riding any bandwagons in, massachusetts, usa
"hot tank" usually refers to a caustic stripping agent.
almost any detergent/degreaser will work well with very hot/boiling water or fairly hot and high pressure. the purple castrol is pretty good. lestoil general purpose detergent works great on grease too. even dawn if its hot enough.
almost any detergent/degreaser will work well with very hot/boiling water or fairly hot and high pressure. the purple castrol is pretty good. lestoil general purpose detergent works great on grease too. even dawn if its hot enough.
Thread Starter
Honda-Tech Member
Joined: Oct 2004
Posts: 1,073
Likes: 1
From: Mid East Deserts
Originally Posted by dRedcoupe98
yup yup
nice to see desertstorm's progress ....but i would say....get something on your new aquarium and plunge them in your new recipe.......the weather is getting colder now....that soup would be perfect then....
everybody is askin you here in Dubai....btw...there will be another Redline Challenge on the 14th.......
have the engine set up done and "break in" all the way to Autodrome...
good luck JRW king......
LOL, yeah we can have some tasty pinoy recipe, "sinigang"
Goodluck with the next race. show them some good numbers this time! Best of luck!
Originally Posted by mike_belben@yahoo.com
"hot tank" usually refers to a caustic stripping agent.
almost any detergent/degreaser will work well with very hot/boiling water or fairly hot and high pressure. the purple castrol is pretty good. lestoil general purpose detergent works great on grease too. even dawn if its hot enough.
almost any detergent/degreaser will work well with very hot/boiling water or fairly hot and high pressure. the purple castrol is pretty good. lestoil general purpose detergent works great on grease too. even dawn if its hot enough.
yep, i used some dish washing liquid soap along with 2 cups of dissolved powder laundry detergent. once again, back to my weekend home chores
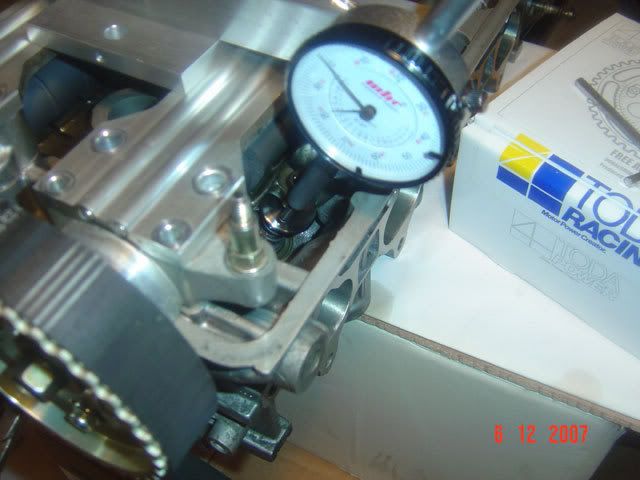
putting in Mike's kit for the first time. this thing is awesome!
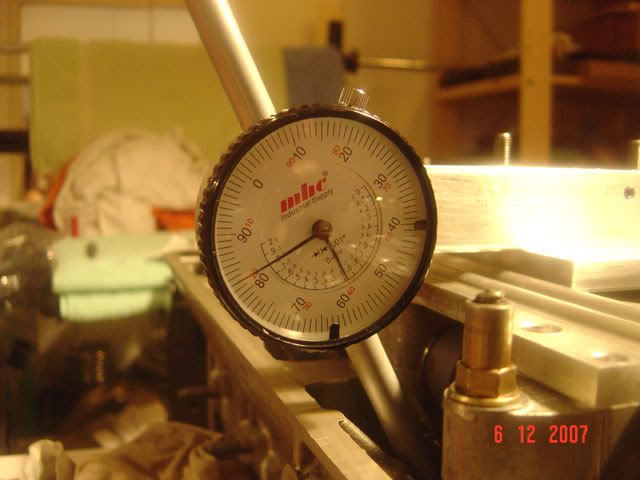
was so curious to determine the cams' max lifts. my utmost thanks to Bisi(Bisimoto) for providing the cam specs as expected. Also many thanks to a good buddy back home, d15Beta for hooking me up with Bisi

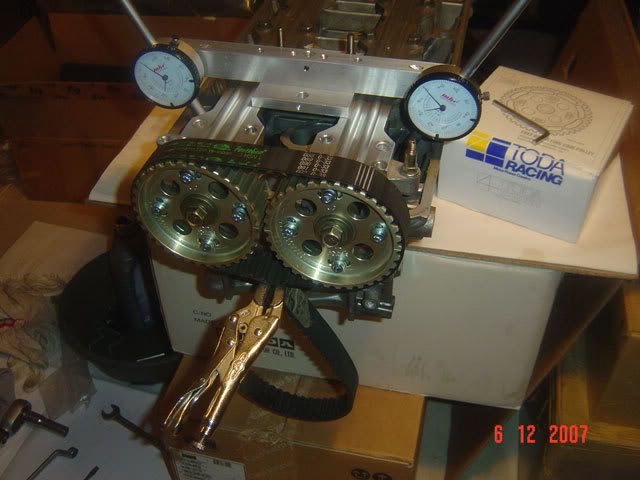
with a preset 0.6" preload:
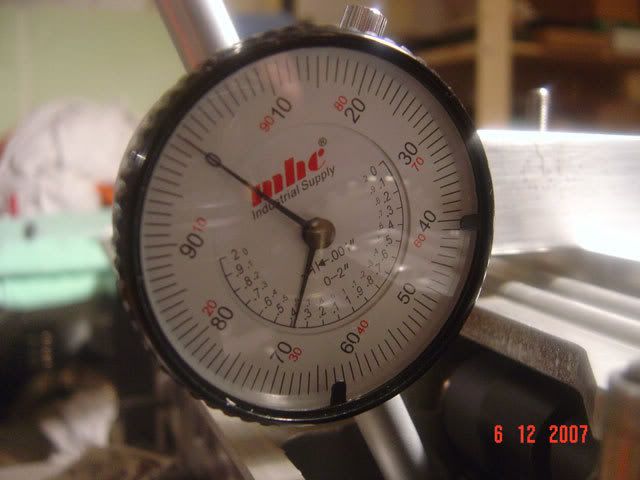
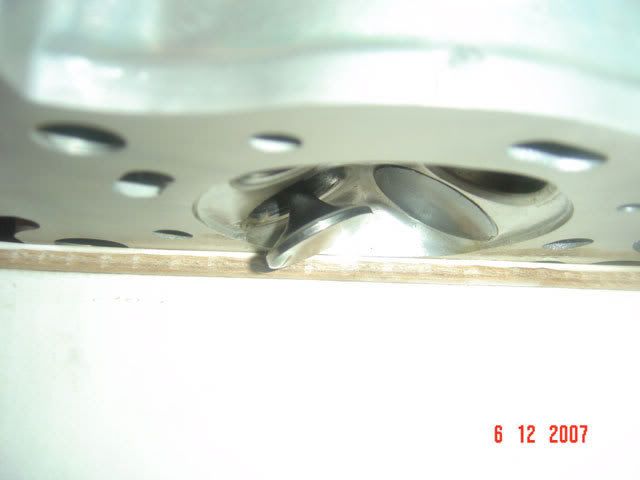
using the dial guage to set "zero" valve lash while touching the top of the valve retainer:
max intake valve lift:
dial gauge reading reveals the actual intake lift??? max???? dunno
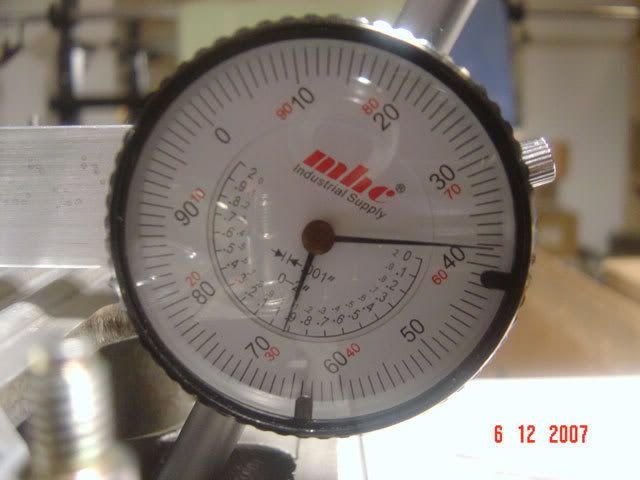
exhaust max valve lift:
and the read out. maxed??? dunno too LOL
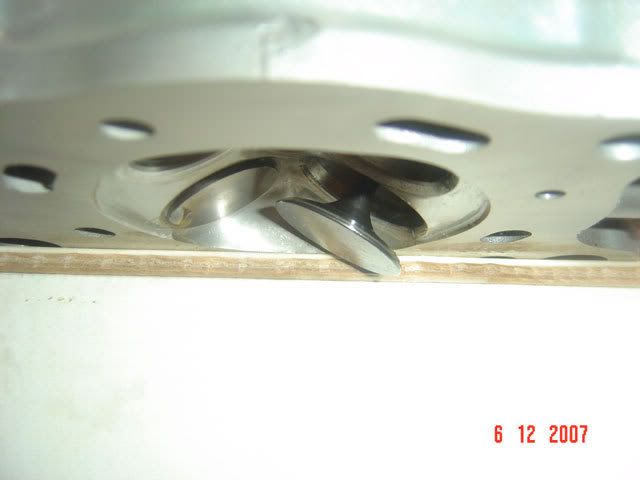
i just noticed one of my VC studs, it's broken
oh well, it was donated to one local guy long time ago. 
cams' durations will follow after i determine all V2V clearances and test install the cyl. head on the buttom end.
Modified by ef92b at 9:26 PM 12/6/2007
Honda-Tech Member
Joined: Feb 2004
Posts: 1,592
Likes: 0
From: not riding any bandwagons in, massachusetts, usa
<TABLE WIDTH="90%" CELLSPACING=0 CELLPADDING=0 ALIGN=CENTER><TR><TD>Quote, originally posted by ef92b »</TD></TR><TR><TD CLASS="quote">
dial gauge reading reveals the actual intake lift??? max????
and the read out. maxed???
Modified by ef92b at 9:26 PM 12/6/2007</TD></TR></TABLE>
1. its pretty damn close, but a slight tolerance should be considered for errors in valve lash zero and indicator axis alignment. . try to make sure they're as in-line as possible when setting up.
2. that dial was about half way. unscrew the backcap so you can lift up and drop the indicator rod several times to zero. it settles more consistently that way and is more important when doing piston to valve clearance.
Thread Starter
Honda-Tech Member
Joined: Oct 2004
Posts: 1,073
Likes: 1
From: Mid East Deserts
thank you Mike.
had a hard time really doin the indicator axis alignment matching the valve stem thrust angle. it slips at first but after 5-6 tries, finally got it, LOL
i was actually hesistant to open the backcap of the rod so i can reduce the preload settings. thanks for letting me know i'll do another test and have it aligned as straight as possible.
one more thing, how do i go using the third dial when dropping it in the spark plug hole? the rod won't protrude underneath the spark plug/chamber hole, kinda short from the top of the fixture.
is that the extra rod/extension that came with the kit be used for? how do i extend it? via the backcap or do i have to unscrew the ball bearing at the tip of the rod?
thanks
had a hard time really doin the indicator axis alignment matching the valve stem thrust angle. it slips at first but after 5-6 tries, finally got it, LOL
i was actually hesistant to open the backcap of the rod so i can reduce the preload settings. thanks for letting me know
i'll do another test and have it aligned as straight as possible.one more thing, how do i go using the third dial when dropping it in the spark plug hole? the rod won't protrude underneath the spark plug/chamber hole, kinda short from the top of the fixture.
is that the extra rod/extension that came with the kit be used for? how do i extend it? via the backcap or do i have to unscrew the ball bearing at the tip of the rod?
thanks

B*a*n*n*e*d
Joined: Jan 2002
Posts: 7,177
Likes: 0
From: retired 2/13/10
there should have been an extension in mikes kit. its a cut to length affair though. i had my block together when i got that far and i just guessed. you just have to make sure you dont bottom out the dial guage when the piston is coming up. also you will have some adjustment in the height of the guage sitting in the hole over the cylinder.
Honda-Tech Member
Joined: Feb 2004
Posts: 1,592
Likes: 0
From: not riding any bandwagons in, massachusetts, usa
<TABLE WIDTH="90%" CELLSPACING=0 CELLPADDING=0 ALIGN=CENTER><TR><TD>Quote, originally posted by 1 2 NV »</TD></TR><TR><TD CLASS="quote">there should have been an extension in mikes kit. its a cut to length affair though. i had my block together when i got that far and i just guessed. you just have to make sure you dont bottom out the dial guage when the piston is coming up. also you will have some adjustment in the height of the guage sitting in the hole over the cylinder.</TD></TR></TABLE>
exactly.
just use a pair of pliers to twist the factory tip off the indicator you'll be using for center, screw in the extension, set to tdc-ish and drop the center indicator in. be sure it doesnt max out or you'll bend stuff.
exactly.
just use a pair of pliers to twist the factory tip off the indicator you'll be using for center, screw in the extension, set to tdc-ish and drop the center indicator in. be sure it doesnt max out or you'll bend stuff.
Honda-Tech Member
Joined: Feb 2004
Posts: 1,592
Likes: 0
From: not riding any bandwagons in, massachusetts, usa
also, cut a junk timing belt and stitch the ends together with fishing line so you can ditch the vice grips and just have a belt for the cam gears only. they hurt when they wack you in the hand or bang up your cam gears.
Thread Starter
Honda-Tech Member
Joined: Oct 2004
Posts: 1,073
Likes: 1
From: Mid East Deserts
thank you gentlemen. i really appreciate it. pointers taken
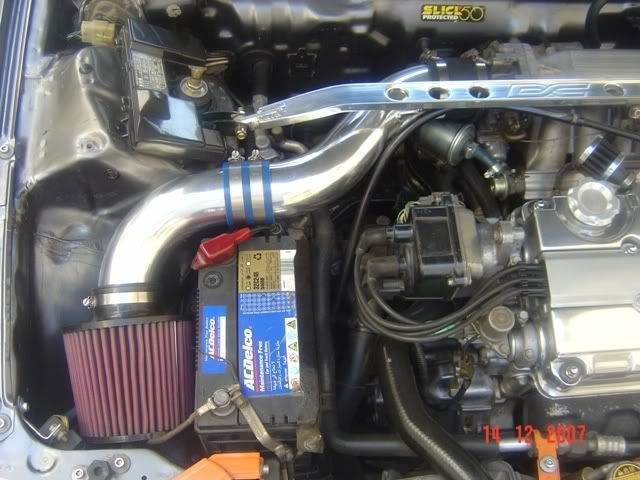
just did a small update using an ebay 2.75" intake piping/AEM filter. surpringly, my fuel maps went lean causing some detonation all over the place so i did some few street tunes to correct them.
my slow updating project will pause for sometime due to some small bits and pieces missing. still haven't got some parts to build a custom catch can setup, exhaust piping and decent muffler to fit the new header and avoid cops respectively without sacrificing an increase in power after the engine swap. also i need to install my custom fuel system setup using a SARD FPR along with the Walbro fuel pump before the swap. this will lessen things to be concerned of during the swap.
i'll be busy street tuning few H22 civics around town after my parts will arrive from xenocron. Chris is always up par with his business. parts will be shipped today Monday along with the Ostrich v2.0. i hope everything turns out well so as to have more cash flow to buy more parts for my build.
hopefully my new Advan RG wheels will arrive soon so i can have my BFG's rolling with the TE's and for the track alone. let the Advan's for street use.
just did a small update using an ebay 2.75" intake piping/AEM filter. surpringly, my fuel maps went lean causing some detonation all over the place so i did some few street tunes to correct them.
my slow updating project will pause for sometime due to some small bits and pieces missing. still haven't got some parts to build a custom catch can setup, exhaust piping and decent muffler to fit the new header and avoid cops respectively without sacrificing an increase in power after the engine swap. also i need to install my custom fuel system setup using a SARD FPR along with the Walbro fuel pump before the swap. this will lessen things to be concerned of during the swap.
i'll be busy street tuning few H22 civics around town after my parts will arrive from xenocron. Chris is always up par with his business
. parts will be shipped today Monday along with the Ostrich v2.0. i hope everything turns out well so as to have more cash flow to buy more parts for my build. hopefully my new Advan RG wheels will arrive soon so i can have my BFG's rolling with the TE's and for the track alone. let the Advan's for street use.