

My Build-up

Honda-Tech Member
Joined: May 2003
Posts: 1,328
Likes: 0
From: r4, mars
so beautiful.. so clean.. like a virgin hahahaha
awesome stuff man! im happy and glad u got them wheels now.. yes many months of waiting and at times we almost fall of our chair , due to customs, weird things.. but finally the wheels are gona be in the engym room hahaha for a little resting bfor being used!
 <--- 3homemade beers for u hahaha
awesome stuff man! im happy and glad u got them wheels now.. yes many months of waiting and at times we almost fall of our chair , due to customs, weird things.. but finally the wheels are gona be in the engym room hahaha for a little resting bfor being used!
<--- 3homemade beers for u hahaha
Thread Starter
Honda-Tech Member
Joined: Oct 2004
Posts: 1,073
Likes: 1
From: Mid East Deserts
who's a virgin?  LOL
LOL
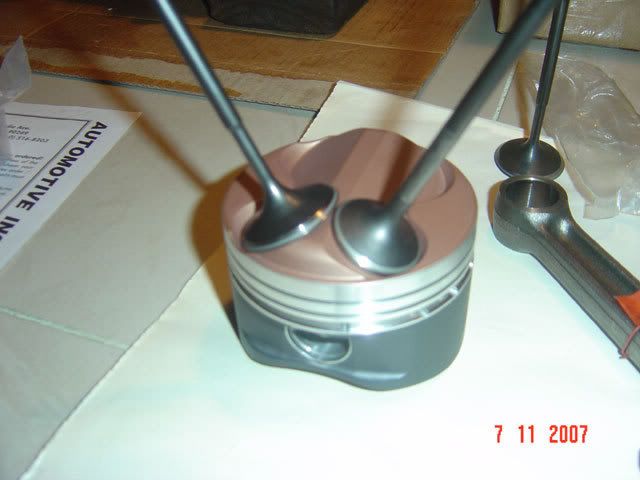
well, after degreeing the cams and did P2V clearancing, disassembled the head once more and finally started assembling the valvetrain.
Bisi's Ti retainers and valve springs kit are snap fit!
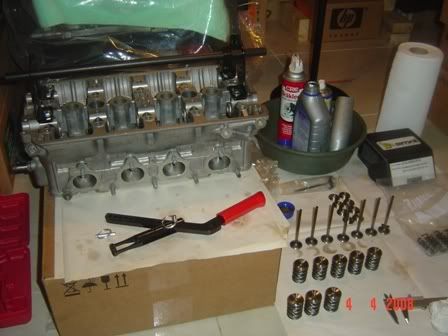
last four to go!
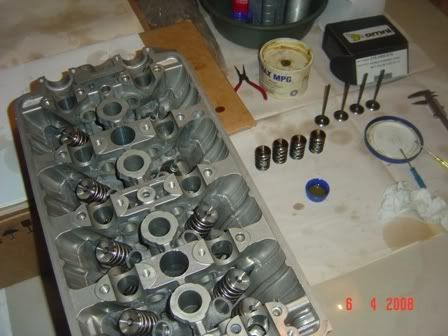
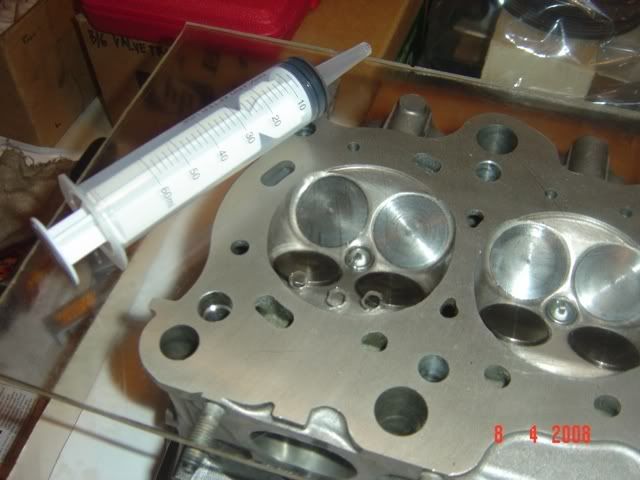
getting ready to CC those chambers
prolly some steriods could help bump some compression, LOL
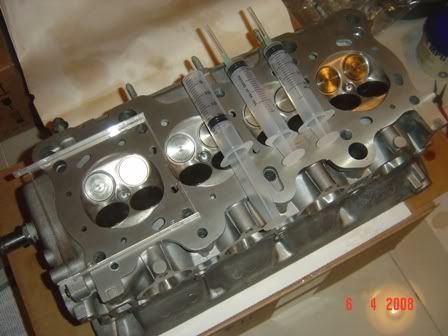
i would like to redo CC'ing again since my syringes are 20cc's each, quite tedious refilling each one up. got ahold of one 60cc unit but i have yet to pick it up tom night after my office works.
LOLwell, after degreeing the cams and did P2V clearancing, disassembled the head once more and finally started assembling the valvetrain.
Bisi's Ti retainers and valve springs kit are snap fit!
last four to go!
getting ready to CC those chambers
prolly some steriods could help bump some compression, LOL
i would like to redo CC'ing again since my syringes are 20cc's each, quite tedious refilling each one up.
got ahold of one 60cc unit but i have yet to pick it up tom night after my office works.
Thread Starter
Honda-Tech Member
Joined: Oct 2004
Posts: 1,073
Likes: 1
From: Mid East Deserts
many thanks for the compliments fellows! makes me more inspired.
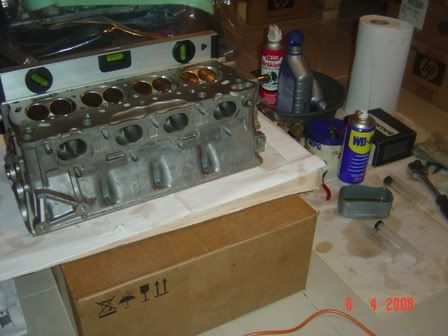
finally did a close to accurate CC volume measurements.
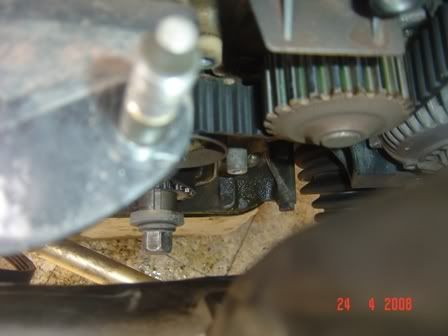
sadly though, my water pump with the existing B16 motor just gave way. this thing luckily lasted since i never replaced it when i bought and installed this used motor, except for the t-belt and tensioner bearing that is.
coolant traces are evident in my cam gears and underneath the motor during initial startup. i'll replace it ASAP, hopefully before hitting up the dyno for this old motor just to take some base figures and to compare it later with this new franky.
makes me more inspired. finally did a close to accurate CC volume measurements.
sadly though, my water pump with the existing B16 motor just gave way.
this thing luckily lasted since i never replaced it when i bought and installed this used motor, except for the t-belt and tensioner bearing that is.coolant traces are evident in my cam gears and underneath the motor during initial startup.
i'll replace it ASAP, hopefully before hitting up the dyno for this old motor just to take some base figures and to compare it later with this new franky.

Thread Starter
Honda-Tech Member
Joined: Oct 2004
Posts: 1,073
Likes: 1
From: Mid East Deserts
thanks for the kind words guys!
finally had time to replace my old water pump.
a water cooled engine indeed! LOL
anti-freeze is all over!
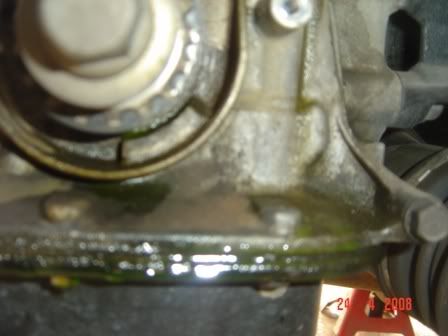
nasty two year old daily driven used pump. finally a brand new one in place. lubed the bolts with ARP ***'y lubricant for proper torque

finally had time to replace my old water pump.
a water cooled engine indeed! LOL
anti-freeze is all over!
nasty two year old daily driven used pump. finally a brand new one in place. lubed the bolts with ARP ***'y lubricant for proper torque
Thread Starter
Honda-Tech Member
Joined: Oct 2004
Posts: 1,073
Likes: 1
From: Mid East Deserts
after replacing my pump, while at it, i checked my valve tappets aswell before putting the VC in place. cleaned and regapped my old plugs too.
went back to my motor project and did more work at night time.
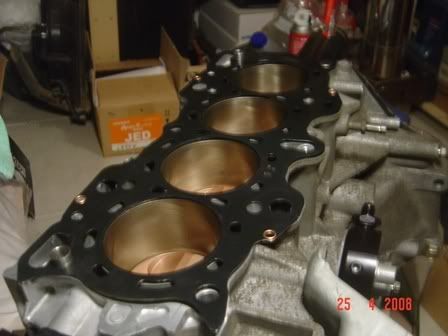
a pic i took some time ago, comparing a VTEC(P30) HG vs. a nonVTEC(LS-PR4) HG. notice the dowel pin holes size differences of the two at the exhaust side. also the inverted oil orifice hole right at the block's intake side. that thing won't flush properly when mating a VTEC head onto a nonVTEC block using a VTEC HG.

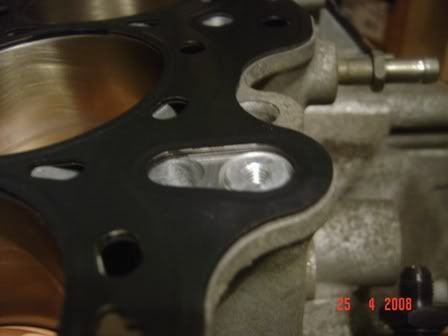
i then took my handy dremel tool to do some work. a custom HG.
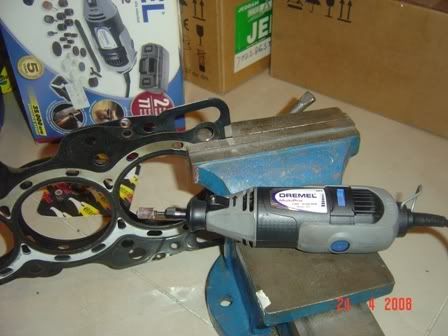
enlarged exhaust side dowel pin(GE kit) holes. fits like butter cut smooth.
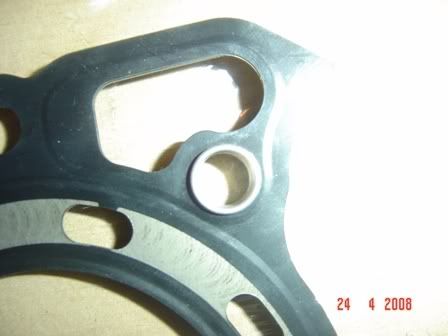
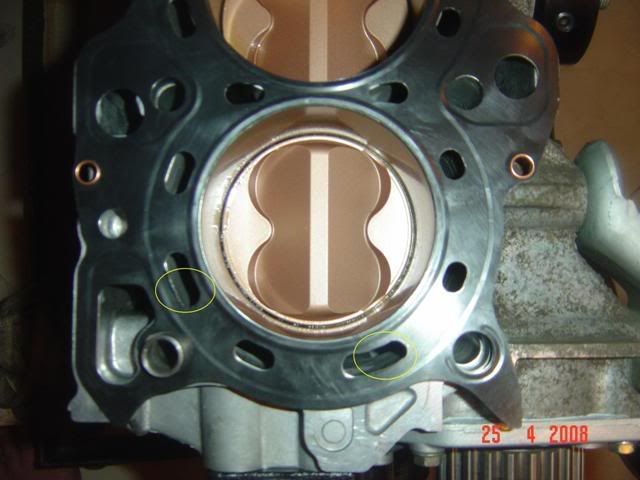
i also enlarged the water jacket holes of the nonVTEC HG to match the VTEC head right off Cylinder 1. it should ensure proper water flow from block to head.
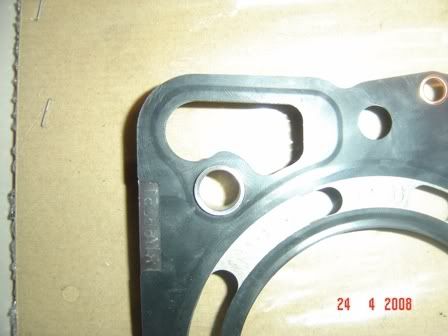
now am ready to bolt-on the head for good. all holes matched perfectly
Modified by ef92b at 7:28 PM 4/28/2008
went back to my motor project and did more work at night time.
a pic i took some time ago, comparing a VTEC(P30) HG vs. a nonVTEC(LS-PR4) HG. notice the dowel pin holes size differences of the two at the exhaust side. also the inverted oil orifice hole right at the block's intake side. that thing won't flush properly when mating a VTEC head onto a nonVTEC block using a VTEC HG.
i then took my handy dremel tool to do some work. a custom HG.
enlarged exhaust side dowel pin(GE kit) holes. fits like butter cut smooth.
i also enlarged the water jacket holes of the nonVTEC HG to match the VTEC head right off Cylinder 1. it should ensure proper water flow from block to head.
now am ready to bolt-on the head for good. all holes matched perfectly
Modified by ef92b at 7:28 PM 4/28/2008
Needs More Cowbell
Joined: Jun 2006
Posts: 1,169
Likes: 0
From: ALL UP IN IT, IN INDIANA, USA
Every day I check my recent topics and hope for an update on this build. Today was my lucky day. I am absolutely amazed by the level of detail that is going into this one. One day I would like to meet you and buy you a .
.
Thread Starter
Honda-Tech Member
Joined: Oct 2004
Posts: 1,073
Likes: 1
From: Mid East Deserts
once again, thanks for the compliments guys!
i wish i can do more given my limited time as am busy tuning other cars as well and doing some wire harness conversions for some extra fundings.
i'm hoping to swap this motor by end of next month but i still haven't received my lsd tranny bearings. my time, parts and shippings costs killin' me big time.
Junior Member
Joined: Dec 2004
Posts: 368
Likes: 0
From: SoCal, California, United States
<TABLE WIDTH="90%" CELLSPACING=0 CELLPADDING=0 ALIGN=CENTER><TR><TD>Quote, originally posted by ef92b »</TD></TR><TR><TD CLASS="quote">
Modified by ef92b at 7:28 PM 4/28/2008</TD></TR></TABLE>
so as of now im trying to figure out how the pistons go....(direction...) .
I HAVE ARIAS PISTONS TOO!
i see u have your pisons with the bigger valve releifs on the exhaust side...
arent the bigger valve releifs supposed to be on the intake side?
Modified by gsrcrazy at 1:13 AM 5/5/2008
Thread Starter
Honda-Tech Member
Joined: Oct 2004
Posts: 1,073
Likes: 1
From: Mid East Deserts
<TABLE WIDTH="90%" CELLSPACING=0 CELLPADDING=0 ALIGN=CENTER><TR><TD>Quote, originally posted by gsrcrazy »</TD></TR><TR><TD CLASS="quote">
so as of now im trying to figure out how the pistons go....(direction...) .
I HAVE ARIAS PISTONS TOO!
i see u have your pisons with the bigger valve releifs on the exhaust side...
arent the bigger valve releifs supposed to be on the intake side?
Modified by gsrcrazy at 1:13 AM 5/5/2008</TD></TR></TABLE>
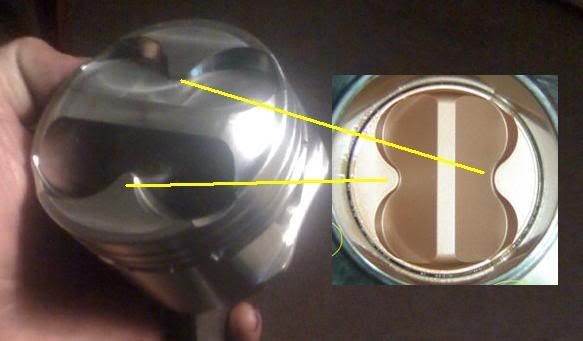
that was my first thoughts too but i figured it out myself.
these pics could help. notice the notches on the piston crown?(intake/ bigger valve on left of pic). they were there for a reason.

there's V2V clearance. tried it in reverse? the valves were kissing each other (i didn't have a pic of it though).
Modified by ef92b at 2:46 PM 5/5/2008
so as of now im trying to figure out how the pistons go....(direction...) .
I HAVE ARIAS PISTONS TOO!
i see u have your pisons with the bigger valve releifs on the exhaust side...
arent the bigger valve releifs supposed to be on the intake side?
Modified by gsrcrazy at 1:13 AM 5/5/2008</TD></TR></TABLE>
that was my first thoughts too but i figured it out myself.
these pics could help. notice the notches on the piston crown?(intake/ bigger valve on left of pic). they were there for a reason.
there's V2V clearance. tried it in reverse? the valves were kissing each other (i didn't have a pic of it though).
Modified by ef92b at 2:46 PM 5/5/2008
Junior Member
Joined: Dec 2004
Posts: 368
Likes: 0
From: SoCal, California, United States
<TABLE WIDTH="90%" CELLSPACING=0 CELLPADDING=0 ALIGN=CENTER><TR><TD>Quote, originally posted by ef92b »</TD></TR><TR><TD CLASS="quote">
that was my first thoughts too but i figured it out myself.
these pics could help. notice the notches on the piston crown?(intake/ bigger valve on left of pic). they were there for a reason.
Modified by ef92b at 2:46 PM 5/5/2008</TD></TR></TABLE>
my pistons have those notches on BOTH sides!! ...

but then i realized that the valve pockets on the upper side are bigger.. its kind of hard to see with just the naked eye... but if you look closely they are.
that was my first thoughts too but i figured it out myself.
these pics could help. notice the notches on the piston crown?(intake/ bigger valve on left of pic). they were there for a reason.
Modified by ef92b at 2:46 PM 5/5/2008</TD></TR></TABLE>
my pistons have those notches on BOTH sides!!
... 
but then i realized that the valve pockets on the upper side are bigger.. its kind of hard to see with just the naked eye... but if you look closely they are.
Thread Starter
Honda-Tech Member
Joined: Oct 2004
Posts: 1,073
Likes: 1
From: Mid East Deserts
yeah, i can see both sides are notched.
anyways, here's something i made. quick comparison. notice the dome shape. i think both our pistons are identical concerning those areas and yes, the deeper valve pockets should be the intake side too.
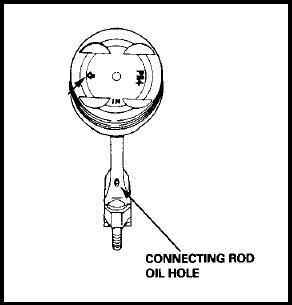
what about your eagle rods? how did you mount them? do they have oil holes too? just like the OEM PR4's (LS stock rods)? they must be in the intake side as well. a pic i grabbed from the helms manual.
Modified by ef92b at 12:10 PM 5/6/2008
anyways, here's something i made. quick comparison. notice the dome shape. i think both our pistons are identical concerning those areas and yes, the deeper valve pockets should be the intake side too.
what about your eagle rods? how did you mount them? do they have oil holes too? just like the OEM PR4's (LS stock rods)? they must be in the intake side as well. a pic i grabbed from the helms manual.
Modified by ef92b at 12:10 PM 5/6/2008
Junior Member
Joined: Dec 2004
Posts: 368
Likes: 0
From: SoCal, California, United States
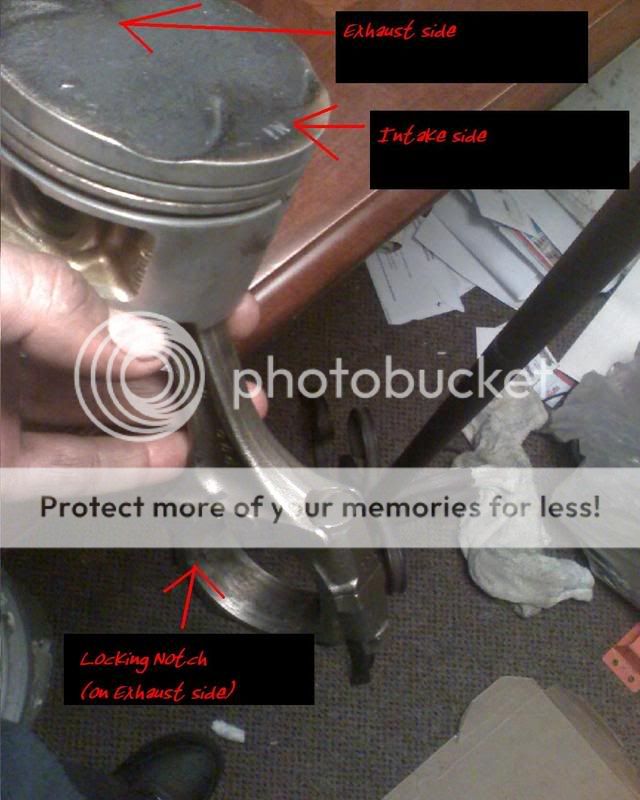
i installed the rods in like if the stock gsr's were. Locking notch on the exhaust side.
And i noticed that valve pocket shape aswell!
thanks for pointing that out! =D
Modified by gsrcrazy at 1:20 AM 5/6/2008
Modified by gsrcrazy at 1:24 AM 5/6/2008
And i noticed that valve pocket shape aswell!
thanks for pointing that out! =D

Modified by gsrcrazy at 1:20 AM 5/6/2008
Modified by gsrcrazy at 1:24 AM 5/6/2008