

My first manifold.....be nice

Thread Starter
Junior Member
Joined: Dec 2003
Posts: 246
Likes: 0
From: Greensboro, NC, USA
Well it's finally done. Im ditching the drag mani (for spiking issues) and putting on my own manifold. I mainly did this because I thought it would be cool to have my own custom parts on the car. My friend ScErAxN helped out a good bit and did some of the porting and gave a hand welding too. I used sc40 1.5" T's and elbows, BMC head flange, BMC turbo flange, which came port matched to the ID of sc40 1.5" piping and I got the WG flange from them too. I used a sawzall to cut the piping....which oddly cut a LOT better than a damn metal cutting blade on a chop saw. I sort of just eyeballed them and cut them. Anyway here are a few pics....then I'll continue my rambling
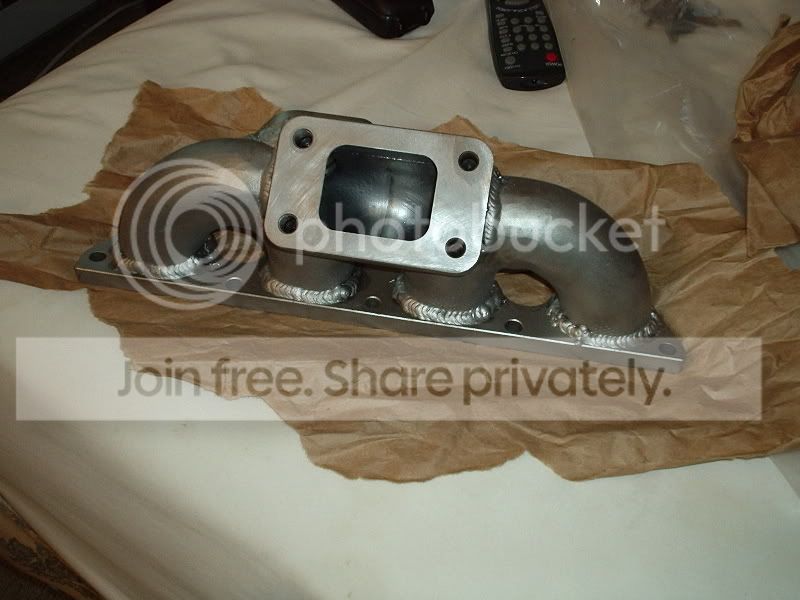
There was some porosity right at the top of the mani...you can see where I grinded for the nuts/studs to go. It was a BITCH to try and weld in there with it bolted to a head and I think we had too much stick out which caused shitty gas coverage. The head studs got in the way big time so we started and stopped a lot around the studdidge area. We used a Hobart Handler 140 with solid wire and C25 gas. Anyway Im in the process of grinding the porosity out and rewelding it. I'll have to grind again to make sure the nuts can fit flush but whatever. I welded the inside of the flange, where to runners connected to it, and port matched that to the flange. Also the tubing we used flared a little at the ends so when I cut the T's and butted them up against the uncut elbows the ID was off a little. We ported that as well. We also ported where the turbo flange was welded on....in other words we spent a lot of time doing things that probably wont help that much lol. Im pretty happy about it though. Any helpful hints for future fab projects is welcome.
There was some porosity right at the top of the mani...you can see where I grinded for the nuts/studs to go. It was a BITCH to try and weld in there with it bolted to a head and I think we had too much stick out which caused shitty gas coverage. The head studs got in the way big time so we started and stopped a lot around the studdidge area. We used a Hobart Handler 140 with solid wire and C25 gas. Anyway Im in the process of grinding the porosity out and rewelding it. I'll have to grind again to make sure the nuts can fit flush but whatever. I welded the inside of the flange, where to runners connected to it, and port matched that to the flange. Also the tubing we used flared a little at the ends so when I cut the T's and butted them up against the uncut elbows the ID was off a little. We ported that as well. We also ported where the turbo flange was welded on....in other words we spent a lot of time doing things that probably wont help that much lol. Im pretty happy about it though. Any helpful hints for future fab projects is welcome.
Thread Starter
Junior Member
Joined: Dec 2003
Posts: 246
Likes: 0
From: Greensboro, NC, USA
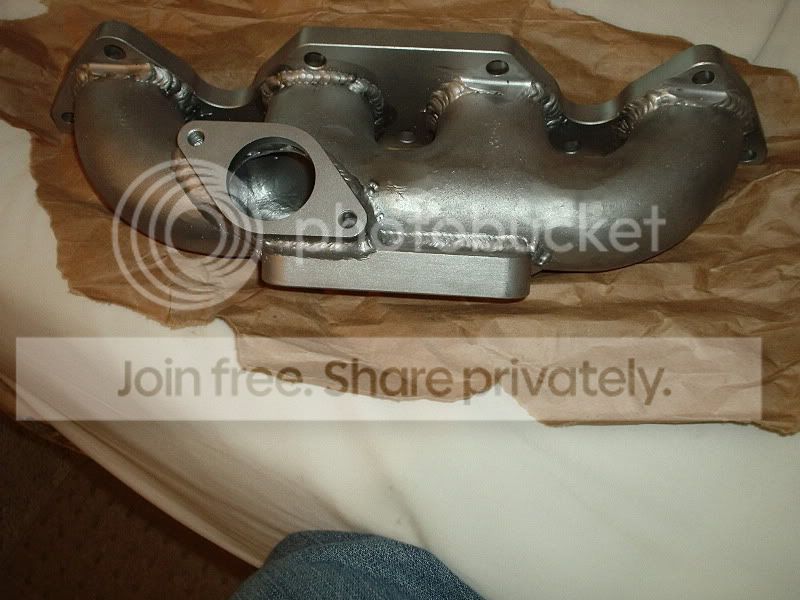
These were butted together using bevels and using a mig welder. The only way you could ever see the actual penetration is if we blew a hole in it...which we did on a few parts lol....just not there. I also bead blasted it today on the inside and the outside and all of the discoleration and the cool blue/purplish colors were taken off.

Trending Topics
Joined: May 2005
Posts: 20
Likes: 0
From: Guelph, Ontario, Canada
looks pretty nice man. Just a little curios how you did everything. I was wondering which polarity you used and which mode of transfer you used ie.(Short Circuit, Spray, Globular). I was also wondering if you used pulse or something to get it to ripple like that. I just finished school and got my tickets for stick flat and horizontal and ill be doing testing for vertical up, and overhead..... maybe pipe after all that. MIG wasnt really something I got alot into and im trying to learn a bit more about it. Also wondering if you had any experience with weiding before this or even welding school school.
- Eric -
- Eric -
Thread Starter
Junior Member
Joined: Dec 2003
Posts: 246
Likes: 0
From: Greensboro, NC, USA
<TABLE WIDTH="90%" CELLSPACING=0 CELLPADDING=0 ALIGN=CENTER><TR><TD>Quote, originally posted by drumking15 »</TD></TR><TR><TD CLASS="quote">not to basd but it doesnt look like you got any penetration...you can clearly see this thru the turbo flange looing in...</TD></TR></TABLE>
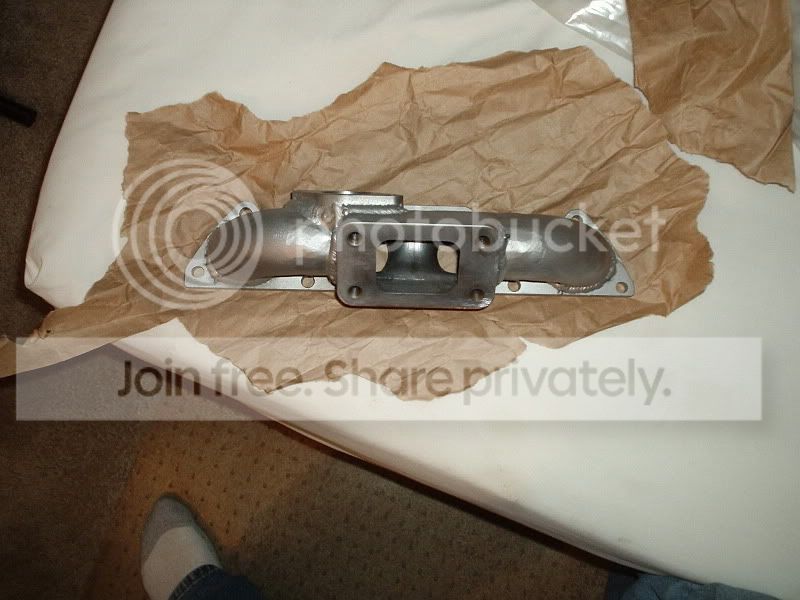
After reading my response I feel retarded lol. Well technically you're right. I didnt penetrate all the way through the mani....but I butted these together with no gap. I've never been able to get FULL penetrationg without leaving some kinda gap or blowing through the metal. I also beveled the runners very thin so I would get the most penetration I could. As a matter of fact when Sean cut out the hole for the turbo I took that piece...which as you can see had the middle weld right in the middle of it...and beat the hell out of it with a hammer right in the middle and it bent and bent...never broke. So it should hold.
<TABLE WIDTH="90%" CELLSPACING=0 CELLPADDING=0 ALIGN=CENTER><TR><TD>Quote, originally posted by Want2race »</TD></TR><TR><TD CLASS="quote">Assuming you didnt warp the flanges I think it looks awesome</TD></TR></TABLE>
Well I did lol. I just got back today from getting that fixed. It didnt warp bad. It actually warped when I tacked it. I tacked it on 4 spots on each runner and then we bolted it to the head....I guess we should have bolted it before we tacked it but I didnt think it would warp with just tacks. I was wrong.
<TABLE WIDTH="90%" CELLSPACING=0 CELLPADDING=0 ALIGN=CENTER><TR><TD>Quote, originally posted by Eric_Hayward »</TD></TR><TR><TD CLASS="quote">looks pretty nice man. Just a little curios how you did everything. I was wondering which polarity you used and which mode of transfer you used ie.(Short Circuit, Spray, Globular). I was also wondering if you used pulse or something to get it to ripple like that. I just finished school and got my tickets for stick flat and horizontal and ill be doing testing for vertical up, and overhead..... maybe pipe after all that. MIG wasnt really something I got alot into and im trying to learn a bit more about it. Also wondering if you had any experience with weiding before this or even welding school school.
- Eric -</TD></TR></TABLE>
Actually yes I took Mig, Tig and stick here at GTCC and I welded excavators at deere hitachi. We spray arced 33-38 volts and anywhere from 550-700+ inches a min...that's movin lol. Anyway this was just plain on short circuit. I just weaved on those welds. Id kinda lay a bead where the pieces connect and then sweep back over it. The best example was the turbo flange. Besides the WG flange that was the only other weld that I didnt have something in my way.
<TABLE WIDTH="90%" CELLSPACING=0 CELLPADDING=0 ALIGN=CENTER><TR><TD>Quote, originally posted by cantaffordaccord »</TD></TR><TR><TD CLASS="quote">looks good
but it also looks just like an drag mani
so I dont see how this would help any with the surging </TD></TR></TABLE>
Well it's the spiking im worried about. Yes the Drag is somewhat of a logger but the WG is ONLY on the right runner and the far right and left runners are sort of "ramhornish" and come up higher then the middle ones. What Im saying is there is no possible way it could bleed off anything but that one runner. I was going to place the WG in the middle but I couldnt because of the dip stick and I dont like the elbows sticking off.
Thanks for all of the comments guys! I really appreciate it!
Thread Starter
Junior Member
Joined: Dec 2003
Posts: 246
Likes: 0
From: Greensboro, NC, USA
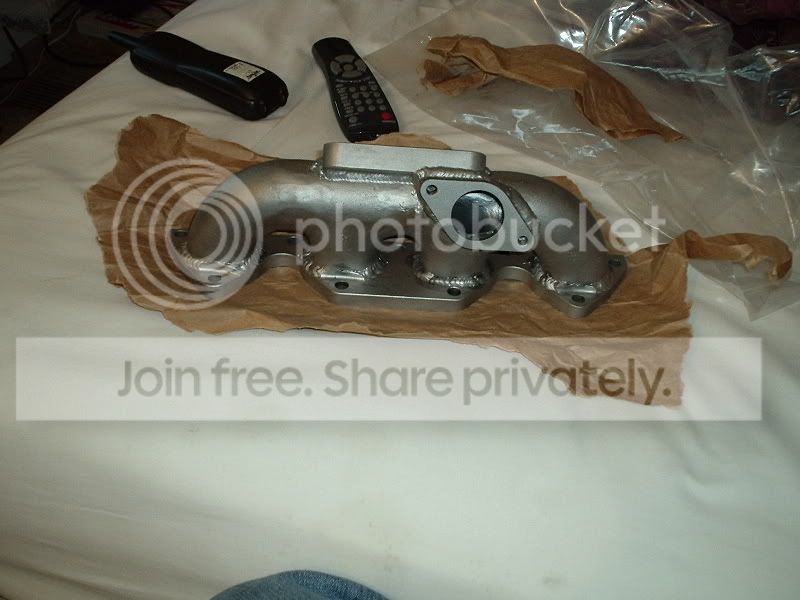
I used VHT flameproof paint to "coat" it. I didnt wanna send it off and spend tons of money. I did this mainly so it wouldnt rust. Anyway it's 1300-2000 degree paint and it has ceramic in it. I put 3 medium/light coats and let it dry. Then I baked it at 200 degrees for 30 min, let it cool for 30, baked it at 400 for 30, let it cool for 30, baked it at 600 for 30 and turned the oven off and let it slowly cool all last night. These were the directions on the VHT can...well it didnt say let it cool in the oven but what the hell. Turned out pretty good. Im gonna paint the exhaust housing of my new 50 trim when it comes in as well. Here are some pics that I took.


I just hope it holds. With a 2000 degree rating and the baking it better.
Oh yea I ground that porosity out, rewelded it and ground it back down some for the nuts to fit.
I just hope it holds. With a 2000 degree rating and the baking it better.
Oh yea I ground that porosity out, rewelded it and ground it back down some for the nuts to fit.
Honda-Tech Member
Joined: Mar 2002
Posts: 14,296
Likes: 1
From: Charleston, SC
<TABLE WIDTH="90%" CELLSPACING=0 CELLPADDING=0 ALIGN=CENTER><TR><TD>Quote, originally posted by drewzilla »</TD></TR><TR><TD CLASS="quote">I used VHT flameproof paint to "coat" it.
</TD></TR></TABLE>
Let us know how it holds up. I've never cured it like you have... but even though it's rated for high temps it usually turns white and flakes off.
</TD></TR></TABLE>
Let us know how it holds up. I've never cured it like you have... but even though it's rated for high temps it usually turns white and flakes off.
Thread Starter
Junior Member
Joined: Dec 2003
Posts: 246
Likes: 0
From: Greensboro, NC, USA
Ill keep you updated. It has directions for curing it on and off the car. Even though I've already done it off the car Im going to follow the directions for it on the car as well. This wont be until next weekend though....until I make the DP for it.
Honda-Tech Double Platinum Member

Joined: May 2002
Posts: 3,293
Likes: 0
From: high point, nc, usa
Yea this was a really good learning experience. We sorta over thought alot of it and made some things harder on ourselves. But thats not necessarily a bad thing because now we know what works best! Alot of the things that we thought would be hard were actually pretty easy. We thought that ovaling the pipe to meet up with the head flange would be hard, but it was actually pretty easy. And we were both dreading cutting the hole for the wg, but that was easy as well. It took maybe 3 minutes to cut it and the holesaw still looked brand new when we were done.
Overall im really happy with how it turned out. I only did a little bit of the welding, but i cut the holes for the turbo flange and wg, along with a little porting. So this is all his work besides a few little things. Pretty damn good for a first attempt at a manifold, especially with a mig welder
I cant wait until you get then new turbo so that we can make that dp. Then its just a matter of slapping it all on and getting it retuned
Thread Starter
Junior Member
Joined: Dec 2003
Posts: 246
Likes: 0
From: Greensboro, NC, USA
<TABLE WIDTH="90%" CELLSPACING=0 CELLPADDING=0 ALIGN=CENTER><TR><TD>Quote, originally posted by TheBandit »</TD></TR><TR><TD CLASS="quote">As long as you cured it, it will stay on. Mine has been holding strong for over a year. Nice looking manifold.
-Michael-</TD></TR></TABLE>
That's good news. I'm going to do the exhaust housing too but I'm using black exhaust wrap for the dump tube and DP.
-Michael-</TD></TR></TABLE>
That's good news. I'm going to do the exhaust housing too but I'm using black exhaust wrap for the dump tube and DP.
Honda-Tech Member
Joined: Feb 2002
Posts: 9,455
Likes: 3
From: I heart tool, US
<TABLE WIDTH="90%" CELLSPACING=0 CELLPADDING=0 ALIGN=CENTER><TR><TD>Quote, originally posted by PrecisionH23a »</TD></TR><TR><TD CLASS="quote">
Let us know how it holds up. I've never cured it like you have... but even though it's rated for high temps it usually turns white and flakes off.</TD></TR></TABLE>
I used the "DEI" (something like that) silicon coating on a manifold, and several turbine housings. I just heated it up with a torch for a couple minutes to cure, and it looked brand new even after 3 years.
Havn't use the VHT stuff tho.
Thread Starter
Junior Member
Joined: Dec 2003
Posts: 246
Likes: 0
From: Greensboro, NC, USA
Here are some pics of the new turbo installed on it.
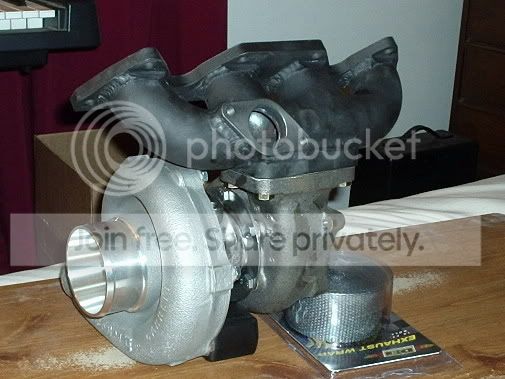
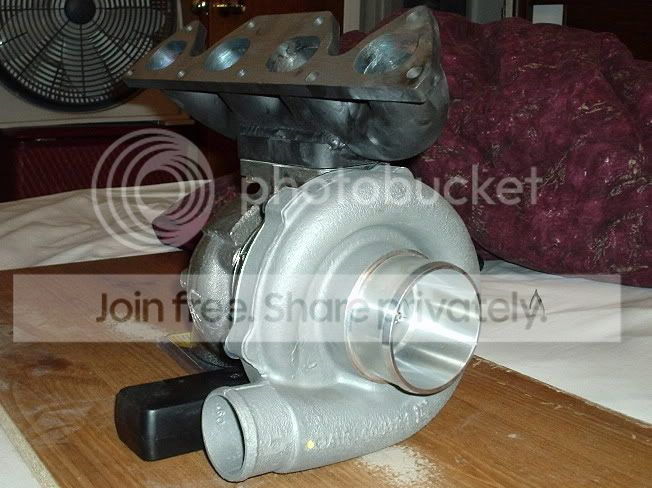
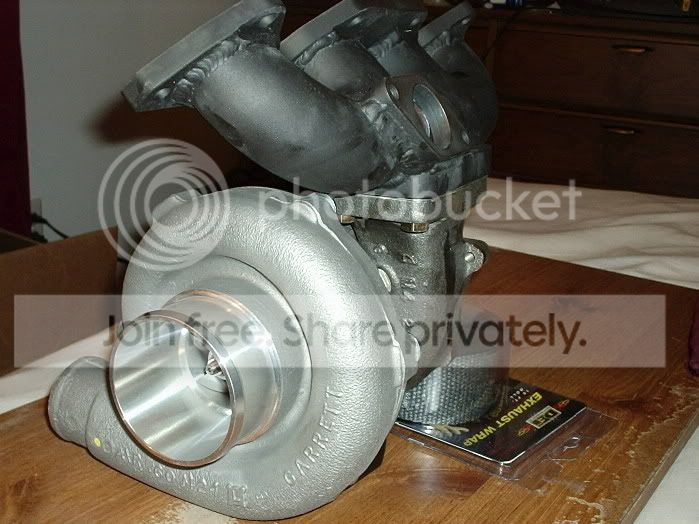

I sanded the vht off of the flanges and it's ashy....I didnt realize it until I took the pics. The flash really made it show up but oh well. It took 320grit and a LOT of pressure to take that **** off. 600 grit didnt do anything to it, so that's good for durability...now we'll see how it holds up to heat this weekend. The turbo is actually on backwards to how it will be. The exhaust housing will be on the passenger side of the car. I just did this for the pics.
I sanded the vht off of the flanges and it's ashy....I didnt realize it until I took the pics. The flash really made it show up but oh well. It took 320grit and a LOT of pressure to take that **** off. 600 grit didnt do anything to it, so that's good for durability...now we'll see how it holds up to heat this weekend. The turbo is actually on backwards to how it will be. The exhaust housing will be on the passenger side of the car. I just did this for the pics.

Thread
Thread Starter
Forum
Replies
Last Post