When you click on links to various merchants on this site and make a purchase, this can result in this site earning a commission. Affiliate programs and affiliations include, but are not limited to, the eBay Partner Network.
well post up your progress if you get power hungry like me. my old auto x car only made 100hp too '10 yaris 5spd
im sick and tired of going slow
Hahah, I do know the feeling, but I actually downgraded in Power. The civic is fun cuz u gotta drive like a maniac to maintain speed. It's manic, and I love it.
But yeah, sometimes I want more power. Driving some of my friends cars at autox is awesome.
Hahah, I do know the feeling, but I actually downgraded in Power. The civic is fun cuz u gotta drive like a maniac to maintain speed. It's manic, and I love it.
But yeah, sometimes I want more power. Driving some of my friends cars at autox is awesome.
Too many ride alongs in stock motor tuned sti and evo. I got the itch. For zoom zoom.
Yeah, there is this local guy who has a B20z with stock internals (only upgraded cams and valvetrain), and he eats my car for lunch on the straightaways (and I have a B18C Type-R). If/when my engine blows up, I plan to keep the tranny and go B20z with the same kind of upgrades. That + the valvetrain upgrades will cost the same as another Type-R engine, be quicker and the replacement engines will be way cheaper.
For a track car, there is no need to swap heads and do all the shenanigans to upgrade to VTEC.
I ran a b18b with brian crower stage 2 cams and vtrain, b16 pistons....that setup was really good. I made really decent power for the money....all in I was less than a vtec motor. I ran in STL with it.
The b20 is a solid choice, especially if you can run the p8r head.
Back on point...don't increase power, just run the **** out of your setup and learn to carry momentum. Once you learn that, you will be much faster with more power. You are on the right track, stay on it and leave power for down the road.
Thanks bud. That's also why I didn't get Toyo RR's to prep myself for HC. I'm still a n00b, so race tires are a bit extreme for someone who needs to learn how tires break away
Power would only exacerbate any of my deficiencies.
I've always wanted to build an ej2 or an eg hatch but just havent gotten around to it and i can't find any clean ones around me to buy ... anyways, nice build so far by the way!
i bought mine from a friend so its clean and relatively not rusted out. only a bit on the fenders like all hondas. im lucky the car is an SLC car so it gets salted to **** months of the year its not too bad my '10 yaris will prolly be in similar shape in a few years
ive never owned an auto car and the civic is my 3rd. tryin to keep it that way but someday i want to buy my moms 05 land cruiser that might be worth the auto life
Thanks for the build thread, has been a great read as I'm also in the process of prepping a car for track use. I am quite a bit further behind you in many areas and this helps guide my wandering mind. I'm not after tons of power either and am running a honda because of the relatively low cost of parts. Can't wait for more content
Thanks for the build thread, has been a great read as I'm also in the process of prepping a car for track use. I am quite a bit further behind you in many areas and this helps guide my wandering mind. I'm not after tons of power either and am running a honda because of the relatively low cost of parts. Can't wait for more content
*sub'd
I'm honored that you find this thread that entertaining...again, I'm super surprised with the feedback on this build. It just goes to show that a lot more people have open minds than you may think.
I will be updating the thread soon...picked up some new parts to improve driveabilitt and prep for my first track day of the season with NASA NE at NJMP Lightning.
The safety steward recommended I do DE1, even with four track days under my belt.
They want me to get instructed...Im okay with that I guess. Civic is kind of slow anyway...So getting caught up in trains of cars shouldn't be a big deal.
So after re-reading the thread I have a few questions about the build...if you don't mind answering them :
why did you decide to upgrade the Master cylinder?
I was going to get MOTUL brake fluid but i see that you're going with ATE Blue...is it actually blue? and why did you decide on this option?
how did you come to decide to pull the trigger on the NT05? there are too many options for tires that I can't decide!
Master cylinder:
If you have two master cylinders and you move your foot an equal distance for either one, the force you have to apply does not change unless the brake booster changes. This is because the brake booster utilizes different surface areas above and below a diaphragm, and vacuum from your intake manifold to "assist" your foot.
The booster is NOT filled with brake fluid.
The master cylinders in this scenario, on the other hand, are.
Now, if one of those two master cylinders is larger than the other, it can hold more brake fluid.
So, when your foot moves the same distance for the larger one as it does for the smaller one, it moves MORE fluid.
Therefore, this means you can move the SAME amount of fluid as the smaller master cylinder with LESS foot movement-- again, because you're moving MORE volume with the bigger master cylinder.
*****
Now, when you increase the size of your brake calipers-- front and rear, you are increasing the REQUIRED volume of brake fluid required for braking. This increase in required volume for braking as compared to the smaller brake setup manifests itself in more pedal travel if you keep the master cylinder the same.
When you upgrade the master cylinder, your foot doesn't need to travel as far with the upgraded setup.
*****
The Integra has a 15/16" master cylinder from the factory.
However, the Integra also has ABS. This means that you have to plug up various other ports to make the MC work with a non-ABS car. You also have to bend some hard lines to make the Integra MC fit the non-ABS DX.
The other alternative is to convert the car to an ABS car.
While converting my car to ABS would result in me being faster around the track or in autocross and safer on the street, it would require MORE money than I've already spent, MORE work than I've already done, and MORE time that I am already pretty short on (aside from right now ^__^).
So, my only option was to buy the Integra MC and plug up some holes and re-route some hard lines, or install this 15/16" 91 Civic EX Master Cylinder which is meant for a non-ABS car to begin with.
After much contemplation, I went with that result lol.
MOTUL Vs. ATE Gold:
So, ATE Gold used to be ATE Blue, if I remember correctly, but they were forced to make the fluid the same color as regular brake fluid by some regulating entity because apparently if the fluid was spilled on the floor in a shop somewhere in this world, a technician may not be able to discern what fluid it was.
According to my NASA Instructor Friend, Motul was designed for motorcycles with metal brake pads originally.
Apparently, there was very little modulation associated with fluids around the time of Motul RBF 600's creation, so Motul made a fluid that was "more compressible" to allow for better modulation for motorcycles.
THIS tid-bit is hear-say.
*****
With that being said, Motul is a very good fluid. I've used the RBF 600 at four/four of the track days I've attended in my life lol. It hasn't ever boiled on me and the modulation was never an issue for me.
However, my NASA Instructor friend said that if I couldn't afford Castrol SRF, then the best bang-for-buck fluid to use would be ATE Gold. This is apparently because it gives a stiffer pedal and has better modulating feel. I have yet to test this statement, but I'm willing to try it out.
Tires:
I do have a stack of Hoo-Hoos sitting in the corner of my room right now that I took off the car originally.
I'm still fairly new to track days.
R comps and slicks tend to break away without warning (squeal), and if you're inexperienced this can be dangerous. So, I decided that I wanted to pick up a 200 TW tire to use at the track.
Originally I was going to use the RE-71R, Direzza ZII*, RS3, or Rival. After talking to a bunch of instructors and wheel-to-wheel guys, I was set on the ZII* spec, but then I saw these Nittos for 325 with shipping, after rebate.
So, I said what the hell, these tires have good dry condition reviews and they're cheap-- plus I'm not a race car driver and I'm only trying to get seat time this season and learn how to drive better hahah.
Sorry for giving you a rant, but I have time and I want to talk about cars!!!
DISCLAIMER: I do not endorse replacing any factory safety equipment with anything other than what came on the car. It is not guaranteed that the work seen below will ensure the safety of the driver of the car, and it is recommended that readers of this thread refrain from such behavior.
UPDATE!!!
So, the ~380 mm steering wheel in my Civic was getting old, like, yesterday. If you all recall, I put some tennis racket handle tape on it and even gave it this fancy rAc3k0R tape jawn to help my eyes follow the centerline of the wheel b3c@us3 rAc3k0R.
The reason I did all of this crap instead of buying a sweet Personal, Momo, OMP, &c was because I wanted to keep my airbag until I have a proper roll bar or cage, harness, and seat, if you all recall.
I started doing research to see if I could swap to a smaller, OEM wheel before I did all of this as well, and did not find anything I could do without swapping my column to the EK Civic column (or whatever the chassis code is here in America).
I was originally going to use a ~350 mm RSX, EP3, or S2K steering wheel until I found out all of this news. So, I started looking at ITR steering wheels...however, the first generation, JDM ITR used a steering wheel with no airbag:
So, I said, okay I'll get a second generation ITR steering wheel...but when I went on eBay, the cost for a good condition one was $350. Luckily, my friend was selling one in okay condition for $200...so I drove to North Jersey and picked it up:
When I tried installing this onto my car, I noticed the connector for this was different than the one for my car for the airbag. So, I did some research and discovered that this wheel had an OBD II connector versus an OBD I connector-- which would make total sense.
I found this DIY, and went to work converting the airbag to work with my Civic:
I went 15/16 MC on my Civic after my rear disc install. Feels much better, but truth be told I wish there was another "easy" option for a 1"+ MC. But for now, this will do fine.
I went 15/16 MC on my Civic after my rear disc install. Feels much better, but truth be told I wish there was another "easy" option for a 1"+ MC. But for now, this will do fine.
Keep up the good work sir. Love that wheel.
One of my mechanic friends said Hondas usually have softer brake pedals up top and I think he's pretty right.
I once bled the brakes on my RSX three times with RBF 600 after a track day and my pedal was still kind of soft up top...It's always been that way.
After heel-toeing on the 15/16 MC with the Integra brakes though, I can say that it's fine. When you REALLY get on the brakes, the softer upper part of the brake travel helps you be able to get your heel/side of foot onto the gas pedal for that blip.
No worries there. I have been running Integra front brakes (DTC-60 pads) and OEM 93 Si rear discs, steel braided lines, PBR fluid, and a 15/16 and for 5 years now without issues. Yes, the pedal is lower than some other cars I've driven, but that's how they are.
I started getting fade last year at our local track when I started to make up time in the braking zones however, which is why I am considering the ITR setup + 1", but I have never had any brake pedal pressure issues.
This is very similar to the setup on our Del Sol racecar. 2400LBS and 176WHP. Hoosier R6-7 225/45/15 tires. Ran DTC-60 for 2-3 years, We just upgraded to the DTC-70 at the end of last season and found they worked much better under constant heavy braking. Not sure what you are running in the rear for pads, but we had been using factory rear pads, or Hawk HP+. Carl at Perry Auto suggested the DTC-30 rear pads, and it made a big difference. Braking into a few corners became more stable with extra rear brake, we get the same amount of unloaded tire lockup as we did with stock. Get more life out of our front pads. Run only at Atlantic Motorsports Park. Track has a lot of off camber corners, Need to be able to trail-brake around or into a few corners to get it right. Also we do not run any cooling system for the brakes. Doing that this year, also installed wildwood DPHA calipers. much lighter then stock and a 4 piston setup. I think if we ran a flatter track I would look into more rear brake. Currently we can brake just as deep at E36 M3 racecars on wider Hoosiers.
This is very similar to the setup on our Del Sol racecar. 2400LBS and 176WHP. Hoosier R6-7 225/45/15 tires. Ran DTC-60 for 2-3 years, We just upgraded to the DTC-70 at the end of last season and found they worked much better under constant heavy braking. Not sure what you are running in the rear for pads, but we had been using factory rear pads, or Hawk HP+. Carl at Perry Auto suggested the DTC-30 rear pads, and it made a big difference. Braking into a few corners became more stable with extra rear brake, we get the same amount of unloaded tire lockup as we did with stock. Get more life out of our front pads. Run only at Atlantic Motorsports Park. Track has a lot of off camber corners, Need to be able to trail-brake around or into a few corners to get it right. Also we do not run any cooling system for the brakes. Doing that this year, also installed wildwood DPHA calipers. much lighter then stock and a 4 piston setup. I think if we ran a flatter track I would look into more rear brake. Currently we can brake just as deep at E36 M3 racecars on wider Hoosiers.
Interesting info. Yeah, I am running HP+ rears, but I have been experiencing rear lock up in some corners, so I don't know if it would be a good idea to add rear bias. Perhaps the Del Sol has more weight in the rear when compared to a Civic hatch? Or perhaps it is because the DTC-70 have enough clamping power to allow you to put DTC-30 in the rear.
I'll look it up. Thanks for your input. Note that I am planning on running an 11 inch setup soon no matter what.
If you guys read the build thread in the beginning, you'll see that I was also going to run DTC-60s on this car, but after considering the power levels and weight levels and tires that other racers were using with their Civics, I figured the HP Plus would be enough.
Even if I can't brake as late with them, I was told by my friend that it will give me better modulation than the dtc-60s.
Thanks for the input guys.
*****
Update:
So, I left my driveway yesterday and my dad told me there was a leak under the car from when I left. I drove back and smelled it-- looked like and smelled like my coolant (which has some oil in it).
Originally thought it was leaking from in between the head gasket and block, so I cleaned it off and checked the area frequently after driving for the day.
No overheating and no issues from the car, so I just kept driving it.
The next day, I ordered a head gasket in anticipation of some work due to this issue, and I began disassembling my parts motor so I could have a backup head if my cylinder head was warped.
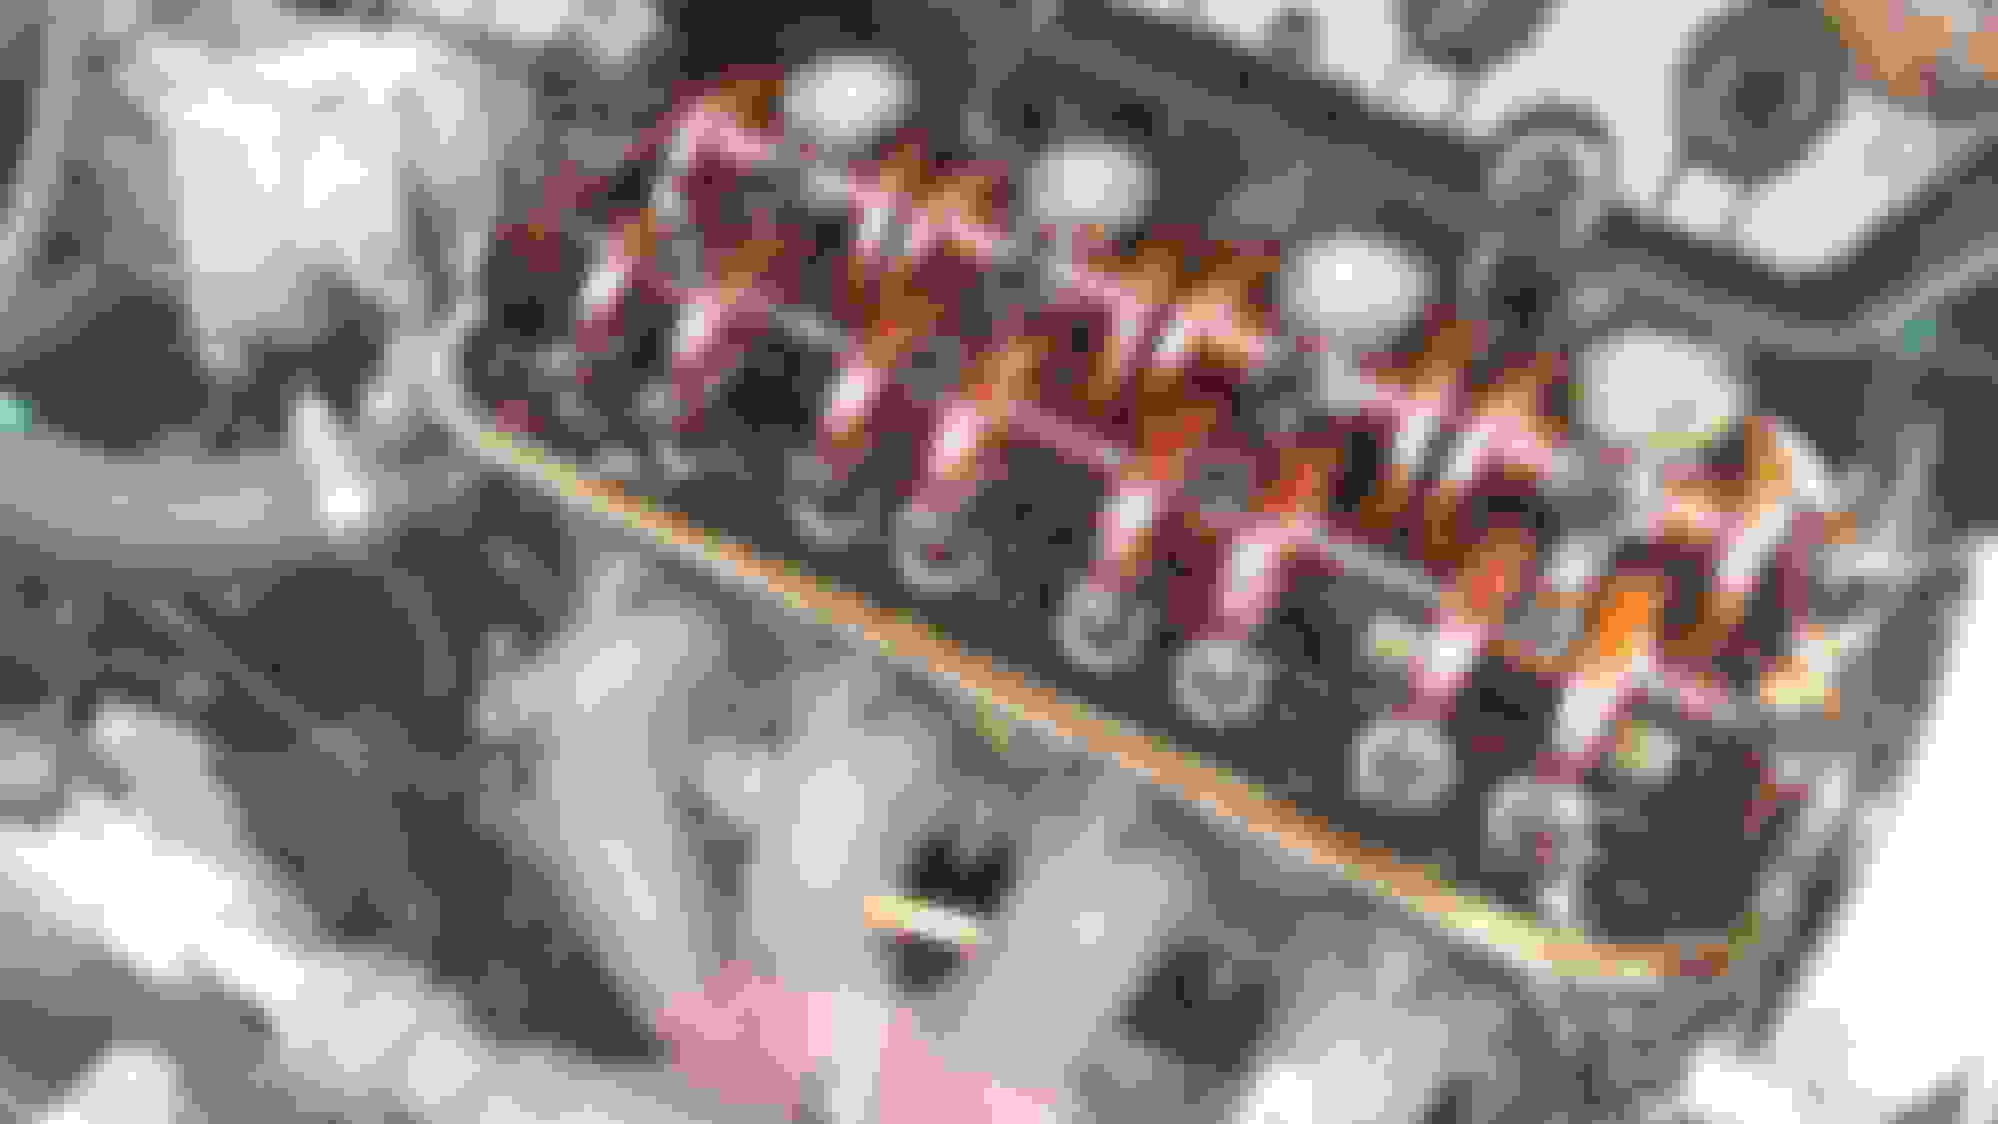
I began by removing the valve cover:
Yes, that is a 2016 GT350. Yes, it's fast. No, I don't just like driving Hondas:
Cylinder head removed:
Here's what the pistons looked like in the engine itself. All of the cylinders but one were in great shape. One of the cylinders had some water damage-- it looks like. There was rust on the bore and also on the piston itself:
I labeled my cylinder head bolts as well per this diagram:
The bottom of the cylinder head, including the valves, looked pretty rough. No wonder this guy sold me the motor for $60 lmao:
While I had my hands dirty, I decided to take the valve cover off of my Civic, which looked like this:
And I decided to check the torque specs on all of my head bolts with an old-school needle-type torque wrench.
No oil-water emulsions, as you all can see, no white smoke coming out of the tail pipe, or blue smoke, but oil in the coolant-- approximately the same amount as when I first bought the car.
Went to check all of the torque specs and eight out of the ten bolts were at approximately 20 ft-lb.....
The torque spec if 47 ft-lb
I torqued all of the bolts in the designated pattern per the FSM (factory service manual), and put my spare motor's valve cover on with a nice valve cover gasket:
Here's the car being a beautiful beast:
Lastly, I loaded up all of my spare parts and I got some sweet "racek0r" photos that I will totally post to the Gram and hashtag like a G. Check out my $20 Integra steering rack that I'll be refurbishing:


 ... anyways, nice build so far by the way!