

Eagle Rod Fitment


Joined: Jul 2004
Posts: 4,144
Likes: 0
From: Farmington, MN, USA
Taken from http://www.theoldone.com
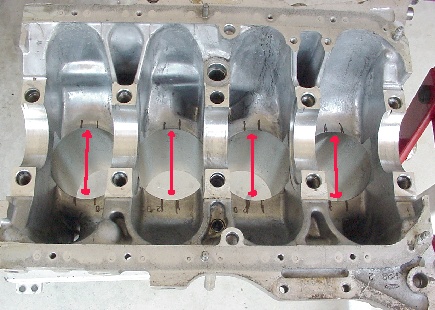
We mark an area that's 3/4" wide and approximately centered on each side of the block's cylinder bores. 3/4" is plenty of distance to clear the rods' beams ans we'll taper the cut from outside the lines back to the cylinder bores. If you put a mark that's 1/4" into the block and 1/4" down into the bores, that's the amount you'll be removing...effectively straight-lining the area with your grinder.
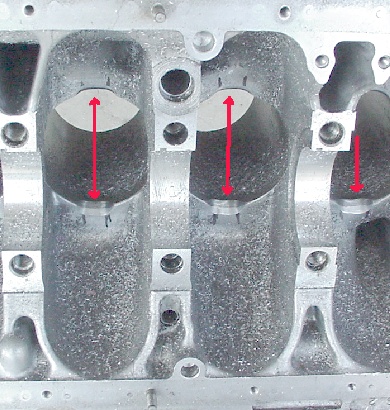
This photo shows the block after about 10 minutes with a die grinder and a carbide cutter. Notice how the corners of the reliefs are tapered back to the original lower edge of the cylinder. You do not want square edges in these areas, as stress risers could develop. make sure when you're grinding in these areas on the block that you wear eye protection, as the cast iron particles from the cylinder liner will rust in your eyes and having them "drilled" out, isn't a pleasant experience. Obviously, the block will need to be cleaned after this operation, as is evidenced by the grinding debris in the photo.
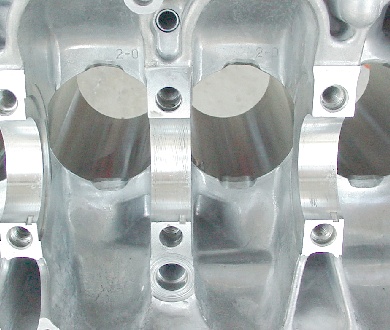
Here's the finished product. The reliefs have been just "touched" by a 60 grit cartridge roll and a tiny radius has also been placed on the bottom of the cylinder bore. This will make the transition back up the cylinder wall a little less "wearing" for the pistons' skirts. The block has been thoroughly cleaned with a solvent and then it's been scrubbed with hot soapy water, prior to the final rinse with hot water. Blow the block dry, including all the bolt holes. Make a good sized roll of Bounty towels on some sticks (paint stirrers work great), spray them with some WD-40 and wipe the cylinder bores until there's no hint of dirt, or surface rust showing.
We mark an area that's 3/4" wide and approximately centered on each side of the block's cylinder bores. 3/4" is plenty of distance to clear the rods' beams ans we'll taper the cut from outside the lines back to the cylinder bores. If you put a mark that's 1/4" into the block and 1/4" down into the bores, that's the amount you'll be removing...effectively straight-lining the area with your grinder.
This photo shows the block after about 10 minutes with a die grinder and a carbide cutter. Notice how the corners of the reliefs are tapered back to the original lower edge of the cylinder. You do not want square edges in these areas, as stress risers could develop. make sure when you're grinding in these areas on the block that you wear eye protection, as the cast iron particles from the cylinder liner will rust in your eyes and having them "drilled" out, isn't a pleasant experience. Obviously, the block will need to be cleaned after this operation, as is evidenced by the grinding debris in the photo.
Here's the finished product. The reliefs have been just "touched" by a 60 grit cartridge roll and a tiny radius has also been placed on the bottom of the cylinder bore. This will make the transition back up the cylinder wall a little less "wearing" for the pistons' skirts. The block has been thoroughly cleaned with a solvent and then it's been scrubbed with hot soapy water, prior to the final rinse with hot water. Blow the block dry, including all the bolt holes. Make a good sized roll of Bounty towels on some sticks (paint stirrers work great), spray them with some WD-40 and wipe the cylinder bores until there's no hint of dirt, or surface rust showing.

Thread
Thread Starter
Forum
Replies
Last Post
d16dcoe45
All Motor / Naturally Aspirated
9
Oct 23, 2006 07:45 AM