

my project

Thread Starter
Honda-Tech Member
Joined: Apr 2004
Posts: 2,785
Likes: 1
From: phoenix, az
the last two days..
removed the rear window wiper. I've always wondered how you removed it but after today i know how to remove and reassemble the internals. had to stop and print out some pages from the helms manual before i proceeded. removed the remaining door trim, door handles, linkages and latch. left the wheels and glass so i could roll it out of the garage for wetsanding.
put on my swimming suit and some sandals and began wetsanding. used 400 and did the whole car except for the roof. i'm new to bodywork and at this point all my mistakes showed up. nothing major just a whole bunch of "razor cuts" around the areas with filler. The razor cuts were caused by using 80 grit and not getting it smooth enough with 320. Tomorrow i'm going to go over all the "razor cuts" with 220 and 400. The piece of trim below the hatch glass is the only part that needs to be removed before painting the exterior.
Modified by eda6 at 10:45 PM 3/21/2006
Modified by eda6 at 12:26 PM 5/14/2006
Thread Starter
Honda-Tech Member
Joined: Apr 2004
Posts: 2,785
Likes: 1
From: phoenix, az
started to transfer the headlight housings onto the new headlights. The housings had some rust and now it's gone. all the primer that was on the car after rust removal and dent filling was removed and reprimered with por-15.
the paint gun arrived today and i have an ice cream freezer that i'm going to strip and repaint for some practice. my neighbor who works at the local paint shop is bringing me some primer and paint to practice with tomorrow.
after the bottom piece of trim is removed from the hatch glass and i learn how to use the gun i'll start painting the exterior.
i thinking about how i'm going to set up the booth. definately going to put plastic on the walls and set up an exhaust fan. maybe get a wallbanger to act as a dehumidifier since it's 90% humidity in the garage right now.
Modified by eda6 at 10:27 PM 3/23/2006
Honda-Tech Member
Joined: Mar 2005
Posts: 6,176
Likes: 0
From: san jo
im a body man and id just like to give you a tip on your project.. on any dent it must be brought down to bare metal, and try to take as much of the dent out as you can. grind away a big area around the dent and then apply filler.. keep separation between filler and paint.. so it would look like filler, metal, paint. and the sanding process is 36/40 - 80 - 180 feather edge.. then you have to use a etching primer like a dust coat.. then a primer like transtar or something in that line of primer grade.. guide coat wet sand 400 bla bla u get the idea.. good luck with your build 

Member
Joined: Feb 2005
Posts: 1,162
Likes: 1
From: Millersville, MD, USA
<TABLE WIDTH="90%" CELLSPACING=0 CELLPADDING=0 ALIGN=CENTER><TR><TD>Quote, originally posted by crxboyy408 »</TD></TR><TR><TD CLASS="quote">im a body man and id just like to give you a tip on your project.. on any dent it must be brought down to bare metal, and try to take as much of the dent out as you can. grind away a big area around the dent and then apply filler.. keep separation between filler and paint.. so it would look like filler, metal, paint. and the sanding process is 36/40 - 80 - 180 feather edge.. then you have to use a etching primer like a dust coat.. then a primer like transtar or something in that line of primer grade.. guide coat wet sand 400 bla bla u get the idea.. good luck with your build </TD></TR></TABLE>damn you use those grits, I start out 80-180-320, then I use 500 to sand the primer, btw I work for a bodyshop too. I guess eveyone has there different ways.
</TD></TR></TABLE>damn you use those grits, I start out 80-180-320, then I use 500 to sand the primer, btw I work for a bodyshop too. I guess eveyone has there different ways.
Thread Starter
Honda-Tech Member
Joined: Apr 2004
Posts: 2,785
Likes: 1
From: phoenix, az
91 sedan headlights on the left, 88 hatch headlights on the right. obviously different but share the same part # on hap.com


i'm going to practice on this. after it looks good i'm going to plug it in and put some beer in it.

<TABLE WIDTH="90%" CELLSPACING=0 CELLPADDING=0 ALIGN=CENTER><TR><TD>Quote, originally posted by crxboyy408 »</TD></TR><TR><TD CLASS="quote">im a body man and id just like to give you a tip on your project.. on any dent it must be brought down to bare metal, and try to take as much of the dent out as you can. grind away a big area around the dent and then apply filler.. keep separation between filler and paint.. so it would look like filler, metal, paint. and the sanding process is 36/40 - 80 - 180 feather edge.. then you have to use a etching primer like a dust coat.. then a primer like transtar or something in that line of primer grade.. guide coat wet sand 400 bla bla u get the idea.. good luck with your build </TD></TR></TABLE>
this is my first time doing body work. after the dents were filled, the thought of banging them out
occured to me. there was only one dent that could have been banged out and the rest were very small. i used a wirewheel to get to bare metal then 80, 180, 400 wet. por-15 is supposed to be a rust preventive paint but it seems to work well as an etching primer at the same time. i'll find out for sure after more wetsanding. thanks for the tip
Modified by eda6 at 11:11 PM 3/23/2006
Modified by eda6 at 12:22 PM 5/14/2006
i'm going to practice on this. after it looks good i'm going to plug it in and put some beer in it.
<TABLE WIDTH="90%" CELLSPACING=0 CELLPADDING=0 ALIGN=CENTER><TR><TD>Quote, originally posted by crxboyy408 »</TD></TR><TR><TD CLASS="quote">im a body man and id just like to give you a tip on your project.. on any dent it must be brought down to bare metal, and try to take as much of the dent out as you can. grind away a big area around the dent and then apply filler.. keep separation between filler and paint.. so it would look like filler, metal, paint. and the sanding process is 36/40 - 80 - 180 feather edge.. then you have to use a etching primer like a dust coat.. then a primer like transtar or something in that line of primer grade.. guide coat wet sand 400 bla bla u get the idea.. good luck with your build
</TD></TR></TABLE>this is my first time doing body work. after the dents were filled, the thought of banging them out
occured to me. there was only one dent that could have been banged out and the rest were very small. i used a wirewheel to get to bare metal then 80, 180, 400 wet. por-15 is supposed to be a rust preventive paint but it seems to work well as an etching primer at the same time. i'll find out for sure after more wetsanding. thanks for the tip
Modified by eda6 at 11:11 PM 3/23/2006
Modified by eda6 at 12:22 PM 5/14/2006
Honda-Tech Member
iTrader: (1)
Joined: Sep 2005
Posts: 5,669
Likes: 0
From: Wasted away again in Margaritaville
Wow, you really love your car. Hats off to you man. I am definetly subscribing to this thread and am going to watch it to the end. Good job and good luck!
Thread Starter
Honda-Tech Member
Joined: Apr 2004
Posts: 2,785
Likes: 1
From: phoenix, az
i found some time to work on the hatch this weekend, took my time and made progress.
friday night-started wetsanding with 220, did everything but the roof before it got dark. removed the hatch struts so i could remove the hatch rear insulation. i had to use a 7/16" wrench to remove the hatch strut.
saturday-finished wetsanding the car with 220. after the body was smooth and the scratches were gone i finished sanding with 400 wet. while i was wetsanding the water was running down the inside of the windshield and collecting on the dash. The water also soaked the insulation behind the dash and made a puddle on the floor.

removed the dash and became familiar with the hvac system and heater controls. removed the blower housing and it was filled with water. the evap housing came out next. the heater core
kicked my ***. i didn't feel like draining coolant so i just cut the hoses and pointed them up. removed the two bolts inside and it wanted to come out. after breaking the bottom diffuser i stopped and looked at the helms. there's a bolt in the engine compartment that i didn't see.
after the heater core was out i cleaned all the crap out of it. removed the steering column support and the remaining ductwork. found more tar to remove and some rust to take care of. sprayed simple green on everything under the dash, let it sit for two hours and sprayed it with the hose.

today i painted the headlight housings, front and rear bumper supports and steering column support and the hvac radio. removed the hvac control and radio braket from the dash and painted that too. installed the housings on the new headlights. picked up 1000 sq. ft of plastic to cover the walls of the garage.
check out the right rear wheel. i found a center cap from my old steelies laying around and decided to see if it would fit in my wheel. it doesn't fit but i made it work. Looks pretty clean imo. time to find three more.
friday night-started wetsanding with 220, did everything but the roof before it got dark. removed the hatch struts so i could remove the hatch rear insulation. i had to use a 7/16" wrench to remove the hatch strut.
saturday-finished wetsanding the car with 220. after the body was smooth and the scratches were gone i finished sanding with 400 wet. while i was wetsanding the water was running down the inside of the windshield and collecting on the dash. The water also soaked the insulation behind the dash and made a puddle on the floor.
removed the dash and became familiar with the hvac system and heater controls. removed the blower housing and it was filled with water. the evap housing came out next. the heater core
kicked my ***. i didn't feel like draining coolant so i just cut the hoses and pointed them up. removed the two bolts inside and it wanted to come out. after breaking the bottom diffuser i stopped and looked at the helms. there's a bolt in the engine compartment that i didn't see.
after the heater core was out i cleaned all the crap out of it. removed the steering column support and the remaining ductwork. found more tar to remove and some rust to take care of. sprayed simple green on everything under the dash, let it sit for two hours and sprayed it with the hose.
today i painted the headlight housings, front and rear bumper supports and steering column support and the hvac radio. removed the hvac control and radio braket from the dash and painted that too. installed the housings on the new headlights. picked up 1000 sq. ft of plastic to cover the walls of the garage.
check out the right rear wheel. i found a center cap from my old steelies laying around and decided to see if it would fit in my wheel. it doesn't fit but i made it work. Looks pretty clean imo. time to find three more.
Thread Starter
Honda-Tech Member
Joined: Apr 2004
Posts: 2,785
Likes: 1
From: phoenix, az
today i picked up some materials from terry's auto paint supply in winter haven, fla.
the label


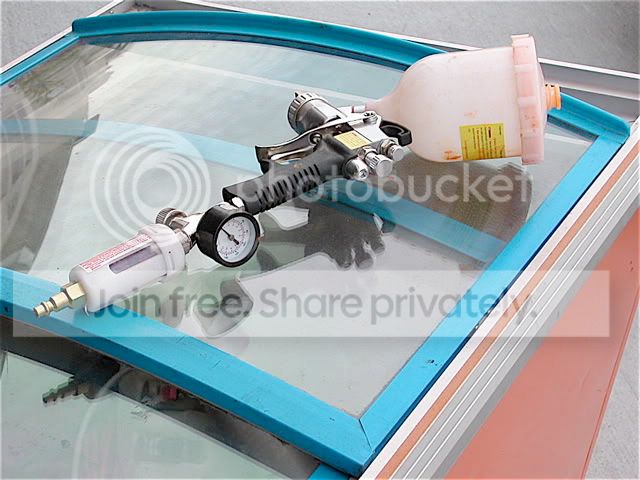
from L to R-paint guns (suction fed touch-up gun and gravity fed hvlp sprayer), mixers, high build primer, fast primer hardener, strainers for mixing, mixing cups, inline filter (removes moisture and oil from pneumatic lines), slow base hardener, SEM self etching primer, slow reducer, cheap paint thinner (for cleaning tools) and 3 qts. honda b-35M paint.

Modified by eda6 at 3:01 PM 4/5/2006
the label
from L to R-paint guns (suction fed touch-up gun and gravity fed hvlp sprayer), mixers, high build primer, fast primer hardener, strainers for mixing, mixing cups, inline filter (removes moisture and oil from pneumatic lines), slow base hardener, SEM self etching primer, slow reducer, cheap paint thinner (for cleaning tools) and 3 qts. honda b-35M paint.
Modified by eda6 at 3:01 PM 4/5/2006

Joined: May 2005
Posts: 4
Likes: 0
From: Virginia Beach, Virginia, US
i too am a bodyman/painter
looks awesome for your first time.
everyone has a different procedure
but sanding the mud with all those different grits is a waste of time
knock your mud down with 80
guidecoat it
block it with 180
guidecoat it again and sand out all your scratches with 220
prime it
block it with 320
reprime it if necessary
final block it...
primer looks feathered out nicely though from what i can see
two thumbs up mate!!!!!!!!
Thread Starter
Honda-Tech Member
Joined: Apr 2004
Posts: 2,785
Likes: 1
From: phoenix, az
<TABLE WIDTH="90%" CELLSPACING=0 CELLPADDING=0 ALIGN=CENTER><TR><TD>Quote, originally posted by efnewb91 »</TD></TR><TR><TD CLASS="quote">Where is the tack cloth!</TD></TR></TABLE>
it's pictured under the touch-up gun.
<TABLE WIDTH="90%" CELLSPACING=0 CELLPADDING=0 ALIGN=CENTER><TR><TD>Quote, originally posted by yllalnad »</TD></TR><TR><TD CLASS="quote">
but sanding the mud with all those different grits is a waste of time
</TD></TR></TABLE>
yep because after i spray self-etching and hi-build primers i'll need to wetsand again.
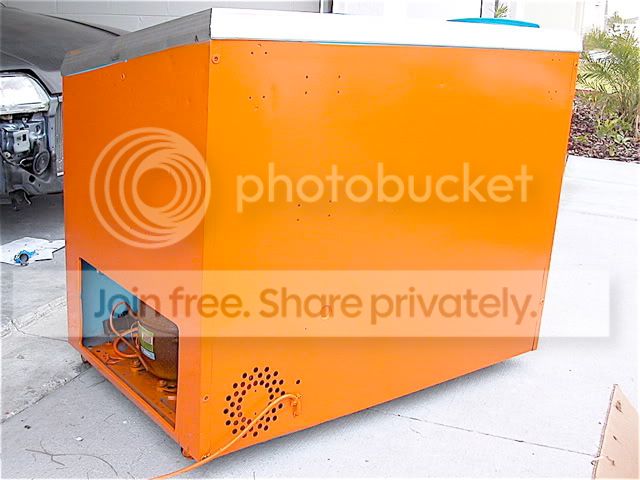
i went back to the paint store to get some seam sealer and green paint to practice with. left with with seam sealer and free orange paint. went home and practiced on that freezer.
washed the freezer with a hose and dried it. wiped it with tack cloth, mixed 4 parts paint to 1 part reducer, strained it and loaded up the hvlp gun.
the first few shots weren't promising but after fine tuning air pressures and paint flow and messing with the spray pattern i figured it out. Ended up with two runs on the top and one in the bottom left corner on this panel.

another run at the top

the last part i sprayed was the back. Finally did a side w/o getting a run
tomorrow i'm going to finish prepping the interior and find something else that needs orange paint.
thanks for the comments
it's pictured under the touch-up gun.
<TABLE WIDTH="90%" CELLSPACING=0 CELLPADDING=0 ALIGN=CENTER><TR><TD>Quote, originally posted by yllalnad »</TD></TR><TR><TD CLASS="quote">
but sanding the mud with all those different grits is a waste of time
</TD></TR></TABLE>
yep because after i spray self-etching and hi-build primers i'll need to wetsand again.
i went back to the paint store to get some seam sealer and green paint to practice with. left with with seam sealer and free orange paint. went home and practiced on that freezer.
washed the freezer with a hose and dried it. wiped it with tack cloth, mixed 4 parts paint to 1 part reducer, strained it and loaded up the hvlp gun.
the first few shots weren't promising but after fine tuning air pressures and paint flow and messing with the spray pattern i figured it out. Ended up with two runs on the top and one in the bottom left corner on this panel.
another run at the top
the last part i sprayed was the back. Finally did a side w/o getting a run
tomorrow i'm going to finish prepping the interior and find something else that needs orange paint.
thanks for the comments
Honda-Tech Member
Joined: Jul 2004
Posts: 9,846
Likes: 0
From: VA, USA
<TABLE WIDTH="90%" CELLSPACING=0 CELLPADDING=0 ALIGN=CENTER><TR><TD>Quote, originally posted by eda6 »</TD></TR><TR><TD CLASS="quote">tomorrow i'm going to finish prepping the interior and find something else that needs orange paint.</TD></TR></TABLE>
Lol.
Lol.
Honda-Tech Member
Joined: Nov 2005
Posts: 3,394
Likes: 0
From: My Garage
hey nice posting..i can just imagine someone opening this post up and seeing all the pictures of a orange freezer without reading everything...lol
yeah i have take years of autobody repair, plus i have worked at many bodyshops myself. everyone has there own way of doing things. looks like your doing good for your first time. just keep it up and it will be a show car before the year is up.
yeah i have take years of autobody repair, plus i have worked at many bodyshops myself. everyone has there own way of doing things. looks like your doing good for your first time. just keep it up and it will be a show car before the year is up.
Thread Starter
Honda-Tech Member
Joined: Apr 2004
Posts: 2,785
Likes: 1
From: phoenix, az
started off the day by sanding the interior with 220 dry. vacuumed out the car with the shop vac afterwards. went through the interior and applied seam sealer. Basically fixed all the nasty looking stuff and touched up the sealer that was damaged during tar removal. removed the seatbelts and rear quarter windows. cleaned out all the ductwork under the dash and finally cleaned the dash itself.
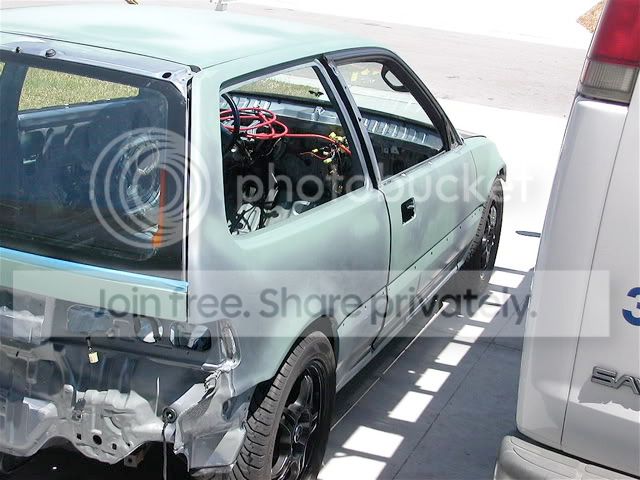
Upper, L and R trim has been removed from the hatch glass and i disconnected the heat strips.
Modified by eda6 at 12:26 PM 5/14/2006
Upper, L and R trim has been removed from the hatch glass and i disconnected the heat strips.
Modified by eda6 at 12:26 PM 5/14/2006
Member
Joined: Dec 2004
Posts: 1,244
Likes: 0
From: Bowling Green, KY, United States
bump for this thread. I need to borrow you for a few weeks so you can turn my hatch into something beautiful as this one should prove to be. good luck with it. I gotta get back to work....
Thread Starter
Honda-Tech Member
Joined: Apr 2004
Posts: 2,785
Likes: 1
From: phoenix, az
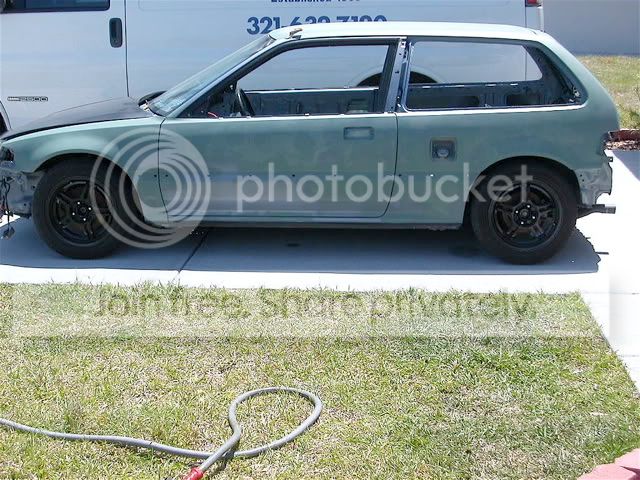
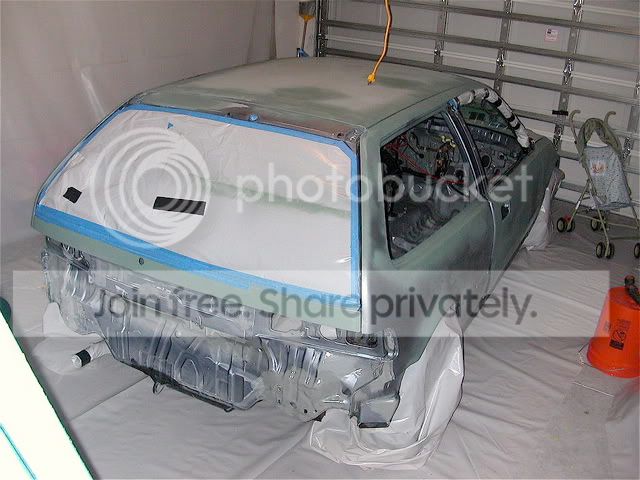
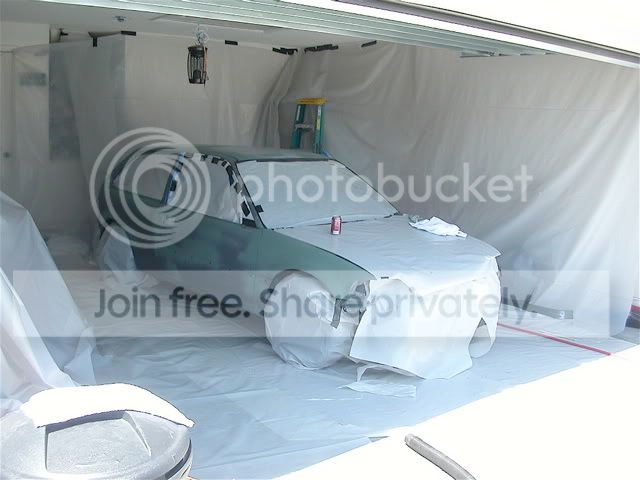
The wife was distracted yesterday so i took advantage of the situation...washed the car with dishsoap, dried it, wiped it down with wax/grease remover, wiped it with the tack cloth. bombed the car with self-etching primer.
laid plastic down on the floor and sidewalls. called it quits at 2am
today i plan on doing some last minute sanding, hanging more plastic, taping off a few more things. might primer today if time permits.
<TABLE WIDTH="90%" CELLSPACING=0 CELLPADDING=0 ALIGN=CENTER><TR><TD>Quote, originally posted by stockbee »</TD></TR><TR><TD CLASS="quote">I need to borrow you for a few weeks so you can turn my hatch into something beautiful as this one should prove to be. good luck with it. </TD></TR></TABLE>
thanks
<TABLE WIDTH="90%" CELLSPACING=0 CELLPADDING=0 ALIGN=CENTER><TR><TD>Quote, originally posted by stockbee »</TD></TR><TR><TD CLASS="quote">I gotta get back to work....</TD></TR></TABLE>
x2

Joined: Jan 2006
Posts: 103
Likes: 0
From: A mile higher
The weather has finnaly started to nice here so I am following in your foot steps. I wannabe just like you.
Can you find that p-15 in stores?
Anothe HB saved!
I might have those center caps for you. When I go to my mom's today I take pictures of what I have and post them for you tonight!
Can you find that p-15 in stores?
Anothe HB saved!I might have those center caps for you. When I go to my mom's today I take pictures of what I have and post them for you tonight!
Honda-Tech Member
Joined: Nov 2005
Posts: 3,394
Likes: 0
From: My Garage
just a little hint that ive used at any bodyshop...you wanna spray the ground down with a water hose...keep it wet, that way the dust will not be flying everywhere and stick to the car while painting...good luck man, looks like your doing a good job...
Thread Starter
Honda-Tech Member
Joined: Apr 2004
Posts: 2,785
Likes: 1
From: phoenix, az
<TABLE WIDTH="90%" CELLSPACING=0 CELLPADDING=0 ALIGN=CENTER><TR><TD>Quote, originally posted by jdmazm »</TD></TR><TR><TD CLASS="quote">good work man, don't forget to vacuum the dust off the ground </TD></TR></TABLE>
thanks. i planned on doing that.
<TABLE WIDTH="90%" CELLSPACING=0 CELLPADDING=0 ALIGN=CENTER><TR><TD>Quote, originally posted by SuperHonDad »</TD></TR><TR><TD CLASS="quote">The weather has finnaly started to nice here so I am following in your foot steps. I wannabe just like you.
Can you find that p-15 in stores?
Anothe HB saved!
I might have those center caps for you. When I go to my mom's today I take pictures of what I have and post them for you tonight! </TD></TR></TABLE>
Lol. i've never seen por-15 in stores. I called their 1-800 # to find dealer. http://www.por-15.com
i appreciate you checking on those center caps, but i've already purchased a set off ebay.
<TABLE WIDTH="90%" CELLSPACING=0 CELLPADDING=0 ALIGN=CENTER><TR><TD>Quote, originally posted by harmonator84 »</TD></TR><TR><TD CLASS="quote">just a little hint that ive used at any bodyshop...you wanna spray the ground down with a water hose...keep it wet, that way the dust will not be flying everywhere and stick to the car while painting...good luck man, looks like your doing a good job... </TD></TR></TABLE>
i'm going to do that..thanks.
i like that shade of green too bad i have to cover it up.
I'm glad the compressor had enough stamina to complete the job. layed down 4 coats of primer.
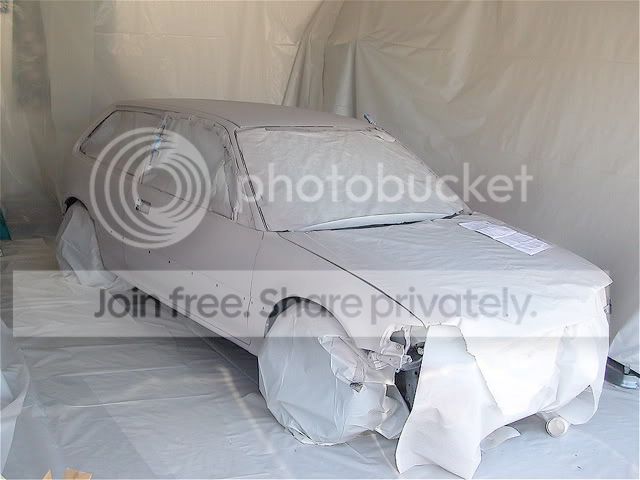
yes, that's the instuction manual for the paint gun on the hood in case there was a problem.

thanks. i planned on doing that.
<TABLE WIDTH="90%" CELLSPACING=0 CELLPADDING=0 ALIGN=CENTER><TR><TD>Quote, originally posted by SuperHonDad »</TD></TR><TR><TD CLASS="quote">The weather has finnaly started to nice here so I am following in your foot steps. I wannabe just like you.
Can you find that p-15 in stores?
Anothe HB saved!
I might have those center caps for you. When I go to my mom's today I take pictures of what I have and post them for you tonight! </TD></TR></TABLE>
Lol. i've never seen por-15 in stores. I called their 1-800 # to find dealer. http://www.por-15.com
i appreciate you checking on those center caps, but i've already purchased a set off ebay.
<TABLE WIDTH="90%" CELLSPACING=0 CELLPADDING=0 ALIGN=CENTER><TR><TD>Quote, originally posted by harmonator84 »</TD></TR><TR><TD CLASS="quote">just a little hint that ive used at any bodyshop...you wanna spray the ground down with a water hose...keep it wet, that way the dust will not be flying everywhere and stick to the car while painting...good luck man, looks like your doing a good job...
</TD></TR></TABLE>i'm going to do that..thanks.
i like that shade of green too bad i have to cover it up.
I'm glad the compressor had enough stamina to complete the job. layed down 4 coats of primer.
yes, that's the instuction manual for the paint gun on the hood in case there was a problem.
Honda-Tech Member
Joined: Jul 2005
Posts: 907
Likes: 0
From: t town, wi, usA
<TABLE WIDTH="90%" CELLSPACING=0 CELLPADDING=0 ALIGN=CENTER><TR><TD>Quote, originally posted by eda6 »</TD></TR><TR><TD CLASS="quote">
</TD></TR></TABLE>
thats a sweet stroller
</TD></TR></TABLE>
thats a sweet stroller