When you click on links to various merchants on this site and make a purchase, this can result in this site earning a commission. Affiliate programs and affiliations include, but are not limited to, the eBay Partner Network.
So my suspension overhaul is complete on my 98 R. I went back to stock springs, stock front struts, bilstein rear struts (OEM rears are discontinued), new front upper control arms, new lower control arms, new lower ball joints, new steering rack, new inner outer tie rods, new front sway bar endlinks, new front sway bar bushings new compliance bushings, new rear lower arms (still need to put the left rear lower arm in), new rear upper arms, new trailing arm bushings, new compensator arms, new rear sway bar endlinks, new rear sway bar bushings....I think I may have forgotten some things....I also had a coolant flush, new brake MC and brake booster installed, trans flush, new OEM engine mounts, new shift rod dust boot...and I think thats it.
So my buddy went to do an alignment as the last thing, I got new tires put on as well. and I'm thinking I'm in the clear, no more camber issues, no more uneven tire wear, but the camber on the left rear is right at -2.00 and he said the adjustment for the toe is maxed out. -2.00 is right at the min spec for the rear camber.
Could this be an issue where I didn't push the trailing arm bushing in enough? Am I going to see bad inner tire wear? I'm not sure what else could cause this issue. No accidents to the car that could affect this. The right rear camber is at -1.8. See my attached alignment printout. Car tracks straight, no issues at all like before this overharul when I would accelerate and the car pulls left then pulls back right after letting off the gas.
Re: I finally finished my suspension overhaul...BUT
I also just noticed today, that after the steering rack replacement, the amount of turns to turn the steering wheel from center to left lock is about <1.5 turns and from center to right lock is >~2.5 turns. what needs to be done to correct this?
Re: I finally finished my suspension overhaul...BUT
For the rear suspension, just get a camber shim set to even out the rear end. They are cheap. I think I used an Ingalls kit on my right rear to reduce camber from -1.2* to -0.9*. The rear toe settings look good so I wouldn't worry too much. BTW: Did you wait to do the final tighten & torque of your suspension bolts until after the car was on the ground? This applies to all but a few bolts (trailing arm bushing chassis bolts & rear UCA chassis bolts). You don't want the rubber to be twisted at rest.
For the steering, you have one of two problems:
1: the steering rack wasn't centered when you re-connected it to the steering column.
2: the alignment place didn't center the steering wheel properly before doing the alignment.
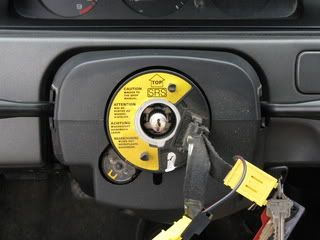
Identify problem #1.... With the tires pointed straight, the ABS cable reel window is indicating a centered steering wheel.
Fix for problem #1.....If you've already had an alignment, your tie-rod settings are all garbage and will need to be re-done (one is much longer than the other). You will have to fix this by disconnecting the column from the steering rack. Next you need to center the steering rack by counting lock to lock on the pinion as best you can in the footwell. Once you are sure the pinion is centered, it's time to center the steering column (make sure the ABS cable reel centering identifier is showing or you could break your cable reel). Now that the two are centered, re-connect them and verify your lock-to-lock is the same in both directions. Now you will notice your alignment is all effed up, you will need to drive to the alignment shop and have them re-do it (most likely at your own expense).
Identify problem #2.... With the tires pointed straight, the ABS cable reel window is NOT indicating a centered steering wheel.
Fix for problem #2.... Go back to the shop and show them how they didn't center the steering wheel properly and have them re-do the alignment with by centering the wheel via a lock-to-lock count.
Re: I finally finished my suspension overhaul...BUT
Originally Posted by 94eg!
For the rear suspension, just get a camber shim set to even out the rear end. They are cheap. I think I used an Ingalls kit on my right rear to reduce camber from -1.2* to -0.9*. The rear toe settings look good so I wouldn't worry too much. BTW: Did you weight to do the final tighten & torque of your suspension bolts until after the car was on the ground? This applies to all but a few bolts (trailing arm bushing chassis bolts & rear UCA chassis bolts). You don't want the rubber to be twisted at rest.
For the steering, you have one of two problems:
1: the steering rack wasn't centered when you re-connected it to the steering column.
2: the alignment place didn't center the steering wheel properly before doing the alignment.
Identify problem #1.... With the tires pointed straight, the ABS cable reel window is indicating a centered steering wheel.
Fix for problem #1.....If you've already had an alignment, your tie-rod settings are all garbage and will need to be re-done (one is much longer than the other). You will have to fix this by disconnecting the column from the steering rack. Next you need to center the steering rack by counting lock to lock on the pinion as best you can in the footwell. Once you are sure the pinion is centered, it's time to center the steering column (make sure the ABS cable reel centering identifier is showing or you could break your cable reel). Now that the two are centered, re-connect them and verify your lock-to-lock is the same in both directions. Now you will notice your alignment is all effed up, you will need to drive to the alignment shop and have them re-do it (most likely at your own expense).
Identify problem #2.... With the tires pointed straight, the ABS cable reel window is NOT indicating a centered steering wheel.
Fix for problem #2.... Go back to the shop and show them how they didn't center the steering wheel properly and have them re-do the alignment with by centering the wheel via a lock-to-lock count.
I didn't have the car on the ground to tighten down the bolts, I just put a jack under the lower control arm in the rears and jacked up till the car was not resting on the jack stand, and then torqued down the bolts that way. I otherwise would have a difficult time getting to all the bolts that I need to get at with the rear wheels on, and the car on the ground. Hopefully that way works too. I'm hoping to find an alignment shop here in Northern VA that does the shims, but I have yet to find one. Back in Hampton Roads there are a few places that strictly do alignments and they do the shims, I was on a tight schedule to get all this work done and come home before Sunday night, so I didn't have time at all to try to resolve the camber issue. I kept trying to retrace my steps in my head as to what might be causing the camber problem.
I had two buddies of mine do all the work, they live 3 hours away from me, lol! I drove down to them to have the work done while my family and i were on spring break. I talked to my friend who did the rack and alignment and he says as long as the airbag light is on, I shouldn't worry about anything getting stressed b/c the lock to lock isn't even. These guys do good work and I trust them to do a good job.
I also saw during my research, that the lock-to-lock turns is 2.98, I mentioned earlier that from center to left lock was <1.5 turns and center to right lock was >~2.5, I double check my numbers there, b/c they don't add up. it should essentially be slightly less than 1.5 turns to each lock from center. I will update my findings.
Thanks again 94 EG for your help! Anymore suggestions or input is appreciated!
Re: I finally finished my suspension overhaul...BUT
Yes jacking up the suspension should do the trick. Definitely better than nothing.
The rear camber kit for one side you need is the ingalls 38940. Costs about $15 shipped on ebay. Longer bolts are necessary when shimming.
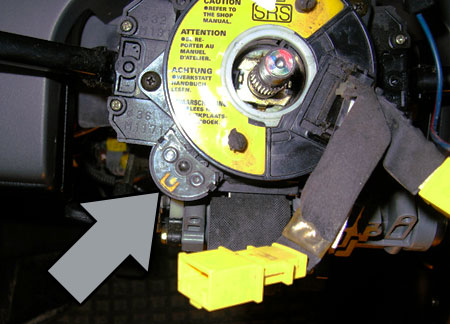
I can't view images so hopefully this one below works. If you turn the wheel to the left, you should be able to see this little window. If the view window shows a yellow mark inside it, then your cable-reel is within it's center-ish range.
Re: I finally finished my suspension overhaul...BUT
The steering wheel being different lock to lock is easy, the ghetto-but-it-works method I used is as follows:
1) Turn the steering wheel all the way to one side, take a picture.
2) Turn it all the way to the other side, counting the turns as exactly as you can, take another picture. (this way you can compare the both lock positions and find the wheel orientation that lines up the best)
3) Divide the number of turns you counted up in 2, turn it back the other way that many times, using the pictures to help get it exact.
4) If the steering wheel isn't straight when the rack is perfectly centered, remove it and the clock spring, if it is straight, skip to step 8.
5) Find the center of the clock spring using roughly the same method as outlined above, IIRC Integra clock springs don't have an indicator on them. Spin it slowly and carefully, you don't want to jerk on the cable reel inside when you hit the end.
6) Reinstall the clock spring as close to centered as you can.
7) Reinstall the steering wheel as close to centered as you can.
8) Get another alignment.
Re: I finally finished my suspension overhaul...BUT
Originally Posted by 94eg!
Yes jacking up the suspension should do the trick. Definitely better than nothing.
The rear camber kit for one side you need is the ingalls 38940. Costs about $15 shipped on ebay. Longer bolts are necessary when shimming.
I can't view images so hopefully this one below works. If you turn the wheel to the left, you should be able to see this little window. If the view window shows a yellow mark inside it, then your cable-reel is within it's center-ish range.
Thanks for taking the time to get the pics! I recounted the number of turns it takes from center to left lock and it is about slightly < 1.5 turns (which if lock to lock is 2.98, <1.5 turns makes sense), now from center to right lock, I was incorrect in my first post about the number of turns, the correct count is slightly more than 1.5 turns, if I had to guess, its probably 1.6 turns....so its VERY BARELY slightly off. That's my mistake for reporting the wrong # of turns. I was in a rush, and mis-counted. But at least I learned something about the clockspring/abs reel, so Thanks again!
Re: I finally finished my suspension overhaul...BUT
Originally Posted by MotorMouth93
The steering wheel being different lock to lock is easy, the ghetto-but-it-works method I used is as follows:
1) Turn the steering wheel all the way to one side, take a picture.
2) Turn it all the way to the other side, counting the turns as exactly as you can, take another picture. (this way you can compare the both lock positions and find the wheel orientation that lines up the best)
3) Divide the number of turns you counted up in 2, turn it back the other way that many times, using the pictures to help get it exact.
4) If the steering wheel isn't straight when the rack is perfectly centered, remove it and the clock spring, if it is straight, skip to step 8.
5) Find the center of the clock spring using roughly the same method as outlined above, IIRC Integra clock springs don't have an indicator on them. Spin it slowly and carefully, you don't want to jerk on the cable reel inside when you hit the end.
6) Reinstall the clock spring as close to centered as you can.
7) Reinstall the steering wheel as close to centered as you can.
8) Get another alignment.
Thanks for posting this procedure! I actually miscounted the number of turns from center to right lock and so its only off by a marginal amount, but if I'm feeling frisky I just may tackle this procedure, lol! Thanks again!
Re: I finally finished my suspension overhaul...BUT
You don't need to remove the steering wheel and srs clock-spring. That would be the HARD way of doing it (removing air-bag & steering column covers etc..). Simply disconnect the u-joint from the steering-gearbox-pinion down in the footwell and move it one tooth in the direction needed. This should re-center the steering rack to the steering wheel. It's very simple...
- Remove u-joint cover
- Remove the two u-joint bolts
- Slide U-joint up the steering column and off the pinion
- Then turn it gently till it slides back down on the next tooth
- Re-install your u-joint bolts
- Check your lock-to-lock
Re: I finally finished my suspension overhaul...BUT
Originally Posted by 94eg!
You don't need to remove the steering wheel and srs clock-spring. That would be the HARD way of doing it (removing air-bag & steering column covers etc..). Simply disconnect the u-joint from the steering-gearbox-pinion down in the footwell and move it one tooth in the direction needed. This should re-center the steering rack to the steering wheel. It's very simple...
- Remove u-joint cover
- Remove the two u-joint bolts
- Slide U-joint up the steering column and off the pinion
- Then turn it gently till it slides back down on the next tooth
- Re-install your u-joint bolts
- Check your lock-to-lock
Thanks! I'm glad that you mentioned the u-joints in the steering column, do they need to be greased every so often? I've been having a rotational "moan" when I rotate the steering wheel, I notice the "moan" when doing parking lot maneuvers, while the car is sitting still. I thought it might be something with the old steering rack, but I still hear it with the new rack.
And going back to the rear camber issue and my rear left toe adjustment being maxed out, is it possible to loosen the rear trailing arm bolts to get more movement, so that my toe adjustment isn't maxed out?
Also, I didn't pay attention to this when I removed the old RTA bushings, but when I pressed in the new ones the bolt holes did not line up, so I had to kind of push on one end of the RTA bushing being its flexible and start one bolt, then kind of push on the other side of the RTA bushing till I could get the other bolt started. The RTA bushings need to be parallel to the trailing arm, correct? They aren't supposed to be "tapered", meaning one side (the 3 oclock position) is pressed in further than the 9 oclock position or vice versa?
Re: I finally finished my suspension overhaul...BUT
For the rears, 1 washer dials out the camber by .5 degrees. In my case, my left rear was at -1 and my right rear was at -1.5. Using the washer trick on one side I got the right rear at -1 degree.
I believe you can put 2 washers before you need a longer bolt. Rear Camber Washer Trick - Team Integra Forums - Team Integra
BTW, are the spring mounts mounted on the upper or lower perch? The bilsteins sports have 2 settings
Re: I finally finished my suspension overhaul...BUT
Originally Posted by aw614
For the rears, 1 washer dials out the camber by .5 degrees. In my case, my left rear was at -1 and my right rear was at -1.5. Using the washer trick on one side I got the right rear at -1 degree.
I believe you can put 2 washers before you need a longer bolt. Rear Camber Washer Trick - Team Integra Forums - Team Integra
BTW, are the spring mounts mounted on the upper or lower perch? The bilsteins sports have 2 settings
Thanks for the link, much appreciated! I have the Bilstein B8 PERFORMANCE PLUS SHOCK, part # 24-023412, there is only one perch. Here is a link to the tire rack page for Bilsteins I'm using in the rear:
I also wonder if the Bilsteins are allow the rear to sit lower than with a set of OEM rear struts, I feel like they would still maybe almost sit a 1/2 inch lower than OEM.
Re: I finally finished my suspension overhaul...BUT
Originally Posted by 94eg!
Yes jacking up the suspension should do the trick. Definitely better than nothing.
I feel I should mention this...so when I was working on the rear, I worked on the right side first, then finished the right side, and torqued down all of the right rear bolts that needed to be torque down. THEN, I proceeded to work on the left side, then finished the left side, and then torqued down the left side. Should I have just jacked up both sides together and then torqued everything down at one time?
Im just trying to still figure out why my toe adjustment is maxed out, if I did something incorrect I want to fix it ASAP, b/c I plan to keep this car a long time. I may just try to push the RTA bushing further in on the left side...I don't know....wheres the easy button at? lol
Re: I finally finished my suspension overhaul...BUT
For the trailing arms, are you certain you installed both of them the correct way? They have to be pressed in with a specific side facing inward. Other than that, they just go straight in (not crooked) to a certain depth. If both are pressed the same, it's kinda pointing toward a bent trailing arm. Though it could also be possible you have a poorly manufactured trailing arm. On my CRX, one of my traling arms had the trailing bushing hole much tighter than the other. So tight it actually coned the trailing arm bushing's outer sleeve. Either way, your toe is well within spec, so no worries.
And no I don't think torquing one side at a time will cause any problems.
Yes you can grease the u-joints. There are two. The lower one with the bolts can even be replaced. The second one higher up is part of the steering column and cannot be replaced without replacing the entire column. Try greasing both and see if the noise goes away.
There is also at least one ball-bearing support inside the column itself. Mine went bad on my Civic and would start creaking as the weather got warmer. The bearings are not serviceable (as far as I know) so I just swapped in an Integra tilt column.
Re: I finally finished my suspension overhaul...BUT
Originally Posted by TypeRod
Thanks for the link, much appreciated! I have the Bilstein B8 PERFORMANCE PLUS SHOCK, part # 24-023412, there is only one perch. Here is a link to the tire rack page for Bilsteins I'm using in the rear:
I also wonder if the Bilsteins are allow the rear to sit lower than with a set of OEM rear struts, I feel like they would still maybe almost sit a 1/2 inch lower than OEM.
aw614 is correct. Bilstein B8 has two perch settings. Mine came from Bilstein with the higher setting and I readjusted it to the lower. I'm in the process of moving the perch back up. I can post pics if you like.
Re: I finally finished my suspension overhaul...BUT
Originally Posted by eHMxhACk
aw614 is correct. Bilstein B8 has two perch settings. Mine came from Bilstein with the higher setting and I readjusted it to the lower. I'm in the process of moving the perch back up. I can post pics if you like.
eH.
REALLY? man, I feel like there was only one perch....yes please post pics, I'll have to take a look at them again this weekend. Do you have to take something apart to change the perch height? So confused...lol
EDIT/UPDATE: Here is a pic from tire racks site, I'm pretty sure this is a pic of the exact part for the Type R, I now see the lower space for the perch, my ignorance/noobness didn't allow me to realize that the perch is movable, lol.
Since I didn't know you could move the perch, I didn't move it at all, I'm hoping that the part gets sent out with the perch on the highest setting, like shown in the pic. Wow, learned something new, I'm an idiot! lol
Re: I finally finished my suspension overhaul...BUT
Originally Posted by 94eg!
For the trailing arms, are you certain you installed both of them the correct way? They have to be pressed in with a specific side facing inward. Other than that, they just go straight in (not crooked) to a certain depth. If both are pressed the same, it's kinda pointing toward a bent trailing arm. Though it could also be possible you have a poorly manufactured trailing arm. On my CRX, one of my traling arms had the trailing bushing hole much tighter than the other. So tight it actually coned the trailing arm bushing's outer sleeve. Either way, your toe is well within spec, so no worries.
And no I don't think torquing one side at a time will cause any problems.
Yes you can grease the u-joints. There are two. The lower one with the bolts can even be replaced. The second one higher up is part of the steering column and cannot be replaced without replacing the entire column. Try greasing both and see if the noise goes away.
There is also at least one ball-bearing support inside the column itself. Mine went bad on my Civic and would start creaking as the weather got warmer. The bearings are not serviceable (as far as I know) so I just swapped in an Integra tilt column.
Yes I'm sure I pressed them in correctly. I put the side of the bushing with the longer "arm" towards the inside of the vehicle. I don't believe the trailing arm is bent in anyway, unless the bushing press I bought bent it while pressing it out (which I doubt), but the pressing out of the old bushing went smoothly, when I pressed in the new one on the left side, it was going in a bit ****-eyed, but I fixed right away. Yes you are right my rear toe is in spec now, but as the car gets older I'm a bit worried that the toe will eventually go back out to a certain point that it can no longer be adjusted, b/c the adjustment is currently maxed out. If it comes down to it, I'd rather nip it in the bud now, and my OCD will calm down, lol. I just may order a new trailing arm, but that may be overkill, lol. I'm just irked about the whole thing after spending all this money, ya know? lol
What type of grease should I use on the column steering shaft u-joints? is white lithium ok?
Thanks again 94, you have been super helpful and I really appreciate it!
Re: I finally finished my suspension overhaul...BUT
Originally Posted by TypeRod
REALLY? man, I feel like there was only one perch....yes please post pics, I'll have to take a look at them again this weekend. Do you have to take something apart to change the perch height? So confused...lol
EDIT/UPDATE: Here is a pic from tire racks site, I'm pretty sure this is a pic of the exact part for the Type R, I now see the lower space for the perch, my ignorance/noobness didn't allow me to realize that the perch is movable, lol.
Since I didn't know you could move the perch, I didn't move it at all, I'm hoping that the part gets sent out with the perch on the highest setting, like shown in the pic. Wow, learned something new, I'm an idiot! lol
Re: I finally finished my suspension overhaul...BUT
Originally Posted by eHMxhACk
Yeah, that's it.
eH.
Thanks eH! I mis-spoke my last post, i meant to say I hope the bilsteins came to me at the highest height, which would be the lower perch. but i dont remember being on the lower perch. the diff in perch height is bare less than half an inch maybe, would that make a difference in ride height, i feel like it would barely raise the car. it could help getting my rear camber in more,maybe... why are moving yours back to the upper perch? which perch setting do you thing is closest to the stock ride height using OEM rear struts? thx!

 04-17-2017, 06:31 AM