

Integra Engine Removal

Thread Starter
Joined: Mar 2007
Posts: 121
Likes: 0
From: Miami, FL, USA
I spun a bearing in my Integra a couple of weeks ago and scoured my crank. That means I get to
pull my engine to install my new crank (which I bought last week). Yeah, good times. If any engine
builders or shop mechs. read this, are there any common problems that people have when pulling
their motors that you can give me the heads up on? And are there any tips that will help me? This is
my first engine pull, but I'm not retarded (my mommy says I'm SPECIAL) , and I'm gonna have
some help from my brother (who is a mechanic) and his boss. But I'm sure there is something that
EVERYBODY has a problem with, so....let me know.
pull my engine to install my new crank (which I bought last week). Yeah, good times. If any engine
builders or shop mechs. read this, are there any common problems that people have when pulling
their motors that you can give me the heads up on? And are there any tips that will help me? This is
my first engine pull, but I'm not retarded (my mommy says I'm SPECIAL)
, and I'm gonna have some help from my brother (who is a mechanic) and his boss. But I'm sure there is something that
EVERYBODY has a problem with, so....let me know.
Jet Life Til' The Next Life
Joined: Jan 2007
Posts: 2,079
Likes: 0
From: Mars
For some reason many people doing there 1st engine pull think they have to take off the tranny, but no. Just a little advice, don't know if I helped.
Junior Member
Joined: Jan 2006
Posts: 234
Likes: 0
From: Cali
it would help if you figured out why you had a spun bearing. same thing can go wrong with your new crank if this isn't taken into consideration. but besides that, honda has one of the highest spun bearing problems mainly because the bearing clearances are so close... clevite77 bearings are the way to go.  n make sure all clearances are as close together as possible. GL
n make sure all clearances are as close together as possible. GL
Thread Starter
Joined: Mar 2007
Posts: 121
Likes: 0
From: Miami, FL, USA
I figured that the reason why I spun that bearing is because my oil pump took a **** on me. I've got an oil press. gauge in my car and I noticed that it just stopped working (or so I THOUGHT) because I lost all oil press. and didn't think that was possible because the oil pump in my car was a BRAND ****** new type r pump. Well, I thought wrong, cause the gear on the inside of the pump had a hairline crack that bled oil, and therefore the pressure therein. So, when the oil pressure dropped (down to nothing), the bearings, crank, and rods got too close for comfort, heated, and here I am. I just have no idea as to where that crack in the pump gear came from. My buddies and I have been playing around with some ideas as to why, and I think that because of the oil pumps position (on the end of the block opposite the tranny), the engine vibration and the shock from the crank had something to do with it. Just a theory. Anybody got any thing else to offer?
Trending Topics
Honda-Tech Member
Joined: Jan 2004
Posts: 225
Likes: 0
From: Orlando, FL, USA
My first engine pull out of a 94 GSR.
I removed the radiator fans.
Removed Tranny bitch pin, then the axels.
Let everything drain also remove the tranny drain plug as well.
Most of the tools used where common metric tools with extensions, 1/2 convertor to 3/8, and a 3 foot breaker bar. Air tools really speed up the process!
The most usefull and important tool was the engine leveller attached to the engine hoist.
Also when you go to remove the Crank Shaft Bolt we used a 3 foot breaker bar, and a 3 foot Chain Wrench. Use an old AC belt, cut it, and wrap around main pully. Then wrap the chain wrench around the belt and lock that MFer to the ground. Took (2) 200 Lbs guys to loosen. The biggest Impact gun we could find at the highest PSI setting from the Compressor couldnt get that damm thing off!
The engine will tilt about 70 degrees driver side up to pull out with tranny attached.
Junior Member
Joined: Feb 2002
Posts: 598
Likes: 0
From: Lunatic Fringe, ATX
By chance are you running a CTR or other aftermarket crank pulley? Something without a harmonic dampner? There have been known oil pump gear failures due to harmonics.
Thread Starter
Joined: Mar 2007
Posts: 121
Likes: 0
From: Miami, FL, USA
No, I'm using my stock crank pulley, and my crankshaft had been balanced and micropolished and the rods and pistons were all weight matched to +/- 1gram and my engine had been reassembled to factory spec using a plastigage. Given the fact that my engine had been balanced and blueprinted, I think that the reason that oil pump gear cracked is because my motor mounts are too soft and they allow my motor to move too much and too violently. I'm planing on investing in some polyurethane mounts from Place (solid mounts will shake your fillings loose), so those should fix that problem, and also make the power delivery from my engine feel much more direct.
Joined: Mar 2004
Posts: 2,568
Likes: 0
From: Titusville, FL, US
Damn, sounds like you went and took all the precautions for a nice safe build and a simple factory defect on the pump caused all this. Next time believe your gauges and shut her down immediately. Good luck on the next build.
As for the previous poster who said Honda's are more prone to bearing failures than other makes, I don't believe it. Honda took many steps in engineering even creating very trick OEM bearings to prevent this scenerio. More times than not, it is poor clearances on rebuilds that doom the bottom end.
As for the previous poster who said Honda's are more prone to bearing failures than other makes, I don't believe it. Honda took many steps in engineering even creating very trick OEM bearings to prevent this scenerio. More times than not, it is poor clearances on rebuilds that doom the bottom end.
Honda-Tech Member
Joined: Mar 2003
Posts: 5
Likes: 0
From: Sterling, VA, US
I have removed countless integra engines. I can do it in about 45 minutes now without cutting anything.
There isn't much to it, But LEAVE THE TRANNY ATTACHED UNTIL YOU GET THE ENGINE OUT. IT'S MUCH FASTER.
I would reccommend the following general steps:
-Drain Coolant and Oil
-Disconnect and Remove Battery
-Wiring only needs to be disconnected from about 6 points. On each Strut Tower area toward the back of the car are bulkhead wiring connectors. (the big plugs with lots of wires) Remove those, then disconnect the main power wire from the fuse box (8mm wrench size). Also, any ground wires.
-Disconnect heater hoses, and radiator hoses. I usually remove radiator
-Unbolt evap solenoids from firewall and leave all vacuum hoses connected(it's easier to transfer over to new engine later)
-Many people have problems with the shift linkage roll pin, but it's pretty easy too.
pull back the rubber boot on the trans side, pull the retaining clip off (usually by hand) get a roll pin punch from sears of the correct size. drive the pin through upwards with the punch and catch it as to reuse it later. (honda reccommends that the pin is replaced every time, but that's not really necessary.)
the other part of the shift linkage is 1 bolt (12mm wrench size) on the trans side.
- Remove Axles. if you struggle with this, you probably shouldn't be doing your own engine job.
-Exhaust is most easily disconned by the three bolts between the manifold and the "B-pipe"
-Secure engine on engine lift using threaded holes in head or studs on a manifold (8mm bolt diameter min. , 12 mm wrench size)
-I usually disconnect fuel lines right before pulling the engine to minimize hazards associated with open fuel lines.
-take bolts out of engine mounts, lift engine out. I use a steel cable which allows the engine to be tilted while on the lift or a small enough (not too small) Chain will work too, or an engine tilter.
-I'm sure I forgot to mention a couple of things, but it's pretty easy overall. The first time you do it will always take longer than the second, third..............
-GOOD LUCK!
Junior Member
Joined: Feb 2002
Posts: 598
Likes: 0
From: Lunatic Fringe, ATX
If I recall, the Bitch Pin (also known as the shift linkage roll pin) is 8mm. Having the right size pin punch will make getting it out much, much easier.
Honda-Tech Member
Joined: Jun 2003
Posts: 133
Likes: 0
From: Camp Hill, PA
<TABLE WIDTH="90%" CELLSPACING=0 CELLPADDING=0 ALIGN=CENTER><TR><TD>Quote, originally posted by PhilMarch7 »</TD></TR><TR><TD CLASS="quote">I have removed countless integra engines. I can do it in about 45 minutes now without cutting anything.
There isn't much to it, But LEAVE THE TRANNY ATTACHED UNTIL YOU GET THE ENGINE OUT. IT'S MUCH FASTER. </TD></TR></TABLE>
I'm getting ready to do my first removal/install . . . so, I guess it is better to get the engine/tranny out completely and on to a safe working surface and then remove the tranny or can you remove the tranny while you have the motor partially out?
Joined: Mar 2004
Posts: 2,568
Likes: 0
From: Titusville, FL, US
You might want to break the crank pulley bolt free before pulling the engine, unless you have a powerful impact gun, it will be very difficult while the engine is on the floor/stand.
Junior Member
Joined: Jan 2007
Posts: 175
Likes: 0
From: So Cal
this worked for me. I dont know about you but I love visuals
http://www.c-speedracing.com/h...p.php
And for the BIATCH pin you could use a punch thats a **** hair smaller in diameter than the pin. So that way the punch wont go into the hole, which would spread it and not come out
http://www.c-speedracing.com/h...p.php
And for the BIATCH pin you could use a punch thats a **** hair smaller in diameter than the pin. So that way the punch wont go into the hole, which would spread it and not come out
Junior Member
Joined: Feb 2002
Posts: 598
Likes: 0
From: Lunatic Fringe, ATX
<TABLE WIDTH="90%" CELLSPACING=0 CELLPADDING=0 ALIGN=CENTER><TR><TD>Quote, originally posted by beer30hatch »</TD></TR><TR><TD CLASS="quote">And for the BIATCH pin you could use a punch thats a **** hair smaller in diameter than the pin. So that way the punch wont go into the hole, which would spread it and not come out</TD></TR></TABLE>
That is the reason to get the right size pin punch.
That is the reason to get the right size pin punch.
Joined: May 2007
Posts: 331
Likes: 0
From: US
does your car make a loud knocking type sound with a spun bearing? jw because my car is making the same noise, and I am wondering could it be a spun bearing like yours or the valves are hitting the pistons or my rods are hitting something ...
Thread Starter
Joined: Mar 2007
Posts: 121
Likes: 0
From: Miami, FL, USA
It kinda depends on what kind of "knocking" sound your car is making. If its a deeper, heavier knock that sounds like its coming from the lower portion of your motor, its most likely you fried a bearing and that knocking sound would be your connecting rod and crank beating the **** out of each other cause that bearing is not there anymore, which is what happened to my motor. If its a lighter sounding knock, almost a ticking noise, thats seems to sound like its up higher in your engine, then it could be a shot valve guide or a bent valve or a rocker arm, or 1 of like 10 different things in your head. Guessing what that sound is is all you really can do without opening your motor, and what it most likely is depends on how many miles are on your engine, and if your engine has ever been "starved" of oil, and many other factors.
By the way, is that a picture of you under your name?
By the way, is that a picture of you under your name?


Joined: Jan 2002
Posts: 30,053
Likes: 59
From: Nowhere and Everywhere
What was the point of bringing this up? You didn't add anything to it, and anyone else searching for the info could have easily found it.
However I'll add something to it: by far the easiest way remove the b!tch pin if you have air tools is this device:
http://www.matcotools.com/Catalog/to...select=&page=4
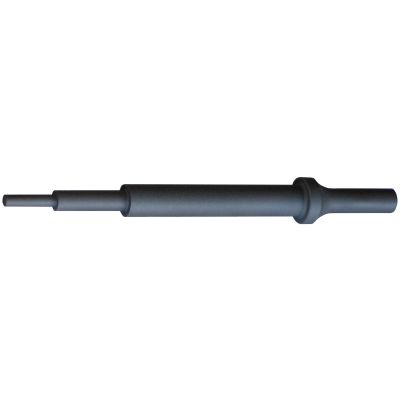
Removes and installs the pin in about 3 seconds using your air hammer. It's probably one of the best tools I bought before pulling my engine out for the first time last May. The smallest tip end of the tool fits inside the spring pin, which makes it very easy to get it going into the hole when you install it.
If you don't have air, then get this punch tool, also with a stepped end to make it easier installing the pin back into the hole.
http://www.matcotools.com/Catalog/to...select=&page=3
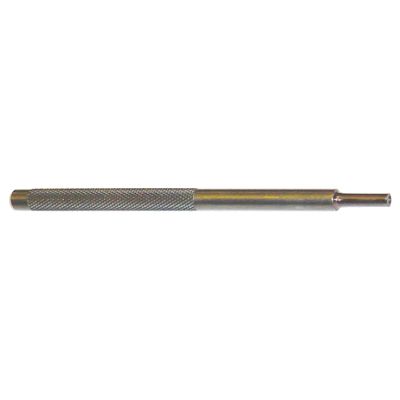
It's best not to hammer directly on the pin when installing it, as that can mushroom/flatten the end of the pin and make future removal more difficult.
However I'll add something to it: by far the easiest way remove the b!tch pin if you have air tools is this device:
http://www.matcotools.com/Catalog/to...select=&page=4
Removes and installs the pin in about 3 seconds using your air hammer. It's probably one of the best tools I bought before pulling my engine out for the first time last May. The smallest tip end of the tool fits inside the spring pin, which makes it very easy to get it going into the hole when you install it.
If you don't have air, then get this punch tool, also with a stepped end to make it easier installing the pin back into the hole.
http://www.matcotools.com/Catalog/to...select=&page=3
It's best not to hammer directly on the pin when installing it, as that can mushroom/flatten the end of the pin and make future removal more difficult.

Thread
Thread Starter
Forum
Replies
Last Post
impr323
Honda Civic / Del Sol (1992 - 2000)
14
Oct 9, 2005 08:32 AM