
Seeking Some Help
 02-08-2016, 04:10 PM
#1
Trial User
Thread Starter

Join Date: Feb 2016
Posts: 1
Likes: 0
Received 0 Likes
on
0 Posts

Hey all-
New member here. looking for a little help with my 2010 Accord Sedan L4 AT. I recently replaced my rear brakes (pads, discs) as they were worn out and starting to grind. While awaiting parts from RockAuto, I had my drivers side caliper seize and leak fluid. I bought a refurb caliper, put it all together, bled them and was good to go. Brakes work wonderfully again while driving, however my parking brake now barely works. The handle will move from all the way down to about 70% of its travel before it does anything at all. I took my wheel back off and looked everything over and all appears to be in the correct place, leaving me pretty confused. any ideas? thanks in advance!
-Matt
 02-09-2016, 07:35 AM
#2
Parking Brake Inspection and Adjustment[/B]
Inspection
image
1. Pull the parking brake lever (A) with 196 N (20 kgf, 44 lbs.) of force to fully apply the parking brake. The parking brake lever should be locked within the specified number of clicks.
2. If the number of lever clicks is excessive, adjust the parking brake.
Adjustment - Rear Disc Brake Type
1. Remove the front console panel.
2. Release the parking brake lever fully.
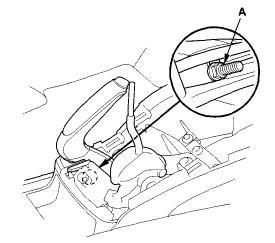
3. Loosen the parking brake adjusting nut (A).
4. Raise the rear of the vehicle, and support it with safety stands in the proper locations.
5. Remove the rear wheels.
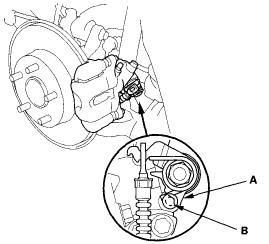
6. Make sure the parking brake lever (A) on the rear brake caliper contacts the stop pin (B). NOTE: The parking brake lever will only contact the stop pin when the parking brake adjusting nut is loosened.
7. Install the rear wheels.
8. Pull the parking brake lever 1 click.
9. Tighten the parking brake adjusting nut until the parking brakes drag slightly when the rear wheels are turned.
10. Release the parking brake lever fully, and check that the parking brakes do not drag when the rear wheels are turned. Readjust if necessary.
11. Make sure the parking brakes are fully applied when the parking brake lever is pulled all the way (8 to 10 clicks).
12. Install the front console panel.
Adjustment - Rear Drum Brake Type
1. Remove the front console panel.
2. Release the parking brake lever fully.
3. Loosen the parking brake adjusting nut (A).
4. Press the brake pedal several times to set the self-adjusting brake before adjusting the parking brake.
5. Pull the parking brake lever 1 click.
6. Tighten the parking brake adjusting nut until the parking brakes drag slightly when the rear wheels are turned.
7. Release the parking brake lever fully, and check that the parking brakes do not drag when the rear wheels are turned. Readjust if necessary.
8. Make sure the parking brakes are fully applied when the parking brake lever is pulled all the way (8 to 10 clicks).
9. Install the front console panel.
Inspection
image
1. Pull the parking brake lever (A) with 196 N (20 kgf, 44 lbs.) of force to fully apply the parking brake. The parking brake lever should be locked within the specified number of clicks.
2. If the number of lever clicks is excessive, adjust the parking brake.
Adjustment - Rear Disc Brake Type
1. Remove the front console panel.
2. Release the parking brake lever fully.
3. Loosen the parking brake adjusting nut (A).
4. Raise the rear of the vehicle, and support it with safety stands in the proper locations.
5. Remove the rear wheels.
6. Make sure the parking brake lever (A) on the rear brake caliper contacts the stop pin (B). NOTE: The parking brake lever will only contact the stop pin when the parking brake adjusting nut is loosened.
7. Install the rear wheels.
8. Pull the parking brake lever 1 click.
9. Tighten the parking brake adjusting nut until the parking brakes drag slightly when the rear wheels are turned.
10. Release the parking brake lever fully, and check that the parking brakes do not drag when the rear wheels are turned. Readjust if necessary.
11. Make sure the parking brakes are fully applied when the parking brake lever is pulled all the way (8 to 10 clicks).
12. Install the front console panel.
Adjustment - Rear Drum Brake Type
1. Remove the front console panel.
2. Release the parking brake lever fully.
3. Loosen the parking brake adjusting nut (A).
4. Press the brake pedal several times to set the self-adjusting brake before adjusting the parking brake.
5. Pull the parking brake lever 1 click.
6. Tighten the parking brake adjusting nut until the parking brakes drag slightly when the rear wheels are turned.
7. Release the parking brake lever fully, and check that the parking brakes do not drag when the rear wheels are turned. Readjust if necessary.
8. Make sure the parking brakes are fully applied when the parking brake lever is pulled all the way (8 to 10 clicks).
9. Install the front console panel.


Thread
Thread Starter
Forum
Replies
Last Post
charlieboy88
Honda Civic / Del Sol (1992 - 2000)
6
01-04-2013 07:58 AM