


clutch install help

Thread Starter
Joined: May 2006
Posts: 57
Likes: 0
From: Evansville, IN, USA
I am trying to replace my clutch in a 94 civic dx. o.g. d15 and 5 speed. I got a exedy clutch kit to replace the old. I've got pretty much all of the sensors, shift rods, and the release cylinder and line off. I am to the drive axles and called it a day since I don't have a socket large enough to remove the hub and then drive axles. So this is where I am, with my crappy Hayne's book. Any tips and references would be greatly appreciated. Or even a how to thread or site....
Thanks
Modified by carseatcivic at 9:07 AM 8/27/2006
Thanks
Modified by carseatcivic at 9:07 AM 8/27/2006

Joined: Dec 2004
Posts: 470
Likes: 0
From: chicago, Il, USA
youll need a 32 mm socket to get the axle nuts off. my suggestions from what i know
1) if the ball joint stud starts to move with the castle nut when you go to take it off, jack up on the lower control arm, and buzz the nut off with an impact
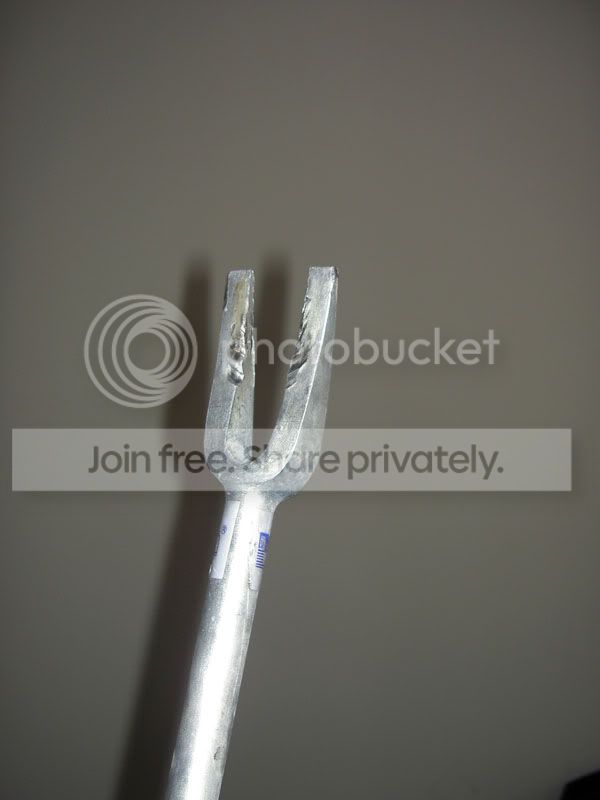
2) buy a ball joint fork (like 5 bucks from autozone), if you cant pop the lower control arm off.
3) make sure you pull the axle straight out so you dont mess up the axle seal. and dont pull it by the joint, pull it from the base, use a scredriver to pry against the trans housing to pop it past the set ring if its being a little bitch to get out.
4) replace the axle nuts when completed.
not anything new, or origonal here, just a few suggestions
1) if the ball joint stud starts to move with the castle nut when you go to take it off, jack up on the lower control arm, and buzz the nut off with an impact
2) buy a ball joint fork (like 5 bucks from autozone), if you cant pop the lower control arm off.
3) make sure you pull the axle straight out so you dont mess up the axle seal. and dont pull it by the joint, pull it from the base, use a scredriver to pry against the trans housing to pop it past the set ring if its being a little bitch to get out.
4) replace the axle nuts when completed.
not anything new, or origonal here, just a few suggestions

Joined: May 2005
Posts: 318
Likes: 0
From: Simi Valley, CA, USA
If you've never popped a balljoint, I suggest you search H-T for tips first. There are easy ways to do it without hitting it with a hammer or using a special tool. All you need is a jack.
Trending Topics
Joined: Jul 2006
Posts: 18
Likes: 0
From: Atlanta, Georgia
I'll try to keep this down to the least amounts of steps as possible and though some steps are not nesessary, its by far the easiest way for someone to do it if they have not seen the inside of the bell housing and know their way around.
To remove the spidles by far the most failproof way (and it doesnt damage your ball joint threads) to release the ball joints is the large two pronged fork tool designed to Remove them (grap one from a harbor tools/northern for like $6) After removing the castle nuts carefully pry under the ball joint and hit the fork with a hammer (small handheld sledge (1-2lb) works best as some force is needed)
Drain your transmission (it probably needs to be changed anyways)
Undo the axles, I would suggest taking both out, it makes manipulating the trans much easier. To release them from the trans find the largest screwdriver you have or a pry bar and CAREFULLY pry the ends from the trans, they will take a little force to pop the snap rings lose but try not to mangle the seals.
Clean the seam where the bell housing meets the block
Undo all wiring, remove the bolts from the slave cylinder, and support transmission with a jack.
Undo the Mounts, left side (1 bolt) and the big one in the back (3 bolts) Then undo the bolts that conncect the bell housing to the block. The transmission should not need too much prying to come lose from the block so if its stuck there probably a bolt you missied. Also there are two pins on either side of the transmission that fit into the block to make sure its aligned properly, (they are about the diameter of one of the bolts) if they come out dont lose them. You shouldnt need to drop the shift linkage but once the trans is free if you feel it would help its only one bolt per link arm.
Move the transmission around so that you have full acess to the flywheel/clutch.
There are 6-8 bolts around the pressure plate cover take those off, and take note how the clutch plate comes out (literally take a note, the exedy clutch does not have any marking indicating which side is the flywheel side, one side of the plate is going to have a protrusion, while the other side is flat)
There are 6 bolts holding the fly wheel on, you will need a 12 point socket to take these off and someone with a breaker bar holding the other side of the crankshaft still.
This is where you need to make a descision, if you do not use a new or resurfaced ( you need the paper work from the job) flywheel you automatically void exedy's and every other manufactuer's warranty on the spot. It's definately a good idea to do either because a flywheel that is not perfectly flat can/will cause excessive wear and premature clutch failure.
Continue after that.
Be very careful here you need to remove and replace the tiny bearing in the flywheel. Pop out the old one (from front out the backside) with a socket but when replacing the new one if you use the socket method make sure that it is larger than the black plastic cover on the bearing (I wish I had a camera) basicailly if you look at the bearing there is a metal outter rim, a black plastic inner circle and a metal inner ring. Do not put any force on the black part, you will damage the bearing.
(another suggestion, if you see any oil residue on the bottom of the bell housing or its time for a replacement, do the rear main seal while you are in here, its cheap and its less effort while you have the trans off)
Put the flywheel back on and torque to specs. Spray the flywheel with brake cleaner (very important step) and let dry.
Hold the clutch plate up against the flywheel make sure its the right direction (refer to notes) and insert the clutch alignment tool.
Spray the contact surface of the pressure plate with brake cleaner and let dry, then put the pressure cover on and bolt it up to specs.
Slide the fork out from the transmission (pull towrads you) and note how its attached to the transmission (the little ball and clip system) and replace the throw out bearing. Before you reassemble the fork/bearing apply a SMALL amount of grease on the input shaft, more is NOT better here. (too much and it might get on the clutch plate and cause slippage) Slide the fork back into place, remove the alignment tool and slide the trans back onto the block, this is where those pins from earlier help.
Button everything up (the reverse of removal) add some fluid and you're done.
Make sure you drive it easy for the first 500 miles or so (no racing) and you shouldnt have any trouble with it.
Modified by MarcoLaMont at 9:59 AM 8/26/2006
Thread Starter
Joined: May 2006
Posts: 57
Likes: 0
From: Evansville, IN, USA
Excellent info. Just what I was looking for. Didn't get to work on it today, but hopefully this weekend I will have time. Still a little confused on the axle removal.
Joined: Jul 2006
Posts: 18
Likes: 0
From: Atlanta, Georgia
Alright excuse the mess and crudeness of the angles but here's a quick overview.
Unbolt the large nut on the end of the axle, 32mm. If you dont have an impact gun break it loose before you take the wheels off.
You are gonna need one of those to break the ball joints.
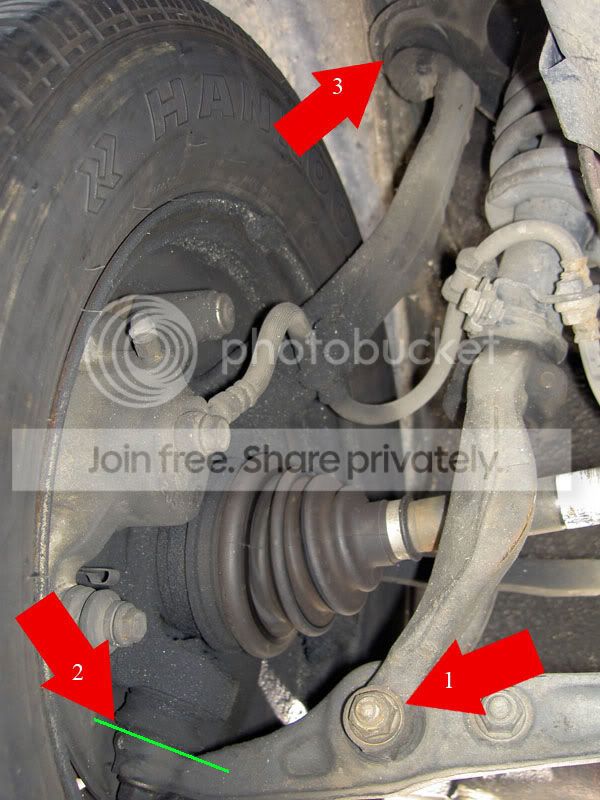
Unbolt #1 and take the castle nuts off #2 and #3. Use the fork to break #2 where the green line is and do the same for #3. Don't worry about the steering linkage, leave it connected.
When all are disconnected leave the end of the axle loose in the spindle for now.
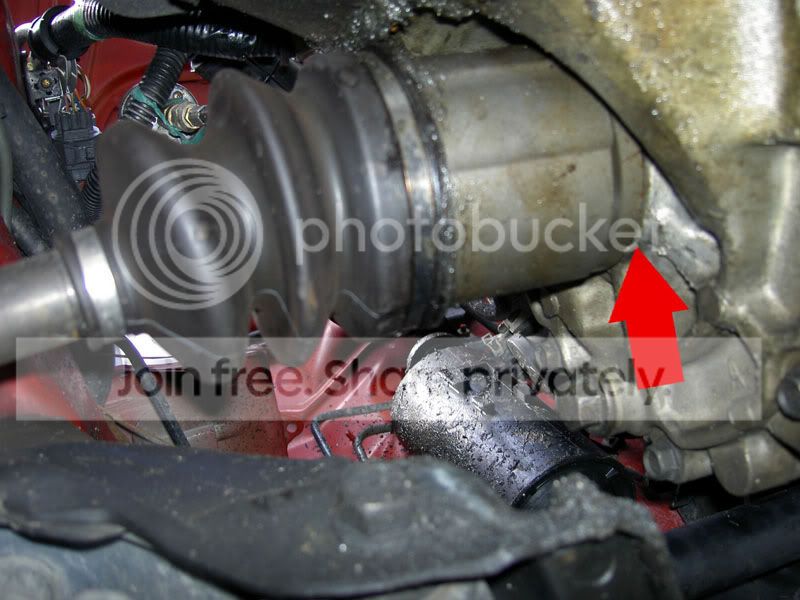
Use a pry bar to pop the axle out of the transmission. Pry at the arrow but again becareful not to damage the seal in there. Last part, pull the spindle away from the car and pull the axle out of it, then just pull the whole thing out. If you didn't drain the trans fluid this is where it pours out of the axle holes.
When Putting the axles back in use a small amount of grease on on the splines; this is important becasue if you dont the splines could seize and be a bitch and a half the next time you want to take them out, that and it just makes putting it together a bit easier
Also, make sure you clean the seal areas where the axles meet the trans when you reassemble.
Unbolt the large nut on the end of the axle, 32mm. If you dont have an impact gun break it loose before you take the wheels off.
You are gonna need one of those to break the ball joints.
Unbolt #1 and take the castle nuts off #2 and #3. Use the fork to break #2 where the green line is and do the same for #3. Don't worry about the steering linkage, leave it connected.
When all are disconnected leave the end of the axle loose in the spindle for now.
Use a pry bar to pop the axle out of the transmission. Pry at the arrow but again becareful not to damage the seal in there. Last part, pull the spindle away from the car and pull the axle out of it, then just pull the whole thing out. If you didn't drain the trans fluid this is where it pours out of the axle holes.
When Putting the axles back in use a small amount of grease on on the splines; this is important becasue if you dont the splines could seize and be a bitch and a half the next time you want to take them out, that and it just makes putting it together a bit easier
Also, make sure you clean the seal areas where the axles meet the trans when you reassemble.
Thread Starter
Joined: May 2006
Posts: 57
Likes: 0
From: Evansville, IN, USA
So here is what I did today. I popped the cv joint boot off. Then unbolted the strut fork and the upper ball joint (#1 and #3) in the pic above. Pulled the whole assemble out and away. Then I just pulled the cv apart and wraped it up with a plastic bag. Supported it up out of the way so that the brake lines and cv joints won't be damaged. I think tomorrow I might pop the boot off of the other cv and then loosen the tranny and see if I can pull it away from the cv. I hope taking the cv apart wasn't a mistake but it all took about ten minutes to do and the axle nut was not coming off with out a impact gun. Which I don't have. Oh well
Thread Starter
Joined: May 2006
Posts: 57
Likes: 0
From: Evansville, IN, USA
Update. I removed the complete axle cv from passanger side and the drivers side is pretty close to being out. I thought maybe I could get the tranny free and slide the axle out at the time I remove the trans. But now I have removed all of the tranny bolts and mount but no love. It is stuck to the engine. Help please...
Thread Starter
Joined: May 2006
Posts: 57
Likes: 0
From: Evansville, IN, USA
BTW I think I got all of the tranny bolts off. A front lower, rear lower and 3 upper. I think I got the one from the starter but not sure if it is the correct one/ it was long and smaller in diameter than the rest. Is there one that I missed. Any pics or help with the last bolt. It would be the top bolt closest to the fire wall. I don't know but I believe I've got it. But the tranny won't come free. 

Thread
Thread Starter
Forum
Replies
Last Post