When you click on links to various merchants on this site and make a purchase, this can result in this site earning a commission. Affiliate programs and affiliations include, but are not limited to, the eBay Partner Network.
Civic CRX Scarebird Rear Brake Disk Conversion Review and Instructions
Civic CRX Rear Brake Disk Conversion Review and Detailed How-to for Scarebird Brackets and Callahan brakes
OMG...another rear conversion review? Yes, yes, I know it's been rehashed a million times, but every review or how-to I've seen so far has been incomplete, contains wrong information, or is too poorly written to follow. So, I've been contemplating giving back to the Honda community for a while, and this is how I wanted to start my first real contribution.
Bottom Line Up Front
Reliable and inexpensive brake conversion that had some small problems with assembly, but none with quality. The entire job was completed for less than $500 and included stainless steel lines. Racing brake pads did increase the total price above $500. I would (and have) recommended this kit to friends.
Scarebird Brake Bracket Adapter Kit
This is small company in Washington I found through eBay that makes brakets for Honda rear disk conversions. My first thought about the company was to quickly question their quality because it was in-fact an ebay merchant which is often synonymous with junk. Thankfully, this company is not. Looking into their website, it turns out that they make conversion kits for many performance cars, and they specialize in bracket design. With one of their kits, one could rebuilt a 70s Mustang and convert it to a current gen set of brakes.
Callanhan Red Powder Coat Brake Calipers
Another eBay seller that I felt questionable about, but decided to take a chance anyways, and was glad that it paid off. They are a seller that has been around for years, and have sold brakes under a variety of resellers. They refurbish old brakes, clean them up, and sell them as sets. Mine were a very bright powder coated red set that came fully loaded for the same price that others sell non-loaded and bare finish brakes for. For the uninitiated, loaded mean that all the brake hardware like the bleeder bolt, e-brake cable brackets, and other furnishings are all included. You want this, because having to buy all that stuff individually is expensive. The banjo bolts are $12 and the cable brackets are $15 each. For the cheap brakes, that means you've already needed to spend almost $60 extra. They also sell the brakes powerder coat which is great because unfinished brakes will have surface rust within the first 24hrs of raining. How do I know? I returned a set of unfinished calipers to JC Whitney because the next morning I saw them, they were rusted over like I'd owned them for years. I had none of these issues with the Callahan brake. They worked right out of the box, and are now doing full time track duty.
Teething Problems
Sweet I thought, at $85 for the bracket kit it sounded like a winner to me, and it was, but with some caveats. First Scarebird ships only the bracket and bolts. They provide no instructions, and not really much information on the conversion itself. Because there are so many variations of parts and model vehicles to swap between I can understand not having the info, but to me it was a negative I needed to put some leg work into overcoming.
All this is a long way to say I was on my own for finding out what part numbers fit, and which one didn't. It was a terrible process of ordering, trying, returning, and trying again sets of parts. I went through 3 sets of parking brake cables before I found the right ones. If you do anything like this custom swap, make sure you order from reputable places that have good return policies. Amazon, JC Whitney, and Autozone were invaluable for lettting me try out parts. In the end I did find the right parts and have included them in my instructions in hopes my data could help aleviate a head for others.
Performance
Excellent. No complaints at all about the quality of the brackets or the calipers after approximately 2000-3000 miles of road courses and mountains. My use for them is probably much more extreme than average. My CRX is equipped with a 250hp K20Z3, and currently competes in SCCA time trials. The brakes have seen repeated use dropping the car from 130mph. It's been in six separate events over the last year and during those have used EBC yellows that have not faded or failed once. So far my experience with this rear brake conversion has been extremely reliable and has performed as expected.
I should note that I did have one problem, but it was my fault. I used Russell stainless steel brake lines and my right side line wasn't routed properly. I didn't account for the lack of clearance to the chassis on that side, and the line scrapped against a frame rail. I was lucky it didn't burst because Bremerton Motorsports Park (now closed) has a 135mph straight that can be nasty if not taken right.
These brakes are used in conjunction with an 11 in front brake conversion from Wilwood brakes. Those front brakes are equipped with EBC blue endurance racing pads, and have 1.5 brake ducting to the front rotors. This combination of brakes sees a 15 degree (F) difference in tire temps front to rear so the brake balance seems to be spot on. The 15 degrees higher in the front means the fronts are doing the majority of the work, with the rears doing just enough to do their part without the threat of locking up before the fronts. The tires are BFG Rivals 205/55/15 front and rear. Temps taken with a contact type tire temperature probe.
Conclusion
I would buy these again if I had to do another conversion. The teething issues I mentioned weren't really related to the brakes themselves. That was more of an issue with performing a non-OEM brake swap where experimentation is unfortunately part of the process. Overall, the parts were cheap, and have been realiable. The next time around, I could even get the total cost down below $200 if I were to buy used parts, but since this was for a car intended for road racing I opted for brand new everything. Safety first!
Long Term Update
2016-04-13. The brakes have been flawless. The adapters have not rusted or come loose. The calipers from Calahan are rock solid and the red in them are as red as when they were new. No fading issues or looking ugly. The brakes overall have been excellent. I can stop repeatedly from 140mph down to 70 all day long on the track. This is with the OEM 1725 CRX brake proportioning valve and 13/16 master cylinder.
I have changed my mind about the EBC Yellow Stuff pad. While I still think they are a great pad choice for the beginner, and is a great pad that can go from street to track with no problem, I experienced enough now to say that I would like a pad with more initial bite. I'm going to try out a few different pads to see which one can generate the kind of torque I want. I'm also going to try the chase bays booster delete for more feedback from the brakes.
Re: Civic CRX Rear Brake Disk Conversion Review and Instructions
Scarebird Adapter Overview
The Scarebird is an adapter that allows installation of more performance oriented rear disc brakes from late model Hondas. Many Hondas came from the factory with economical drum brakes. They operate fine in day to day street duties, but fall short when it comes to racing and aesthetics. It�s fortunate that many Hondas can interchange many of their parts, but sometime they just don�t fit perfectly. This adapter ensures that brake components will line up properly. Other than the adapter, all the parts necessary to complete the installation are OEM which means a certain level of reliability and ease of use is expected.
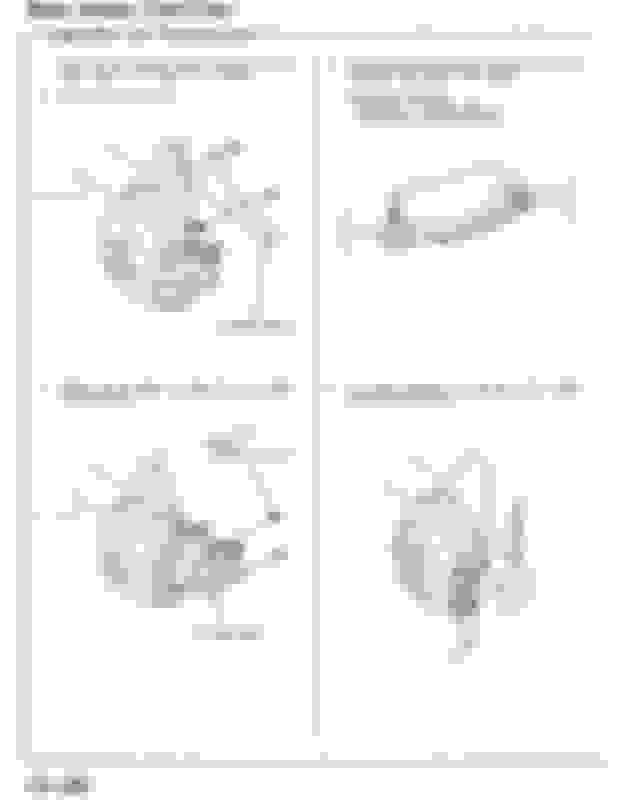
Step 1 � Remove old drum brake hardware. All of it except the spindle will not be reused. Be sure to clean off the mounting surfaces of any old dirt or rust. The new adapter brackets will attach to the mounting surface that the brake drum backing plate was once mounted to. Complete list includes the following:
� Brake drum (discard)
� Drum internal assembly & backing plate (discard)
� Parking brake lines for drum brakes (discard)
� Brake hoses for drum brakes (discard)
� Hub & spindle nut (keep)
Step 2 � Install the Scarebird brackets using the 12x1.25 mm x 20mm bolts and tightening to 40 LB-FT. Use the high temp thread locker on these bolts. Adapter may differ from one pictured to the right depending on model.
Step 3 � Install hub onto spindle using the original mounting bolts saved from the brake drum uninstall. Tighten to 139 LB-FT. High temp thread locker on this spindle nut not necessary because spindle nut is retained by staking the nut to the spindle.
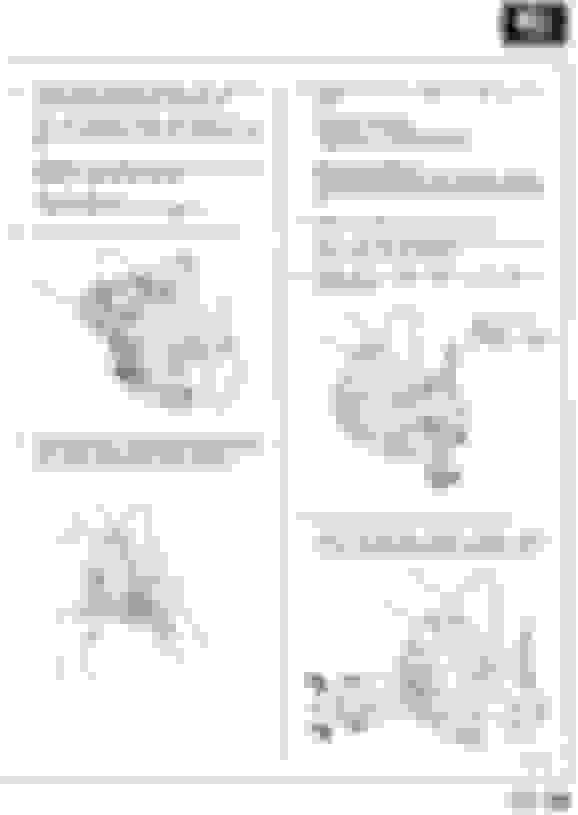
Step 4 � Align caliper to brake disk. Some OEM replacement calipers have different spacing on the caliper bracket and may not line up properly to the rotor. The rotor should be set right in the middle of the caliper, or within 1mm of variance. Follow these steps:
� Mount brake disk to spindle, and secure with lug nuts to make disk seat flat against the spindle. See photo above in step 3.
� Bolt firmly, but do not tighten caliper mounting bracket to the Scarebird adapter.
� Determine if disk lies evenly in the middle of the caliper opening. See photos below.
� Add hardened washers as shims in between Scarebird adapter and caliper mounting bracket as necessary. See arrow in photo.
� Once caliper and disk are centered to each other, remove disk from spindle and remove the caliper from the Scarebird bracket.
Step 5 � Mount disk brake to spindle, and secure with lug nuts to make disk seat flat against the spindle. See photo above in step 3.
Step 6 � Install caliper bracket to Scarebird bracket using the 12x1.25 mm x 25mm bolts and tightening to 55 LB-FT. Use the high temp thread locker on these bolts. Be sure to include any shims used in Step 4 to align the caliper to the brake disk.
Step 7 � Install brake pads. See instructions in reference diagram below.
Step 8 � Install caliper to caliper bracket. Ensure that pad retaining spring is secure and is providing pressure to hold the pads in proper position. Tight using the 8x1.0 mm bolts and tightening to 24 LB-FT. Use the high temp thread locker on these bolts.
Step 9 � Install brake hose to brake hard line with 10mm line wrench. (WARNING: only use a line wrench or risk damaging the flare nut) Tighten to hand tight enough to prevent leakage. Use banjo bolt on the brake hose to caliper end of the hose. Tighten banjo bolt to 25 LB-FT.
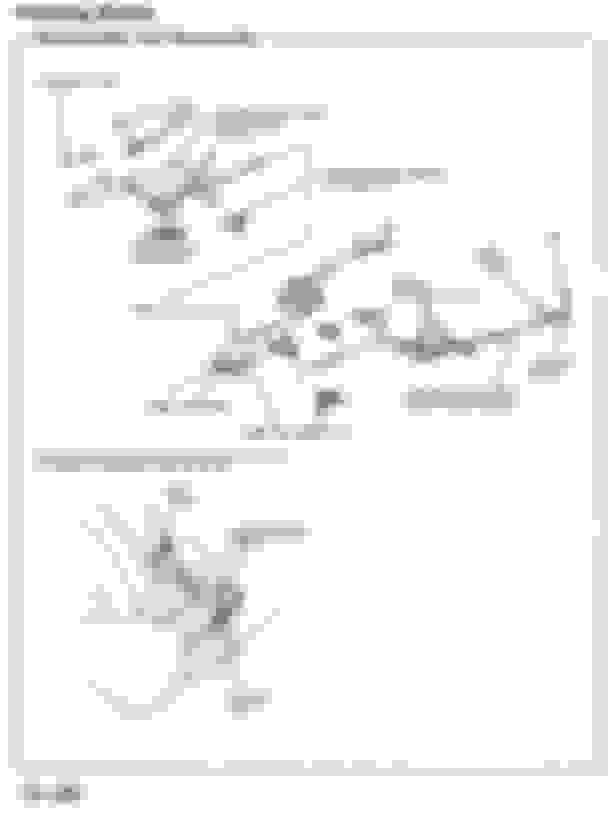
Step 10 � Install new parking brake lines
To Remove Old Lines:
� Disconnect parking brake handle from parking brake lines.
� Remove the 3 retaining bolts holding the line in place.
� Remove line from retaining hole in the swing arm.
� Line should be completely free to remove from vehicle.
� Installation is the opposite of the reverse.
� Once installed, secure the brake line to the caliper with a clevis pin and cotter pin.
**Note: Some aftermarket lines come equipped with parking brake cable connectors (yellow arrow) that are slightly larger than the hole (red arrow) for the OEM retaining bracket. This is normal. To adjust, use a Dremel or grinder to smooth out some of the material to fit. The required material to be removed will not be enough to affect function or reliability.
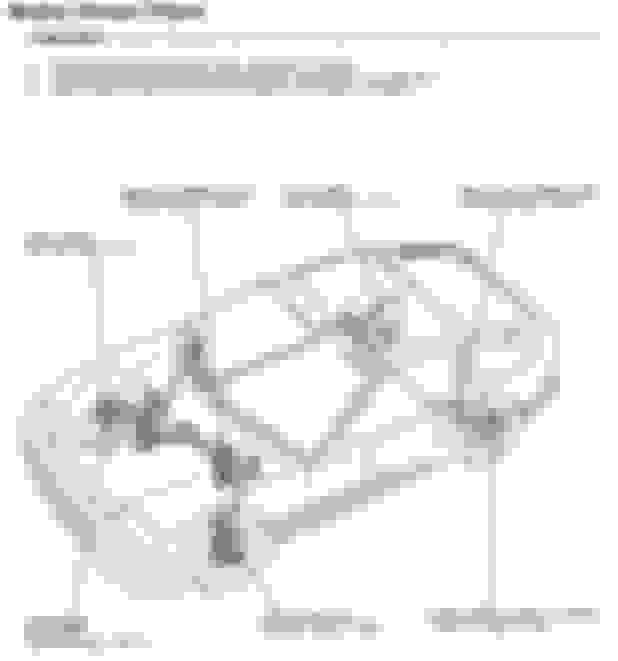
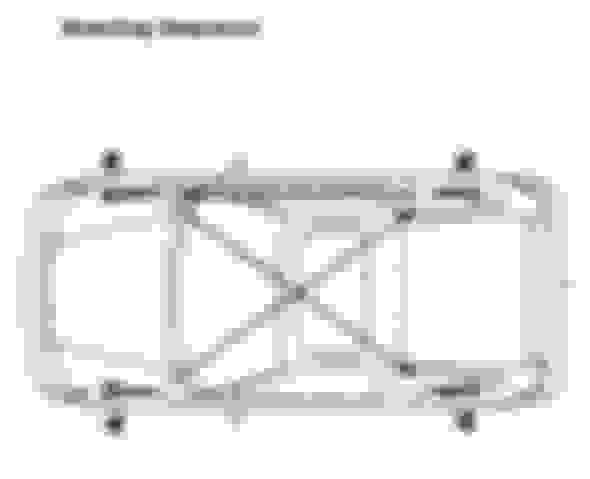
Step 11 � Bleed entire brake system. Some recommend starting with furthest brake from brake master cylinder and working towards the closest brake. The CRX has an alternating wheel bleeding sequence of left-front, right-rear, right-front, then left-rear (see diagram in reference notes section) Note: depending on the type of rear brake line chosen, the line may not seat within a set of pins that are built into the caliper to hold the brake line in place.
Step 12 � Brake conversion complete (photo to right). Take car for a 5mph test drive for an initial test. Stop and check brakes for leakage, loose parts, and other signs of problems. If brakes are still ok, test again at gradually higher speeds. Complete the install by bedding in the pads to the pad manufacturers recommend bed in procedures.
Re: Civic CRX Scarebird Rear Brake Disk Conversion Review and Instructions
Originally Posted by subtlecuddle
Nice Post, I plan on doing this myself this winter. Thanks.
I appreciate that. I'll be posting up my conversion for the front in a while. Scarebird will be making a front kit for the CRX/Civic line for an 11in brake kit.
Re: Civic CRX Scarebird Rear Brake Disk Conversion Review and Instructions
Originally Posted by JDM_rolex
Great writeup! you have pm After the conversion were you able to use the E-brake? If so what cables did you use?
The ebrake worked worked just fine. I used the cables from a 1990-91 Honda CRX Si. I tried the Integra and Civic cables, but they were just too long. The CRX Si were just the right length, and the ends fit the integra calipers. I did have trim the cable end to fit through the eye-let of the brake cable holder, but that was a minor modification.
Re: Civic CRX Scarebird Rear Brake Disk Conversion Review and Instructions
Originally Posted by JDM_rolex
rallyrcr, with it being nearly a year of use, how has the brake set-up worked out for you?
It's funny you asked that. I just updated my conclusion above with a long term update. I'll repost it here.
Bottom line is that they are very good, it has held up through 5 Time Trails Events at Bremerton Raceway, Pacific Raceway, The Ridge Motorsports park, and Portland Int'l Raceway and in addition to a handful of trackdays. The car has approximately 1500-2000 on track miles with the brakes. Another 4000 miles of off-track street and mountain use. The car is powered by a 280bhp K20 CRX HF.
Long Term Update
2016-04-13. The brakes have been flawless. The adapters have not rusted or come loose. The calipers from Calahan are rock solid and the red in them are as red as when they were new. No fading issues or looking ugly. The brakes overall have been excellent. I can stop repeatedly from 140mph down to 70 all day long on the track. This is with the OEM 1725 CRX brake proportioning valve and 13/16 master cylinder.
I have changed my mind about the EBC Yellow Stuff pad. While I still think they are a great pad choice for the beginner, and is a great pad that can go from street to track with no problem, I experienced enough now to say that I would like a pad with more initial bite. I'm going to try out a few different pads to see which one can generate the kind of torque I want. I'm also going to try the chase bays booster delete for more feedback from the brakes.
Re: Civic CRX Scarebird Rear Brake Disk Conversion Review and Instructions
, thank you for posting. Just a couple questions, what issues or drawbacks were you experiencing before? Before The conversion I assume you were on drums? Also, what are your spring rates? Also, do you have any idea wake differences between this and a stock SI rear disc set up? I've been thinking about leaving the drums in the rear because everything I find says that they are significantly lighter than a disc set up. Most people I know that track CRXs alsocan't use too aggressive of a compound on their drums due to it forcing lock up under braking. I'd like to know your thoughts
Re: Civic CRX Scarebird Rear Brake Disk Conversion Review and Instructions
My only beef with the Scarebird brackets is that they don't clock the calipers at the same angle as the stock spindles. I'm guessing it doesn't make a difference with the 9.5" conversion (since I've never seen anyone complain about this issue). I did ITR calipers and EP3 rotors and ended up having to notch the trailing arms to clear the caliper and lines fully.
Re: Civic CRX Scarebird Rear Brake Disk Conversion Review and Instructions
Originally Posted by spAdam
My only beef with the Scarebird brackets is that they don't clock the calipers at the same angle as the stock spindles. I'm guessing it doesn't make a difference with the 9.5" conversion (since I've never seen anyone complain about this issue). I did ITR calipers and EP3 rotors and ended up having to notch the trailing arms to clear the caliper and lines fully.
Nerco bump, but just wondering, do you have any pictures of where and how much you had to notch the trailing arms to clear the calipers and lines?
Thinking of doing this to my EK coupe, mostly because I have RSX Rear calipers just sitting not being used and I sold my rear 9.5 in calipers.
Re: Civic CRX Scarebird Rear Brake Disk Conversion Review and Instructions
Oof, maybe next time I get the wheels off but that will be a while. I do have a Scarebird set that is no longer on the car. Send me a PM if you want to chat.

 06-29-2015, 12:43 PM