

DIY: Diagnose Check Engine Lights 4th gen Prelude

Thread Starter
Junior Member
Joined: May 2008
Posts: 150
Likes: 0
From: Memramcook, NB, Canada
So I decided to do a write up on this since I get this question a lot and it�s not in the FAQ
Tools needed:
Paper clip or wire
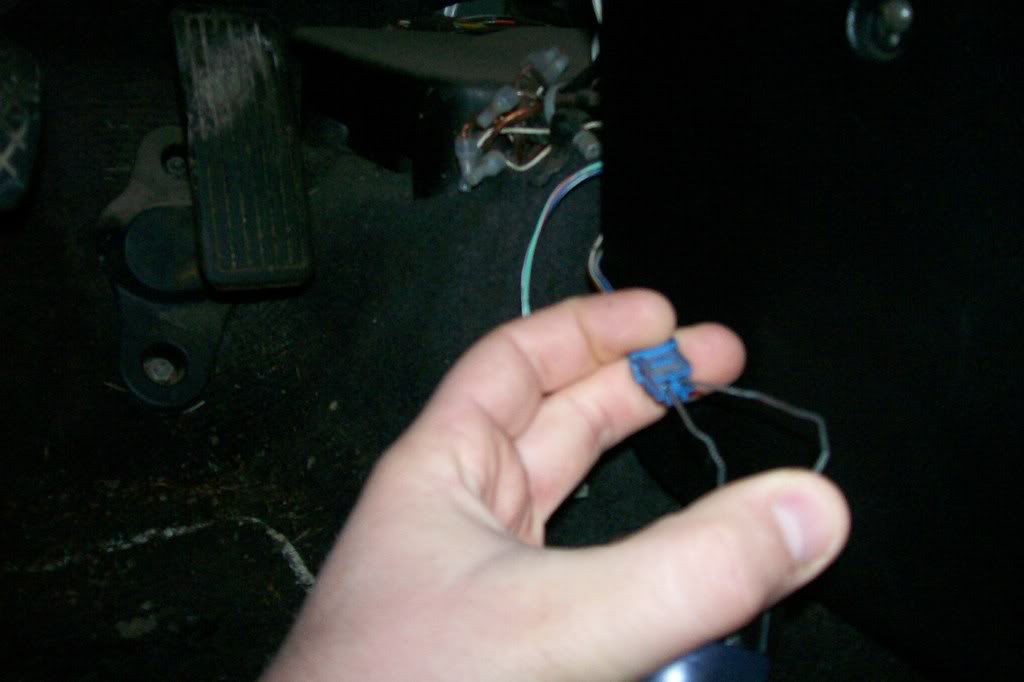
Step 1: Locate the 2P connector behind the console driver�s side (near the gas pedal). It�s the blue one shown here.
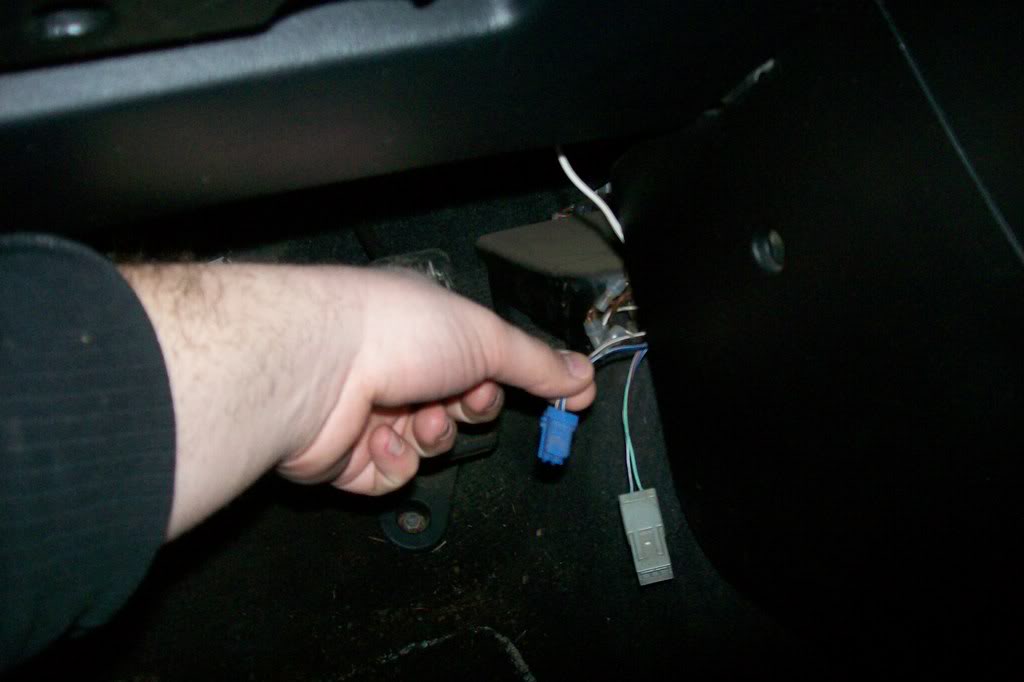
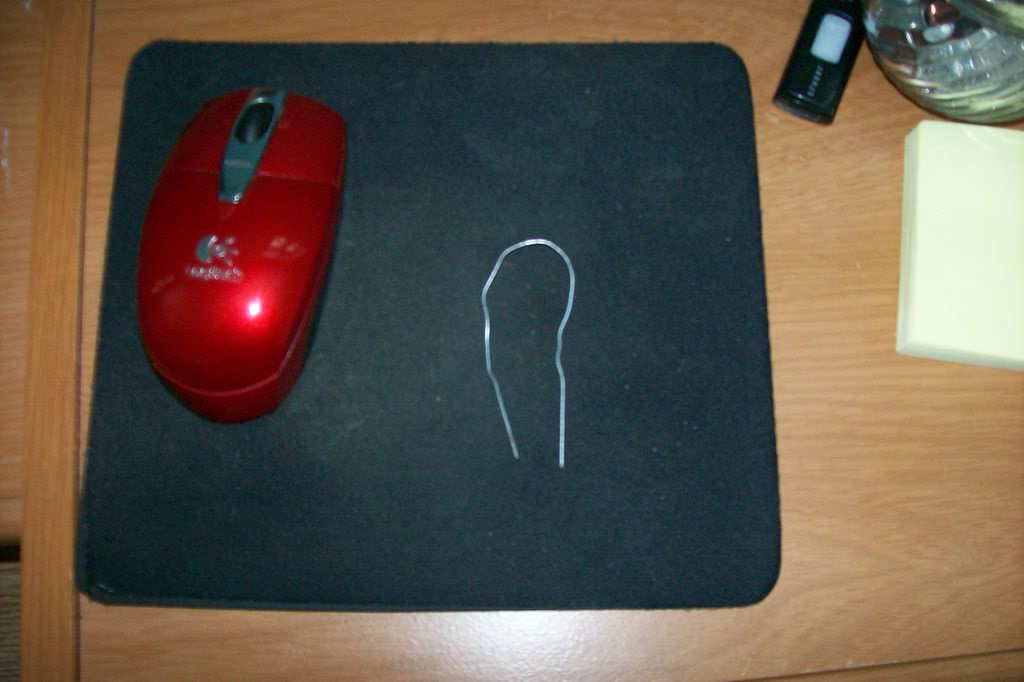
Step 2: Take a paper clip or wire and form it into a U to use as your jumper.
Step 3: Insert the jumper in the 2P
Connector
Step 4: Turn the ignition to ON without starting the car.
The Check engine light should start to blink revealing your code. Codes 1-9 are indicated by short blinks. Codes 10-43 are revealed with short and long blinks. Long blinks indicated the first digit and short blinks the second digit. For exemple: Two long blinks and three short blinks would indicate code 23 (i.e. Knock Sensor, one I have personally seen many times lol). Multiple codes will be shown one after the other in order from 1 to 43. I personally have had 6 at the same time. After you have read the code(s) remember to remove the jumper.
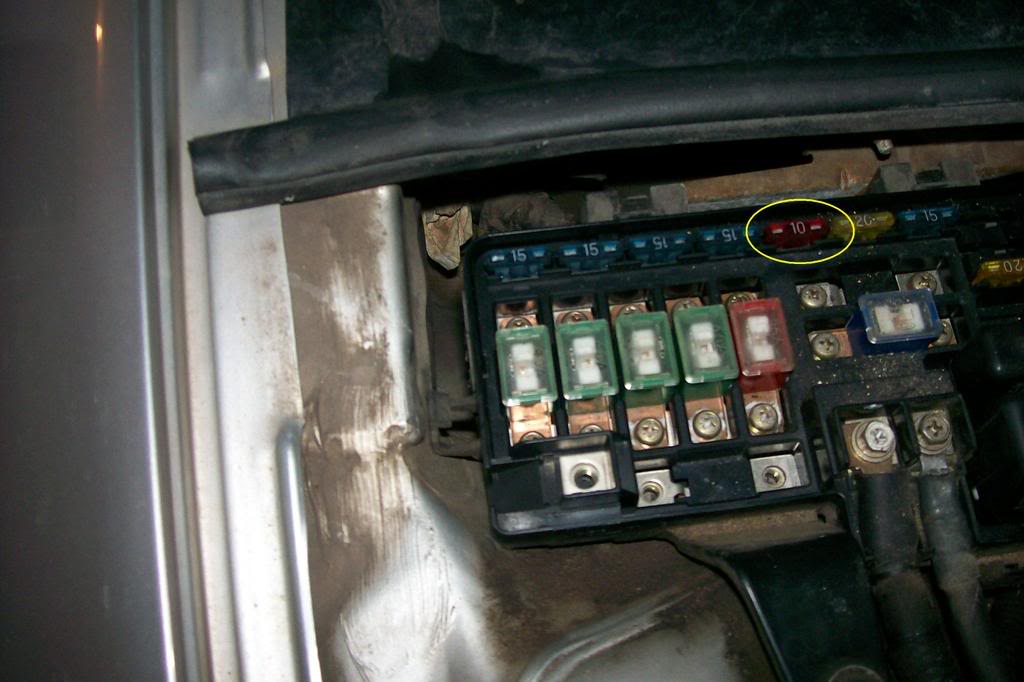
Step 5: Reset the ECU by removing the clock/radio (10A) fuse or removing the negative cable from the battery.
Heres a list of the codes/helms manual reference:
0
ECU
Page: 11-31
1
OXYGEN SENSOR
Page: 11-36
3-5
MANIFOLD ABSOLUTE PRESSURE (MAP SENSOR)
Page: 11-44
4
CRANK ANGLE (CRANK SENSOR)
Page: 11-50
6
COOLANT TEMPERATURE (TW SENSOR)
Page: 11-52
7
THROTTLE ANGLE
Page: 11-54
8
TDC POSITION (TDC SENSOR)
Page: 11-50
9
No. 1 CYLINDER POSITION (CYL SENSOR)
Page: 11-50
10
INTAKE AIR TEMPERATURE (TA SENSOR)
Page: 11-56
12
EXHAUST GAS RECIRCULATION SYSTEM (EGR)
Page: 11-135
13
ATMOSPHERIC PRESSURE (PA SENSOR)
Page: 11-58
14
ELECTRONIC AIR CONTROL (EACV)
Page: 11-76
15
IGNITION OUTPUT SIGNAL
Page: 11-60
16
FUEL INJECTOR
Page: 11-96
17
VEHICLE SPEED SENSOR
Page: 11-62
20
ELECTRIC LOAD DETECTOR (ELD)
Page: 11-64
23
KNOCK SENSOR
Page: 11-68
30
A/T Fl SIGNAL A
Page: 11-70
31
A/T Fl SIGNAL B
Page: 11-70
41
OXYGEN SENSOR HEATER
Page: 11-38
43
FUEL SUPPLY SYSTEM
Page: 11-42
Remiss
Tools needed:
Paper clip or wire
Step 1: Locate the 2P connector behind the console driver�s side (near the gas pedal). It�s the blue one shown here.
Step 2: Take a paper clip or wire and form it into a U to use as your jumper.
Step 3: Insert the jumper in the 2P
Connector
Step 4: Turn the ignition to ON without starting the car.
The Check engine light should start to blink revealing your code. Codes 1-9 are indicated by short blinks. Codes 10-43 are revealed with short and long blinks. Long blinks indicated the first digit and short blinks the second digit. For exemple: Two long blinks and three short blinks would indicate code 23 (i.e. Knock Sensor, one I have personally seen many times lol). Multiple codes will be shown one after the other in order from 1 to 43. I personally have had 6 at the same time. After you have read the code(s) remember to remove the jumper.
Step 5: Reset the ECU by removing the clock/radio (10A) fuse or removing the negative cable from the battery.
Heres a list of the codes/helms manual reference:
0
ECU
Page: 11-31
1
OXYGEN SENSOR
Page: 11-36
3-5
MANIFOLD ABSOLUTE PRESSURE (MAP SENSOR)
Page: 11-44
4
CRANK ANGLE (CRANK SENSOR)
Page: 11-50
6
COOLANT TEMPERATURE (TW SENSOR)
Page: 11-52
7
THROTTLE ANGLE
Page: 11-54
8
TDC POSITION (TDC SENSOR)
Page: 11-50
9
No. 1 CYLINDER POSITION (CYL SENSOR)
Page: 11-50
10
INTAKE AIR TEMPERATURE (TA SENSOR)
Page: 11-56
12
EXHAUST GAS RECIRCULATION SYSTEM (EGR)
Page: 11-135
13
ATMOSPHERIC PRESSURE (PA SENSOR)
Page: 11-58
14
ELECTRONIC AIR CONTROL (EACV)
Page: 11-76
15
IGNITION OUTPUT SIGNAL
Page: 11-60
16
FUEL INJECTOR
Page: 11-96
17
VEHICLE SPEED SENSOR
Page: 11-62
20
ELECTRIC LOAD DETECTOR (ELD)
Page: 11-64
23
KNOCK SENSOR
Page: 11-68
30
A/T Fl SIGNAL A
Page: 11-70
31
A/T Fl SIGNAL B
Page: 11-70
41
OXYGEN SENSOR HEATER
Page: 11-38
43
FUEL SUPPLY SYSTEM
Page: 11-42
Remiss
Honda-Tech Member
Joined: Feb 2009
Posts: 159
Likes: 0
From: NB, Canada
Code 36 on the jdm P13 ecu is traction control witch only came in the jdm prelude obviously
discoverd that mine is throwing this today haha
discoverd that mine is throwing this today haha

Honda-Tech Member
Joined: Jan 2004
Posts: 10,629
Likes: 1
From: Further down the spiral, TX, usa

Honda-Tech Member
Joined: Mar 2013
Posts: 6
Likes: 0
So I decided to do a write up on this since I get this question a lot and it�s not in the FAQ
Tools needed:
Paper clip or wire
Step 1: Locate the 2P connector behind the console driver�s side (near the gas pedal). It�s the blue one shown here.

Step 2: Take a paper clip or wire and form it into a U to use as your jumper.

Step 3: Insert the jumper in the 2P
Connector

Step 4: Turn the ignition to ON without starting the car.
The Check engine light should start to blink revealing your code. Codes 1-9 are indicated by short blinks. Codes 10-43 are revealed with short and long blinks. Long blinks indicated the first digit and short blinks the second digit. For exemple: Two long blinks and three short blinks would indicate code 23 (i.e. Knock Sensor, one I have personally seen many times lol). Multiple codes will be shown one after the other in order from 1 to 43. I personally have had 6 at the same time. After you have read the code(s) remember to remove the jumper.
Step 5: Reset the ECU by removing the clock/radio (10A) fuse or removing the negative cable from the battery.

Heres a list of the codes/helms manual reference:
0
ECU
Page: 11-31
1
OXYGEN SENSOR
Page: 11-36
3-5
MANIFOLD ABSOLUTE PRESSURE (MAP SENSOR)
Page: 11-44
4
CRANK ANGLE (CRANK SENSOR)
Page: 11-50
6
COOLANT TEMPERATURE (TW SENSOR)
Page: 11-52
7
THROTTLE ANGLE
Page: 11-54
8
TDC POSITION (TDC SENSOR)
Page: 11-50
9
No. 1 CYLINDER POSITION (CYL SENSOR)
Page: 11-50
10
INTAKE AIR TEMPERATURE (TA SENSOR)
Page: 11-56
12
EXHAUST GAS RECIRCULATION SYSTEM (EGR)
Page: 11-135
13
ATMOSPHERIC PRESSURE (PA SENSOR)
Page: 11-58
14
ELECTRONIC AIR CONTROL (EACV)
Page: 11-76
15
IGNITION OUTPUT SIGNAL
Page: 11-60
16
FUEL INJECTOR
Page: 11-96
17
VEHICLE SPEED SENSOR
Page: 11-62
20
ELECTRIC LOAD DETECTOR (ELD)
Page: 11-64
23
KNOCK SENSOR
Page: 11-68
30
A/T Fl SIGNAL A
Page: 11-70
31
A/T Fl SIGNAL B
Page: 11-70
41
OXYGEN SENSOR HEATER
Page: 11-38
43
FUEL SUPPLY SYSTEM
Page: 11-42
Remiss
Tools needed:
Paper clip or wire
Step 1: Locate the 2P connector behind the console driver�s side (near the gas pedal). It�s the blue one shown here.
Step 2: Take a paper clip or wire and form it into a U to use as your jumper.
Step 3: Insert the jumper in the 2P
Connector
Step 4: Turn the ignition to ON without starting the car.
The Check engine light should start to blink revealing your code. Codes 1-9 are indicated by short blinks. Codes 10-43 are revealed with short and long blinks. Long blinks indicated the first digit and short blinks the second digit. For exemple: Two long blinks and three short blinks would indicate code 23 (i.e. Knock Sensor, one I have personally seen many times lol). Multiple codes will be shown one after the other in order from 1 to 43. I personally have had 6 at the same time. After you have read the code(s) remember to remove the jumper.
Step 5: Reset the ECU by removing the clock/radio (10A) fuse or removing the negative cable from the battery.
Heres a list of the codes/helms manual reference:
0
ECU
Page: 11-31
1
OXYGEN SENSOR
Page: 11-36
3-5
MANIFOLD ABSOLUTE PRESSURE (MAP SENSOR)
Page: 11-44
4
CRANK ANGLE (CRANK SENSOR)
Page: 11-50
6
COOLANT TEMPERATURE (TW SENSOR)
Page: 11-52
7
THROTTLE ANGLE
Page: 11-54
8
TDC POSITION (TDC SENSOR)
Page: 11-50
9
No. 1 CYLINDER POSITION (CYL SENSOR)
Page: 11-50
10
INTAKE AIR TEMPERATURE (TA SENSOR)
Page: 11-56
12
EXHAUST GAS RECIRCULATION SYSTEM (EGR)
Page: 11-135
13
ATMOSPHERIC PRESSURE (PA SENSOR)
Page: 11-58
14
ELECTRONIC AIR CONTROL (EACV)
Page: 11-76
15
IGNITION OUTPUT SIGNAL
Page: 11-60
16
FUEL INJECTOR
Page: 11-96
17
VEHICLE SPEED SENSOR
Page: 11-62
20
ELECTRIC LOAD DETECTOR (ELD)
Page: 11-64
23
KNOCK SENSOR
Page: 11-68
30
A/T Fl SIGNAL A
Page: 11-70
31
A/T Fl SIGNAL B
Page: 11-70
41
OXYGEN SENSOR HEATER
Page: 11-38
43
FUEL SUPPLY SYSTEM
Page: 11-42
Remiss
Trending Topics

kind of confused a little fellas, i've got 3 connectors, 2 are 2-pin(yellow&blue) and 1 is 3-pin (blue/grey)
when i jump the 2-pin blue the abs light flashes 4 slow 1 fast
when i jump the yellow 2-pin cel just stays on solid, while others all go off
when i jump the 2-pin blue the abs light flashes 4 slow 1 fast
when i jump the yellow 2-pin cel just stays on solid, while others all go off


Honda-Tech Member
Joined: Feb 2009
Posts: 6
Likes: 0
Well if it's not to late the 2 pin blue connector is the right one. Did you find out the abs code?

Honda-Tech Member
Joined: Nov 2014
Posts: 5
Likes: 0
So I decided to do a write up on this since I get this question a lot and it�s not in the FAQ
Tools needed:
Paper clip or wire
Step 1: Locate the 2P connector behind the console driver�s side (near the gas pedal). It�s the blue one shown here.
Step 2: Take a paper clip or wire and form it into a U to use as your jumper.
Step 3: Insert the jumper in the 2P
Connector
Step 4: Turn the ignition to ON without starting the car.
The Check engine light should start to blink revealing your code. Codes 1-9 are indicated by short blinks. Codes 10-43 are revealed with short and long blinks. Long blinks indicated the first digit and short blinks the second digit. For exemple: Two long blinks and three short blinks would indicate code 23 (i.e. Knock Sensor, one I have personally seen many times lol). Multiple codes will be shown one after the other in order from 1 to 43. I personally have had 6 at the same time. After you have read the code(s) remember to remove the jumper.
Step 5: Reset the ECU by removing the clock/radio (10A) fuse or removing the negative cable from the battery.
Heres a list of the codes/helms manual reference:
0
ECU
Page: 11-31
1
OXYGEN SENSOR
Page: 11-36
3-5
MANIFOLD ABSOLUTE PRESSURE (MAP SENSOR)
Page: 11-44
4
CRANK ANGLE (CRANK SENSOR)
Page: 11-50
6
COOLANT TEMPERATURE (TW SENSOR)
Page: 11-52
7
THROTTLE ANGLE
Page: 11-54
8
TDC POSITION (TDC SENSOR)
Page: 11-50
9
No. 1 CYLINDER POSITION (CYL SENSOR)
Page: 11-50
10
INTAKE AIR TEMPERATURE (TA SENSOR)
Page: 11-56
12
EXHAUST GAS RECIRCULATION SYSTEM (EGR)
Page: 11-135
13
ATMOSPHERIC PRESSURE (PA SENSOR)
Page: 11-58
14
ELECTRONIC AIR CONTROL (EACV)
Page: 11-76
15
IGNITION OUTPUT SIGNAL
Page: 11-60
16
FUEL INJECTOR
Page: 11-96
17
VEHICLE SPEED SENSOR
Page: 11-62
20
ELECTRIC LOAD DETECTOR (ELD)
Page: 11-64
23
KNOCK SENSOR
Page: 11-68
30
A/T Fl SIGNAL A
Page: 11-70
31
A/T Fl SIGNAL B
Page: 11-70
41
OXYGEN SENSOR HEATER
Page: 11-38
43
FUEL SUPPLY SYSTEM
Page: 11-42
Remiss
What if my CEL doesn't come on when I just turn the key to the on spot only comes on when I start it ?


Honda-Tech Member


Joined: Jan 2013
Posts: 10,047
Likes: 1,240
From: The South - Roll Tide !!!

Thread
Thread Starter
Forum
Replies
Last Post
Drew313
Honda Accord (1990 - 2002)
2
Dec 10, 2001 08:04 AM