

How much does it cost you for lower ball joint pressed.

Thread Starter
Junior Member
Joined: Aug 2007
Posts: 247
Likes: 0
From: Minneapolis, Mn, USA
Just wondering how much you pay to get a lower ball joint pressed in? I just brought mine to a local shop and the guy said he would give me a good deal and it ended up being $75. I am feeling very ripped. They do good work but every time I go there it ends up being double what I think it should be.
Member
Joined: Jun 2007
Posts: 2,726
Likes: 1
From: LA, CA
i rented a ball joint press from autozone for free, well u paid $100 first and they will return $100 back to you when you return the equipment and it is easy to diy. it is just a huge c clam. so costs me $0 to have lower ball joint pressed in .
Honda-Tech Member
Joined: May 2005
Posts: 631
Likes: 0
From: Ohio
I went to advanced and rented the tools and got a air impact for that c-clamp. Popped right out and put the new one in. I think in total I had $30 bucks in the ball joint. Was easy too.
Honda-Tech Member
Joined: Oct 2002
Posts: 12,653
Likes: 7
From: Cali
Did you bring them the car or just the knuckle? If you brought them the car then thats an alright price. If you brought them just the knuckle thats a rip. Its 10 bucks to replace the ball joint.
Honda-Tech Member
Joined: Jul 2006
Posts: 679
Likes: 0
From: Saint Paul, MN, USA
did you do both or just one side? i think that pricing is okay...it cost me $50 for just one side...brought mines to le's auto on university...pretty cool guy...


<TABLE WIDTH="90%" CELLSPACING=0 CELLPADDING=0 ALIGN=CENTER><TR><TD>Quote, originally posted by D50boy »</TD></TR><TR><TD CLASS="quote">Nothing. I used a BFH and it worked really well.</TD></TR></TABLE>
Yep, me too. Not very hard at all.
Yep, me too. Not very hard at all.
Trending Topics


Honda-Tech Member
Joined: Jun 2002
Posts: 3,116
Likes: 2
Hammering them out is as easy as a anything, once you get the snap-ring off.
Now DIY tapping a new one in takes some finesse. I put mine in the freezer (for shrinkage) while I thoroughly cleaned off the knuckle and put in some wd40. The hardest part is finding a way to properly support the knuckle while you are tapping it in... DONT bang the top of the ball joint with a hammer, put a piece of wood on top of it and TAP the piece of wood...be patient.
Another way to get one in requires a big socket and a very big screw clamp... I could not find a big enough screw clamp.
Honda-Tech Member
Joined: Jun 2002
Posts: 3,116
Likes: 2
Oh, and one more piece of advice concerning the bearing dust rings. If you get into a situation where they wont stay put once you put them in, use a punch to dent them a little, then a rubber mallet to tap them back in... if you dont get it where they cant be removed by hand, they'll spin and make an awful screeching noise.
Honda-Tech Member
Joined: Oct 2002
Posts: 333
Likes: 0
From: CR80 Powered T7, CA, USA
I can't seem to find my original post about replacing wheel bearings and lower ball joints. So I will repost here:
After searching the usual spots for a lower ball joint replacement write up, I came up empty handed. I needed to replace a wheel bearing and 2 lower ball joints. The more I searched the more I read:
�I just get them done at a shop.�
Armed with my Helms, my tools, and the Force, I embarked on an enlightening journey to demystify the LBJ removal/install. As well as see how the wheel bearing removal/install went as well.
Let�s start with the wheel bearing first. The following assumptions are made:
1. Spindle has been removed from the vehicle
2. You have a hydraulic press
3. You have arbor plates
4. You have an assortment of pressing shims
5. Knuckle ring has been removed
6. Circlip has been removed
7. Screws that attached the splash guard from the spindle have been removed
a. Using a small vise grip, I was able to break them free and remove them
The tool called out for in the Helms to shim the spindle against the base is:
HUB DIS/ASSEMBLY BASE � Part # 07GAF-SD40700
When I took this part number to the Acura dealership, they told me that this part did not exist. They looked through their sources and could not find anything that would match up to it. The service rep was very helpful but could not get me this part. After some pondering I decided to go to Orchard Hardware Supply. They carry a lot of metal stock. What I found that worked PERFECTLY was:
PLAT STL-SQUARE by Steel Works
SKU # 1133032
The following is covered in the Acura Helms pages 18-13 through 18-15.
Some close-ups of the bars in action:
Now the big picture:
Yet another angle of the driver pushing out the hub:

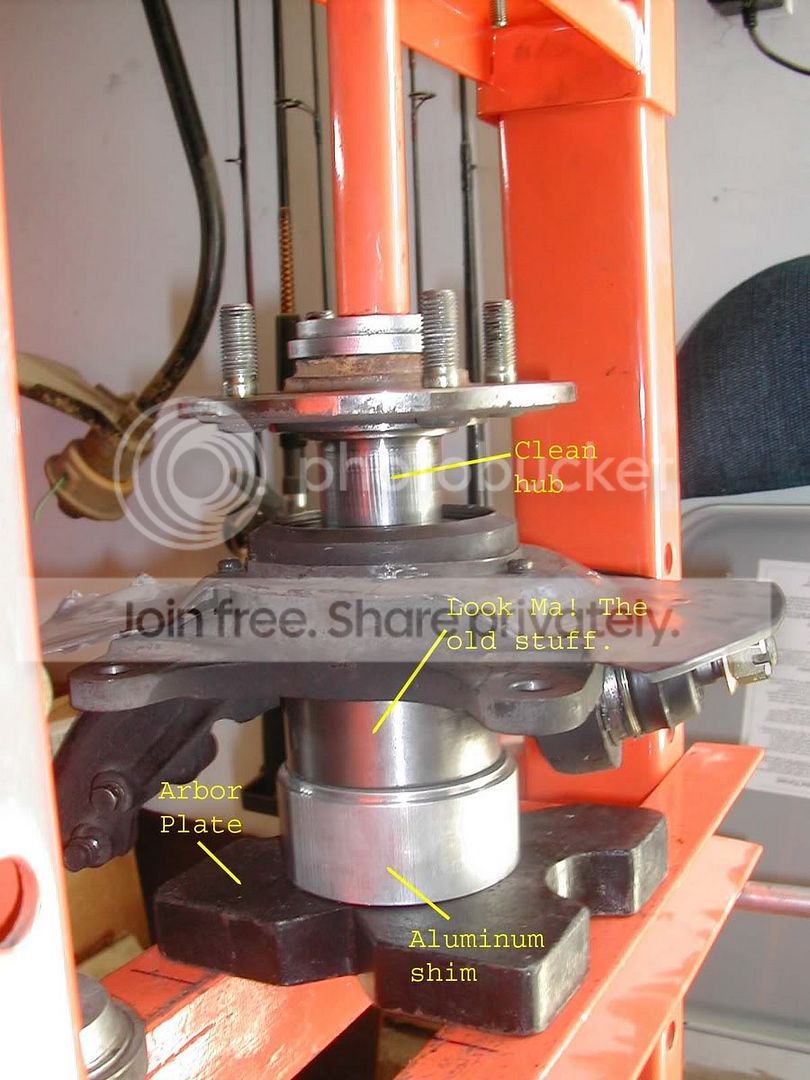
After the hub was pressed out, there was a piece that stayed with the hub:
Using a gear puller and some driver shims, I removed it from the hub. The whole assembly looked like this:

After the hub was cleared of the wheel bearing piece, the parts were laid out as such. Naked spindle and wheel bearings:

I kept the old wheel bearing because I used it as a backing when pressing in the new wheel bearing. Instead of using the tool called out for in the Helms:
SUPPORT BASE Part # 07965-SD90100
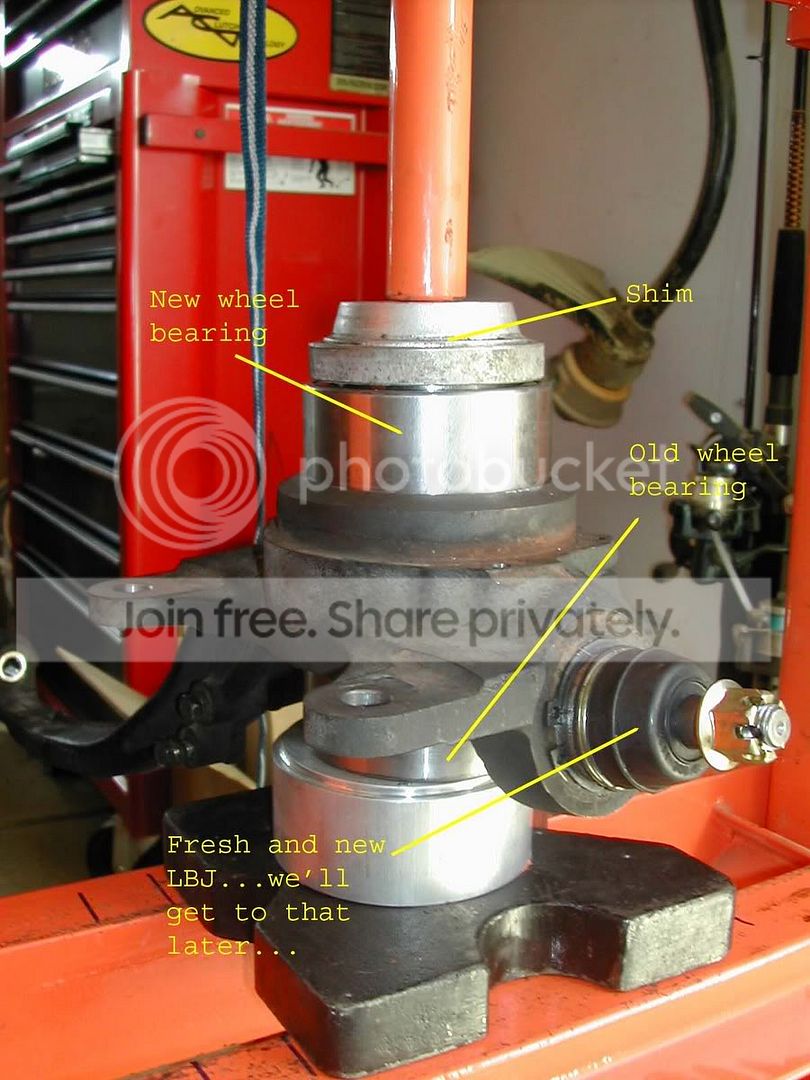
After the wheel bearing was installed, the circlip, splash guard and splash guard screws were installed. Now goes the hub goes in:
Presto ala KAZAM! The wheel bearing is done.
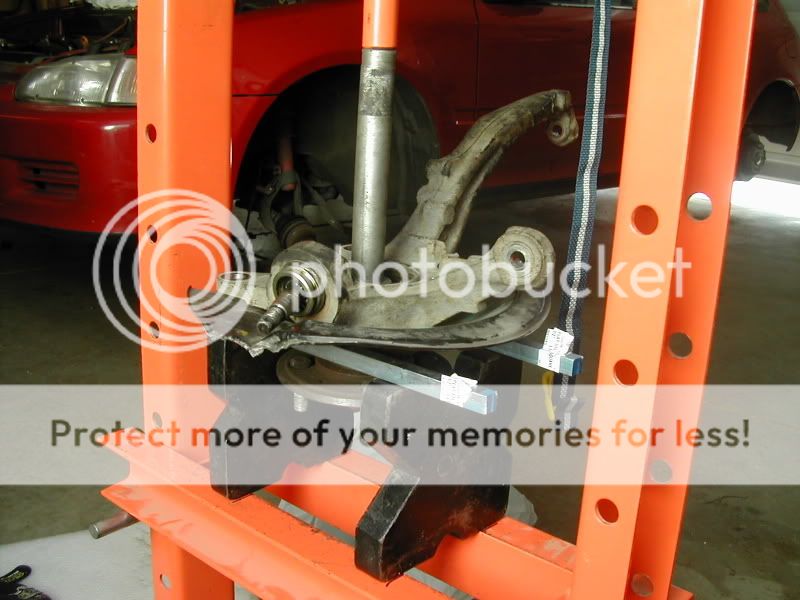
Now for the lower ball joint. For tiiite-ness factor, I�ll call it the LBJ. Both LBJs had the to be replaced due to damaged threads. I purchased the LBJs from Kragen. I was lucky that there were in stock. The person behind the counter told me that they are usually special order parts.
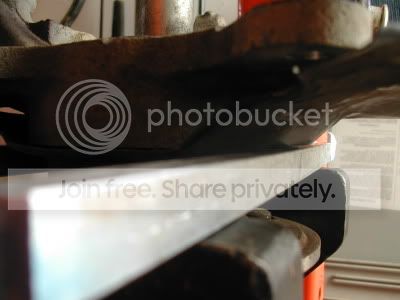
I started looking for a tool to press these out of the spindle as well as press them into the spindle. I came across this tool from Autozone (part # 27023):
The rental cost was $100.00. You get the money back after you return the rental tool. I tried to use this tool to remove the LBJ and I got absolutely no where. After getting quotes to remove the LBJ, I headed over to H-T to see what they had to say. After searching the �hammer� it out idea was beginning to sound good. The only issue with that is how am I going to stop the LBJ from moving on its axis.
After a little amount of profound brain activities in my head, I came up with this:
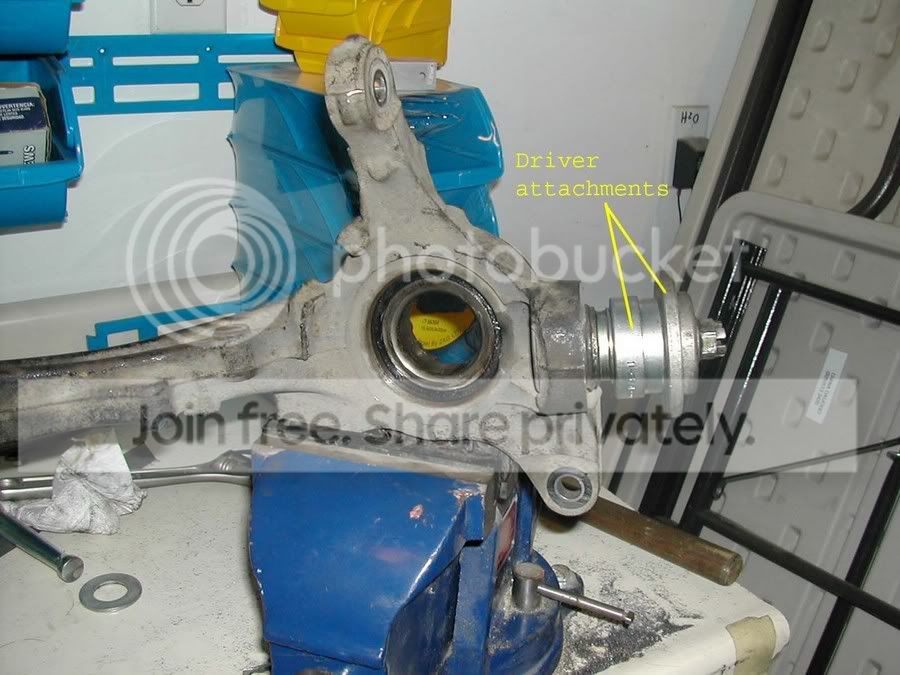
The LBJ has been secured by using an assortment of driver attachments. The attachments were secured to the LBJ using the caster nut.
After securing the LBJ, the BFH came out to play:

Once the �distance to hammer out� was reached, the LBJ was still in the spindle. Here is where a extra deep 17mm Craftsmen socket comes in handy. Slide the socket over the LBJ and hammer it out . (No pics )
Once the old and defunct LBJ comes out you need to prep the new LBJ so that it can be pressed in. You need to remove the retaining ring (use two needle nose pliers) and remove the boot. Be careful not to tear the rubber boot.
Place the new LBJ into the spindle where the old LBJ was hammered out. Attach the appropriate sleeve from the LBJ press so that the massive c-clamp tool will press evenly:
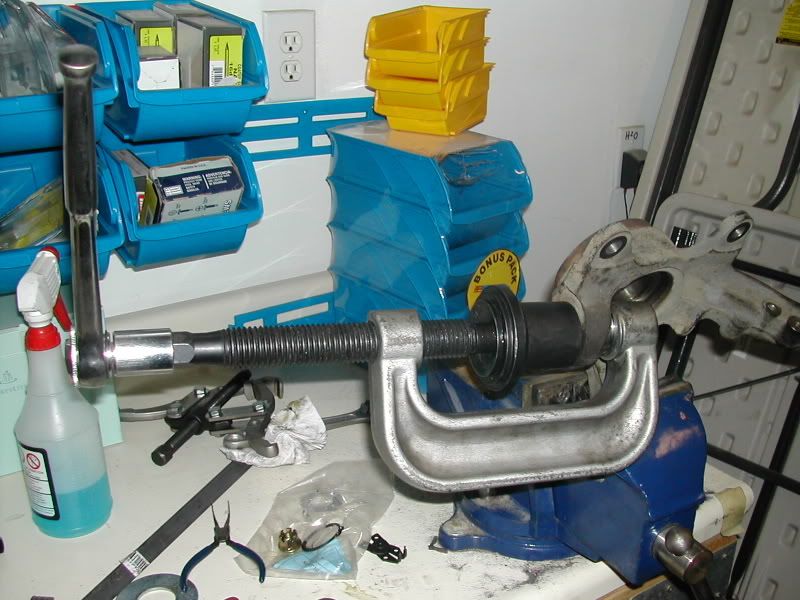
When using the above method, the tool does the job quite nicely. You will have to add a shim over the adapter so that the LBJ is completely pressed into the LBJ. Again, I did not take a picture of the extra shim that I added.
Within minutes, the LBJ was hammered out and pressed in.
M-
Just found the original link: https://honda-tech.com/zerothread?id=1567042
After searching the usual spots for a lower ball joint replacement write up, I came up empty handed. I needed to replace a wheel bearing and 2 lower ball joints. The more I searched the more I read:
�I just get them done at a shop.�
Armed with my Helms, my tools, and the Force, I embarked on an enlightening journey to demystify the LBJ removal/install. As well as see how the wheel bearing removal/install went as well.
Let�s start with the wheel bearing first. The following assumptions are made:
1. Spindle has been removed from the vehicle
2. You have a hydraulic press
3. You have arbor plates
4. You have an assortment of pressing shims
5. Knuckle ring has been removed
6. Circlip has been removed
7. Screws that attached the splash guard from the spindle have been removed
a. Using a small vise grip, I was able to break them free and remove them
The tool called out for in the Helms to shim the spindle against the base is:
HUB DIS/ASSEMBLY BASE � Part # 07GAF-SD40700
When I took this part number to the Acura dealership, they told me that this part did not exist. They looked through their sources and could not find anything that would match up to it. The service rep was very helpful but could not get me this part. After some pondering I decided to go to Orchard Hardware Supply. They carry a lot of metal stock. What I found that worked PERFECTLY was:
PLAT STL-SQUARE by Steel Works
SKU # 1133032
The following is covered in the Acura Helms pages 18-13 through 18-15.
Some close-ups of the bars in action:
Now the big picture:
Yet another angle of the driver pushing out the hub:
After the hub was pressed out, there was a piece that stayed with the hub:
Using a gear puller and some driver shims, I removed it from the hub. The whole assembly looked like this:
After the hub was cleared of the wheel bearing piece, the parts were laid out as such. Naked spindle and wheel bearings:
I kept the old wheel bearing because I used it as a backing when pressing in the new wheel bearing. Instead of using the tool called out for in the Helms:
SUPPORT BASE Part # 07965-SD90100
After the wheel bearing was installed, the circlip, splash guard and splash guard screws were installed. Now goes the hub goes in:
Presto ala KAZAM! The wheel bearing is done.
Now for the lower ball joint. For tiiite-ness factor, I�ll call it the LBJ. Both LBJs had the to be replaced due to damaged threads. I purchased the LBJs from Kragen. I was lucky that there were in stock. The person behind the counter told me that they are usually special order parts.
I started looking for a tool to press these out of the spindle as well as press them into the spindle. I came across this tool from Autozone (part # 27023):
The rental cost was $100.00. You get the money back after you return the rental tool. I tried to use this tool to remove the LBJ and I got absolutely no where. After getting quotes to remove the LBJ, I headed over to H-T to see what they had to say. After searching the �hammer� it out idea was beginning to sound good. The only issue with that is how am I going to stop the LBJ from moving on its axis.
After a little amount of profound brain activities in my head, I came up with this:
The LBJ has been secured by using an assortment of driver attachments. The attachments were secured to the LBJ using the caster nut.
After securing the LBJ, the BFH came out to play:
Once the �distance to hammer out� was reached, the LBJ was still in the spindle. Here is where a extra deep 17mm Craftsmen socket comes in handy. Slide the socket over the LBJ and hammer it out . (No pics )
Once the old and defunct LBJ comes out you need to prep the new LBJ so that it can be pressed in. You need to remove the retaining ring (use two needle nose pliers) and remove the boot. Be careful not to tear the rubber boot.
Place the new LBJ into the spindle where the old LBJ was hammered out. Attach the appropriate sleeve from the LBJ press so that the massive c-clamp tool will press evenly:
When using the above method, the tool does the job quite nicely. You will have to add a shim over the adapter so that the LBJ is completely pressed into the LBJ. Again, I did not take a picture of the extra shim that I added.
Within minutes, the LBJ was hammered out and pressed in.
M-
Just found the original link: https://honda-tech.com/zerothread?id=1567042

Thread
Thread Starter
Forum
Replies
Last Post
Kevins89notch
Honda Civic / Del Sol (1992 - 2000)
21
Nov 4, 2013 06:17 AM
DEL HATCH
Honda Civic / Del Sol (1992 - 2000)
6
Dec 16, 2006 01:57 PM