

Fabricating Carbon Fiber Intake/Airbox

Thread Starter
Honda-Tech Member
Joined: Jun 2004
Posts: 416
Likes: 0
From: Tempe, AZ, U.S.A.
Hi guys,
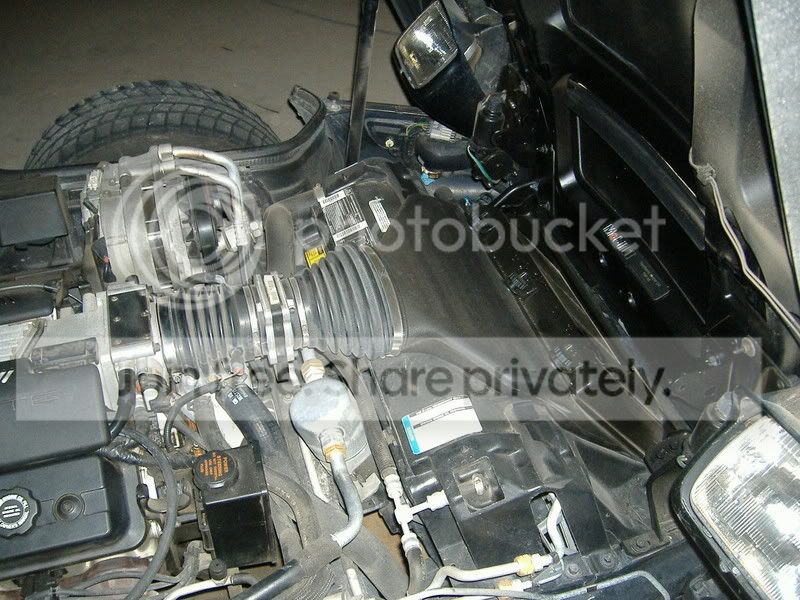
I'm trying to make an airbox and intake arm for my car. I've never worked with carbon fiber myself, but I've seen people make subwoofer enclosures out of it. I already have a design in my mind.
I just want to know how I should go about making the tubing out of carbon fiber. I was thinking of making a skeleton out of welding wire and wrap the carbon fiber cloth around it. Then heat it up with a hair dryer and apply the resin. My concern is, if I use this method, would I be able to take the seam, where the two edges of the cloth meet, out? I'm not too worried about the look of the seam, as it will end up on the bottom side of the tube; I just don't want it to leak.
I have attached two pictures of what I'm working with. Maybe you guys have already done this or can give me better ideas!
Thanks a lot in advance!

Joined: Oct 2002
Posts: 1,708
Likes: 0
From: Eagle Mountain, UT, USA
Well there are many ways to reach the end goal and like anything it just depends on what type of time and money you want to give up to reach your goal. Anyway if the tubing was the same diameter down the length you could just use carbon sleeve which means you would have no seam. Since this necks up and down you can't use sleeve. You will have a seam no doubt so just place the seam in the right place so it's hidden. I'm not sure why you want to hit the resin with a hair dryer but it's not really needed. I see you ave a concern about leaking here, is this intake going to be pressurized or will the motor stay NA? Either way the resin is really what will seal it up so just make sure yuo have complete coverage.
Anyway, here is a quick way to get the results you are looking for. Buy some foam that is will dissolve in acetone or paint thinner, just try it first. From there sand the shape you want. Now wrap the foam in clear packing tape. Then wrap the top half of the part in carbon and resin maybe 4 layers is all if this is a non boost situation. Wrap the bottom half first so you can drop the top half on and hide the seam. You might even want to cut some strips of carbon to be applied first before the layers of carbon to add extra rigidity at the seam. Now apply a layer of carbon to the top side and go back and forth overlapping the seam. You could then vacuum bag the whole setup if you want to get crazy. It does add another layer of complexity but you choose. Now let cure and pour acetone into the foam and dissolve it mostly. Now pull the packing tape out of the inside. If you don't use packing tape the inside won't be very smooth at all. The packing tape keep the resin from migrating into the foam.
Now add a layer or two of resin one side at a time and sand the whole thing with 150 grit until it's smooth. Now use finer and finer grits of paper to finish it how you want it to look. Now clear coat it or just buff it to a polish. That is about as quick and dirty as it gets but you will get the job done without much experience.
All the other methods require at least building molds but I'm not sure how far you want to get into this so let me know if you want to hear the other methods.
Thread Starter
Honda-Tech Member
Joined: Jun 2004
Posts: 416
Likes: 0
From: Tempe, AZ, U.S.A.
That's great information man, I appreciate you sharing it with me.
The reason I mentioned a hair drier was to help the carbon fiber "fit" the skeleton better, not to cure the resin. I saw this method on TV when they were building a prototype piece for the space shuttle.
I think I have a pretty clear picture of the method you're talking about. How many layers of carbon fiber cloth is necessary? and how many layers of resin should I add between each layer?
Thanks for your help!
Joined: Oct 2002
Posts: 1,708
Likes: 0
From: Eagle Mountain, UT, USA
Ahh ok that makes sense on the heat gun. Most likely the material they used on the space shuttle was prepreg. This means the resin is impregnated into the carbon fabric after weaveing and then it is stored in the freezer so the resin won't cure. They used a heat gun because it makes the prepreg slightly tacky like fruit leather pretty much. This makes it easy to stick the layers of prepreg in the mold. You will not be using prepreg material, you will use dry cloth with no resin in it which is a lot like fiberglass cloth. Prepreg costs way more than standard dry cloth and is not really suited to garage work.
I would say maybe 4-6 layers of 5.7 oz carbon fabric would be ok. As far as layup and how many layers of resin this is how it works. First you paint a thin layer of resin down and then drop fabric down and brush, stipple or squeegee more resin on top of that first layer, then drop another layer of fabric down and do it again. BTW stippling is just tapping the fabric with a 1-2" wide brush to get the resin below to come up through the material. You don;t want to do this too hard or you'll mess up the weave pattern of the fabric. You could use a clear epoxy or a polyester resin for this job. Epoxy is stronger but at least twice the price of ester based resin. I got your IM
I would say maybe 4-6 layers of 5.7 oz carbon fabric would be ok. As far as layup and how many layers of resin this is how it works. First you paint a thin layer of resin down and then drop fabric down and brush, stipple or squeegee more resin on top of that first layer, then drop another layer of fabric down and do it again. BTW stippling is just tapping the fabric with a 1-2" wide brush to get the resin below to come up through the material. You don;t want to do this too hard or you'll mess up the weave pattern of the fabric. You could use a clear epoxy or a polyester resin for this job. Epoxy is stronger but at least twice the price of ester based resin. I got your IM
Honda-Tech Member
Joined: Jul 2004
Posts: 500
Likes: 0
Great info and I'm planning to do a similar project.
How well does the packing tape pull out though? with it being a plastic, it seems like the resin might melt it or the aectone? I know some plastics are affected and some aren't.
I take it you have used this method on some parts? Do you have any pictures?
Thanks for the info as well.
How well does the packing tape pull out though? with it being a plastic, it seems like the resin might melt it or the aectone? I know some plastics are affected and some aren't.
I take it you have used this method on some parts? Do you have any pictures?
Thanks for the info as well.
Joined: Jan 2006
Posts: 149
Likes: 0
If its just for looks, just take the stock airbox and wrap it with a single layer of carbon fiber and then do a wet layup. Then clearcoat the heck out of it and sand it smooth.
The best way would be to mold the thing
The best way would be to mold the thing
Joined: Oct 2002
Posts: 1,708
Likes: 0
From: Eagle Mountain, UT, USA
<TABLE WIDTH="90%" CELLSPACING=0 CELLPADDING=0 ALIGN=CENTER><TR><TD>Quote, originally posted by 99_GS-T »</TD></TR><TR><TD CLASS="quote">Great info and I'm planning to do a similar project.
How well does the packing tape pull out though? with it being a plastic, it seems like the resin might melt it or the aectone? I know some plastics are affected and some aren't.
I take it you have used this method on some parts? Do you have any pictures?
Thanks for the info as well.</TD></TR></TABLE>
Yah you'll just want to dissolve the majority of the foam and try to keep the acetone away from the tape as much as possible. You will end up melting the tape slightly but if you are careful you won't melt much of it since you can pour it straight through on a part like this. You could also use solvent resistant tape found at screen printer supply shops as we as composite flash tape. You have lots of options if you're worried about it. I don't have any pics myself but look about 2/3 of the way down this page and you can see a few pics of a similar airbox project:
http://www.kimini.com/Diaries/2005Dec/
Trending Topics
Thread Starter
Honda-Tech Member
Joined: Jun 2004
Posts: 416
Likes: 0
From: Tempe, AZ, U.S.A.
<TABLE WIDTH="90%" CELLSPACING=0 CELLPADDING=0 ALIGN=CENTER><TR><TD>Quote, originally posted by 8mpg »</TD></TR><TR><TD CLASS="quote">If its just for looks, just take the stock airbox and wrap it with a single layer of carbon fiber and then do a wet layup. Then clearcoat the heck out of it and sand it smooth.
The best way would be to mold the thing </TD></TR></TABLE>
That's a good idea, but it's not just for looks. Like I said, I already had a design in my mind. If this project came out half way decent, I might actually wrap a few pieces, such as the fuel rail covers.
<TABLE WIDTH="90%" CELLSPACING=0 CELLPADDING=0 ALIGN=CENTER><TR><TD>Quote, originally posted by crx12 »</TD></TR><TR><TD CLASS="quote">Ahh ok that makes sense on the heat gun. Most likely the material they used on the space shuttle was prepreg. This means the resin is impregnated into the carbon fabric after weaveing and then it is stored in the freezer so the resin won't cure. They used a heat gun because it makes the prepreg slightly tacky like fruit leather pretty much. This makes it easy to stick the layers of prepreg in the mold. You will not be using prepreg material, you will use dry cloth with no resin in it which is a lot like fiberglass cloth. Prepreg costs way more than standard dry cloth and is not really suited to garage work.
I would say maybe 4-6 layers of 5.7 oz carbon fabric would be ok. As far as layup and how many layers of resin this is how it works. First you paint a thin layer of resin down and then drop fabric down and brush, stipple or squeegee more resin on top of that first layer, then drop another layer of fabric down and do it again. BTW stippling is just tapping the fabric with a 1-2" wide brush to get the resin below to come up through the material. You don;t want to do this too hard or you'll mess up the weave pattern of the fabric. You could use a clear epoxy or a polyester resin for this job. Epoxy is stronger but at least twice the price of ester based resin. I got your IM </TD></TR></TABLE>
You're the man!
I replied to the IM. Thanks for your help!
Thread Starter
Honda-Tech Member
Joined: Jun 2004
Posts: 416
Likes: 0
From: Tempe, AZ, U.S.A.
<TABLE WIDTH="90%" CELLSPACING=0 CELLPADDING=0 ALIGN=CENTER><TR><TD>Quote, originally posted by Pat McGroin »</TD></TR><TR><TD CLASS="quote">Quick question, what is the name of that foam?
Also, when you build the blocks of foam, I am guessing you glue the individual blocks together?</TD></TR></TABLE>
I didn't know this either, but I researched it a little bit. Apparantly, laquer thinner and aceton both dissolve styrofoam.
I just did a test and nail polish remover melted the regular packing styrofoam, but it took a long time. I assume something stronger, like laquer thinner, will do it in a shorter amount of time. I think a "dry" form of foam would work better, something like the green stuff they stick fake flowers into. I've seen it in Walmart.
You might want to look up keyword "lost foam" for more information on this.
Joined: Oct 2002
Posts: 1,708
Likes: 0
From: Eagle Mountain, UT, USA
Yup styrofoam works well, I haven't tried that flower foam but I bet it works as well. Just test before use. Really you just need to melt out 50% of the foam and then you could just break it out when you start puling on the tape.
i HAS questions ?
Joined: Feb 2003
Posts: 7,850
Likes: 0
From: OH
Joined: Oct 2002
Posts: 1,708
Likes: 0
From: Eagle Mountain, UT, USA
Here isa how to on foam building one of themembers on my composites forum posted on another site:
http://dsmtuners.com/forums/sh...57621
This is exactly what I am talking about. Use everything herebut forget about the sleeve. Sleeves are not that great when it comes to large changes in diamter on the same part as in this case.
http://dsmtuners.com/forums/sh...57621
This is exactly what I am talking about. Use everything herebut forget about the sleeve. Sleeves are not that great when it comes to large changes in diamter on the same part as in this case.
Junior Member
Joined: Aug 2006
Posts: 423
Likes: 0
From: Clemson, SC, USA
Good questions and answers on this topic. I'm looking into making an airbox and intake tube for my setup that I'm currently working on. I'm thinking something like the dsmtuners link would be fairly easy and it looks pretty good. lmk how it turns out and check my thread if you want to see how mine turns out. https://honda-tech.com/zerothread?id=2055357

Thread
Thread Starter
Forum
Replies
Last Post
Nate@KAIZENSPEED
Honda Civic / Del Sol (1992 - 2000)
2
Mar 15, 2007 08:27 PM