
♠ Shaved, Tucked, Customized Engine Bays - Pics, Theory, Discussion ♠
 01-08-2011, 05:16 PM
I depinned mine at the wiper motor plug. There are I think 5 wires in total. After doing that, I routed them through where rain waters drains from the cowl into the fender wells. If you take a look at the area I'm talking about you should be able to see how I did it.
 01-08-2011, 06:02 PM
Honda-Tech Member
Join Date: Nov 2006
Posts: 353
Likes: 0
Received 0 Likes
on
0 Posts


I've tried pulling/sticking a microtip screwdriver in their with no luck
 01-08-2011, 06:22 PM
I cant really describe it cuz I suck w/wording things. But I'll try. I use a very small pick (got a set of 4 picks at Walmart for $7 -- Stanley Brand) I used the 90* pick, inserted into the face of the plug (your second picture) into the red areas, while doing this I tugged on the wire. It broke free one the first tug for me.

Theres a plastic tab that locks the spade in place, if you pry up on the tab it should free the spade connector. All you have to do is free that rubber plug on the back of the connector.
Also, it might help to break that rubber plug loose before prying that tab up. dont pry too hard it will break.
Theres a plastic tab that locks the spade in place, if you pry up on the tab it should free the spade connector. All you have to do is free that rubber plug on the back of the connector.
Also, it might help to break that rubber plug loose before prying that tab up. dont pry too hard it will break.
01-08-2011, 07:02 PM
Honda-Tech Member
Join Date: Mar 2006
Location: Atl, GA
Posts: 3,730
Likes: 0
Received 0 Likes
on
0 Posts
yeah i figured out this is same for the alternator plug and obd1 2 wire dizzy plug
01-08-2011, 07:19 PM
Honda-Tech Member
Join Date: Nov 2006
Posts: 353
Likes: 0
Received 0 Likes
on
0 Posts
Been trying to do this for a while now with no luck. Thanks for all the help though!
01-09-2011, 12:45 PM
Hmm, If my car wasnt all together Id make a video of me depinning it for you! Sorry man!
01-09-2011, 04:27 PM
Honda-Tech Member
Join Date: Aug 2004
Location: milwaukee, wisconsin, usa
Posts: 2,192
Likes: 0
Received 0 Likes
on
0 Posts
Hey Joe. It'd be tricky to block off the openings to prevent the internal baffles of the booster from getting coated during the chrome plating process. However, what's stopping you from polishing the booster? I know it's a lot of work, but the booster can be polished if you spend some time on it. Or, you could always try something like this: http://www.summitracing.com/search/b...rake-Boosters/
01-09-2011, 05:33 PM
Honda-Tech Member
Join Date: Nov 2006
Posts: 353
Likes: 0
Received 0 Likes
on
0 Posts
 01-09-2011, 07:57 PM
Honda-Tech Member

Join Date: Dec 2010
Posts: 5
Likes: 0
Received 0 Likes
on
0 Posts
I have a 96 ek coupe and I just pulled off my headlight/radiator/horn harness and noticed that the whole front front harness goes from passenger all the way to the driverside main plugs.
Did you somehow cut that in half or is it still one piece from passenger side to driverside?
Sorry for such a noob question but I would like to know how I can tuck the headlight harness/horn/radiator harness.
Did you somehow cut that in half or is it still one piece from passenger side to driverside?
Sorry for such a noob question but I would like to know how I can tuck the headlight harness/horn/radiator harness.
01-09-2011, 08:21 PM
Honda-Tech Member
Join Date: Nov 2006
Posts: 353
Likes: 0
Received 0 Likes
on
0 Posts
some people ahve been asking me how to do some tucks and stuff, so i made a simple diagram showing more or less hwo a stock engine is routed, and how a tucked one is routed (when i do it) im not getting into detail because if u read this thread instead of looking for pictures theres alot of helpful material in here... heres 1 visual... so please stop asking for help (j.k im glad to help)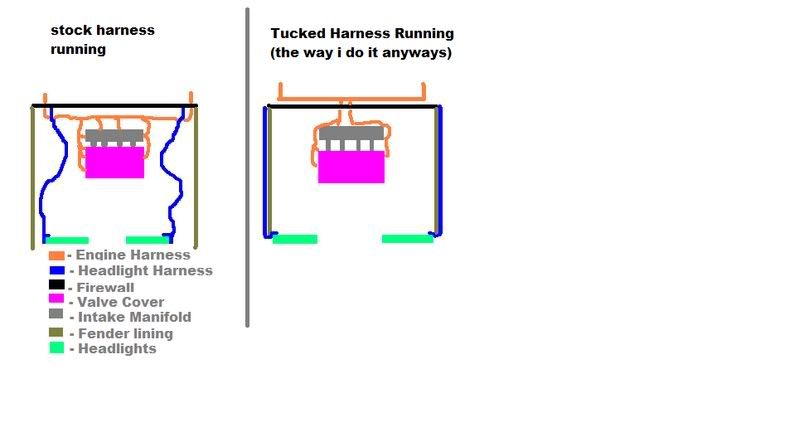
As far as my "tuck" went, I still have my stock motor w/AC in my car. I simply tucked the driver's side portion of my harness and left the passenger's side untouched. On the passenger's side, I simply re-arranged the plugs from the shock tower to a lower position (out of site + zip tied) and detached the headlight harness from the side/engine bay and zip tied it along with the AC stuff by my air intake.
 01-09-2011, 10:38 PM
Honda-Tech Member

Join Date: Sep 2010
Posts: 271
Likes: 0
Received 0 Likes
on
0 Posts

Switching to Rage bondo and SEM primer filler Wednesday, So for now Ill finish welding the firewall and ****. Im doing a full shave... Anyone got any suggestions?

 01-11-2011, 07:38 AM
Honda-Tech Member

Join Date: May 2009
Posts: 233
Likes: 0
Received 0 Likes
on
0 Posts
Shameless plug: I have a Rywire brake booster delete (painted black), 3/4" Wilwood BMC, and S2K CMC for sale, all brand new never used.
http://hondamarketplace.com/showthread.php?t=2881704
http://hondamarketplace.com/showthread.php?t=2881704
01-11-2011, 08:55 AM
Honda-Tech Member
Join Date: Oct 2005
Location: birmingham, AL, usa
Posts: 1,970
Likes: 0
Received 0 Likes
on
0 Posts
I depinned mine at the wiper motor plug. There are I think 5 wires in total. After doing that, I routed them through where rain waters drains from the cowl into the fender wells. If you take a look at the area I'm talking about you should be able to see how I did it.
can this be done on a eg/ej? tucking it through the wiper cowl, and theres a hole to run it to the fenderwell?
01-11-2011, 09:07 AM
Yessir! Its relatively easy. Just use a flash light and look in your frame/wiper cowl for a path to use. Make sure you put something on the wiring so it doesn't chafe and short out. That would suck!
01-11-2011, 09:11 AM
Honda-Tech Member
Join Date: Oct 2005
Location: birmingham, AL, usa
Posts: 1,970
Likes: 0
Received 0 Likes
on
0 Posts
the wad of **** that most of the time people just push down as far as it goes right behind the shock tower...
that will get into the wiper cowl aswell??
01-11-2011, 01:09 PM
Once you deloom it, it will become apparent what goes where (as long as you 1.label it or 2. have photographic memory). also the driver side "headlight" harness as most refer to it as can be unplugged from the cabin harness (the passenger side can not). so once you get it apart, deloom it you should look under your dash for its plug, its techanically above the clutch pedal. I believe its a white/grey plug rectangular in shape.
01-11-2011, 01:21 PM
Honda-Tech Member
Join Date: Oct 2005
Location: birmingham, AL, usa
Posts: 1,970
Likes: 0
Received 0 Likes
on
0 Posts
once you find it under the dash, then whats the best route to run it?
01-11-2011, 01:27 PM
Have you pulled it apart at all? Some of it you just gotta do. Like I said, once you get started its up to you to determine the best routs to run it. I chose to depin the wires from the cabin side plug, run my wires through the stock door harness boot (to prevent leaks, others have done this too) and then repin them all in the original location (sans cruise control, brake switch and power steering sensor).
Once its apart, it should become clear. I didnt take any pictures along the way sorry.
Once its apart, it should become clear. I didnt take any pictures along the way sorry.
 01-11-2011, 06:21 PM
Honda-Tech Member
Join Date: Nov 2006
Posts: 353
Likes: 0
Received 0 Likes
on
0 Posts
I took some pics of mine. But yeah, just like Cpt. xThread said, once you take it all apart, you will see/figure out the best way to re-route your wires. He mentioned he depinned all the wires from the the plug and then rerouted them. You can do that or you can do like me and just cut/re-route/solder/heatshrink/loom. It's your choice. I chose to cut the wires because some wires had a lot of excess wire and I felt it would be easier/better to deal with the least amount of wires that I could.
*Here is what the driver's side harness looks like after it has been unplugged/pulled out:

*Notice how there are two plugs at the end of this harness pictured above (one brown, one grey)? Well, after you unwrap it all you can separate them into two separate harnesses. Here is a pic of the grey plug wires after it has been separated/wrapped. This harness was kept (tucked) completely inside of the car. The brown plug has all the wires for the headlights/corners, cruise control/sidemarkers if apl., + wiper motor)

*Here I pulled "the wad of **** that most of the time people just push down as far as it goes right behind the shock tower" in behind the firewall. This one connects to the "small" harness with the grey plug pictured above:

*I pulled my harness through a hole beside where the hood cable runs through. It was covered by a plastic plug but I cut the center part out and ran my harness through it and pressed it back in. Also tucked/pulled my hood latch cable through the fender. The taped up wires on the left are for the wiper motor and in this pic you can see of the "excess wire" I'm talking about...

* I cut a wire hanger and used it to aid me in pulling my harness through the fender:

*Then, I plugged everything in/mocked it up and cut the wires to my liking. After, I prepped it all for soldering. (Note: remember to slide your heat shrink tubing in over the wires before you solder them together!)

*Soldered/heat shrunk/taped/loomed. Looking back at these pics I really wish I would've extended that ground wire (for the headlights) and taped it up with the rest of the harness to have it come out with/beside the other two ground wires :


*Finished product:

*Here is what the driver's side harness looks like after it has been unplugged/pulled out:
*Notice how there are two plugs at the end of this harness pictured above (one brown, one grey)? Well, after you unwrap it all you can separate them into two separate harnesses. Here is a pic of the grey plug wires after it has been separated/wrapped. This harness was kept (tucked) completely inside of the car. The brown plug has all the wires for the headlights/corners, cruise control/sidemarkers if apl., + wiper motor)
*Here I pulled "the wad of **** that most of the time people just push down as far as it goes right behind the shock tower" in behind the firewall. This one connects to the "small" harness with the grey plug pictured above:
*I pulled my harness through a hole beside where the hood cable runs through. It was covered by a plastic plug but I cut the center part out and ran my harness through it and pressed it back in. Also tucked/pulled my hood latch cable through the fender. The taped up wires on the left are for the wiper motor and in this pic you can see of the "excess wire" I'm talking about...
* I cut a wire hanger and used it to aid me in pulling my harness through the fender:
*Then, I plugged everything in/mocked it up and cut the wires to my liking. After, I prepped it all for soldering. (Note: remember to slide your heat shrink tubing in over the wires before you solder them together!)
*Soldered/heat shrunk/taped/loomed. Looking back at these pics I really wish I would've extended that ground wire (for the headlights) and taped it up with the rest of the harness to have it come out with/beside the other two ground wires
:*Finished product:
01-11-2011, 06:39 PM
Honda-Tech Member
Join Date: Nov 2006
Posts: 353
Likes: 0
Received 0 Likes
on
0 Posts
Here are some links that I found helpful while doing this:
http://civic-eg.com/viewtopic.php?t=92&highlight=
https://honda-tech.com/forums/showth...741857&page=10
http://civic-eg.com/viewtopic.php?t=92&highlight=
https://honda-tech.com/forums/showth...741857&page=10
01-11-2011, 09:42 PM
Who is Mr Robot?
iTrader: (2)
Join Date: Jul 2004
Location: ATL - Where the Pimps and Players dwell
Posts: 21,474
Likes: 0
Received 10 Likes
on
10 Posts
The one thing I haven't seen so far is a full shave/tuck with ps and ac.
I have an s13 (sr20) that has a full shave and tuck I'll post pics of later, but I just picked up a 97 EJ8 as a daily/tinker toy. The plan is the keep the d16, build it and boost it. i want to at least do a full tuck but have yet to see anyone accomplish this with the ac components in place...
I was thinking I could potentially relocate the heat exchanger under the core support. Clearly this would take new ac hard lines ( I have a spare set that I can take fittings from) and me and my fab guy could bend/weld new hardlines that tucked out of the way.
My other concern is seeing how this car is OBD2 and me needing to pass a yearly OBD check. I was wondering the possibility of deleting the canister, purge solenoid, etc without affecting obd2 functionality
01-12-2011, 03:17 AM
Honda-Tech Member
Look harder in this thread. There are at least 3 cars I can think of off the top of my head that are fully tucked with a/c and ps in here.