


 Mar 31, 2015, 10:26 AM
Last edit by: IB Advertising
See related guides and technical advice from our community experts:
Browse all: Honda Accord Brake Guides
- Honda Accord: How to Replace Brake Pads, Calipers and Rotors
Step by step instructions for do-it-yourself repairs
Browse all: Honda Accord Brake Guides

HOW-TO: Front/Rear pads & rotor change

Thread Starter
Trial User
Joined: Nov 2011
Posts: 4
Likes: 0
Hey guys,
We just got done swapping out my front and rear pads & rotors, and wrote up a pretty lengthy tutorial with a bunch of pics. I truly hope this helps somebody! Let me know what you think
Front rotors & pads: http://revvolution.com/tutorials/read/46/
Back rotors & pads: http://revvolution.com/tutorials/read/47/
Thanks guys!!
Honda-Tech Member
Joined: Oct 2004
Posts: 471
Likes: 0
From: Central, NJ, USA
nice attempt, but some things to change or edit as recommended:
use METRIC sizes; please edit to use metric sockets... like 19mm for the lug nuts
torque specs for the pins, and other bolts would be helpful in your tutorial; just to give it a more complete one-stop lookup
you don't need to remove the master cylinder cap completely; I just unscrew it and can see the fluid level on the side ~ keep the cap on to avoid having dirt accidentally drop in there
-------------------
8-11: you have the later generation accord (LUCKY!) please edit your information to reflect that since the 94-97 generation have that dumb hub-over-rotor design
-------------------
8: if you are going to re-use the old rotors (but just removing them to get them re-surfaced at a machine shop) & the rubber mallet trick doesn't work,
there are 2 other threaded holes to "push" the rotor off the hub by using 8 mm x 1.25 mm x ~25 mm sized METRIC bolts (thickness of bolt x thread pitch x length)

-------------------
10: tip ~ i'd put a very small amount of anti seize or grease on the hub before re-installing the rotor (just to prevent the rotor being stuck on the hub for future jobs)
-------------------
11: you don't really need to re-install those cumbersome screws, but if you do please use some anti-seize on the threads so it won't rust on to the hub in the future. They were mainly used to speed up the assembly process when putting them together. I use the lug nut as a temp holder while re-assembling the brakes instead of these 2 screws
-------------------
17: you can also use a c-clamp while the caliper is still on to push the piston back in for the new brake pads (this step can be squeezed between steps 3 - 4)

or if you don't have a huge c-clamp, a smaller one would work the following way:
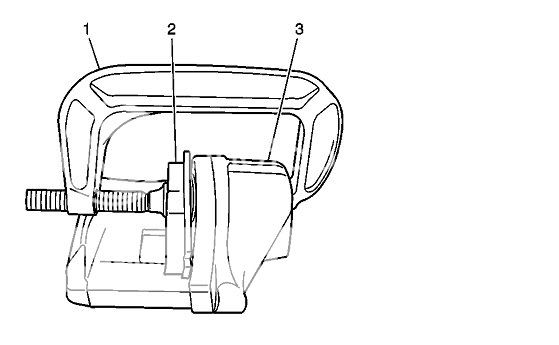
where you use the old brake pad(#2 in that drawing) as a buffer to push the piston back in evenly
not like the following:

this is a big no-no!
-------------
26: not really needed since you didn't open the hydraulic circuit, but good idea to flush out old fluid with new DOT 3 or 4 brake fluid as a maintenance item as well
instead of plastic zip ties, i like to use an old coat hanger - cut and bend to desired length & can be re-used as many times as you want!
-----------------------------------
rear: similar notes as above with metric sizes and torque specs
=======
insert between steps 4-5: release parking brake
--------
16: just say to rotate that tool clockwise while pushing the piston in; that toolset can be rented from a parts place for free or buy the following and toss it in your toolbox:


----------
17: what what?
agree to properly bed new pads to either new rotors
or to bed new pads to old rotors (but after re-surfacing the old ones with some sandpaper or emery cloth followed with a brake cleaner)
http://www.zeckhausen.com/bedding_in_brakes.htm
http://www.tirerack.com/brakes/tech/....jsp?techid=85
since my generation accord has those dumb rotor-over-hub design, i make sure to catch the front brakes before they go too thin and gouge/destroy the rotors. making circular patterns while removing the old layer of brake pad material from the rotors so the new pads will mate to the rotor better has been successful for the past 3 brake jobs on this generation accord so far.
the next brake pad change will require me to remove the whole knuckle assembly to replace the rotors & i feel sorry for the next owner since I don't have this car anymore.
use METRIC sizes; please edit to use metric sockets... like 19mm for the lug nuts
torque specs for the pins, and other bolts would be helpful in your tutorial; just to give it a more complete one-stop lookup
you don't need to remove the master cylinder cap completely; I just unscrew it and can see the fluid level on the side ~ keep the cap on to avoid having dirt accidentally drop in there
-------------------
8-11: you have the later generation accord (LUCKY!) please edit your information to reflect that since the 94-97 generation have that dumb hub-over-rotor design
-------------------
8: if you are going to re-use the old rotors (but just removing them to get them re-surfaced at a machine shop) & the rubber mallet trick doesn't work,
there are 2 other threaded holes to "push" the rotor off the hub by using 8 mm x 1.25 mm x ~25 mm sized METRIC bolts (thickness of bolt x thread pitch x length)
-------------------
10: tip ~ i'd put a very small amount of anti seize or grease on the hub before re-installing the rotor (just to prevent the rotor being stuck on the hub for future jobs)
-------------------
11: you don't really need to re-install those cumbersome screws, but if you do please use some anti-seize on the threads so it won't rust on to the hub in the future. They were mainly used to speed up the assembly process when putting them together. I use the lug nut as a temp holder while re-assembling the brakes instead of these 2 screws
-------------------
17: you can also use a c-clamp while the caliper is still on to push the piston back in for the new brake pads (this step can be squeezed between steps 3 - 4)
or if you don't have a huge c-clamp, a smaller one would work the following way:
where you use the old brake pad(#2 in that drawing) as a buffer to push the piston back in evenly
not like the following:
this is a big no-no!
-------------
26: not really needed since you didn't open the hydraulic circuit, but good idea to flush out old fluid with new DOT 3 or 4 brake fluid as a maintenance item as well
instead of plastic zip ties, i like to use an old coat hanger - cut and bend to desired length & can be re-used as many times as you want!
-----------------------------------
rear: similar notes as above with metric sizes and torque specs
=======
insert between steps 4-5: release parking brake
--------
16: just say to rotate that tool clockwise while pushing the piston in; that toolset can be rented from a parts place for free or buy the following and toss it in your toolbox:
----------
17: what what?
agree to properly bed new pads to either new rotors
or to bed new pads to old rotors (but after re-surfacing the old ones with some sandpaper or emery cloth followed with a brake cleaner)
http://www.zeckhausen.com/bedding_in_brakes.htm
http://www.tirerack.com/brakes/tech/....jsp?techid=85
since my generation accord has those dumb rotor-over-hub design, i make sure to catch the front brakes before they go too thin and gouge/destroy the rotors. making circular patterns while removing the old layer of brake pad material from the rotors so the new pads will mate to the rotor better has been successful for the past 3 brake jobs on this generation accord so far.
the next brake pad change will require me to remove the whole knuckle assembly to replace the rotors & i feel sorry for the next owner since I don't have this car anymore.
Last edited by ricebike; Feb 29, 2012 at 06:55 PM. Reason: added pix from the internetz & confirmed size of extractor bolts
Honda-Tech Member
Joined: Oct 2004
Posts: 471
Likes: 0
From: Central, NJ, USA
no problem, Fw!
but I didn't get #17 on the rear brake job, can you elaborate and/or illustrate that?
i stressed using METRIC sizes over SAE sizes, because if the SAE sized tool slips off & rounds off the bolts/ nuts, you'll be in a pickle! also, more of the american/domestic models are now giving up and using METRIC sized fasteners over fractional-inch sizes for quite some time now...
also, wait for others to chime in about your tutorial; i've only been changing brake pads/ shoes since 1993 on various makes and models besides Honda.


Trending Topics

SHAME ON YOU REBECCA!

Joined: Mar 2007
Posts: 1,812
Likes: 0
From: My house.
I didn't bother putting in new #3 phillips screws because the old ones were so rusted I had to remove my rotor by taking out the hub bolt. My mechaninc suggested I leave them out (phillips screws) I hope he's right. Any input on this?


B*a*n*n*e*d
Joined: Dec 2008
Posts: 12,028
Likes: 5
The key is to use brake grease on the screws so that they don't bind over time and make it difficult to take out.
You can buy new ones cheap at parts stores. Just replace them if they get stripped. Very cheap cost.
Also, it's best to just buy the tool that is designed to press in the caliper for like $10. I also use a socket, normally like a 19mm socket to make it easier, i just put it in between the tool and the caliper.

Honda-Tech Member
Joined: Oct 2004
Posts: 471
Likes: 0
From: Central, NJ, USA
well, um, thanks for bumping it... because the poster before you gave out mis-information...
no, those little "set screws" were there for assembly line purposes only... google it and you'll see a vast array of answers about it. those little set screws aren't needed
the WHEEL LUGS will keep the rotor steady and true on the HUB... the caliper cage will keep your pads from bouncing against the rotor like holmes mis-stated on his post. just be sure to make sure the sliding caliper pins are lubricated well
Originally Posted by by holmes
It's very important to put the screws in there to help keep the rotor tight against the hub at high rates of travel and braking. Otherwise the rotor will bounce against the pad and cause unnecessary heat and wear.
the WHEEL LUGS will keep the rotor steady and true on the HUB... the caliper cage will keep your pads from bouncing against the rotor like holmes mis-stated on his post. just be sure to make sure the sliding caliper pins are lubricated well
MM Gruppe B
Joined: Feb 2009
Posts: 7,005
Likes: 105
From: 94577/Gaillimh

Honda-Tech Member
Joined: Jun 2009
Posts: 128
Likes: 0
I'm changing the rear rotors on a 93 Accord EX and one of the lugs is broken and I'm wondering if its difficult to replace myself.

Honda-Tech Member
Joined: Aug 2015
Posts: 2
Likes: 0
From: Airdrie, Alberta
I have tried 4 different rotors for my 2012 CR-V and each one has a problem with the shoulder of the brake pad holder rubbing against the new rotors. Any suggestions? I have a front wheel drive CR-V.
MM Gruppe B
Joined: Feb 2009
Posts: 7,005
Likes: 105
From: 94577/Gaillimh
It appears there are two different front rotors.
FWD has a 300mm front rotor. Thickness 25mm.
AWD has a 296mm front rotor. Thickness 28mm.
Either the rotor you have is too thick or too tall depending on where it is rubbing.
Welcome to the Accord Forum.
*EDIT: goofed on the AWD and FWD labeling.*
FWD has a 300mm front rotor. Thickness 25mm.
AWD has a 296mm front rotor. Thickness 28mm.
Either the rotor you have is too thick or too tall depending on where it is rubbing.
Welcome to the Accord Forum.
*EDIT: goofed on the AWD and FWD labeling.*
Last edited by MAD_MIKE; Aug 7, 2015 at 11:35 PM. Reason: I am Error
MM Gruppe B
Joined: Feb 2009
Posts: 7,005
Likes: 105
From: 94577/Gaillimh
Difference between rotors is minimal, you will need to verify the rotors given are indeed the correct rotors.
Beg/borrow/steal a ruler and verify the dimensions of the rotors first.
If the rotor is too rub/wear on the caliper/caliper cage, then most likely you have the AWD 28mm thick rotors rather than the correct FWD 25mm rotors.
If you cannot measure the diameter of the rotor, use dial calipers to measure the rotor thickness, 25mm is for FWD, 28mm AWD.
*EDIT: goofed on the AWD and FWD labeling.*
Last edited by MAD_MIKE; Aug 7, 2015 at 11:37 PM. Reason: I am Error


Thread
Thread Starter
Forum
Replies
Last Post