
Fixing Up a Turd: A Build Thread
 08-20-2017, 10:45 AM
#176
Honda-Tech Member
I read whole thread. Nice progres. I just hope you don't cut shortcuts with NSX. :D
Btw, do you remember where exactly you bought your seat foam? From who, I mean.
Btw2, thank you for the tip about photoshitbucket extension.
Imgur is the best.
Btw, do you remember where exactly you bought your seat foam? From who, I mean.
Btw2, thank you for the tip about photoshitbucket extension.
Imgur is the best.
 08-21-2017, 01:32 PM
#177

Yeah I made quite a few mistakes and attempted shortcuts with the Integra that I'm trying not to do with the NSX. So far I've been mostly successful except for the fiasco with the driver side fender that will haunt me until the day I die despite it being invisible to anyone but me.
Great deals from Capital Seating | eBay Stores
That's the only place I've seen Recaro parts, it's based in the UK so shipping is terribly slow and it's pricey at about $100 per bolster but it's better than having a smashed in and frayed bolster. Capital Seating has a website too that might be cheaper but when I tried to order from there they never got back to me so I just bought it on their Ebay store.
08-30-2017, 02:42 PM
#179
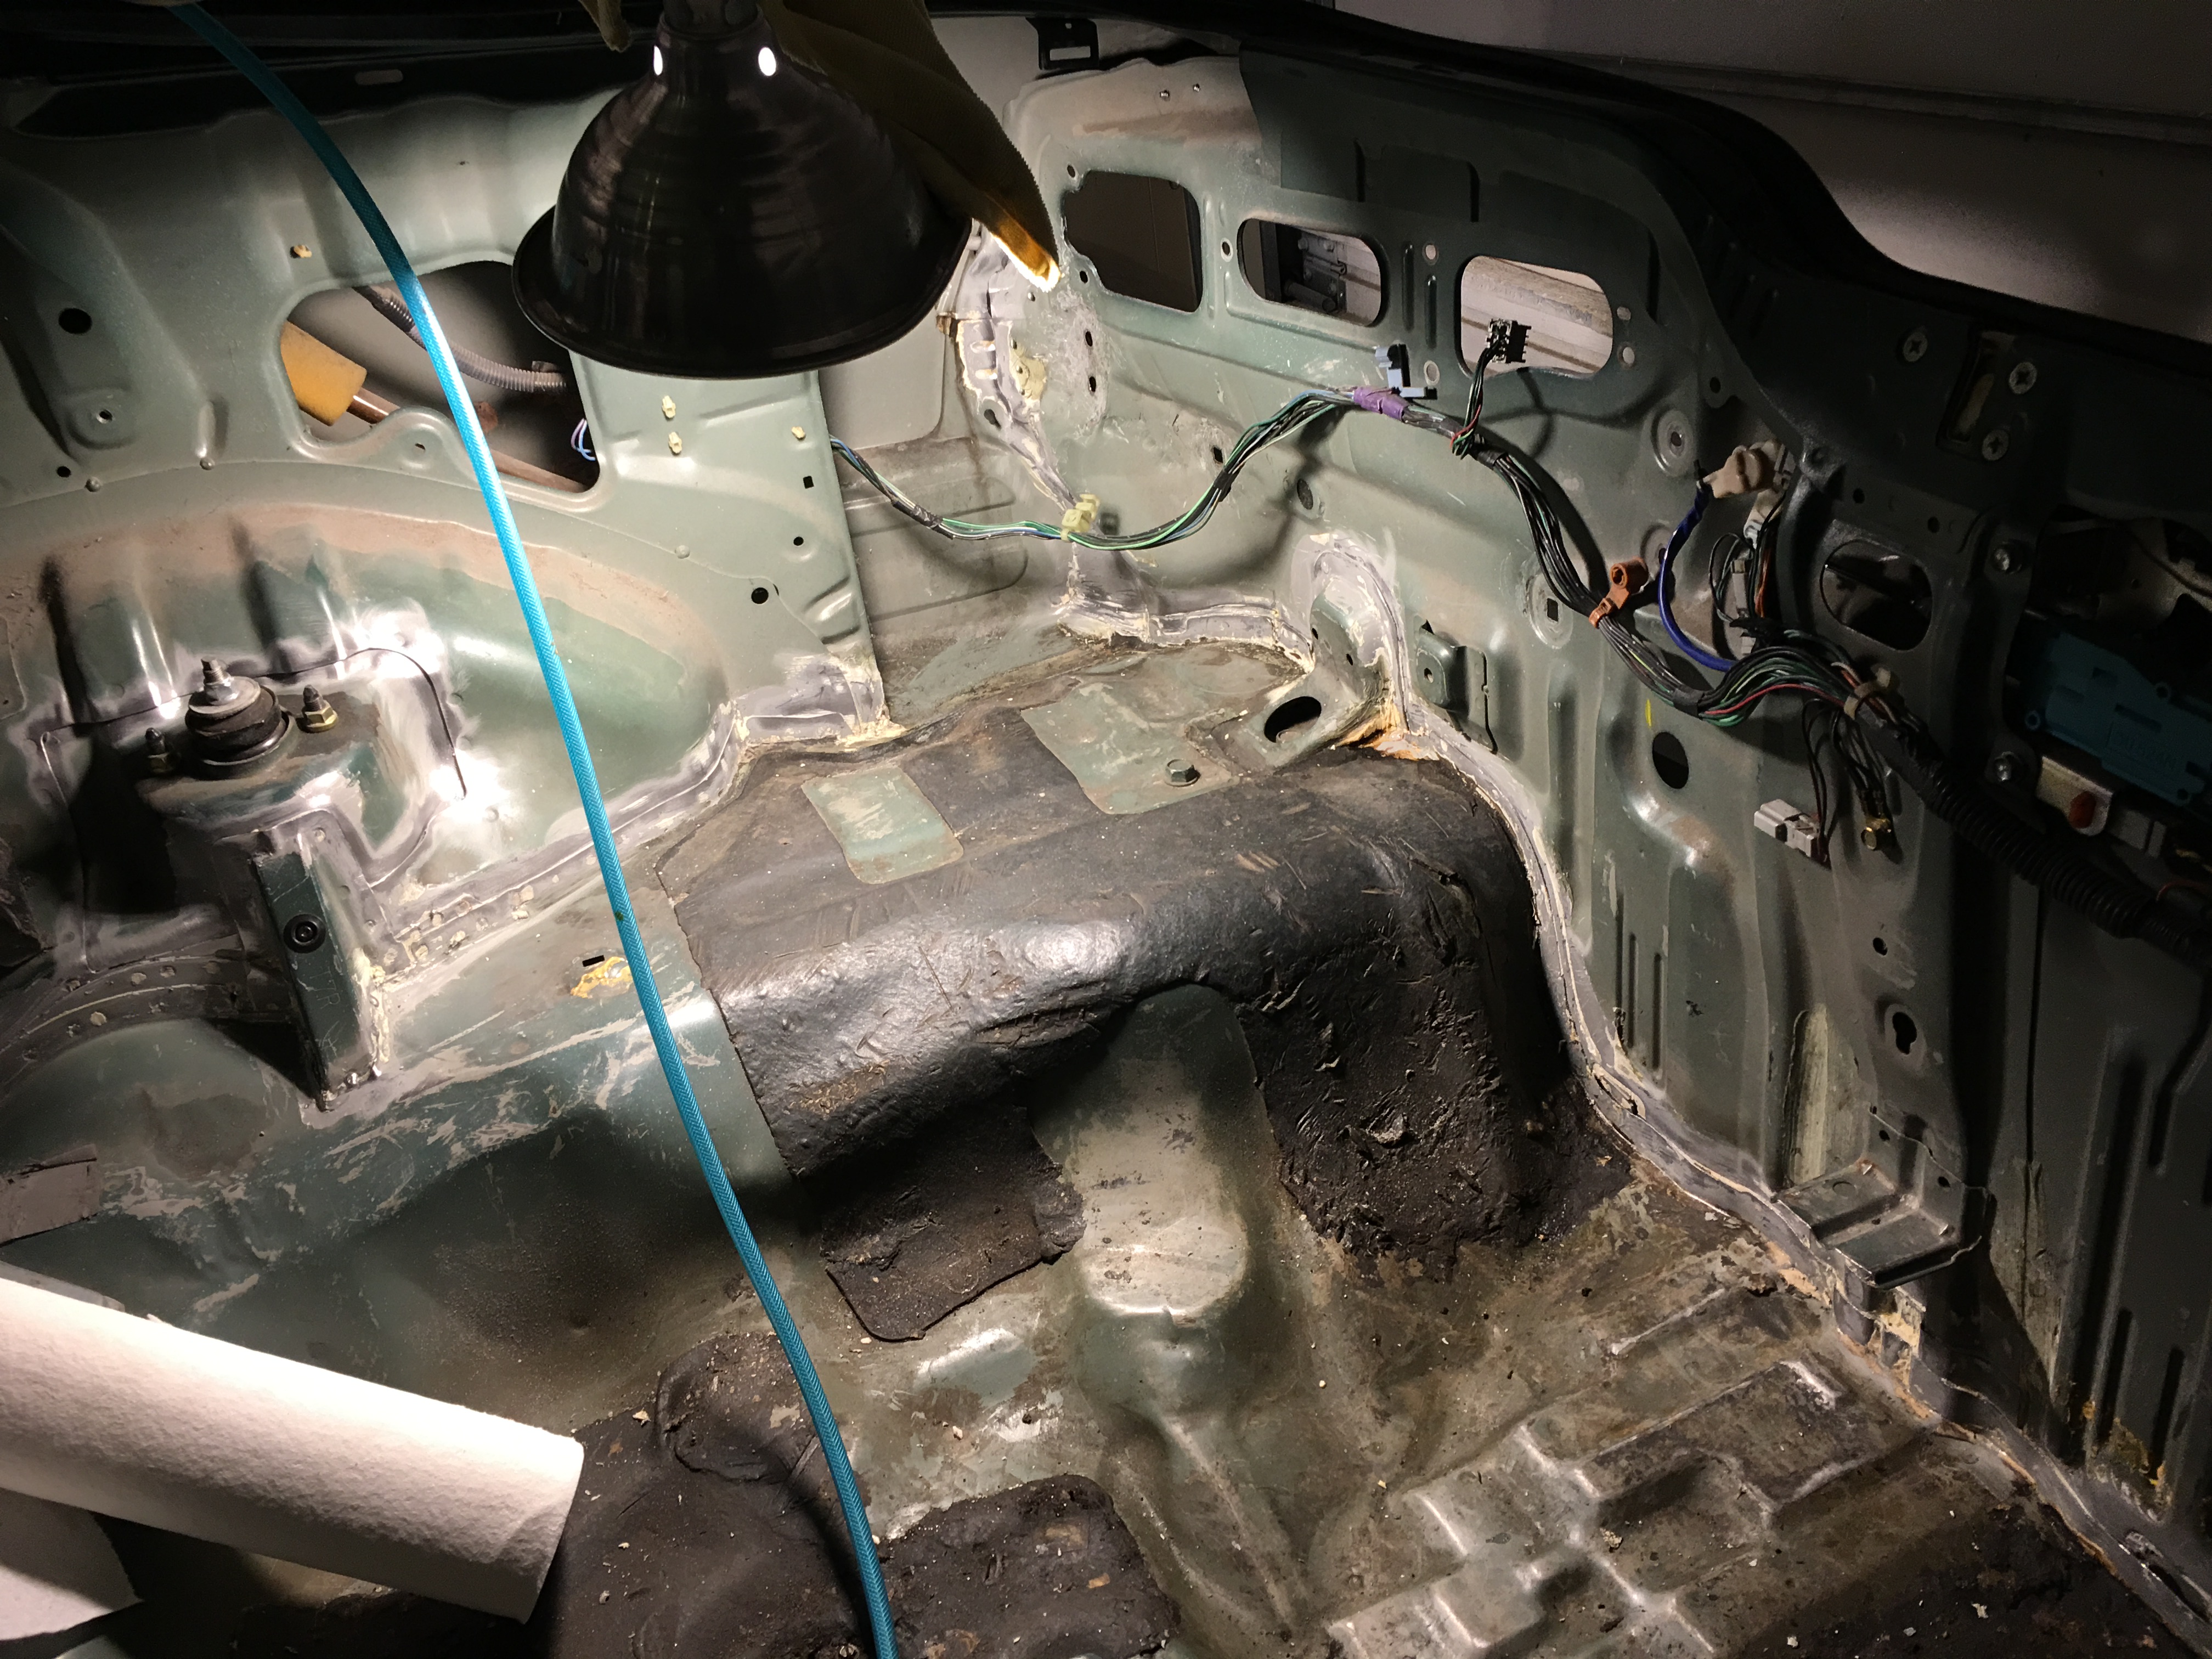
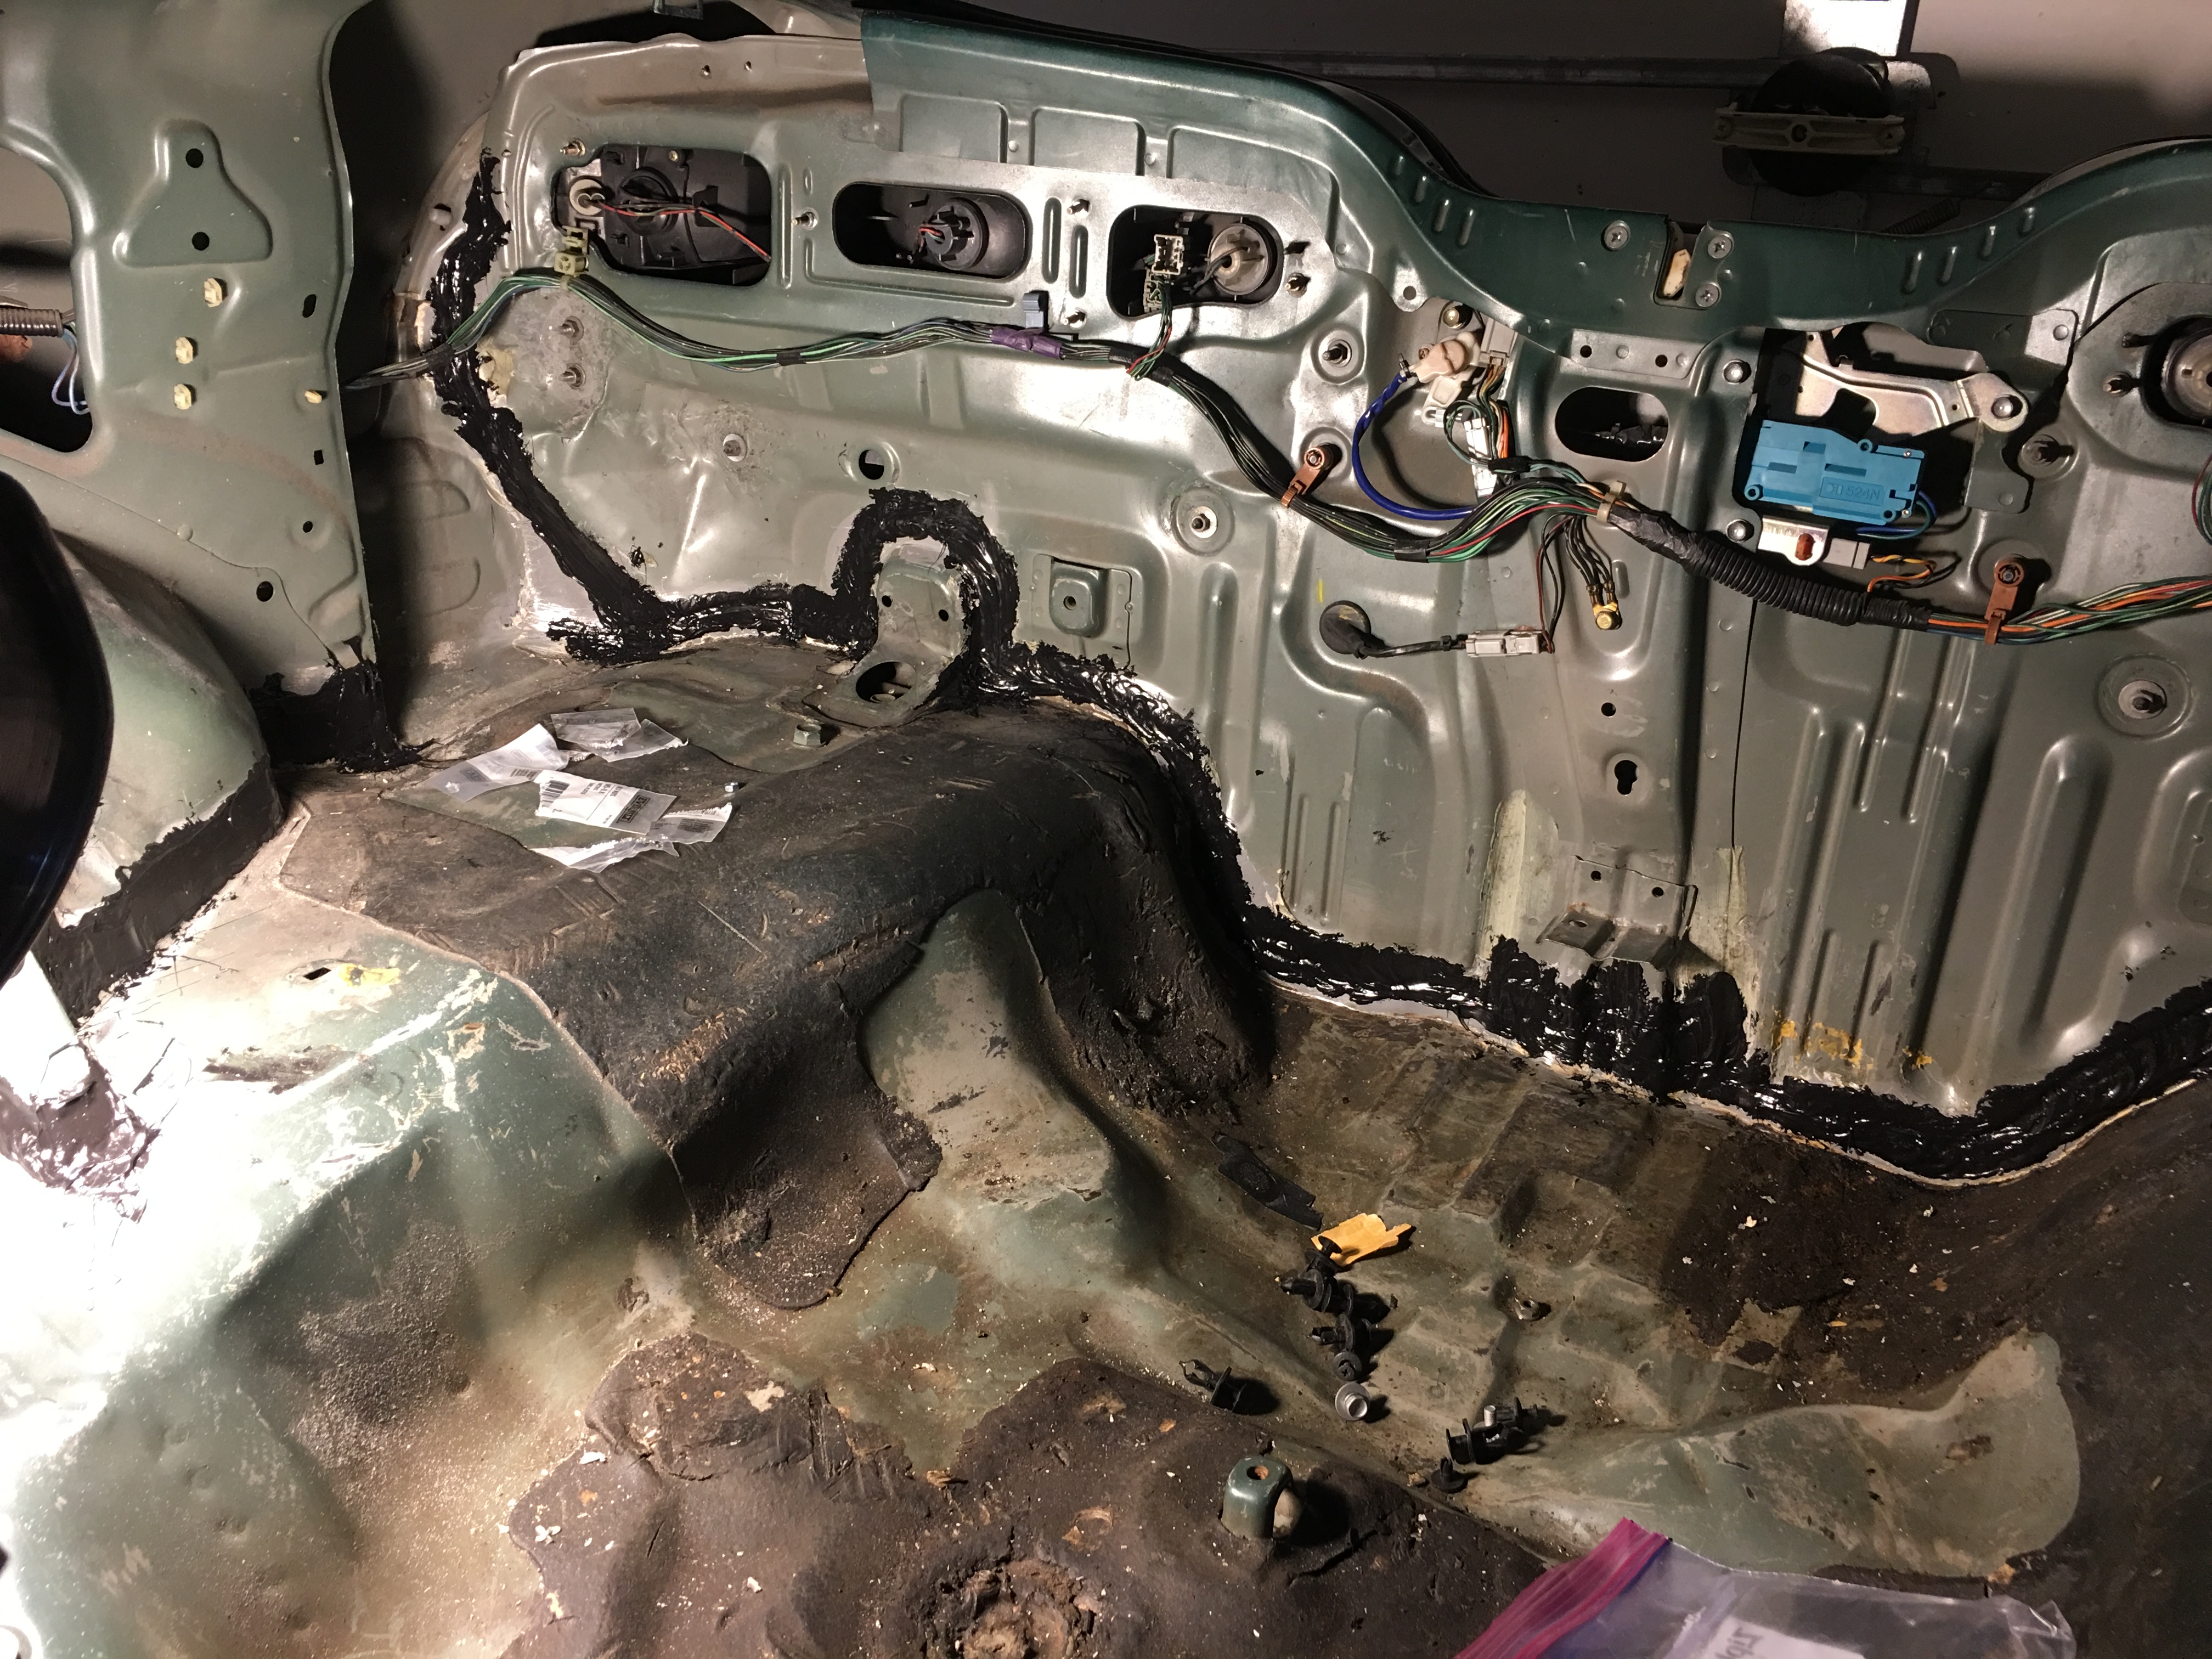
This car is just the gift that keeps on giving. I'm sure most of you know about the hurricane that recently hit Texas, I live in Austin so we got off easy with a bit of wind and lots of rain, but it was enough that the floor of the car got completely drenched from failed seam sealer and whatever awful attempted repair on the floor plugs this is. There wasn't even a flood, it's just water splashing up on the firewall and floor pan while driving. And I guess it's time to take care of the leak in the trunk that's been there for years.
Here we see a floor pan cap installed with expanding foam like you'd use on a house, and whoever did it tried to just use sheet metal roofing screws instead of panel adhesive.
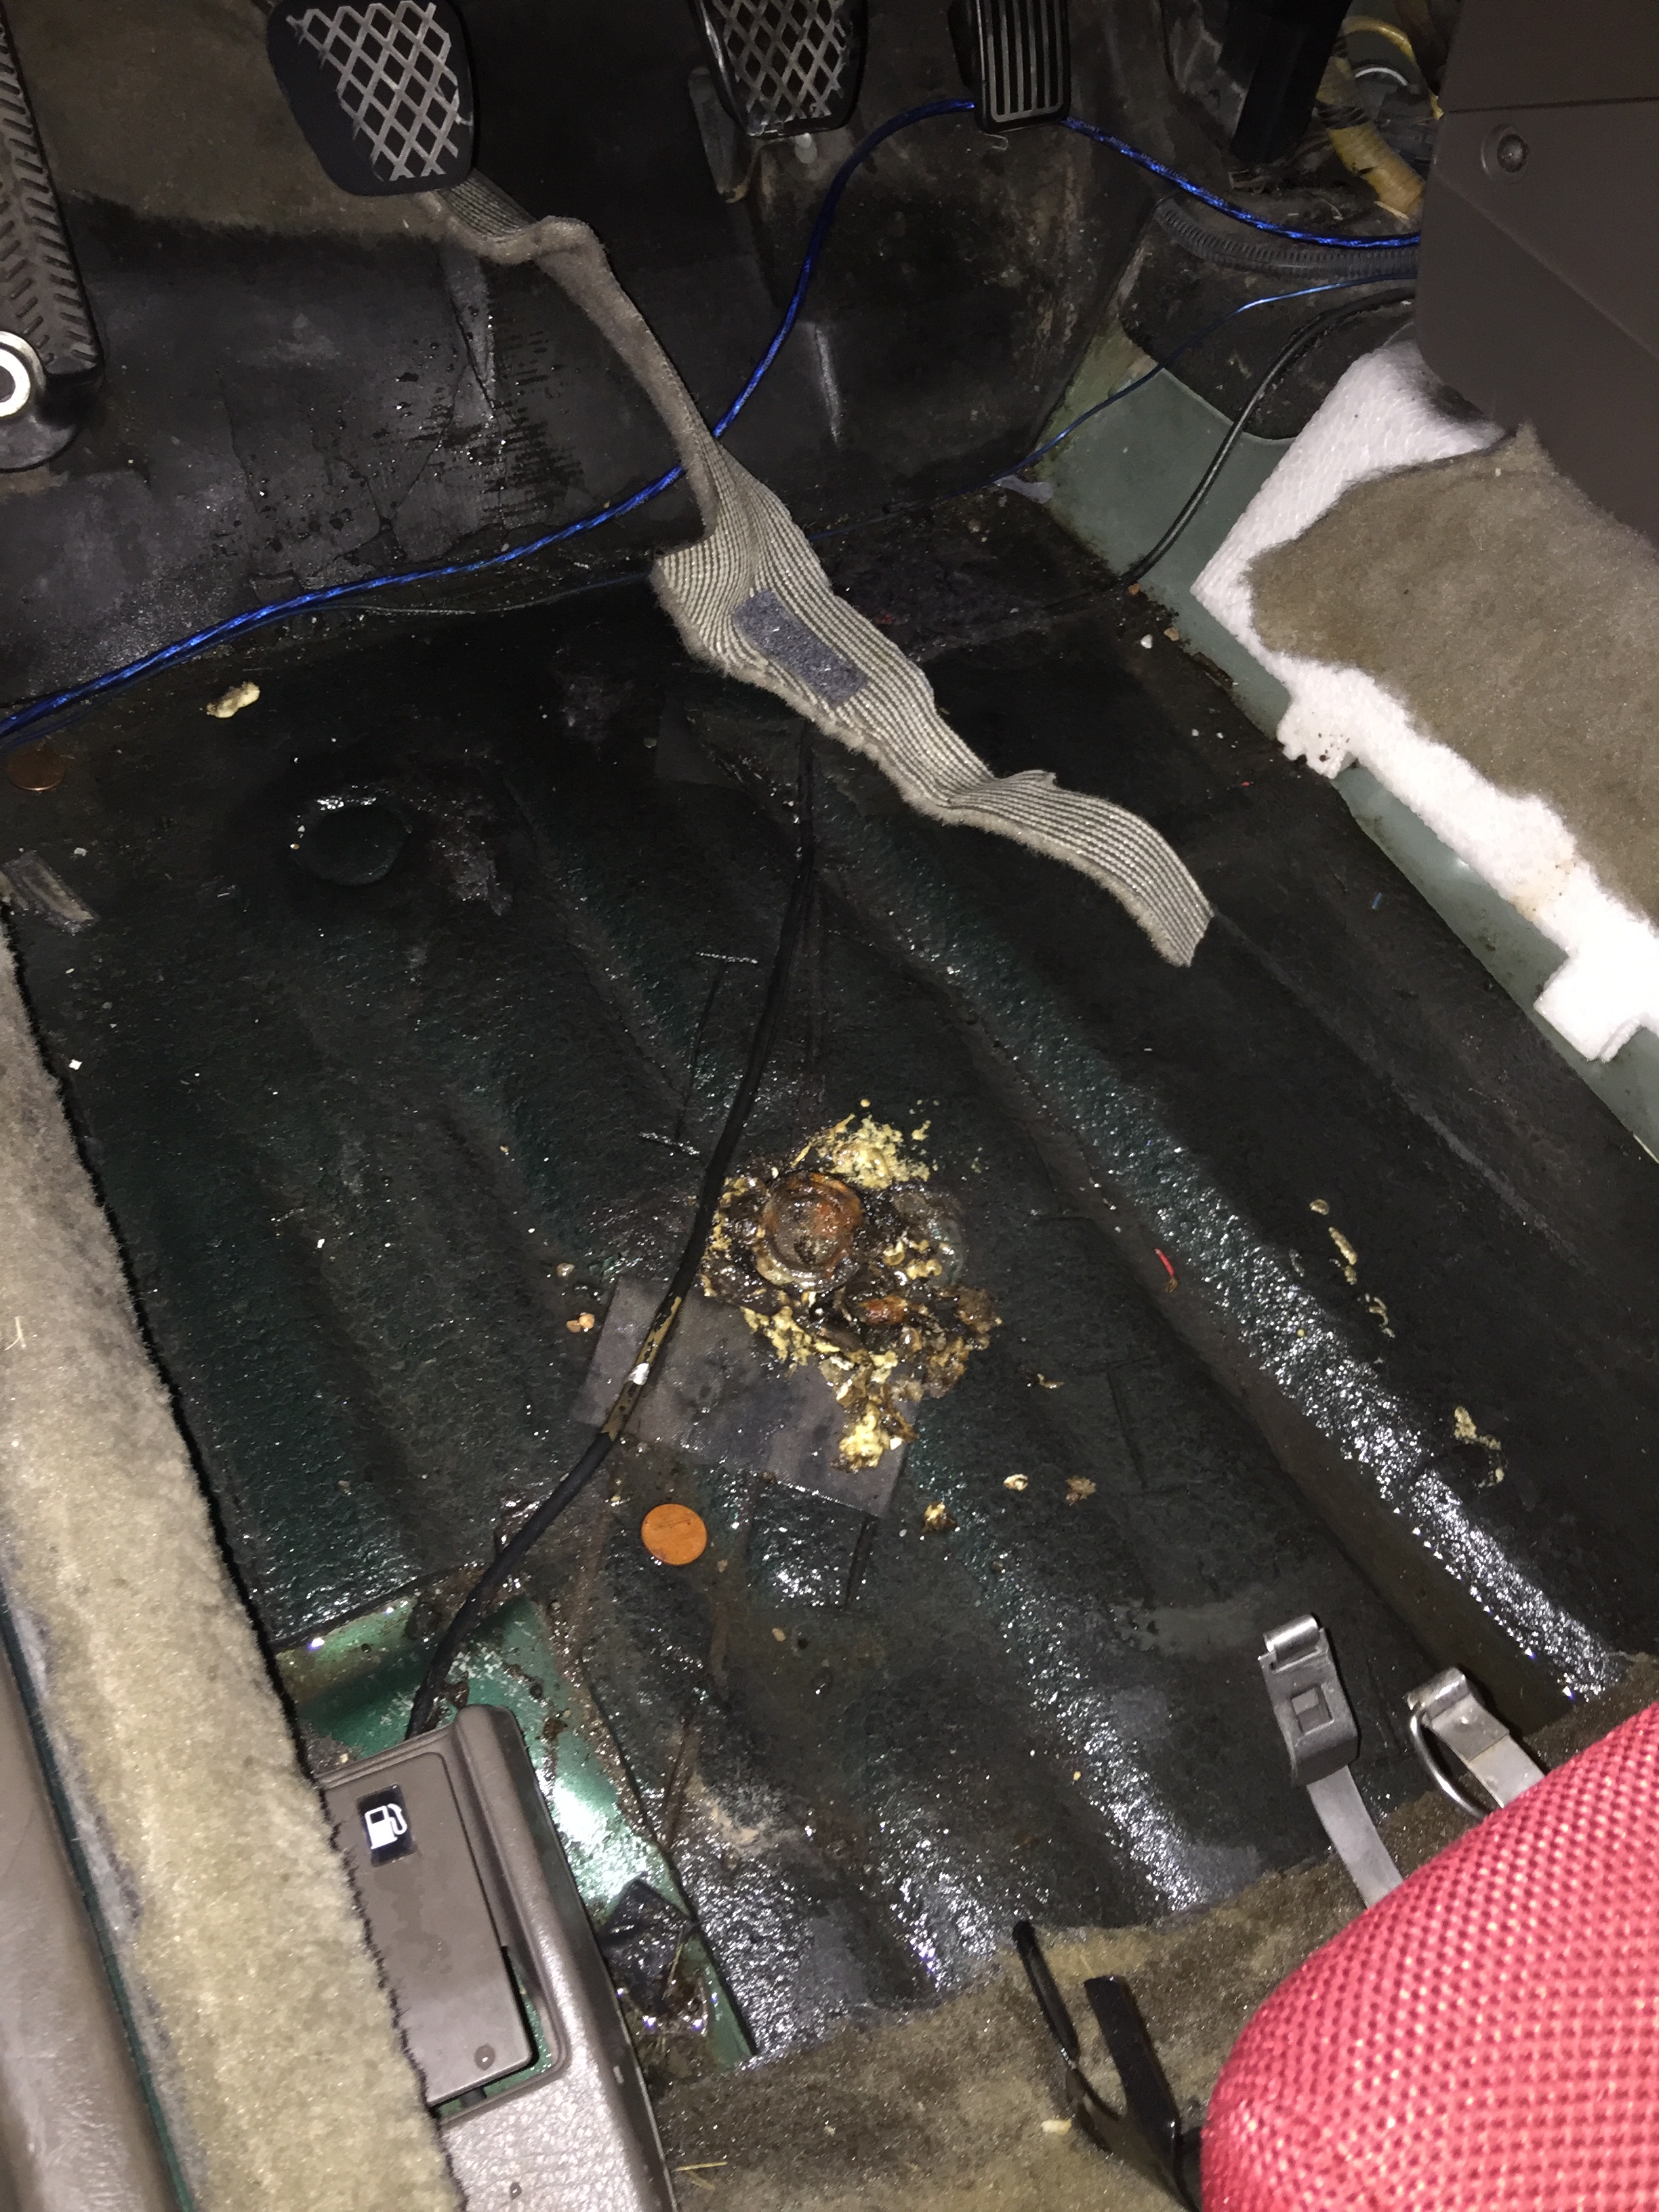
The screws were all loose and the foam wasn't stuck to much of anything and had cracked badly.
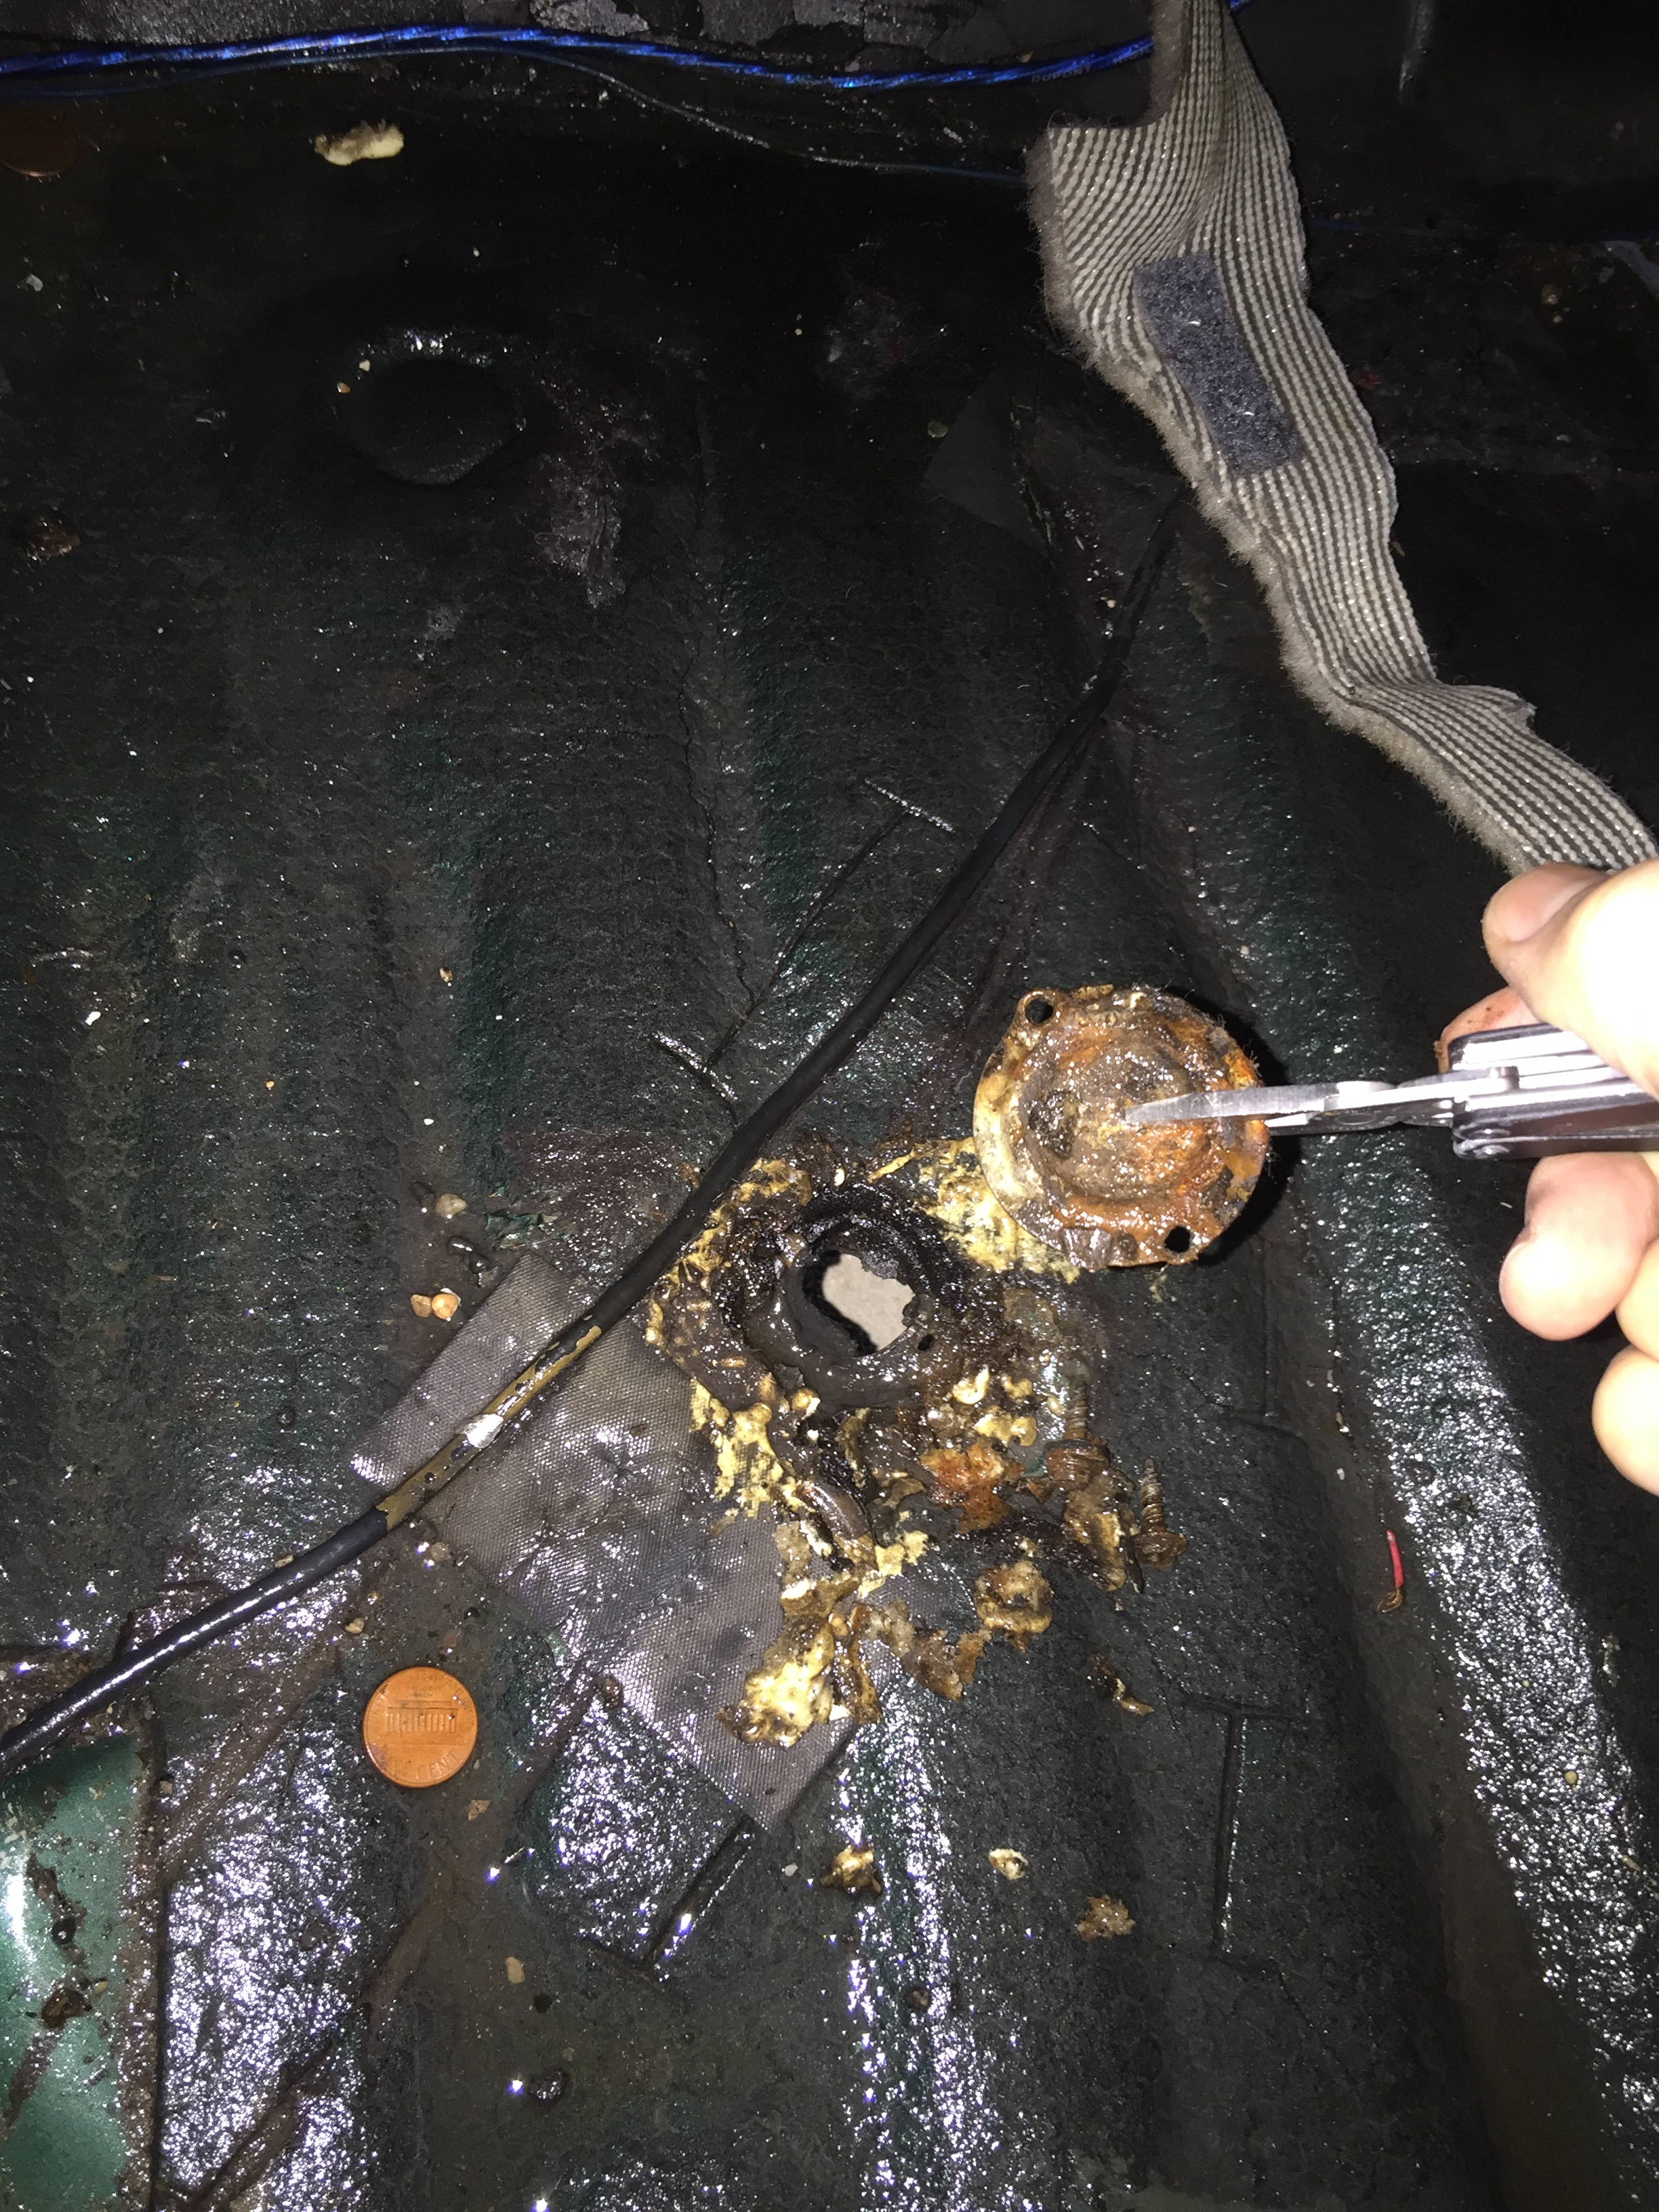
This is what the other side looked like before I scraped it all off, same crap.
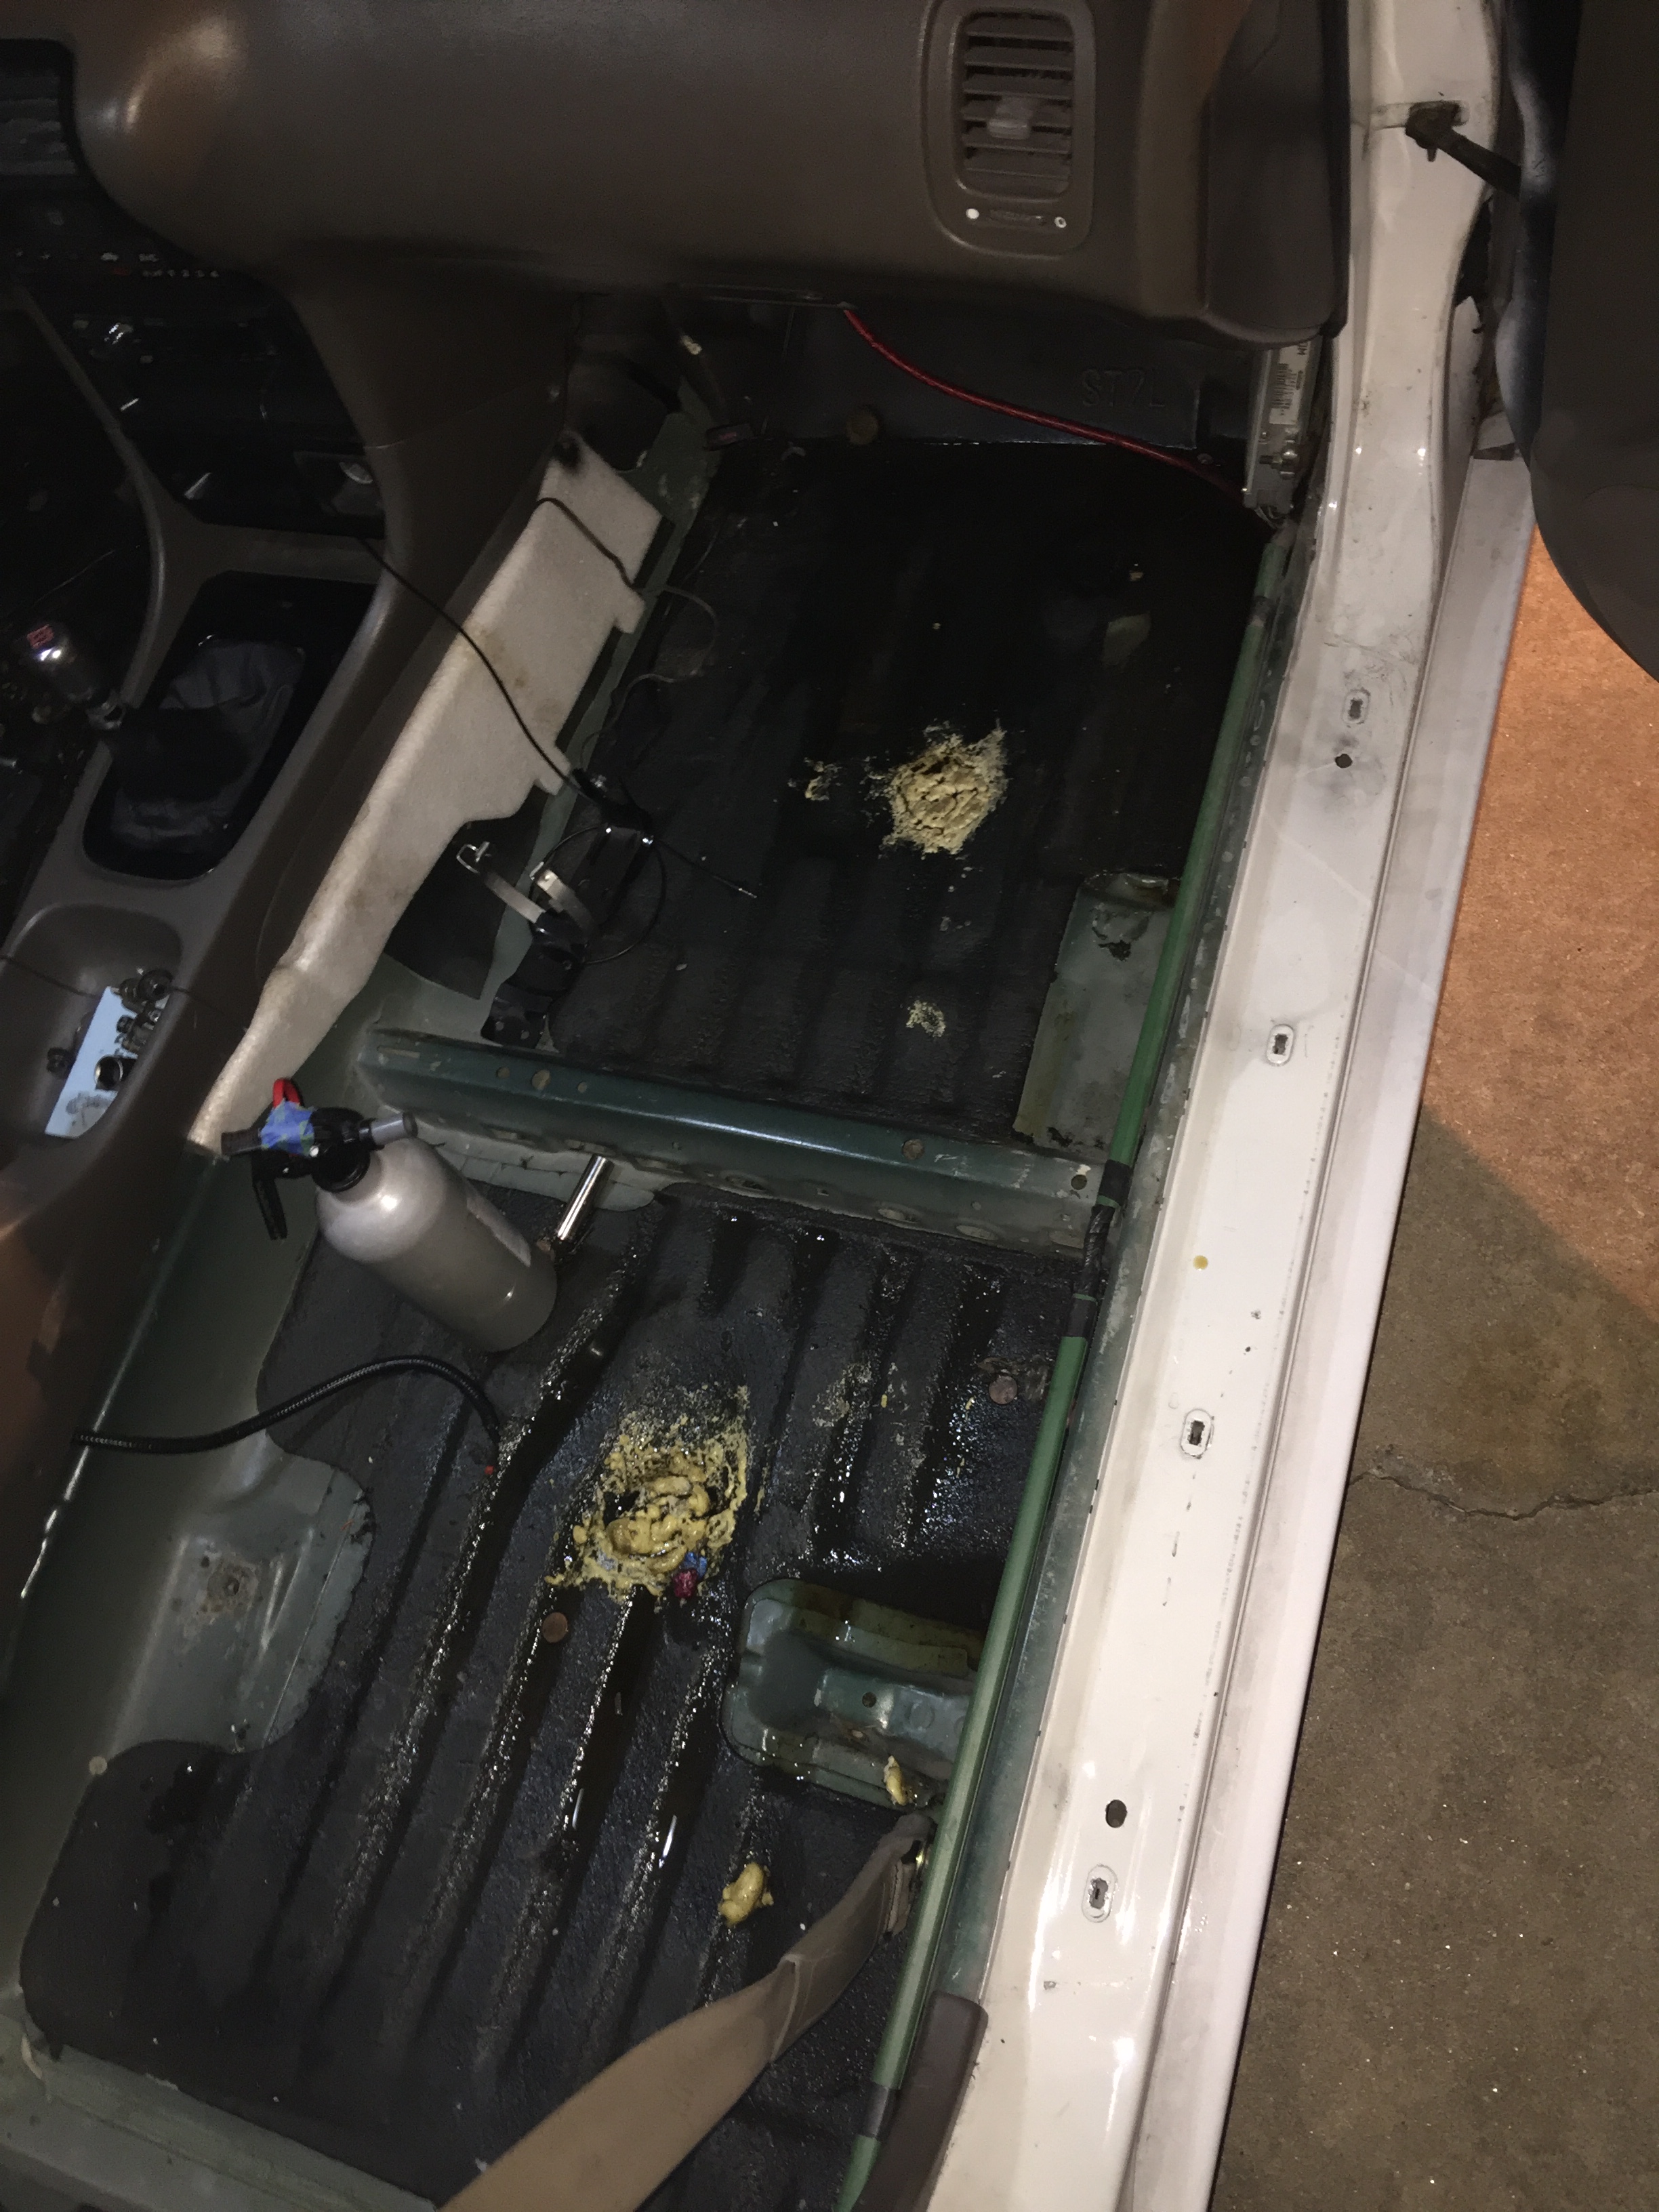
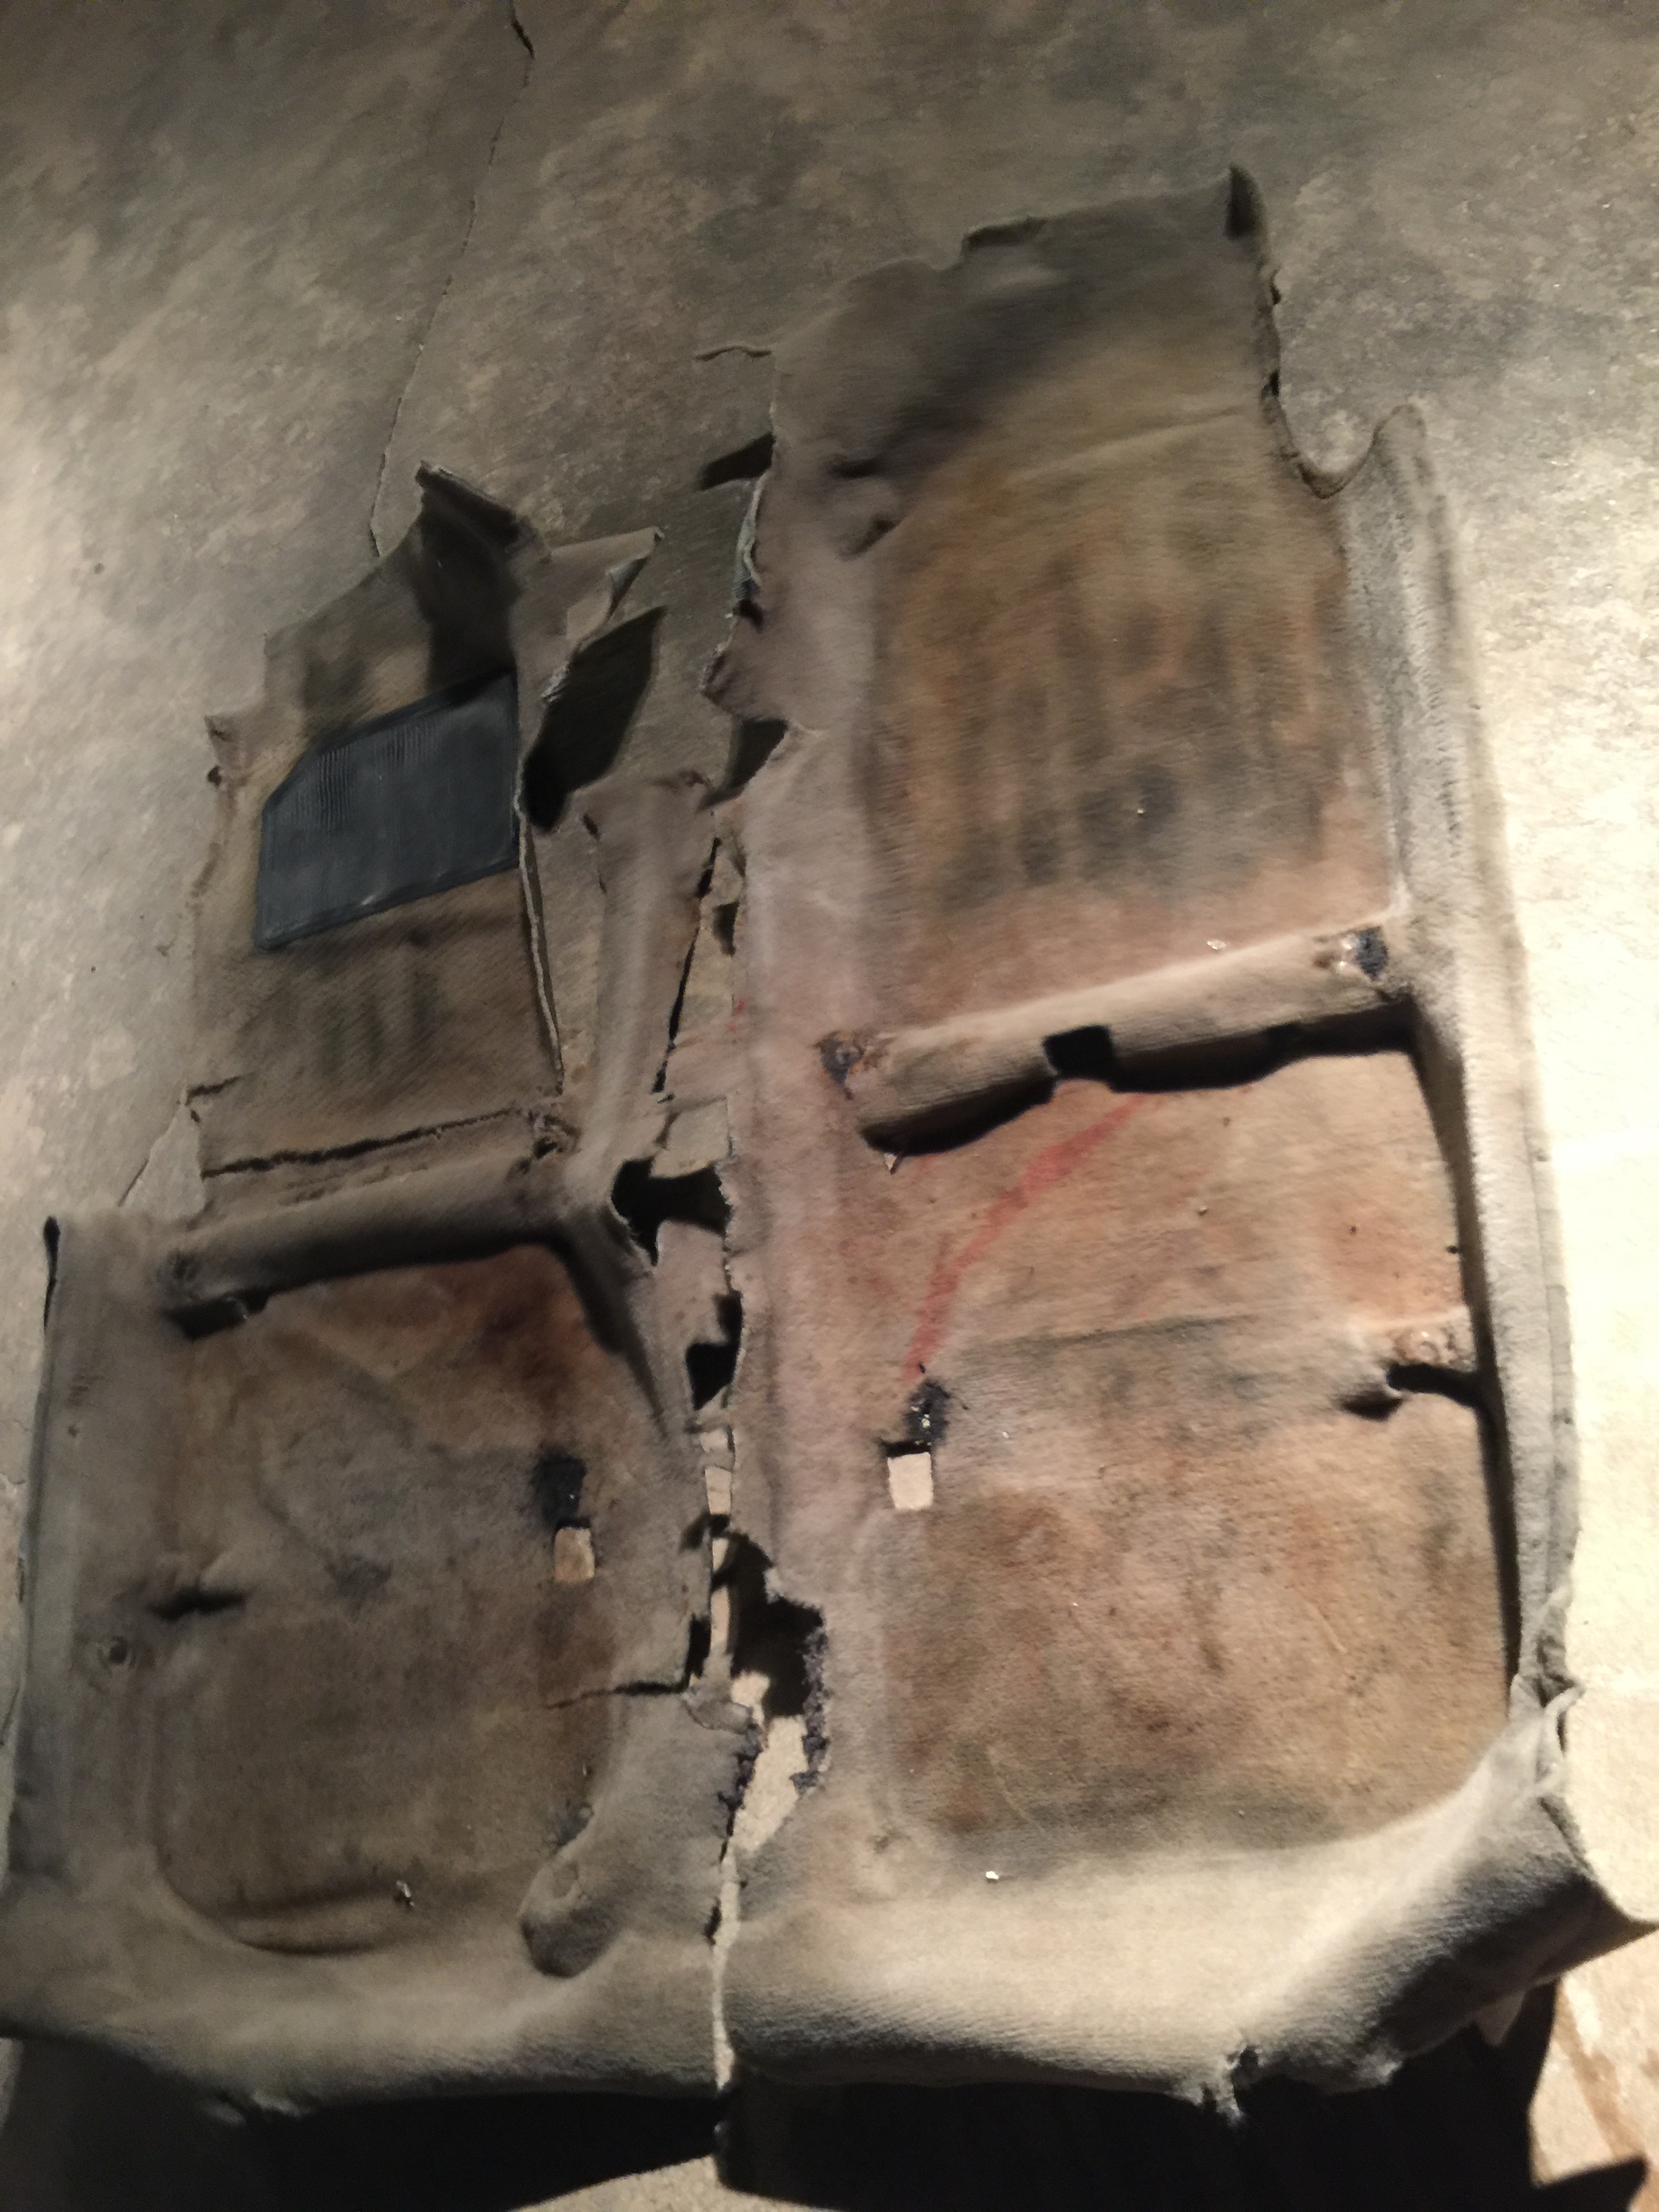
Carpet was completely ruined with no way to remove the smell, before it would smell a bit off when damp but this time it's not worth saving. I ended up just cutting it out to save time rather than remove all the interior trim pieces. With stains like this it's probably for the best, a few years ago I tried everything I could think of to clean it with very little success. Not sure whether I'm going to buy a new carpet from stockinteriors like I did with the floor mats or source one used, but I'll figure it out over the next few weeks.
Here we see a floor pan cap installed with expanding foam like you'd use on a house, and whoever did it tried to just use sheet metal roofing screws instead of panel adhesive.
The screws were all loose and the foam wasn't stuck to much of anything and had cracked badly.
This is what the other side looked like before I scraped it all off, same crap.
Carpet was completely ruined with no way to remove the smell, before it would smell a bit off when damp but this time it's not worth saving. I ended up just cutting it out to save time rather than remove all the interior trim pieces. With stains like this it's probably for the best, a few years ago I tried everything I could think of to clean it with very little success. Not sure whether I'm going to buy a new carpet from stockinteriors like I did with the floor mats or source one used, but I'll figure it out over the next few weeks.
08-31-2017, 03:24 AM
#180
Fish Twig
Join Date: Nov 2005
Location: Still hunting that foo up there
Posts: 15,555
Received 309 Likes
on
285 Posts
If you have a sunroof check to make sure the tubes didn't fall off. Check the area where the pillar meets the fender/hood, under the cowl. I hit up those areas and resealed with caulk. Could be more, just have to inspect.
10-11-2017, 08:25 AM
#181
Thanks for the tip about the sunroof, turned out to be the L shaped rubber pipe where the drain turns to go out of the car had a hole in it, so the sunroof was draining into the driver side footwell. Some of the seam sealer was cracking as well so I went ahead and RTV'd it just to be safe, and rather than wait around for a likely out of stock part to show up I just made a new piece out of CPVC pipe. I'll order a replacement with my next Acura dealer order and get around to replacing it with the proper part at some point though.
Also, the car had a brake failure. I haven't taken pictures yet, but the seal that goes around the parking brake cam on the rear passenger side caliper blew out on one side, I was lucky that this was a fairly slow leak and I was able to catch it before losing my brakes on the road, I went ahead and ordered proper rebuild kits from Honda though (~$20 each) so hopefully I won't have to worry about this happening again.
The calipers are "Power Stop" brand rebuilds sold on RockAuto and a few other sites, ITR calipers on the front and RSX on the rear, and I don't think I could ever recommend them after this. Developing a slow leak from a piston seal would be one thing, but this was a complete failure of the handbrake lever seal. The only way this could happen is if their rebuild components are made out of low-quality materials or if tolerances are terrible, and neither of which is acceptable for brake parts. Avoid Power Stop at all costs, and I'd take it a step further and avoid any brake rebuild components that aren't OEM.
10-21-2017, 08:30 PM
#183
After being backordered for a few weeks, I finally got my brake caliper rebuild kits in from Honda last Wednesday, so today I started tearing down the calipers. Since one went bad so quickly I went ahead and rebuilt all four and I'm glad I did.
Before I start, the calipers are the car are Power Stop brand remanufactured OEM calipers, purchased new from Rockauto in March of 2016 . The front calipers are from an Integra Type-R and the rears are from an RSX (same as ITR calipers but reversed and easier to find) for a poor mans Type R brake swap.
First up, the one that was leaking. You can see here exactly why it leaked, this seal was starting to blow out, due to not fitting quite like factory and being made out of a lower quality material.
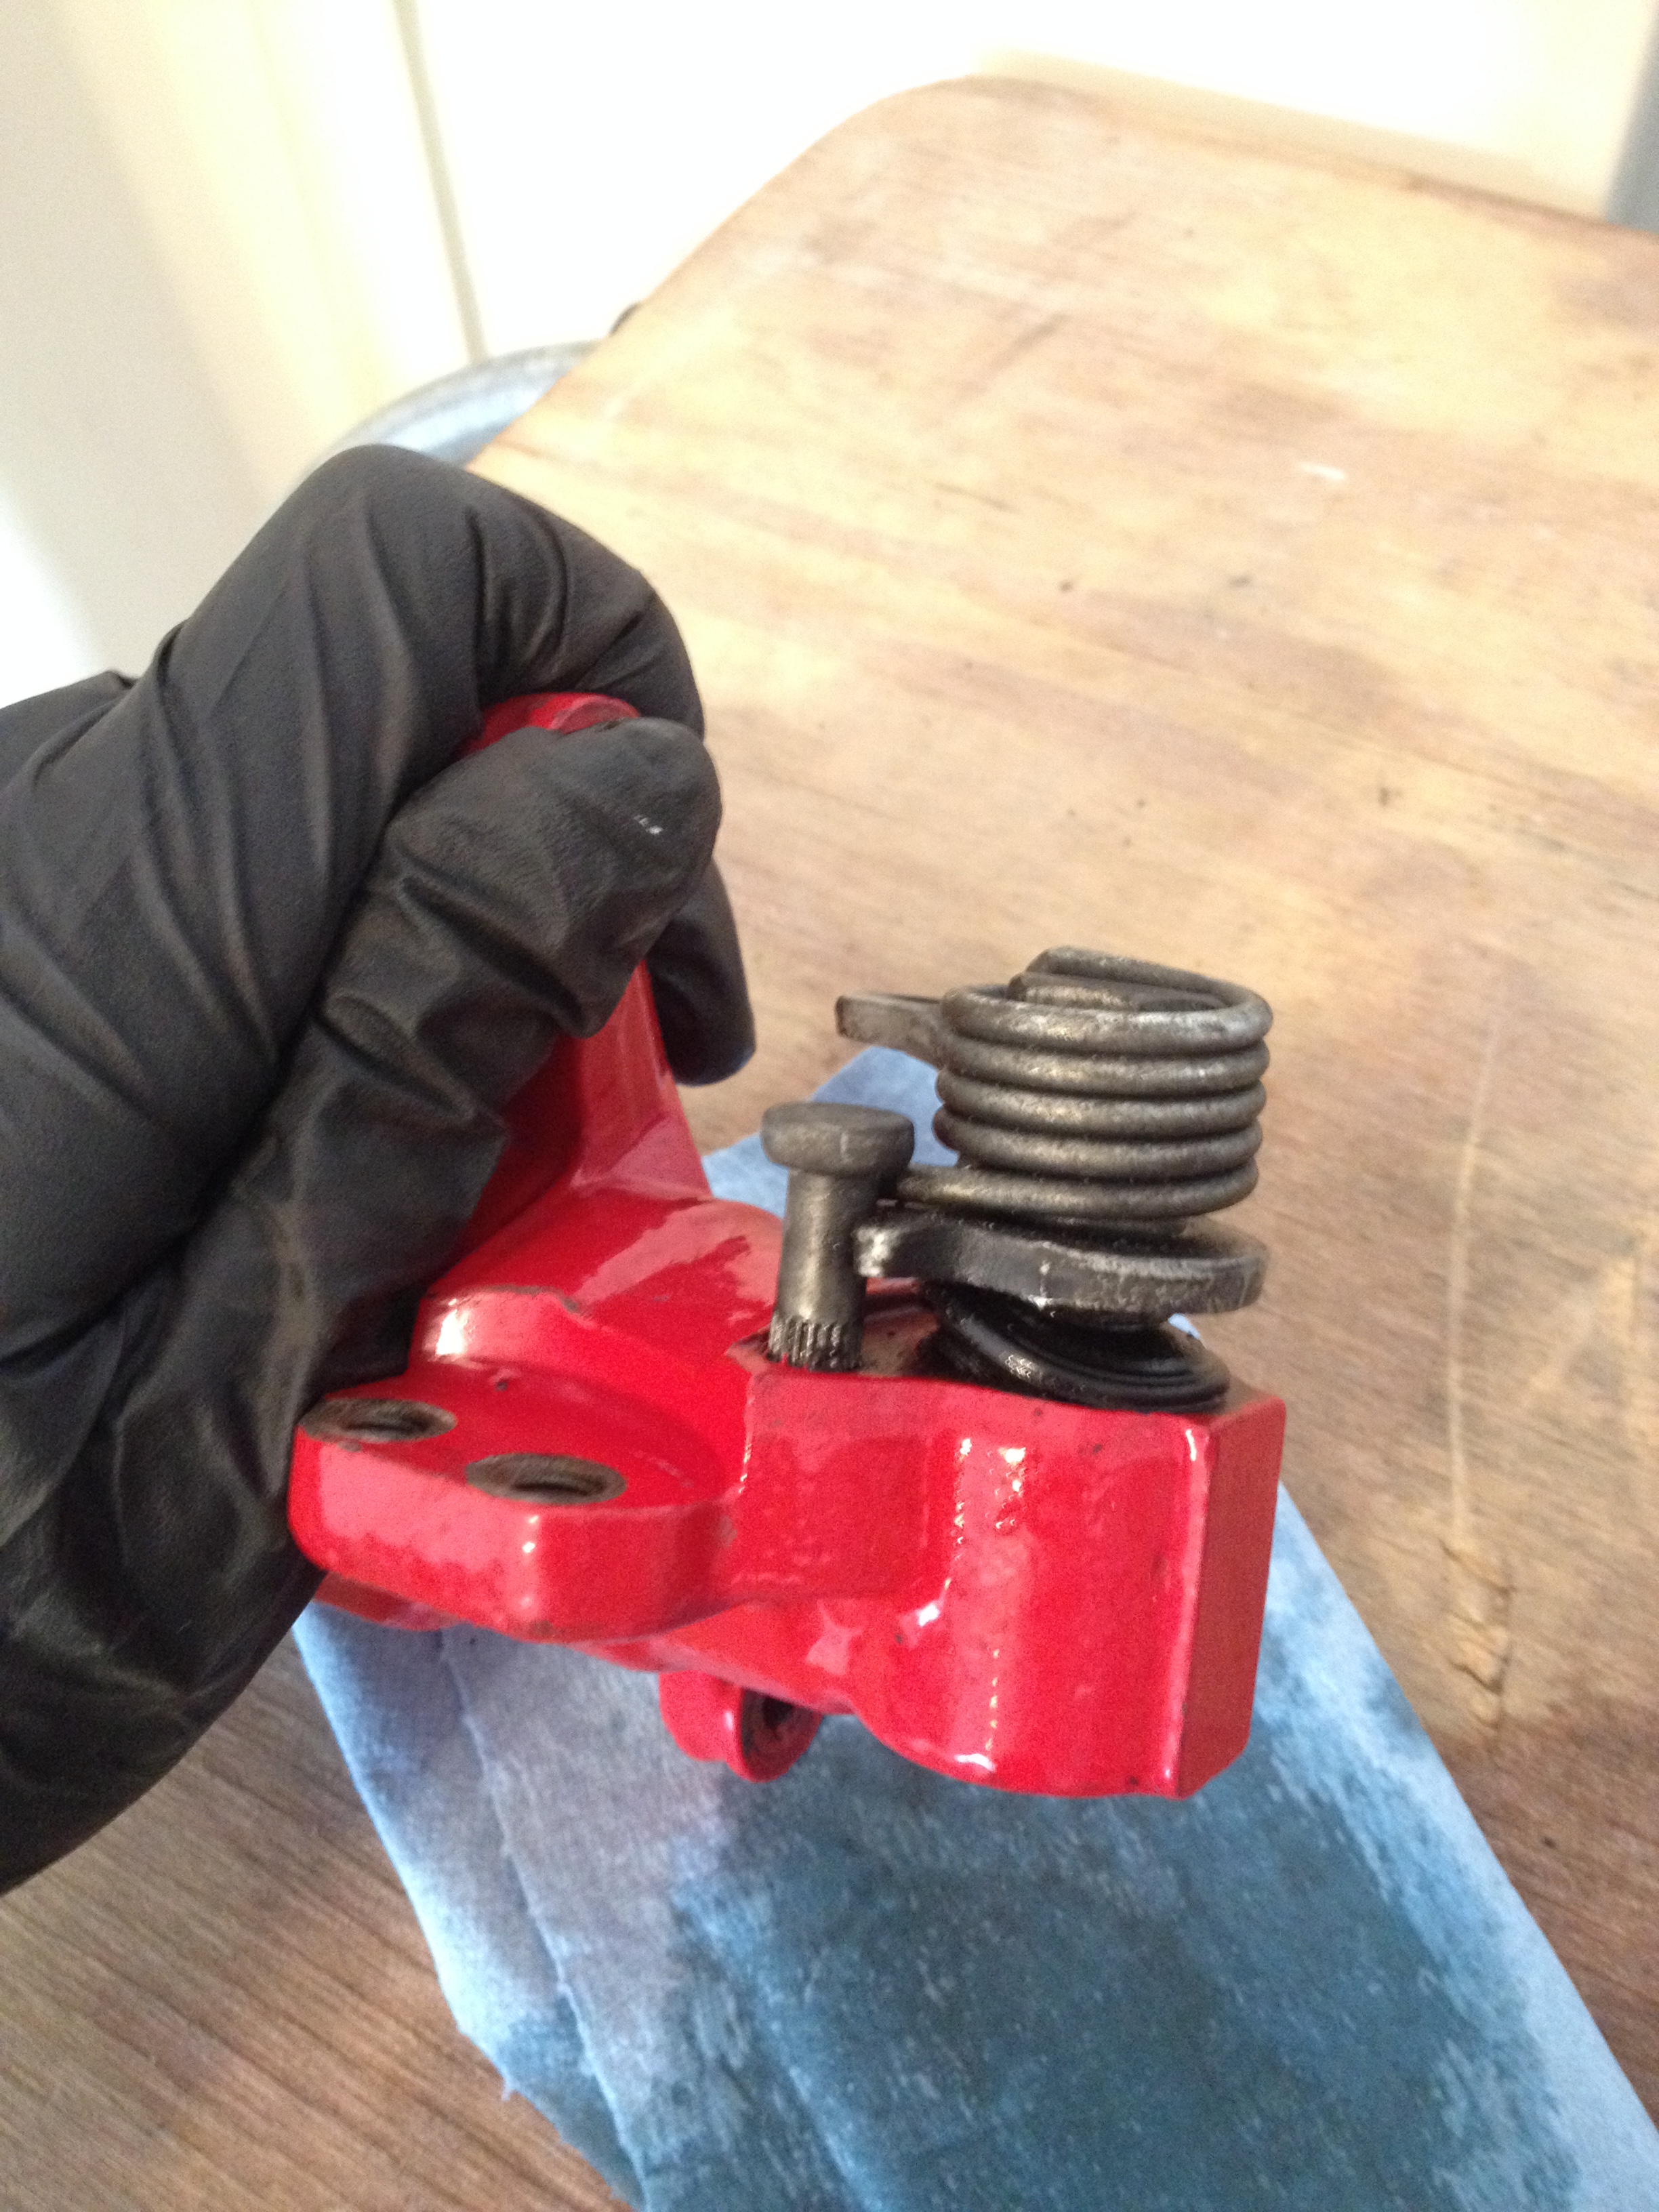
Digging a little deeper you can see that, rather than the needle bearing you'd usually see around the parking brake cam, there's a brass sleeve. I'm not sure if this is something Power Stop (company that sells these calipers) did or a different design by Honda but Honda didn't include any bearing grease in the rebuild kits so I assume it's a design change.
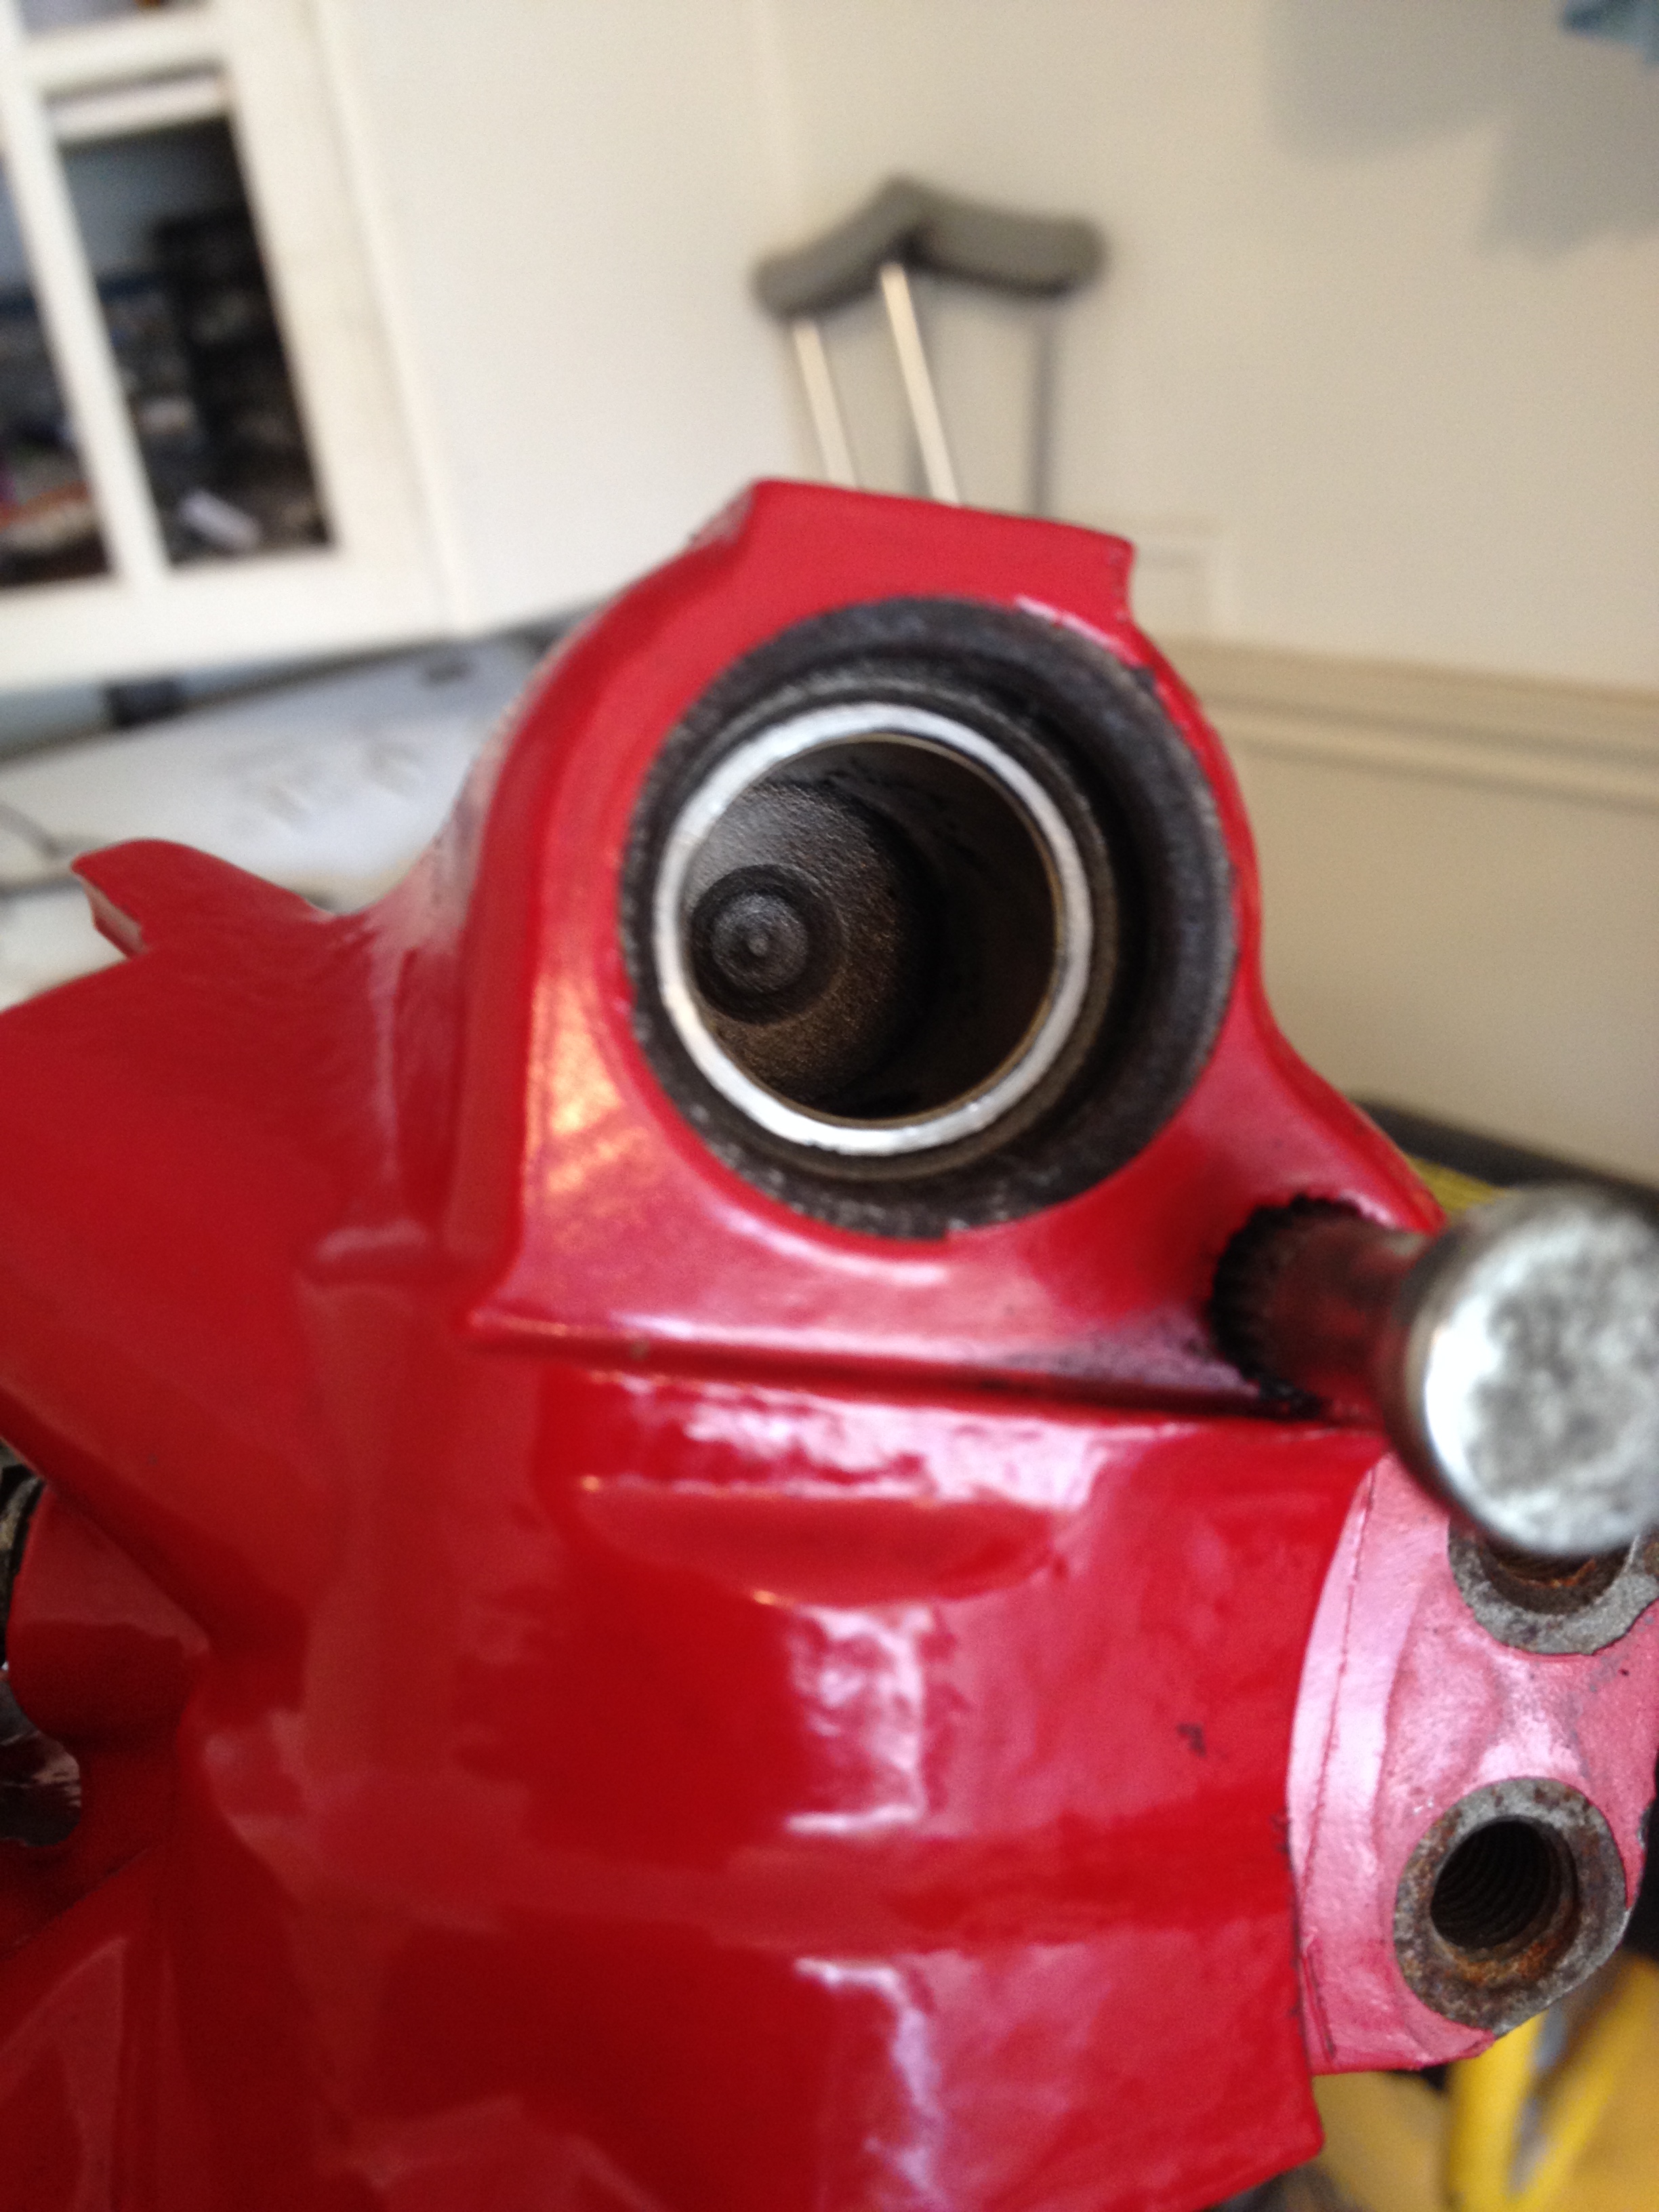
This O-ring is trashed, looks like it was the wrong size and they crammed it in anyways.
This O-ring is too big compared to the factory part too, but at least it's not disintegrating.
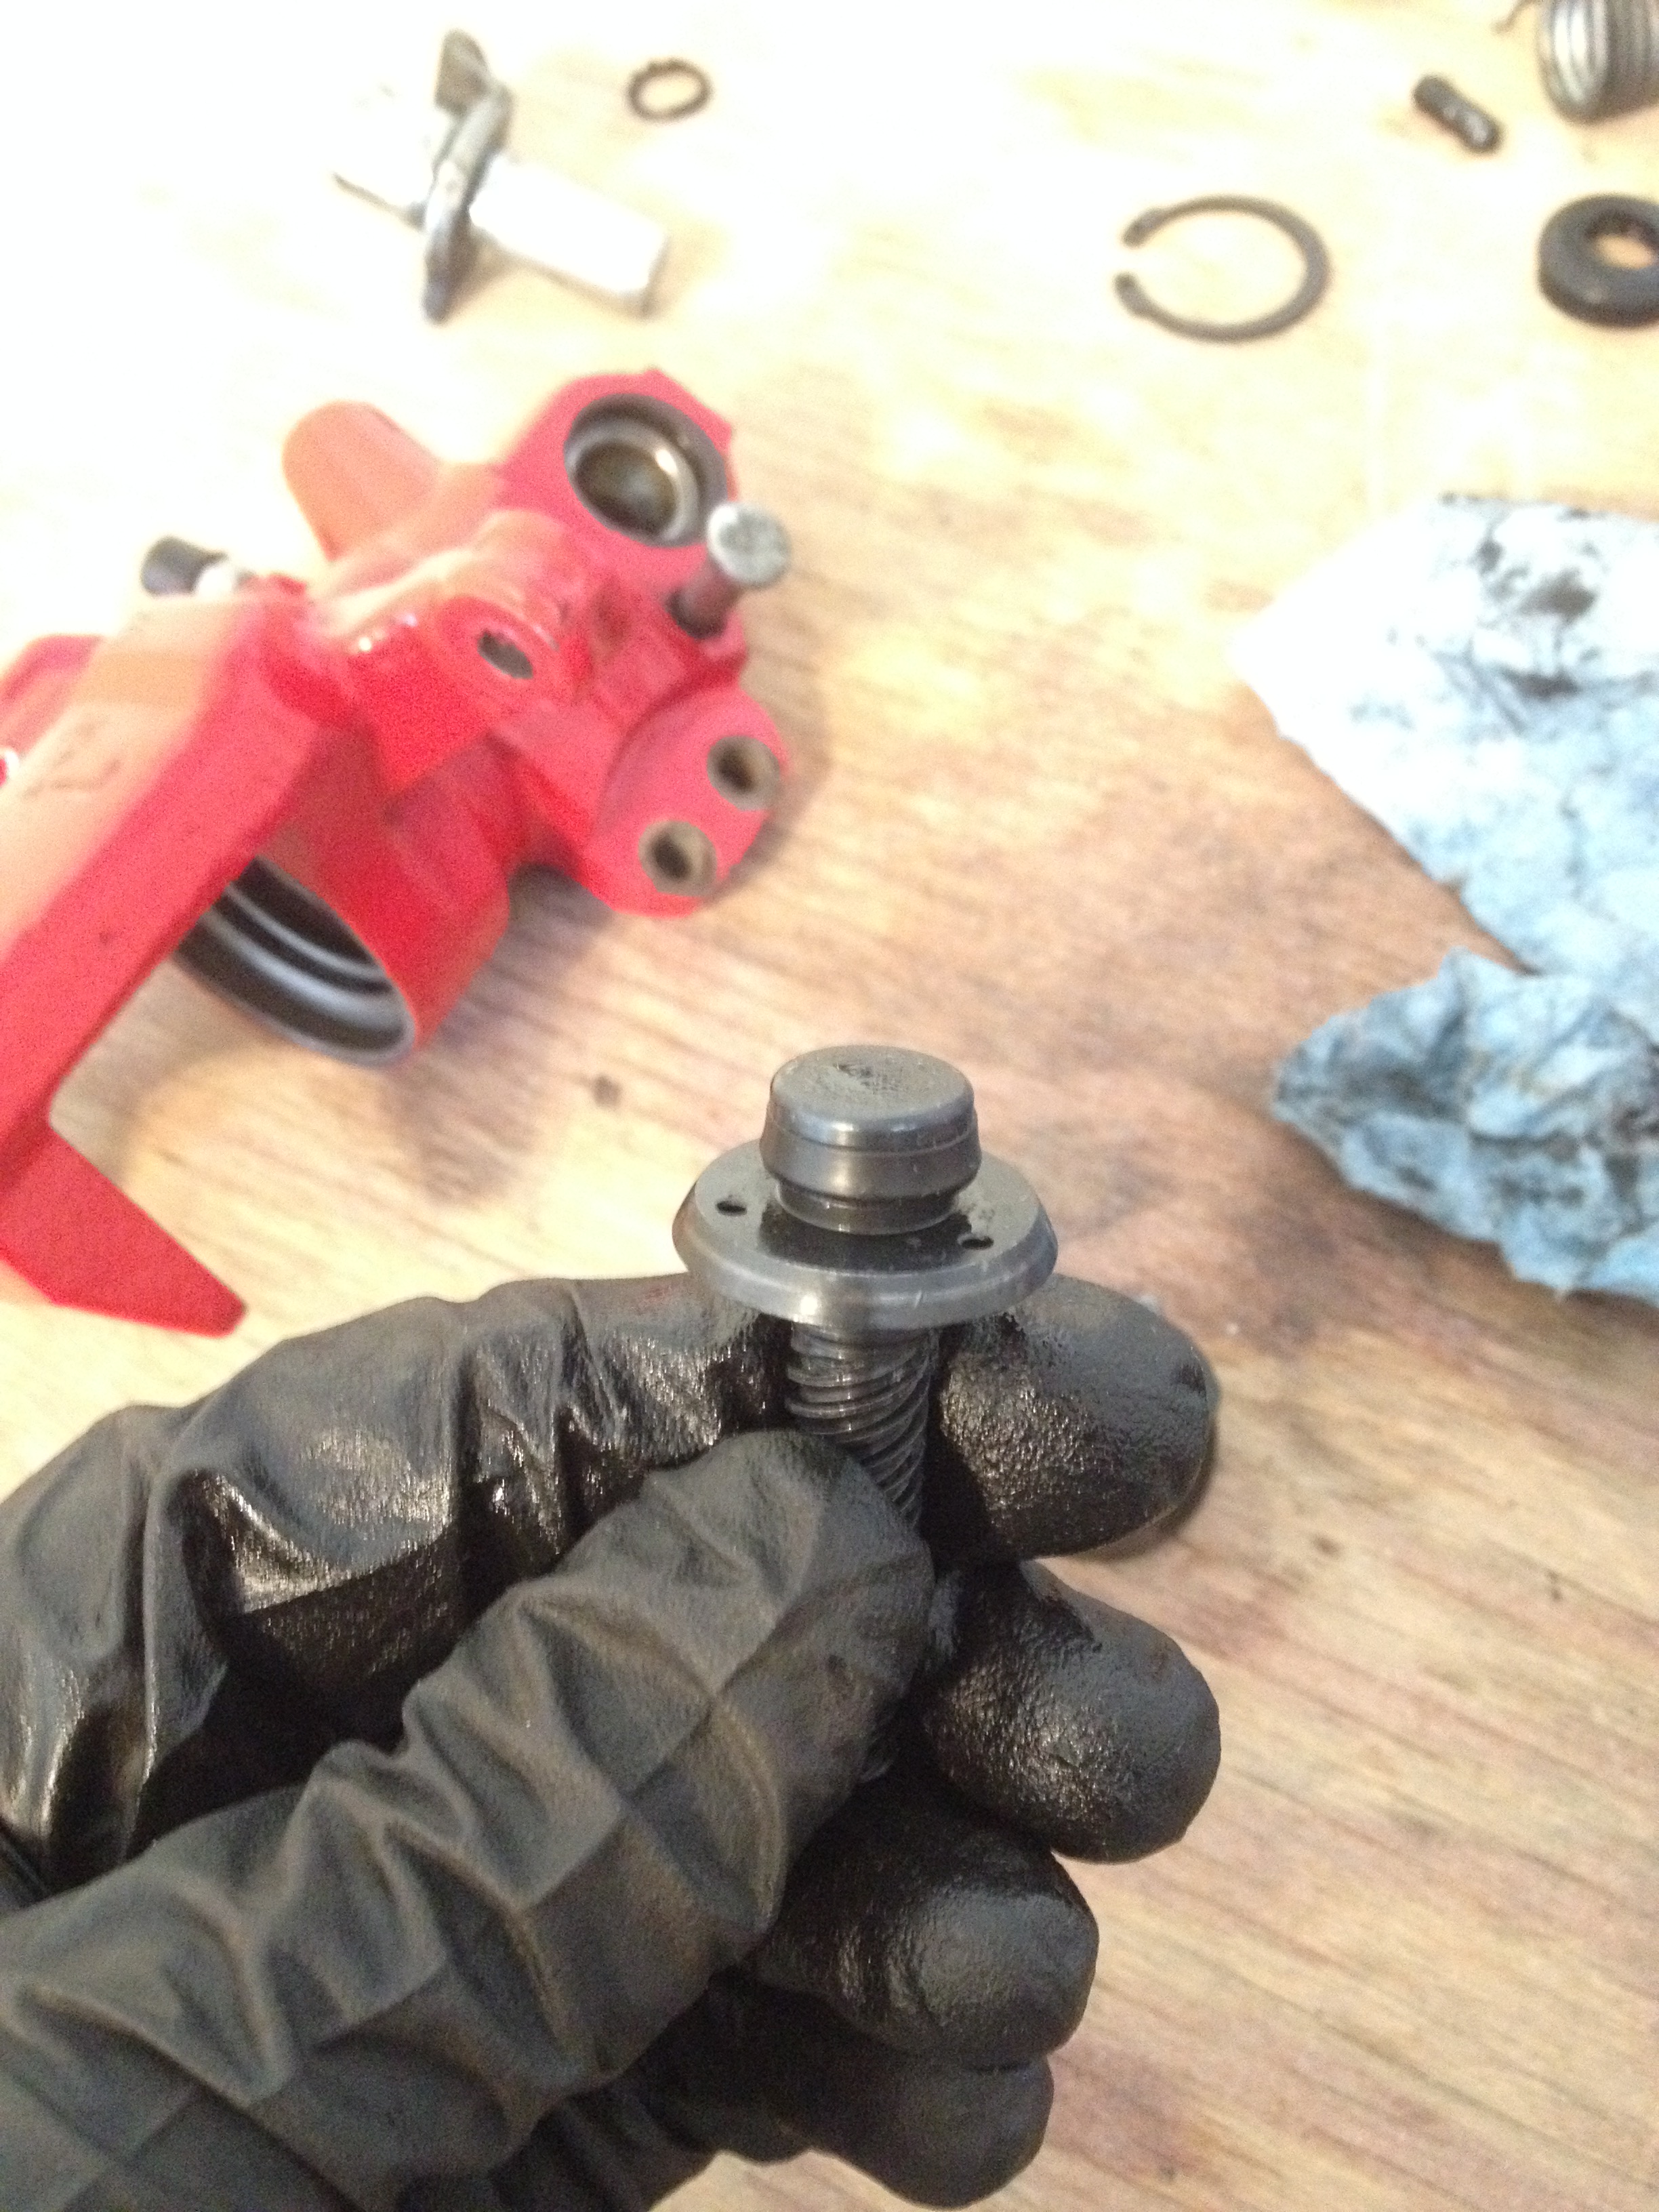
The piston is pitted and on the very edge of what could be considered usable, using something like this in a rebuild is lazy and cheap, but it seems to seal okay.
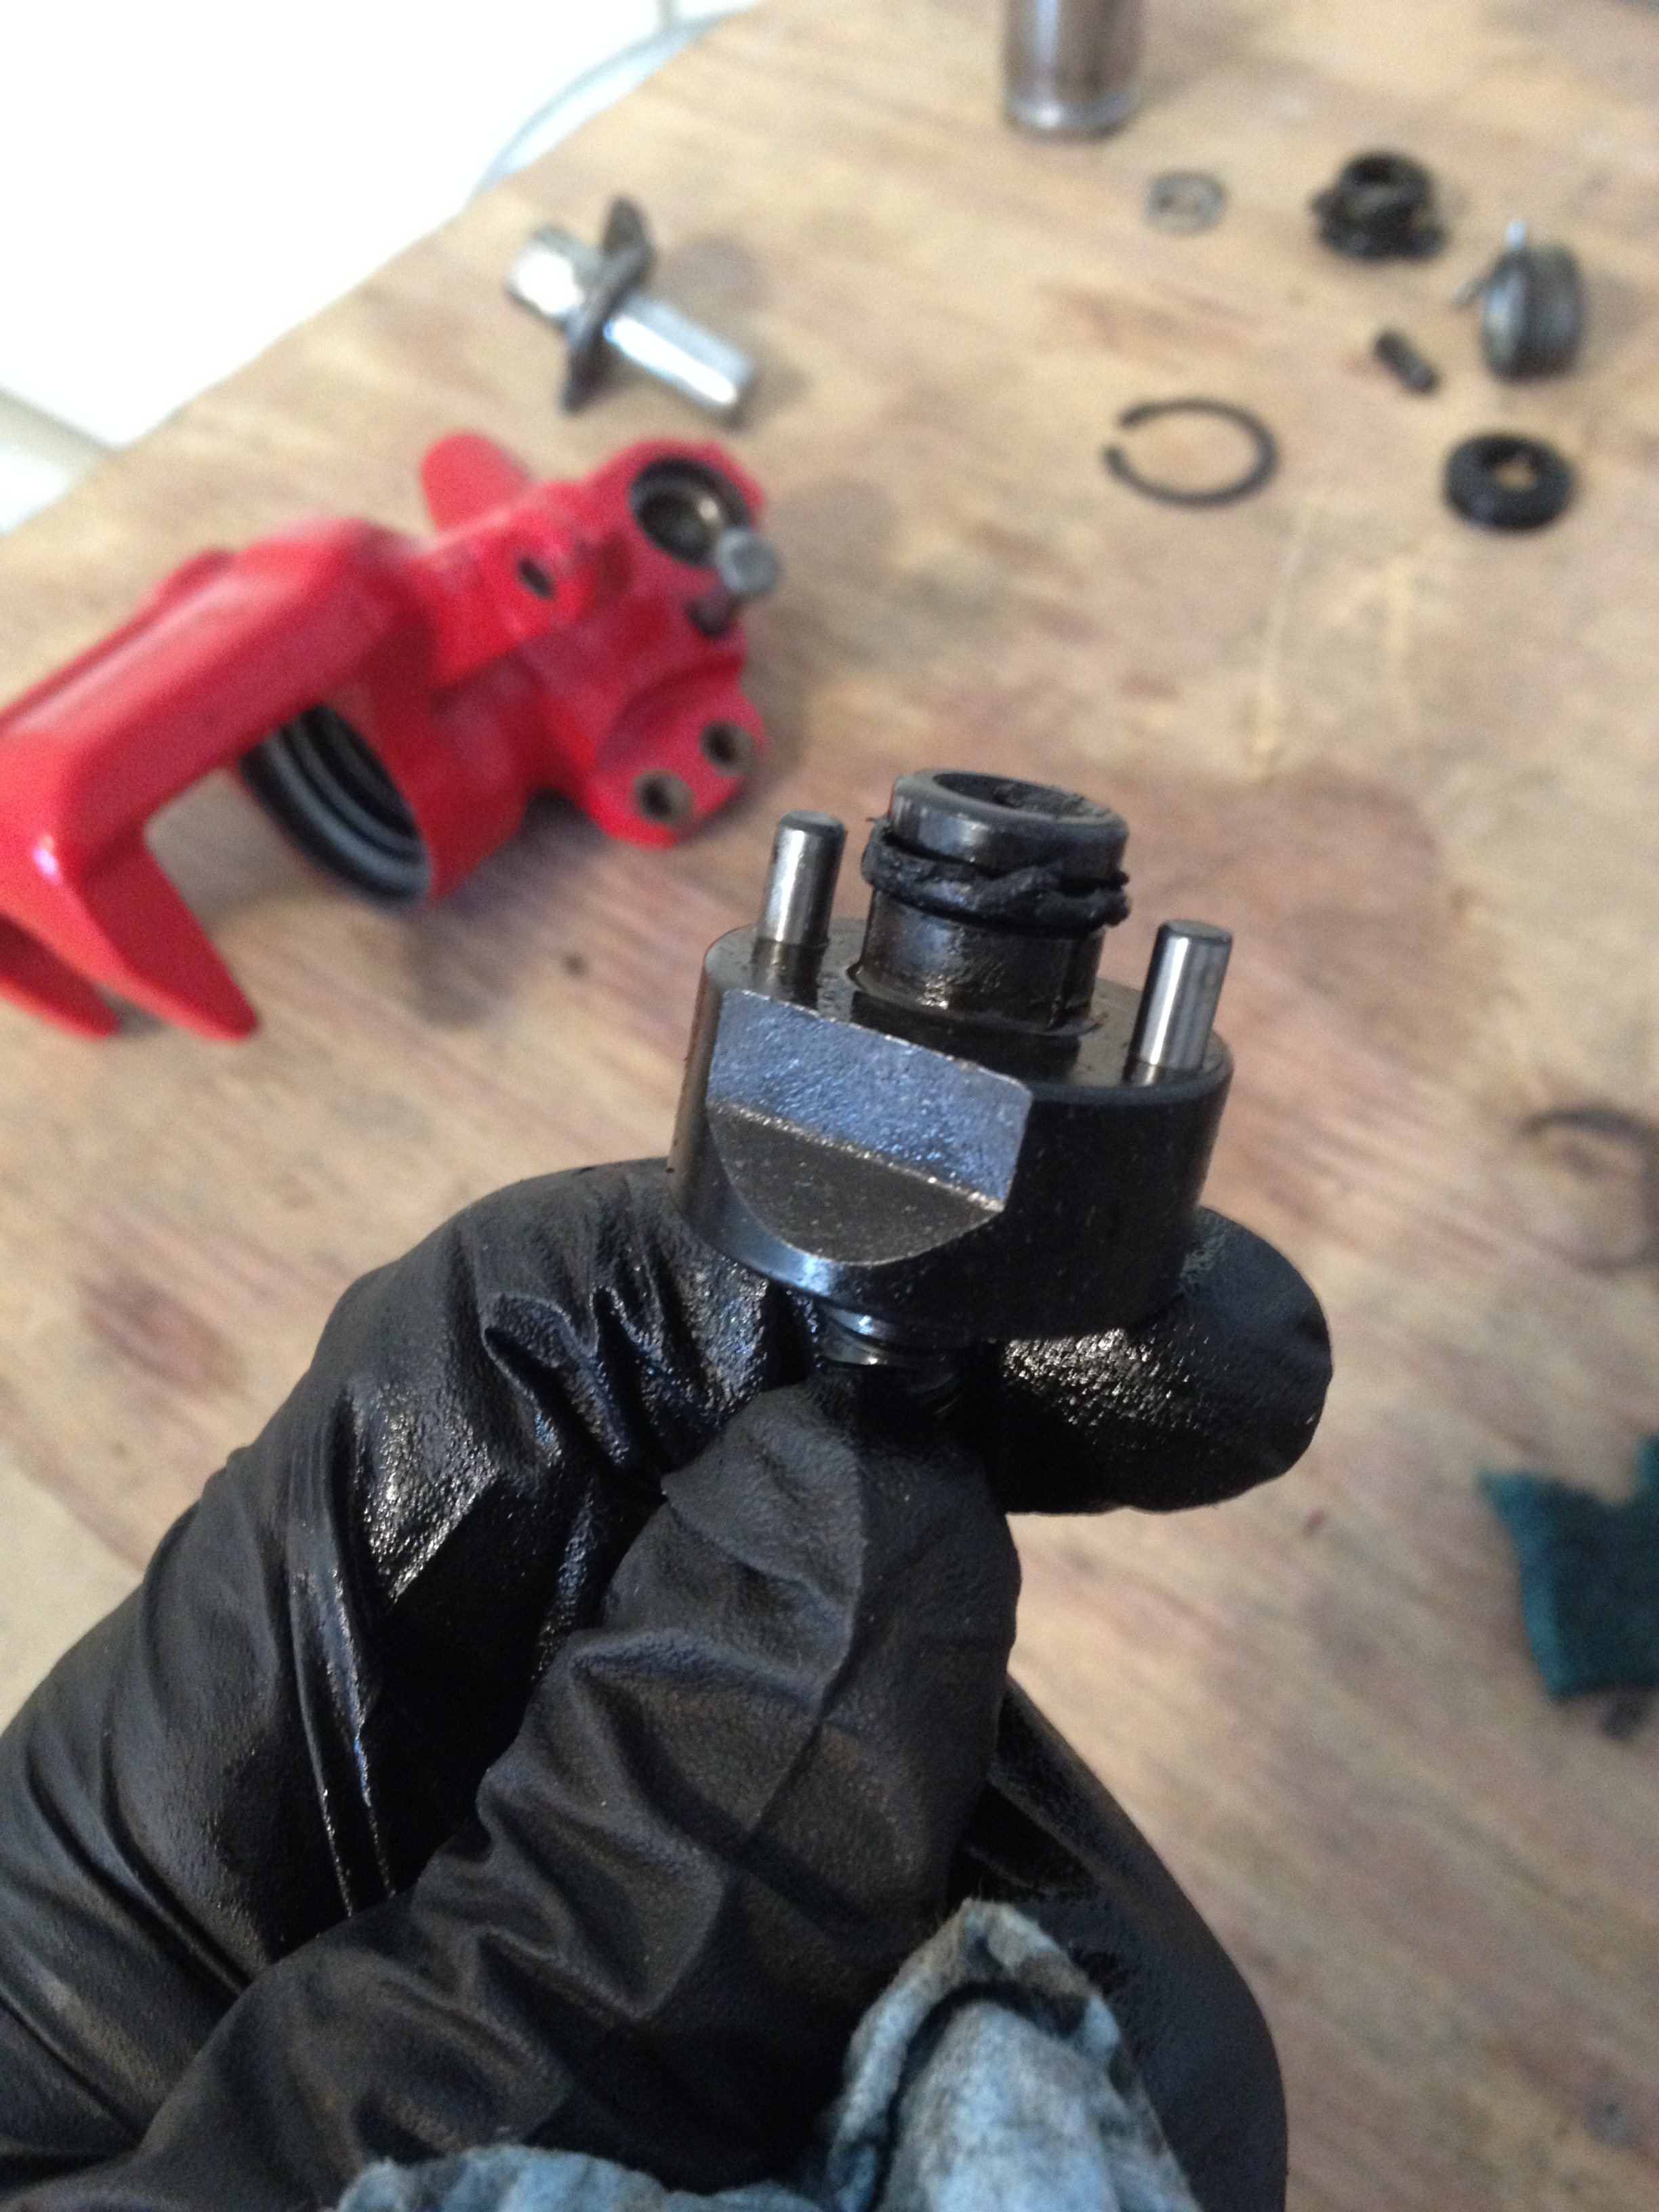
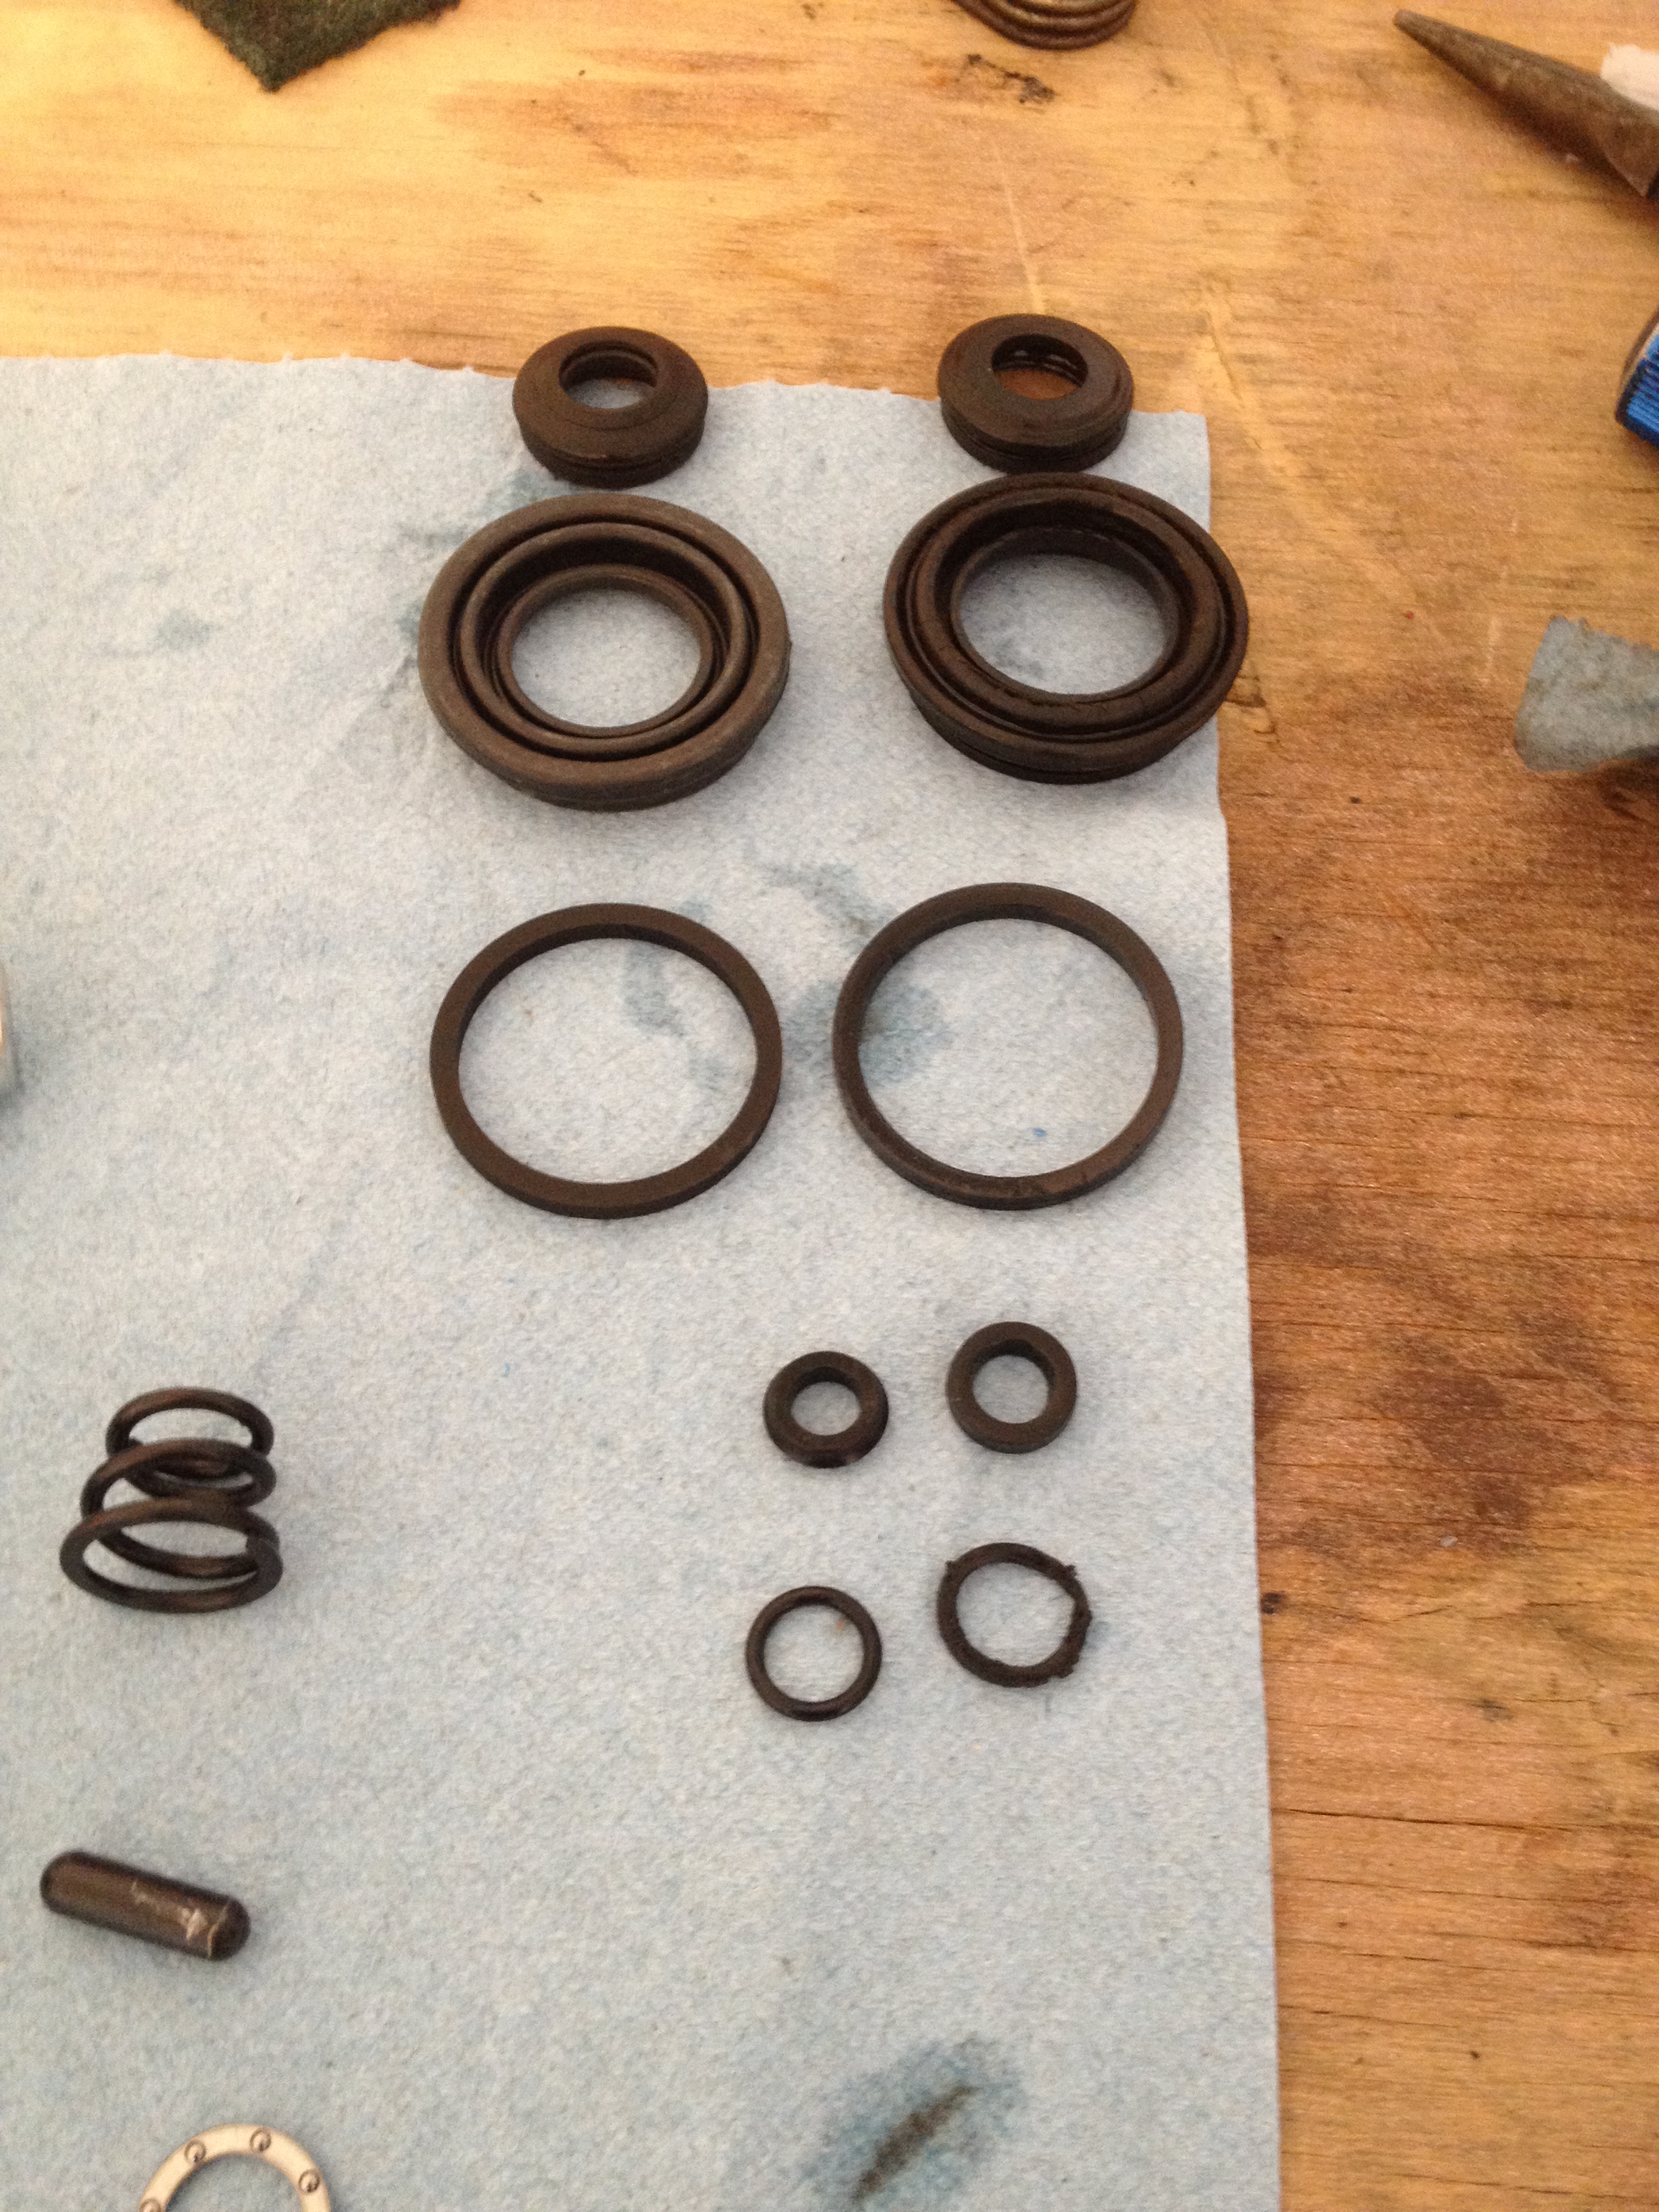
Here is a comparison of the new Honda parts (left) and the old parts on the right. You can see that the O-rings are the wrong size and the main seal rings are even a bit different.
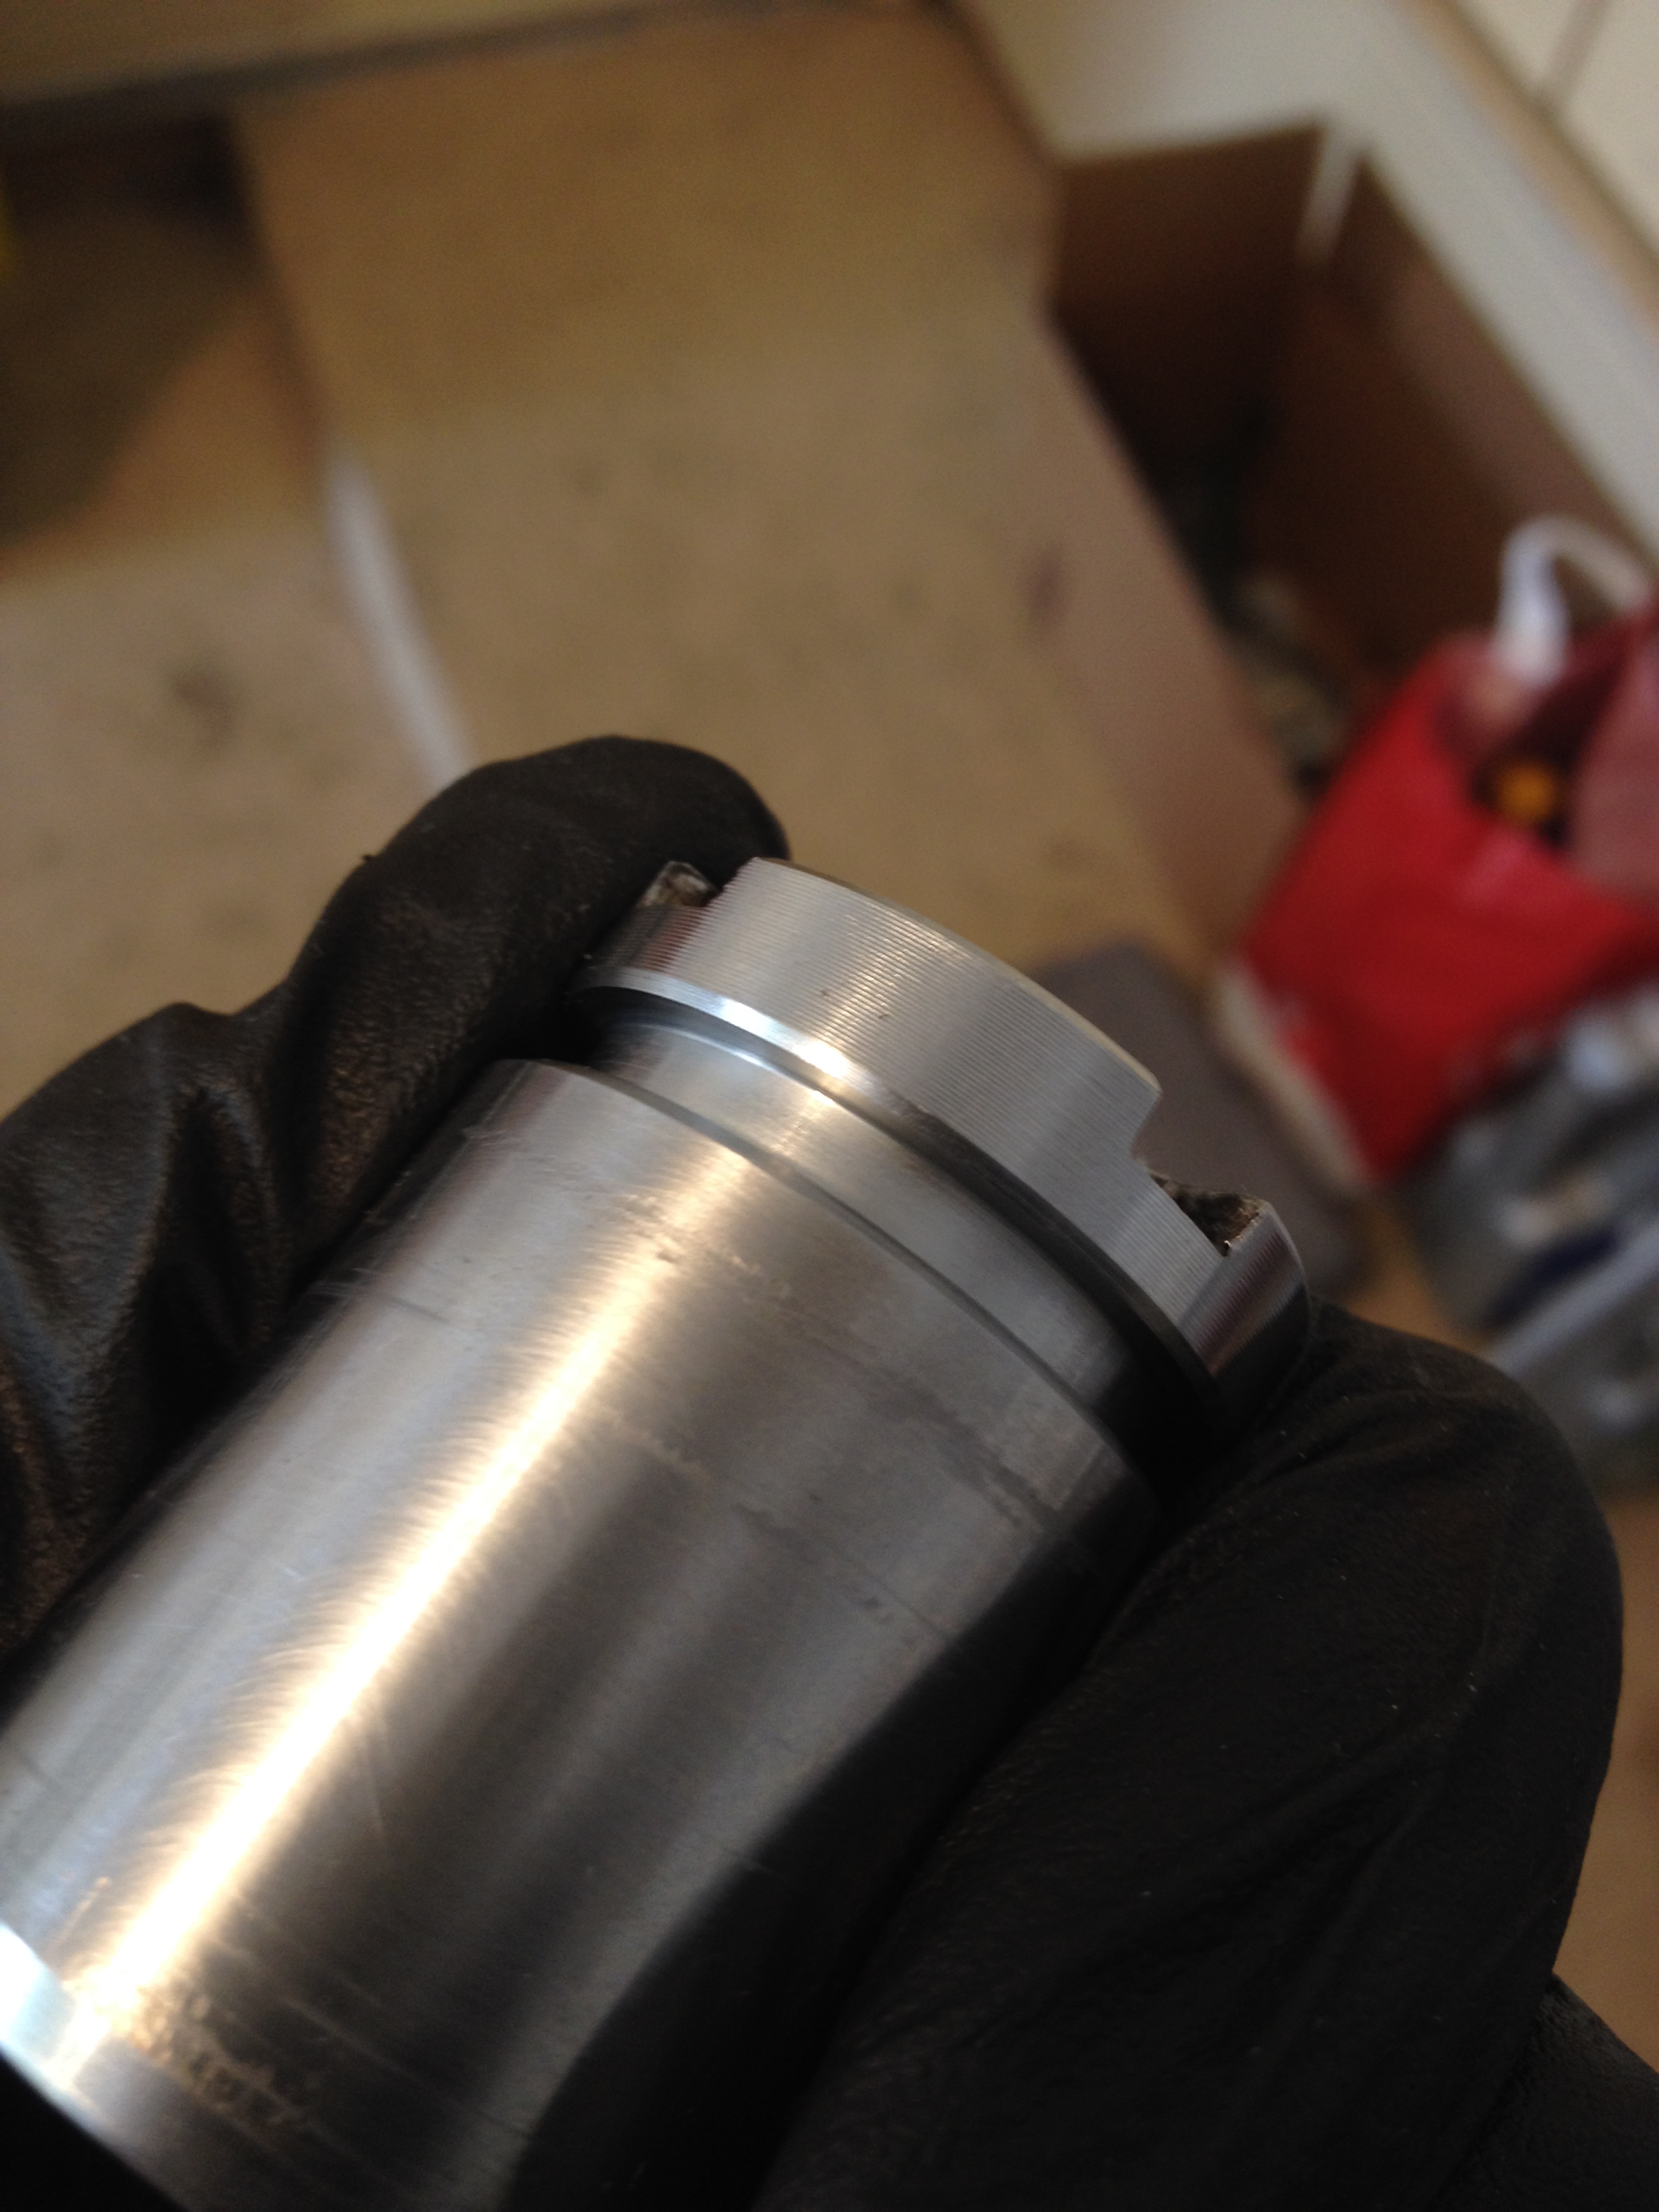
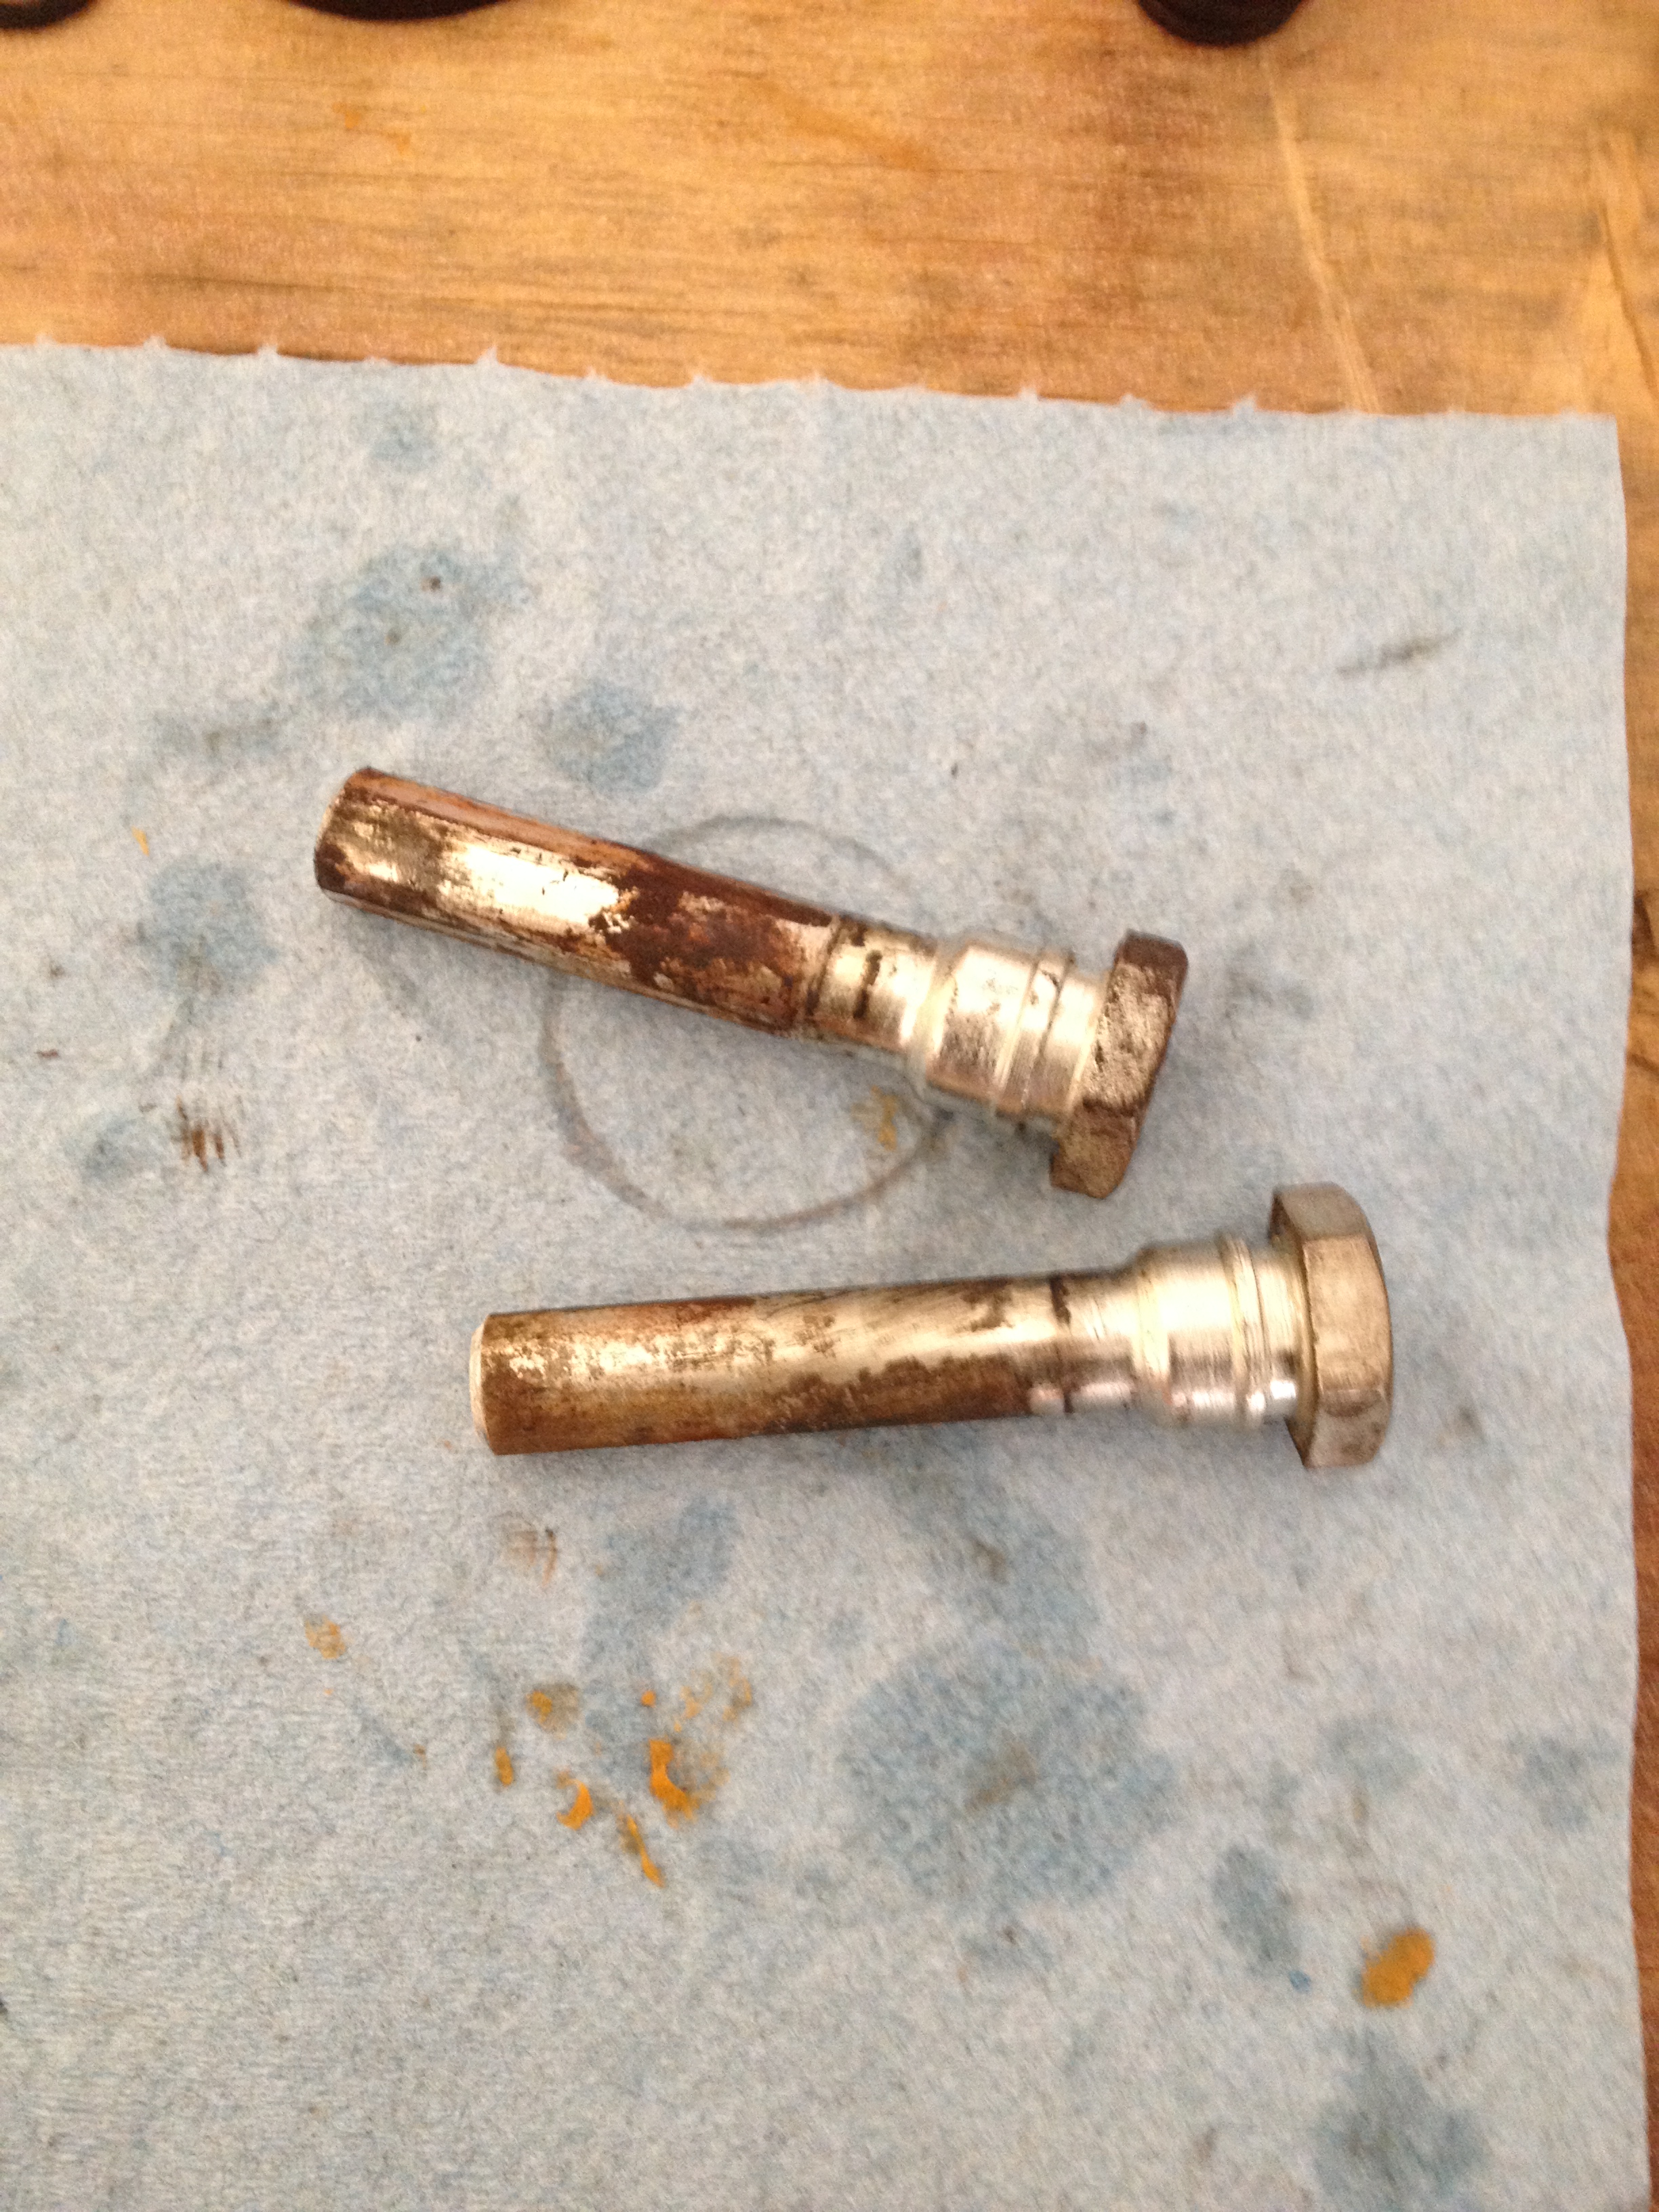
The caliper pins were rusting and looked like they didn't even bother regreasing them. After removing the rust and properly greasing them they are usable though.
Overall, these Power Stop reman calipers are dog **** and I'll never buy anything from them again. Factory calipers will easily last 15+ years and 200,000+ miles, these things didn't even make it 2 years before failing due to shitty parts and lubrication. Also, due to the parking brake cam being poorly lubricated, the parking brake would stick about half the time it was released so I'd have to get out of the car and reach around the wheel with a hammer and tap on it to release it. The powder coat is pretty decent though so I will give them that.
The other three calipers had similar issues. Seals falling apart, not lubricated properly, etc. One of the pin slider holes had what appear to be tiny metal ***** about .5mm in diameter in it that made the pin bind and barely move. The rubber dust boots were also starting to harden and were in much worse shape than the 24 year old OEM dust boots I pulled off of the NSX brakes. 2019 Edit: I'm pretty sure the "metal *****" were leftover blasting media from the powder coating prep.
So, to recap:
- Mixed up slider pins, some calipers had two A pins, some had two B pins when they were supposed to have one A and one B.
- Piston dust boots not seated properly.
- Dust boots beginning to get hard and brittle after less than 2 years/20,000 miles of use.
- Slider pins not lubricated properly or at all. Some were rusted, some had debris in the holes.
- Small seals and O-rings falling apart or the wrong size.
- Handbrake sticking due to poor lubrication of the handbrake cam.
- Pistons were in barely usable shape, the outer surfaces were starting to pit and score.
TL;DR: **** Power Stop.
Before I start, the calipers are the car are Power Stop brand remanufactured OEM calipers, purchased new from Rockauto in March of 2016 . The front calipers are from an Integra Type-R and the rears are from an RSX (same as ITR calipers but reversed and easier to find) for a poor mans Type R brake swap.
First up, the one that was leaking. You can see here exactly why it leaked, this seal was starting to blow out, due to not fitting quite like factory and being made out of a lower quality material.
Digging a little deeper you can see that, rather than the needle bearing you'd usually see around the parking brake cam, there's a brass sleeve. I'm not sure if this is something Power Stop (company that sells these calipers) did or a different design by Honda but Honda didn't include any bearing grease in the rebuild kits so I assume it's a design change.
This O-ring is trashed, looks like it was the wrong size and they crammed it in anyways.
This O-ring is too big compared to the factory part too, but at least it's not disintegrating.
The piston is pitted and on the very edge of what could be considered usable, using something like this in a rebuild is lazy and cheap, but it seems to seal okay.
Here is a comparison of the new Honda parts (left) and the old parts on the right. You can see that the O-rings are the wrong size and the main seal rings are even a bit different.
The caliper pins were rusting and looked like they didn't even bother regreasing them. After removing the rust and properly greasing them they are usable though.
Overall, these Power Stop reman calipers are dog **** and I'll never buy anything from them again. Factory calipers will easily last 15+ years and 200,000+ miles, these things didn't even make it 2 years before failing due to shitty parts and lubrication. Also, due to the parking brake cam being poorly lubricated, the parking brake would stick about half the time it was released so I'd have to get out of the car and reach around the wheel with a hammer and tap on it to release it. The powder coat is pretty decent though so I will give them that.
The other three calipers had similar issues. Seals falling apart, not lubricated properly, etc. One of the pin slider holes had what appear to be tiny metal ***** about .5mm in diameter in it that made the pin bind and barely move. The rubber dust boots were also starting to harden and were in much worse shape than the 24 year old OEM dust boots I pulled off of the NSX brakes. 2019 Edit: I'm pretty sure the "metal *****" were leftover blasting media from the powder coating prep.
So, to recap:
- Mixed up slider pins, some calipers had two A pins, some had two B pins when they were supposed to have one A and one B.
- Piston dust boots not seated properly.
- Dust boots beginning to get hard and brittle after less than 2 years/20,000 miles of use.
- Slider pins not lubricated properly or at all. Some were rusted, some had debris in the holes.
- Small seals and O-rings falling apart or the wrong size.
- Handbrake sticking due to poor lubrication of the handbrake cam.
- Pistons were in barely usable shape, the outer surfaces were starting to pit and score.
TL;DR: **** Power Stop.
Last edited by MotorMouth93; 02-26-2021 at 02:27 PM.
12-26-2017, 06:45 PM
#184
Finally, after several years, I have actually tried to fix the leaks in the trunk.
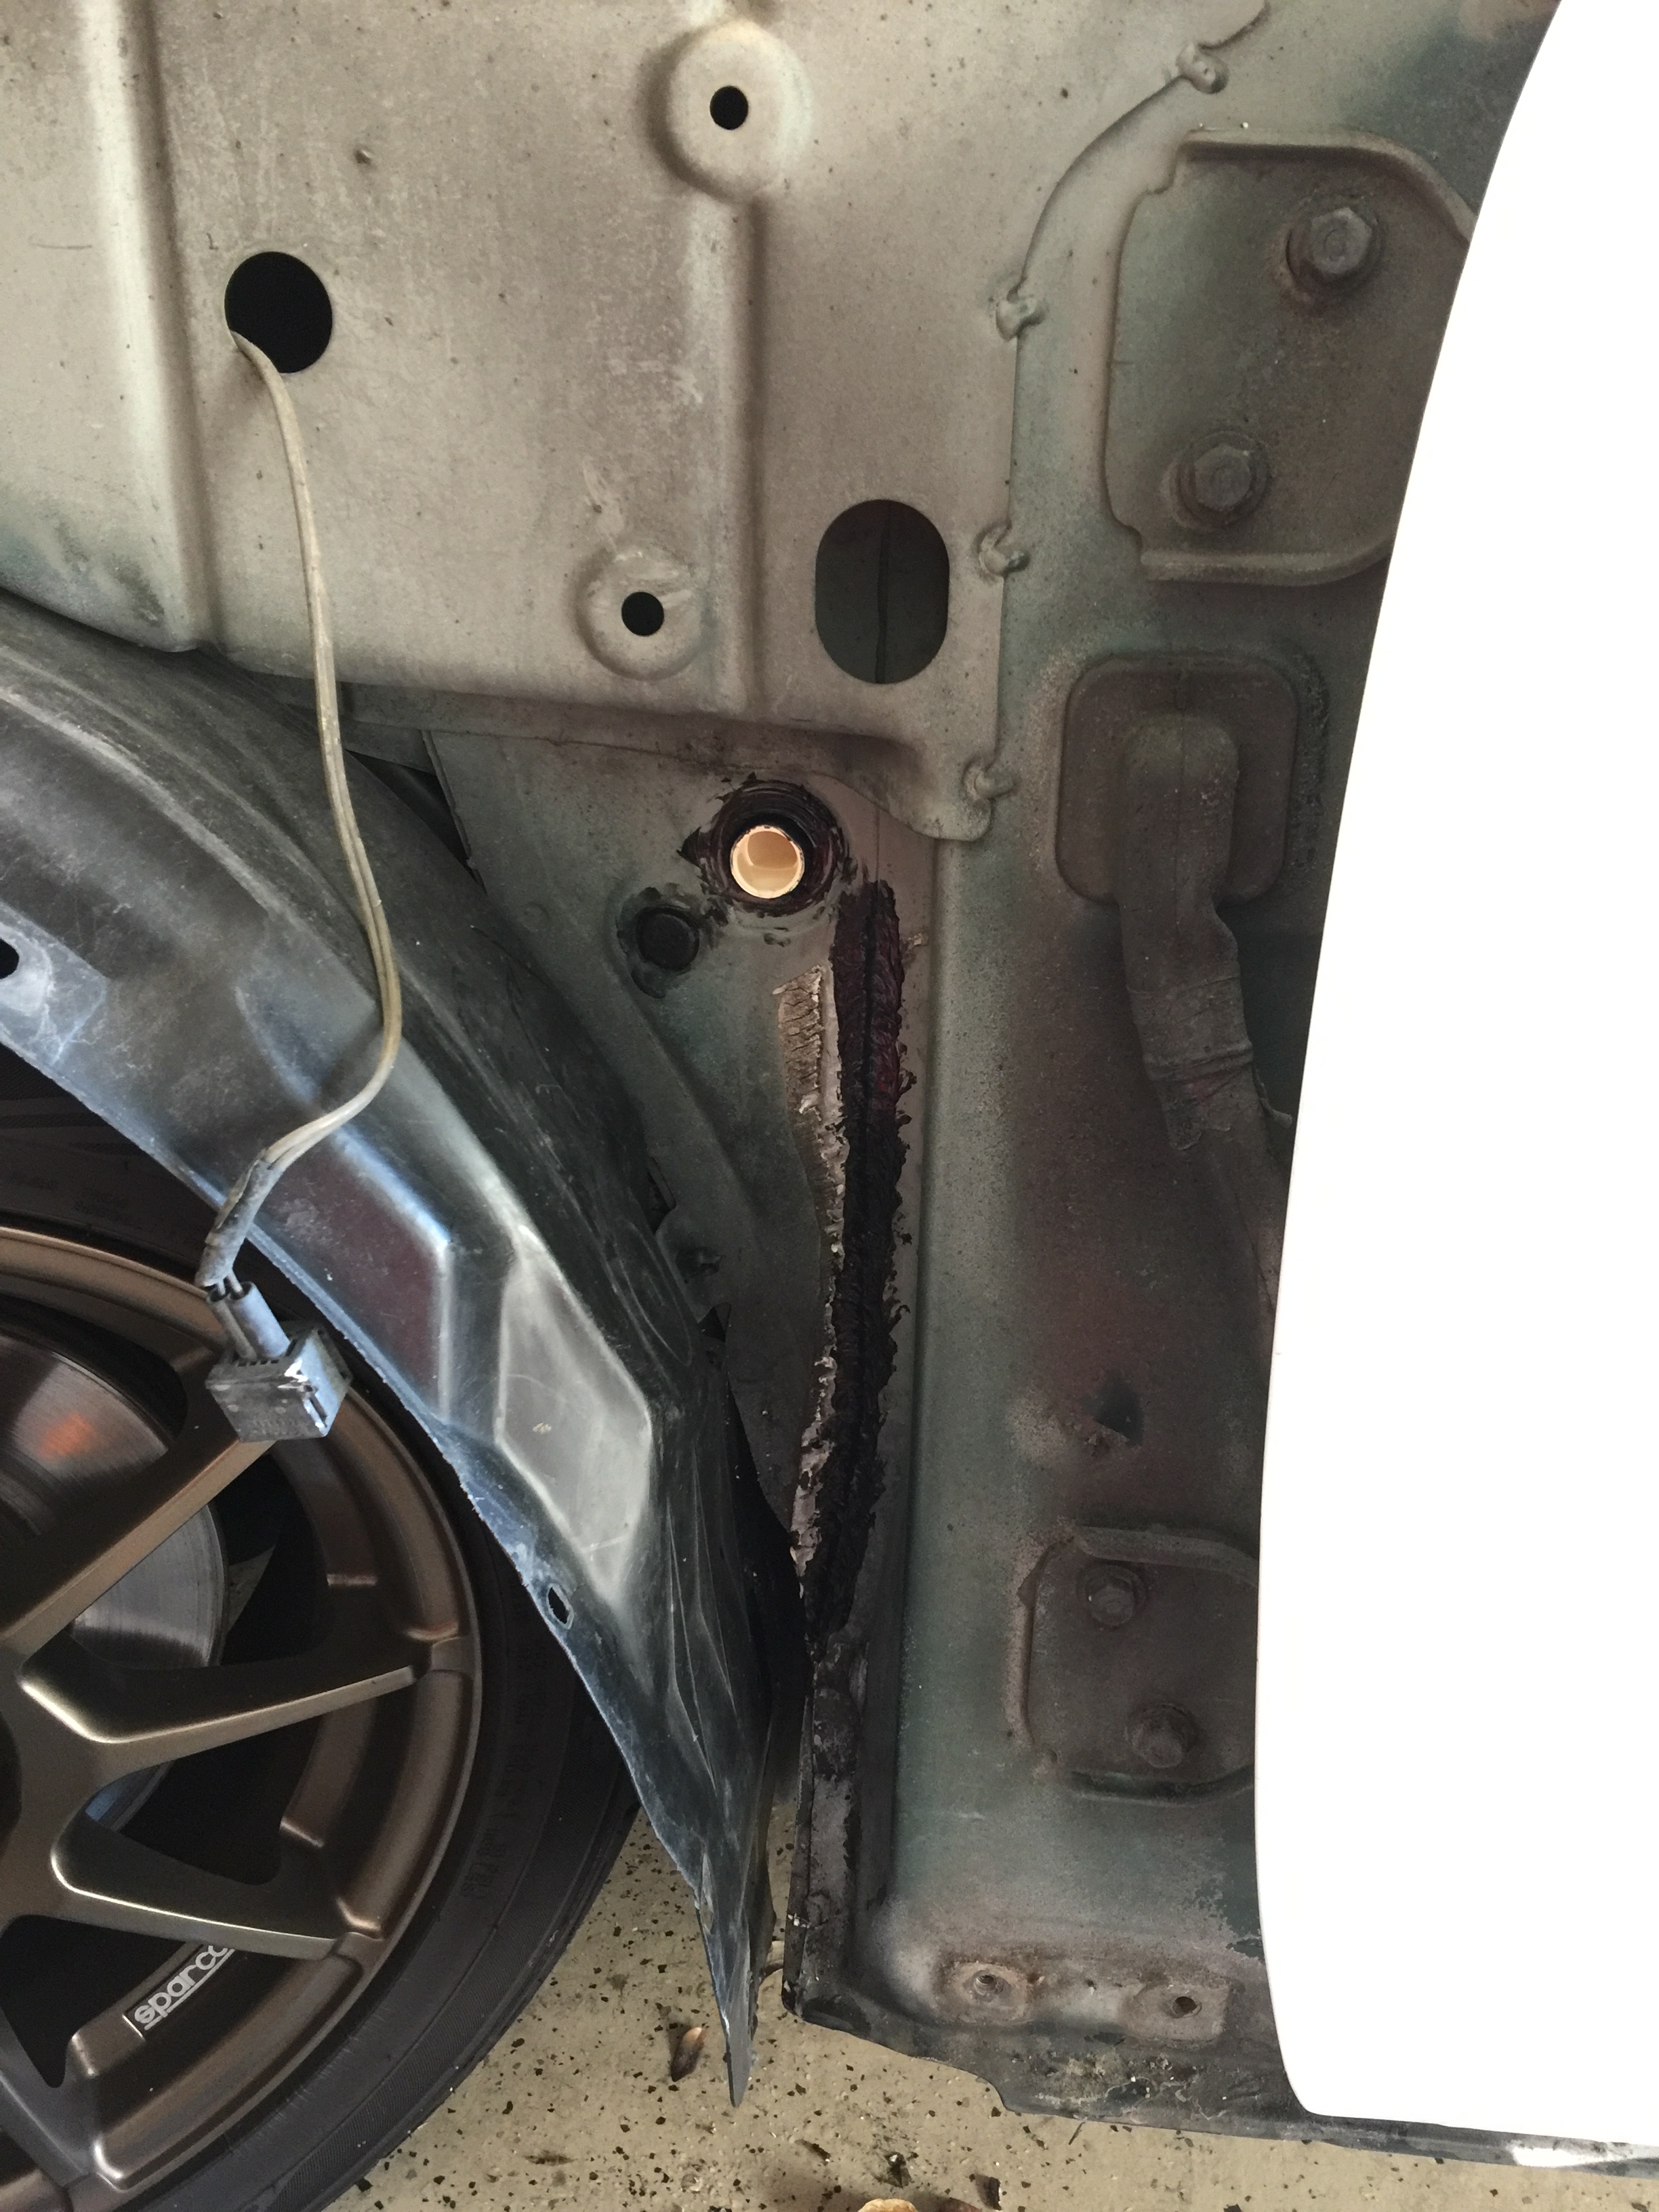
First off, the back passenger side of this car had been hit and badly repaired at some point before I had it. The bumper mounting points were pushed in and I just had some combination of bolts and spacers and missing nuts that more or less held the bumper in the right place. This left several of the mounting studs without nuts on the inside so they didn't seal, and water would leak in through the holes. I guess when I bolted the bumper and stuff up it was supposed to be temporary and then I just never got around to fixing it but who knows. The same goes for that piece between the bumper and the trunk, missing nuts, spacers holding it out properly, leaks everywhere, etc. And same goes for the tail lights, the gaskets were old and worn out and the back panel was so messed up that there were huge gaps around the tail light gasket so more water could come in.
So, to start, I took everything off the back, got out the hammers, and beat the various mounting points on the back panel more or less back into place. It's not perfect but the bumper/trim/lights are more or less in the right place now and I can actually tighten down all the fasteners for the first time since owning this car.
After that was taken care of, I got a pneumatic gasket remover tool from Harbor Freight for $25 (seriously how is their **** so cheap?) and removed all of the seam sealer from the back right corner of the car since most of it was cracking, then wire-wheeled it to prepare for new seam sealer.
I picked up a tube of 3M seam sealer from Napa (oddly enough it's the only auto parts store that seems to carry it in-store and I was too impatient to order online) and went to town on it. Seam sealer is messy as hell and stinks so bad you need a respirator but hopefully my main leaking problems will be fixed now. I need to redo the sealer on the inside of the rear wheel wells since I have leaks there too but I think this took care of most of the leaks. When I removed the back bumper I found 1/4 inch gaps between panels where the damage had been """repaired""" in the past, so I used sheet metal screws to pull the panels back together before resealing them. It's not the proper way but it just needs to keep water out and the screws are hidden behind the bumper and covered with seam sealer so they won't leak.
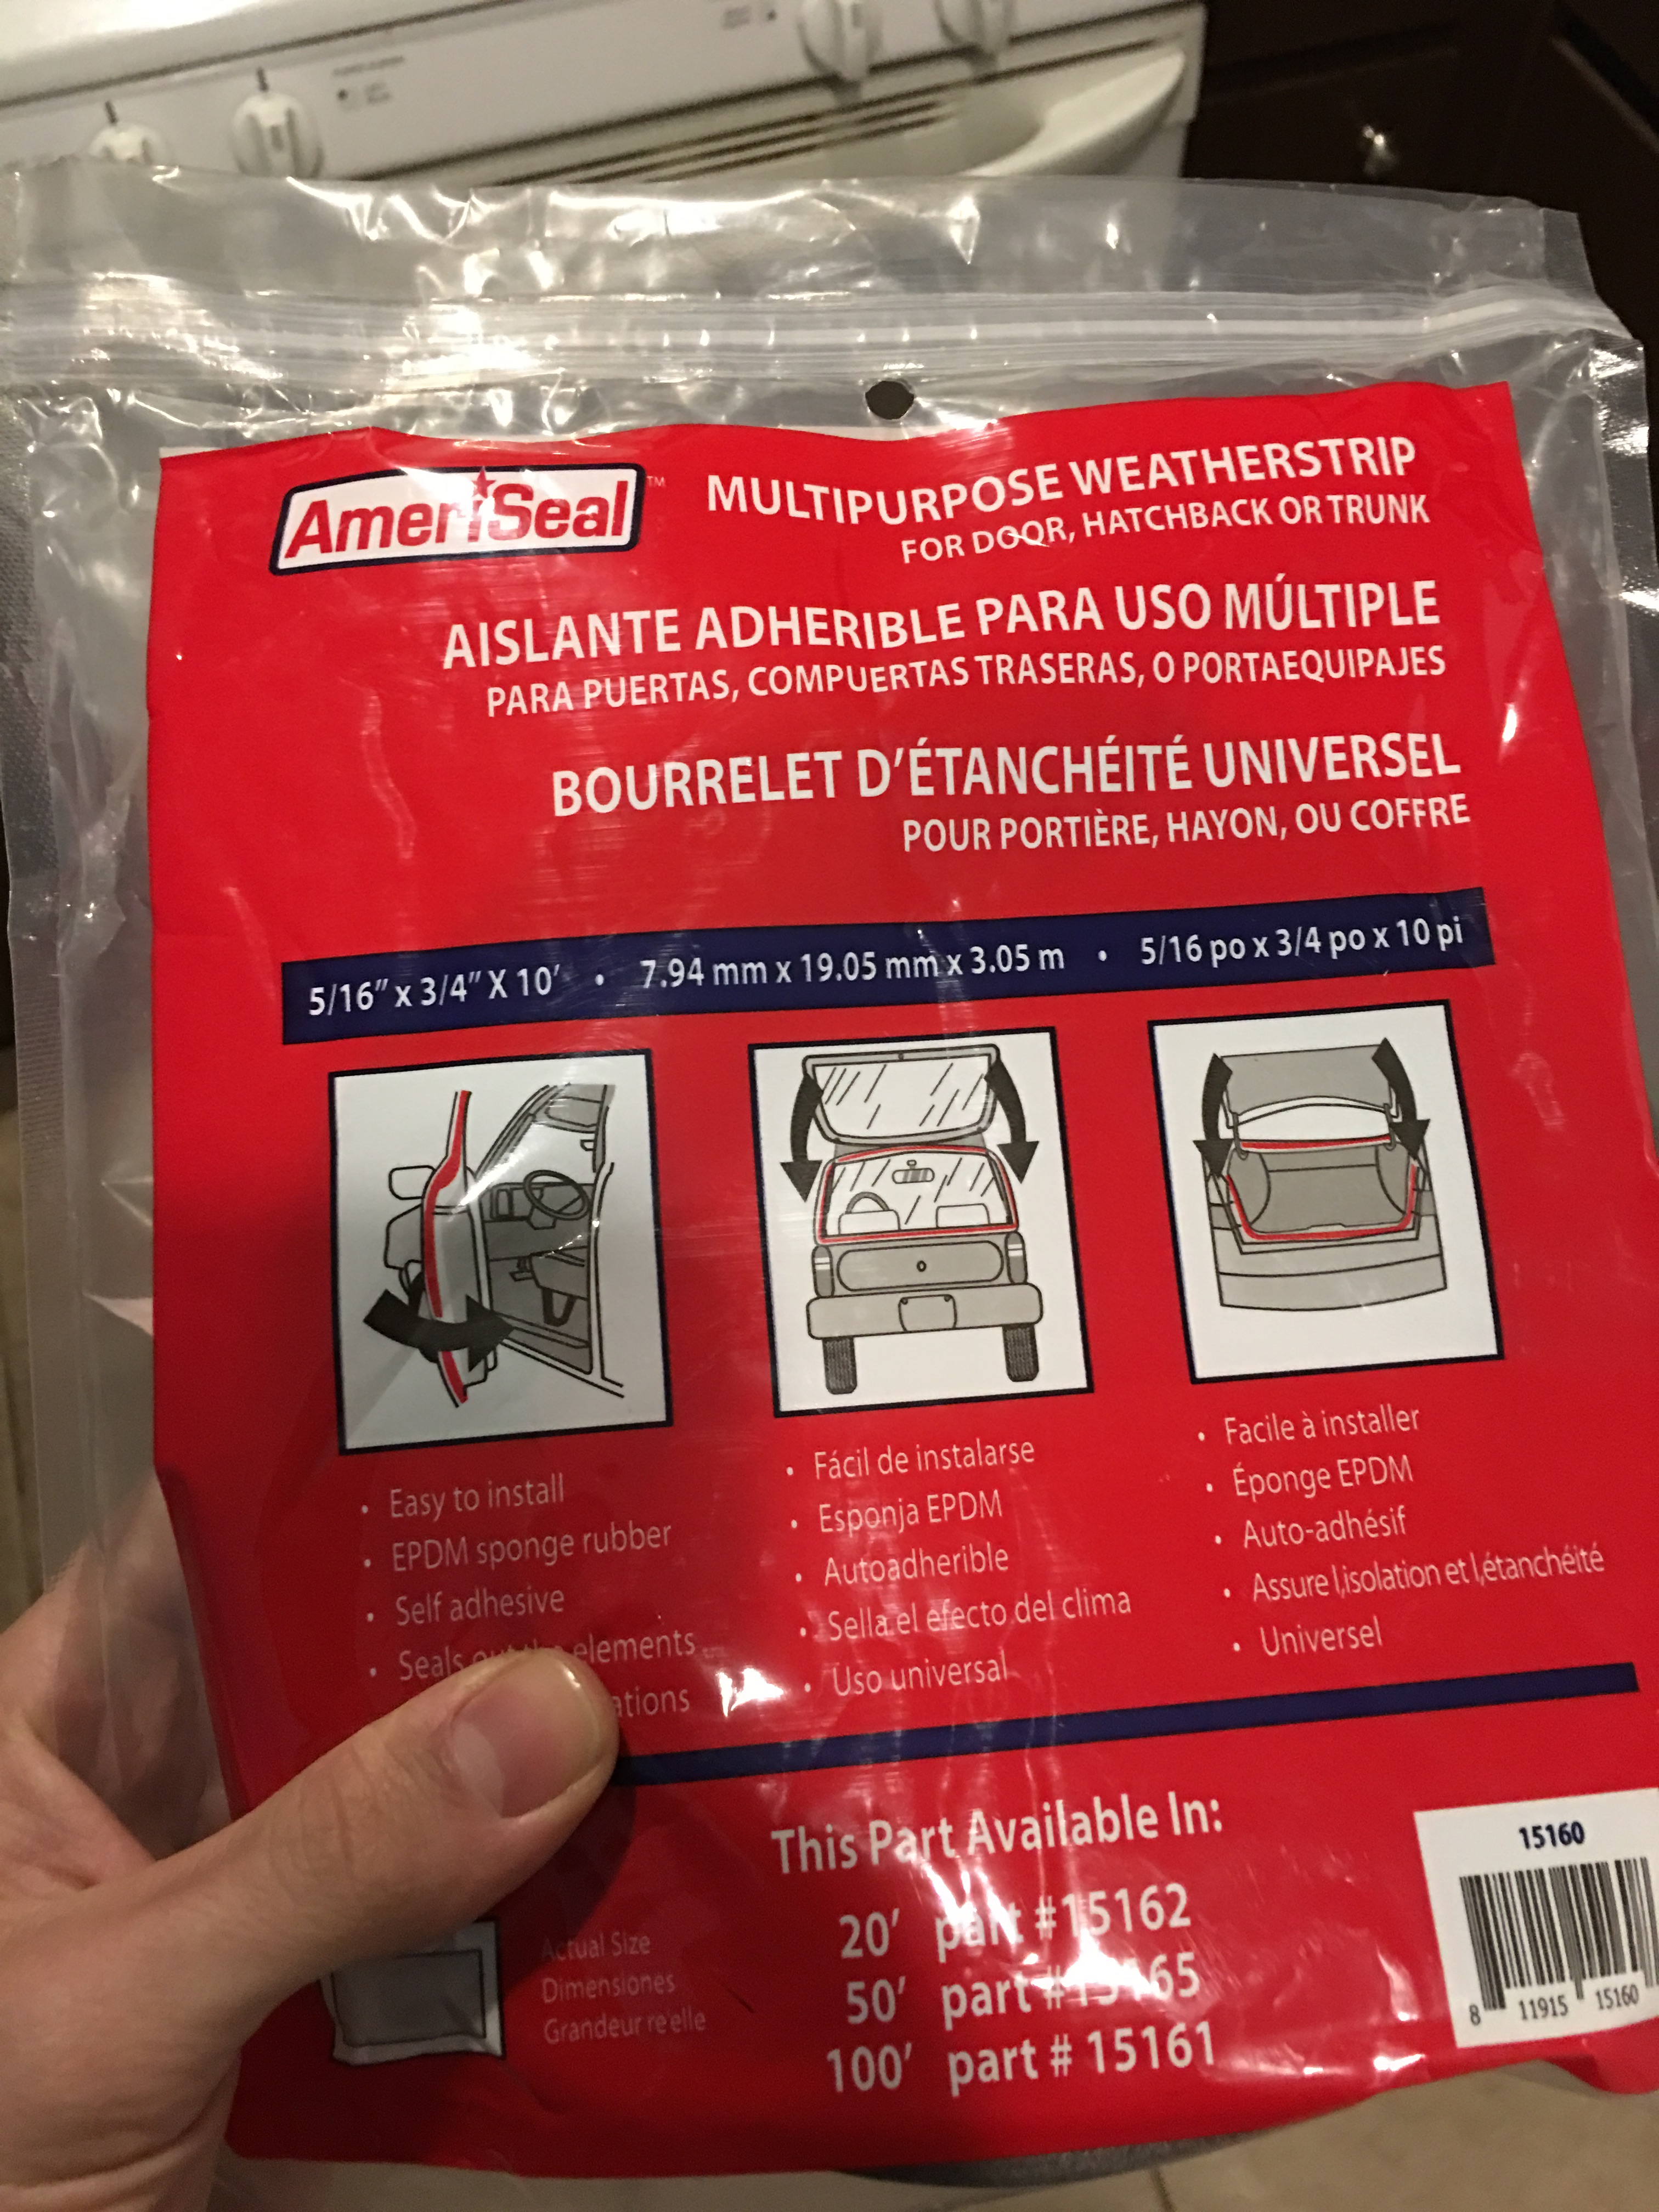
After the seam sealer was done I made some gaskets for the bumper mount studs and trim piece out of 1/4" inch thick weather stripping and reinstalled the bumper.
Then made new tail light gaskets out of some thicker weather stripping I found at Advance that actually works quite well and was way cheaper than buying new gaskets. It's about 5/16 inch thick and fills up the gaps caused by the damaged panel around the tail lights quite nicely.
Time will tell if the leaks are actually fixed, but if so I'll put carpet in the car again and probably do some sound deadening to make it more livable as a daily. I actually had the car for sale for a week or so and had a few offers but in the end I changed my mind since I couldn't find anything I actually wanted for less than $10k to replace it.
I'm also replacing both front wheel bearings roughly a year after installing them. I suspect my method of installation caused the early failure so I'm going to try having a shop press them in this time.
First off, the back passenger side of this car had been hit and badly repaired at some point before I had it. The bumper mounting points were pushed in and I just had some combination of bolts and spacers and missing nuts that more or less held the bumper in the right place. This left several of the mounting studs without nuts on the inside so they didn't seal, and water would leak in through the holes. I guess when I bolted the bumper and stuff up it was supposed to be temporary and then I just never got around to fixing it but who knows. The same goes for that piece between the bumper and the trunk, missing nuts, spacers holding it out properly, leaks everywhere, etc. And same goes for the tail lights, the gaskets were old and worn out and the back panel was so messed up that there were huge gaps around the tail light gasket so more water could come in.
So, to start, I took everything off the back, got out the hammers, and beat the various mounting points on the back panel more or less back into place. It's not perfect but the bumper/trim/lights are more or less in the right place now and I can actually tighten down all the fasteners for the first time since owning this car.
After that was taken care of, I got a pneumatic gasket remover tool from Harbor Freight for $25 (seriously how is their **** so cheap?) and removed all of the seam sealer from the back right corner of the car since most of it was cracking, then wire-wheeled it to prepare for new seam sealer.
I picked up a tube of 3M seam sealer from Napa (oddly enough it's the only auto parts store that seems to carry it in-store and I was too impatient to order online) and went to town on it. Seam sealer is messy as hell and stinks so bad you need a respirator but hopefully my main leaking problems will be fixed now. I need to redo the sealer on the inside of the rear wheel wells since I have leaks there too but I think this took care of most of the leaks. When I removed the back bumper I found 1/4 inch gaps between panels where the damage had been """repaired""" in the past, so I used sheet metal screws to pull the panels back together before resealing them. It's not the proper way but it just needs to keep water out and the screws are hidden behind the bumper and covered with seam sealer so they won't leak.
After the seam sealer was done I made some gaskets for the bumper mount studs and trim piece out of 1/4" inch thick weather stripping and reinstalled the bumper.
Then made new tail light gaskets out of some thicker weather stripping I found at Advance that actually works quite well and was way cheaper than buying new gaskets. It's about 5/16 inch thick and fills up the gaps caused by the damaged panel around the tail lights quite nicely.
Time will tell if the leaks are actually fixed, but if so I'll put carpet in the car again and probably do some sound deadening to make it more livable as a daily. I actually had the car for sale for a week or so and had a few offers but in the end I changed my mind since I couldn't find anything I actually wanted for less than $10k to replace it.
I'm also replacing both front wheel bearings roughly a year after installing them. I suspect my method of installation caused the early failure so I'm going to try having a shop press them in this time.
The following users liked this post:
12-29-2017, 08:29 PM
#185
Honda-Tech Member
Was the quote you got for the bearing install from your local Honda dealer for them being on the car or off the car?
I had the local garage down the street from me press in a set of ball joints for like $40 on both knuckles of my civic si.
btw, do you work at freescale?
i used to live in buda.
I had the local garage down the street from me press in a set of ball joints for like $40 on both knuckles of my civic si.
btw, do you work at freescale?
i used to live in buda.
12-30-2017, 01:07 PM
#186
It was for the whole thing, drive the car in, hand them the bearings and ball joints, and pick the car up with the parts swapped.
I did it myself using a huge bolt like in the pics I posted, turns out that was a terrible idea as both bearings failed in about a year, I'd assume because I pushed it in by the inner race and damaged it. When I did it again last week, I took the disassembled knuckles to the shop my buddy works at and he pressed both front wheel bearings and hubs for $40.
I was an intern at Freescale for 18 months but I haven't worked there since 2014.
01-22-2018, 10:52 AM
#188
Honda-Tech Member

Join Date: May 2011
Posts: 30
Likes: 0
Received 0 Likes
on
0 Posts
Awesome thread.. Looks like a labor of love! I am also running the myhondahabit oil pan gasket. It's been solid for years. How soon until you are driving this car?
03-21-2018, 01:02 PM
#191
Time for another update. I've been putting some time into this car lately and doing pretty much everything I can to avoid redoing the wheel bearings yet again even though the definitely need it. My trunk resealing was somewhat successful. I'm still getting a bit of water but MUCH less than before, and the leaks in the passenger compartment floor pan appear to be completely fixed. I need to jack up the back and remove the rear wheels and redo the seam sealer in the wheel well but that's about it as far as I can tell. It's nice to not have to bail out my trunk everytime it rains, the bit of moisture that gets in evaporates on it's own pretty quick.
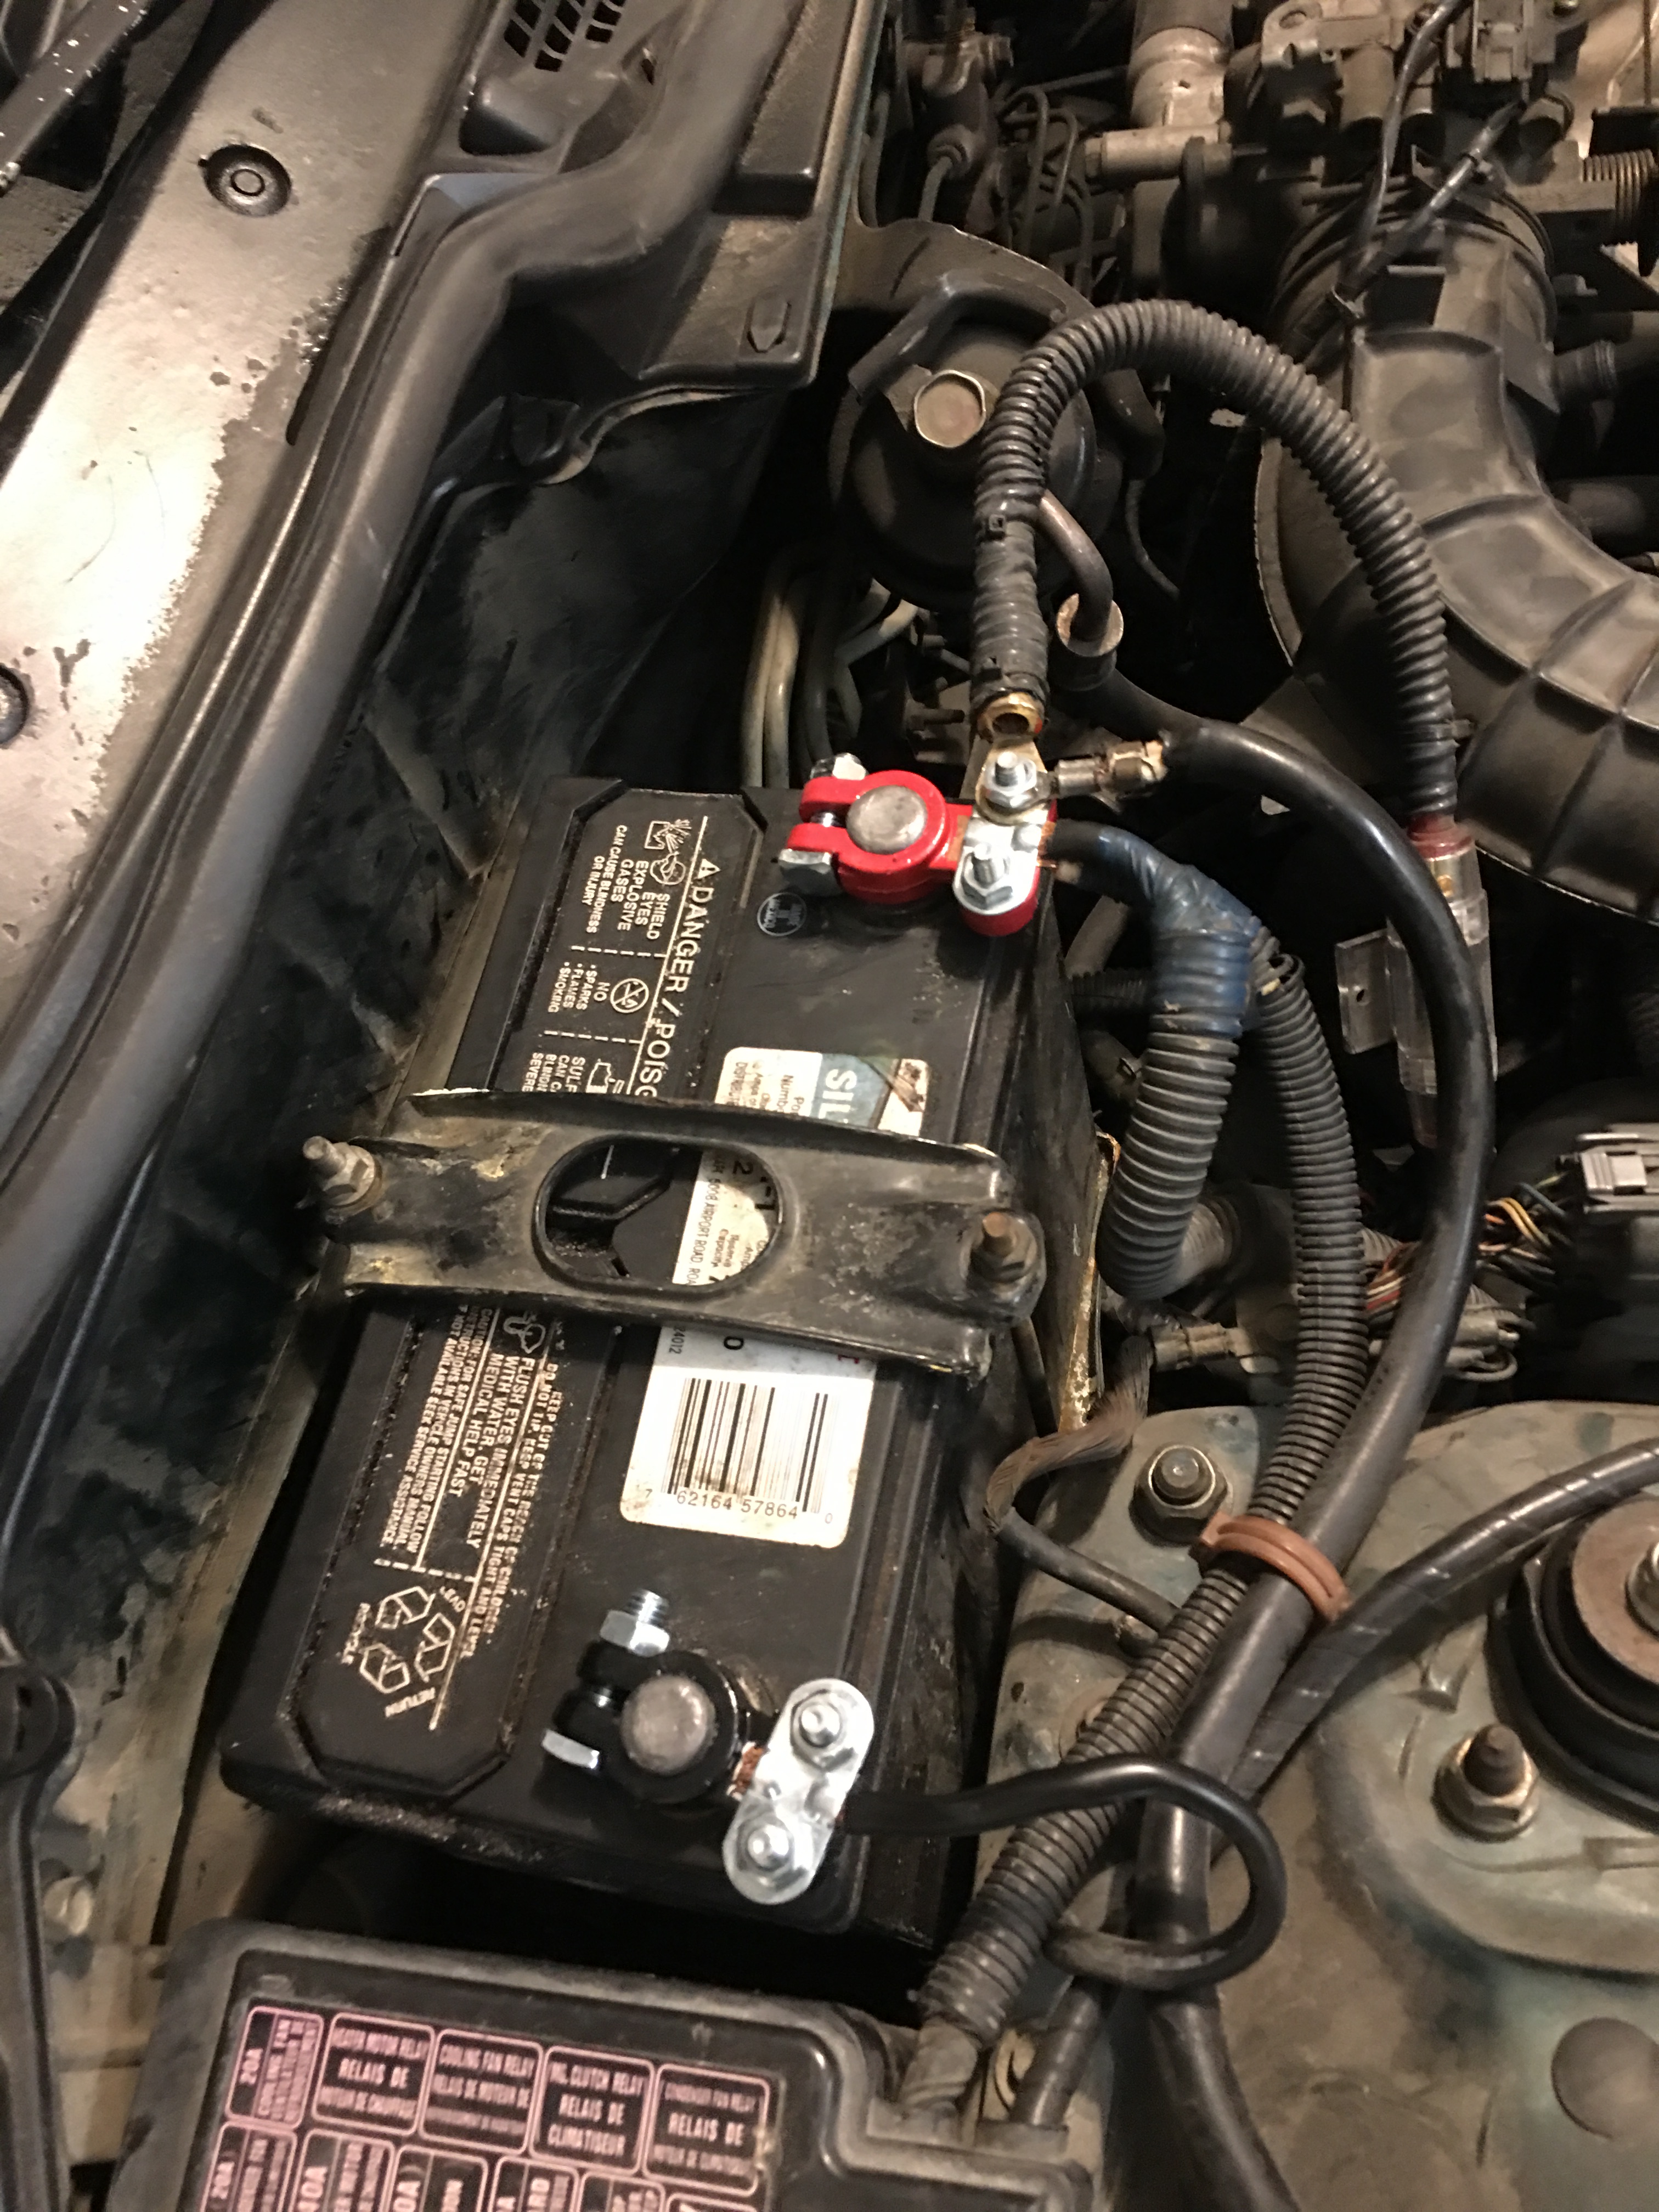
The factory battery terminals were getting pretty worn out so I picked up a set of universal terminals and installed them. I like them a lot better than the scrawny original terminals which tend to warp as you tighten them and eventually stop connecting very well.
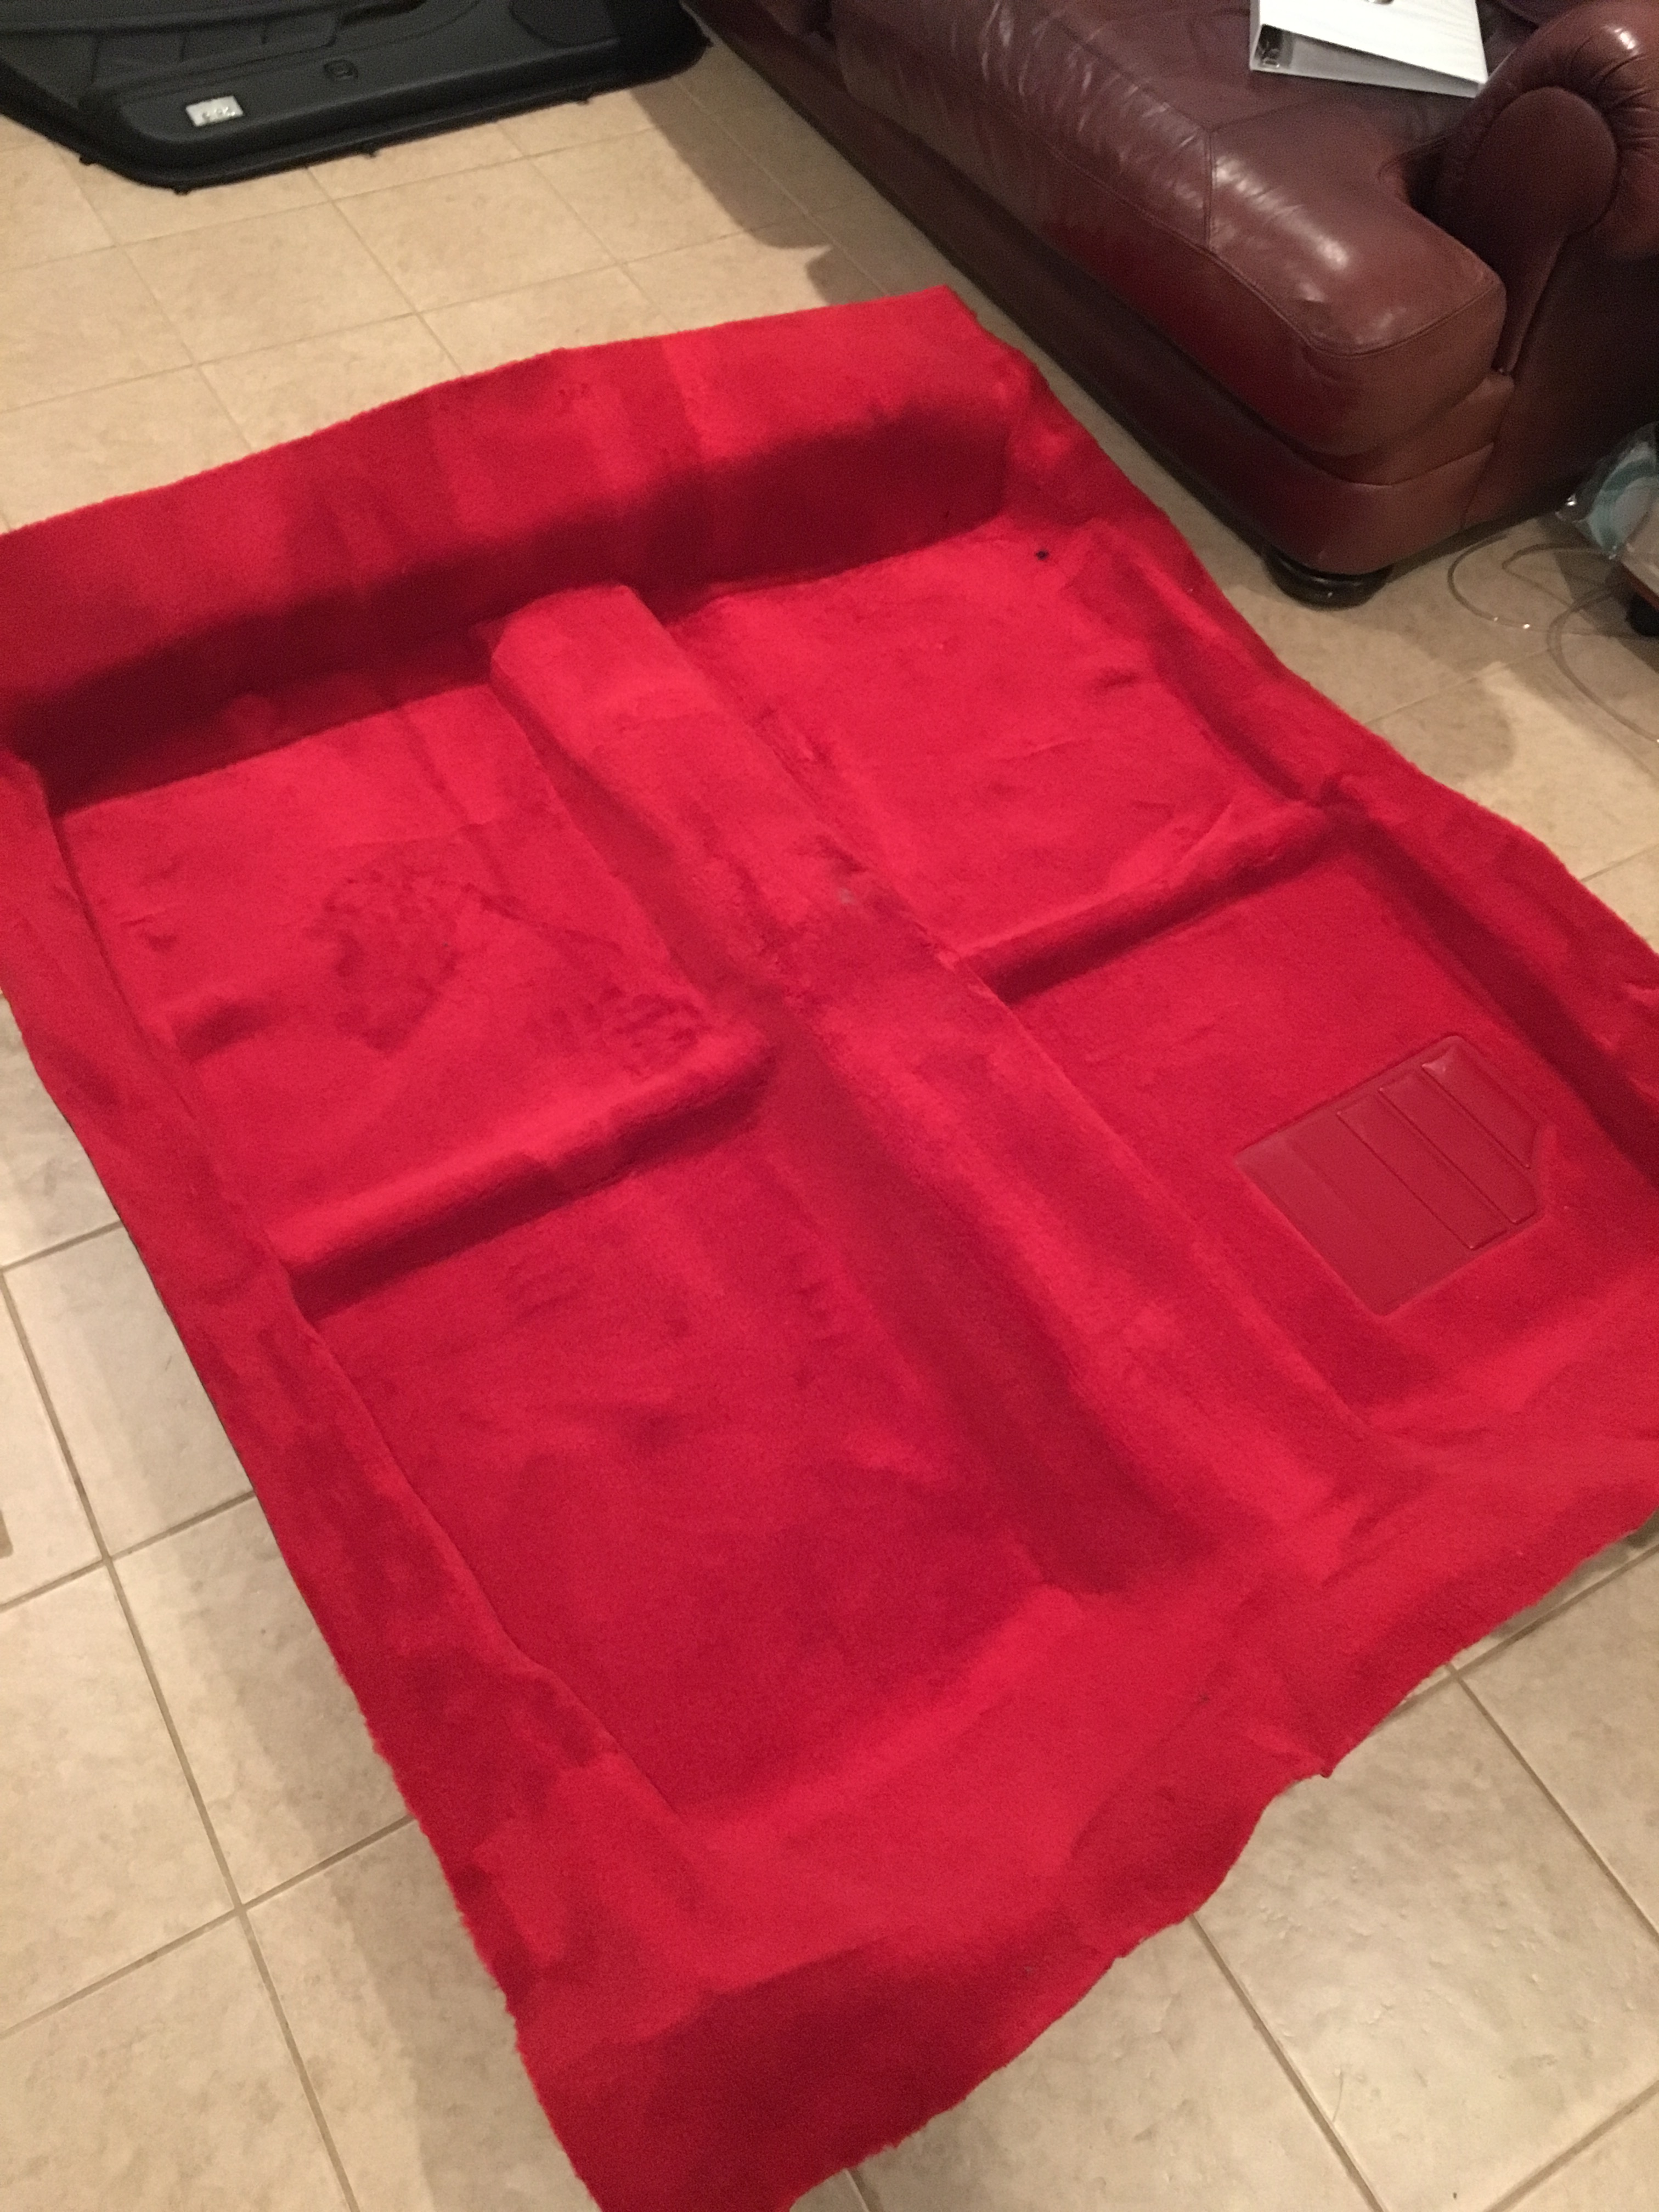
I also bought some new carpet, I couldn't find any factory carpet worth buying so I ordered some from stockinteriors.com in Type-R red. Yes it's tacky, but that's what I'm going for, and I think it actually turned out pretty well. I went with the extra mass backing and the carpet made a huge difference in road noise, like it's a whole different car. I can actually have conversations at highway speed now.
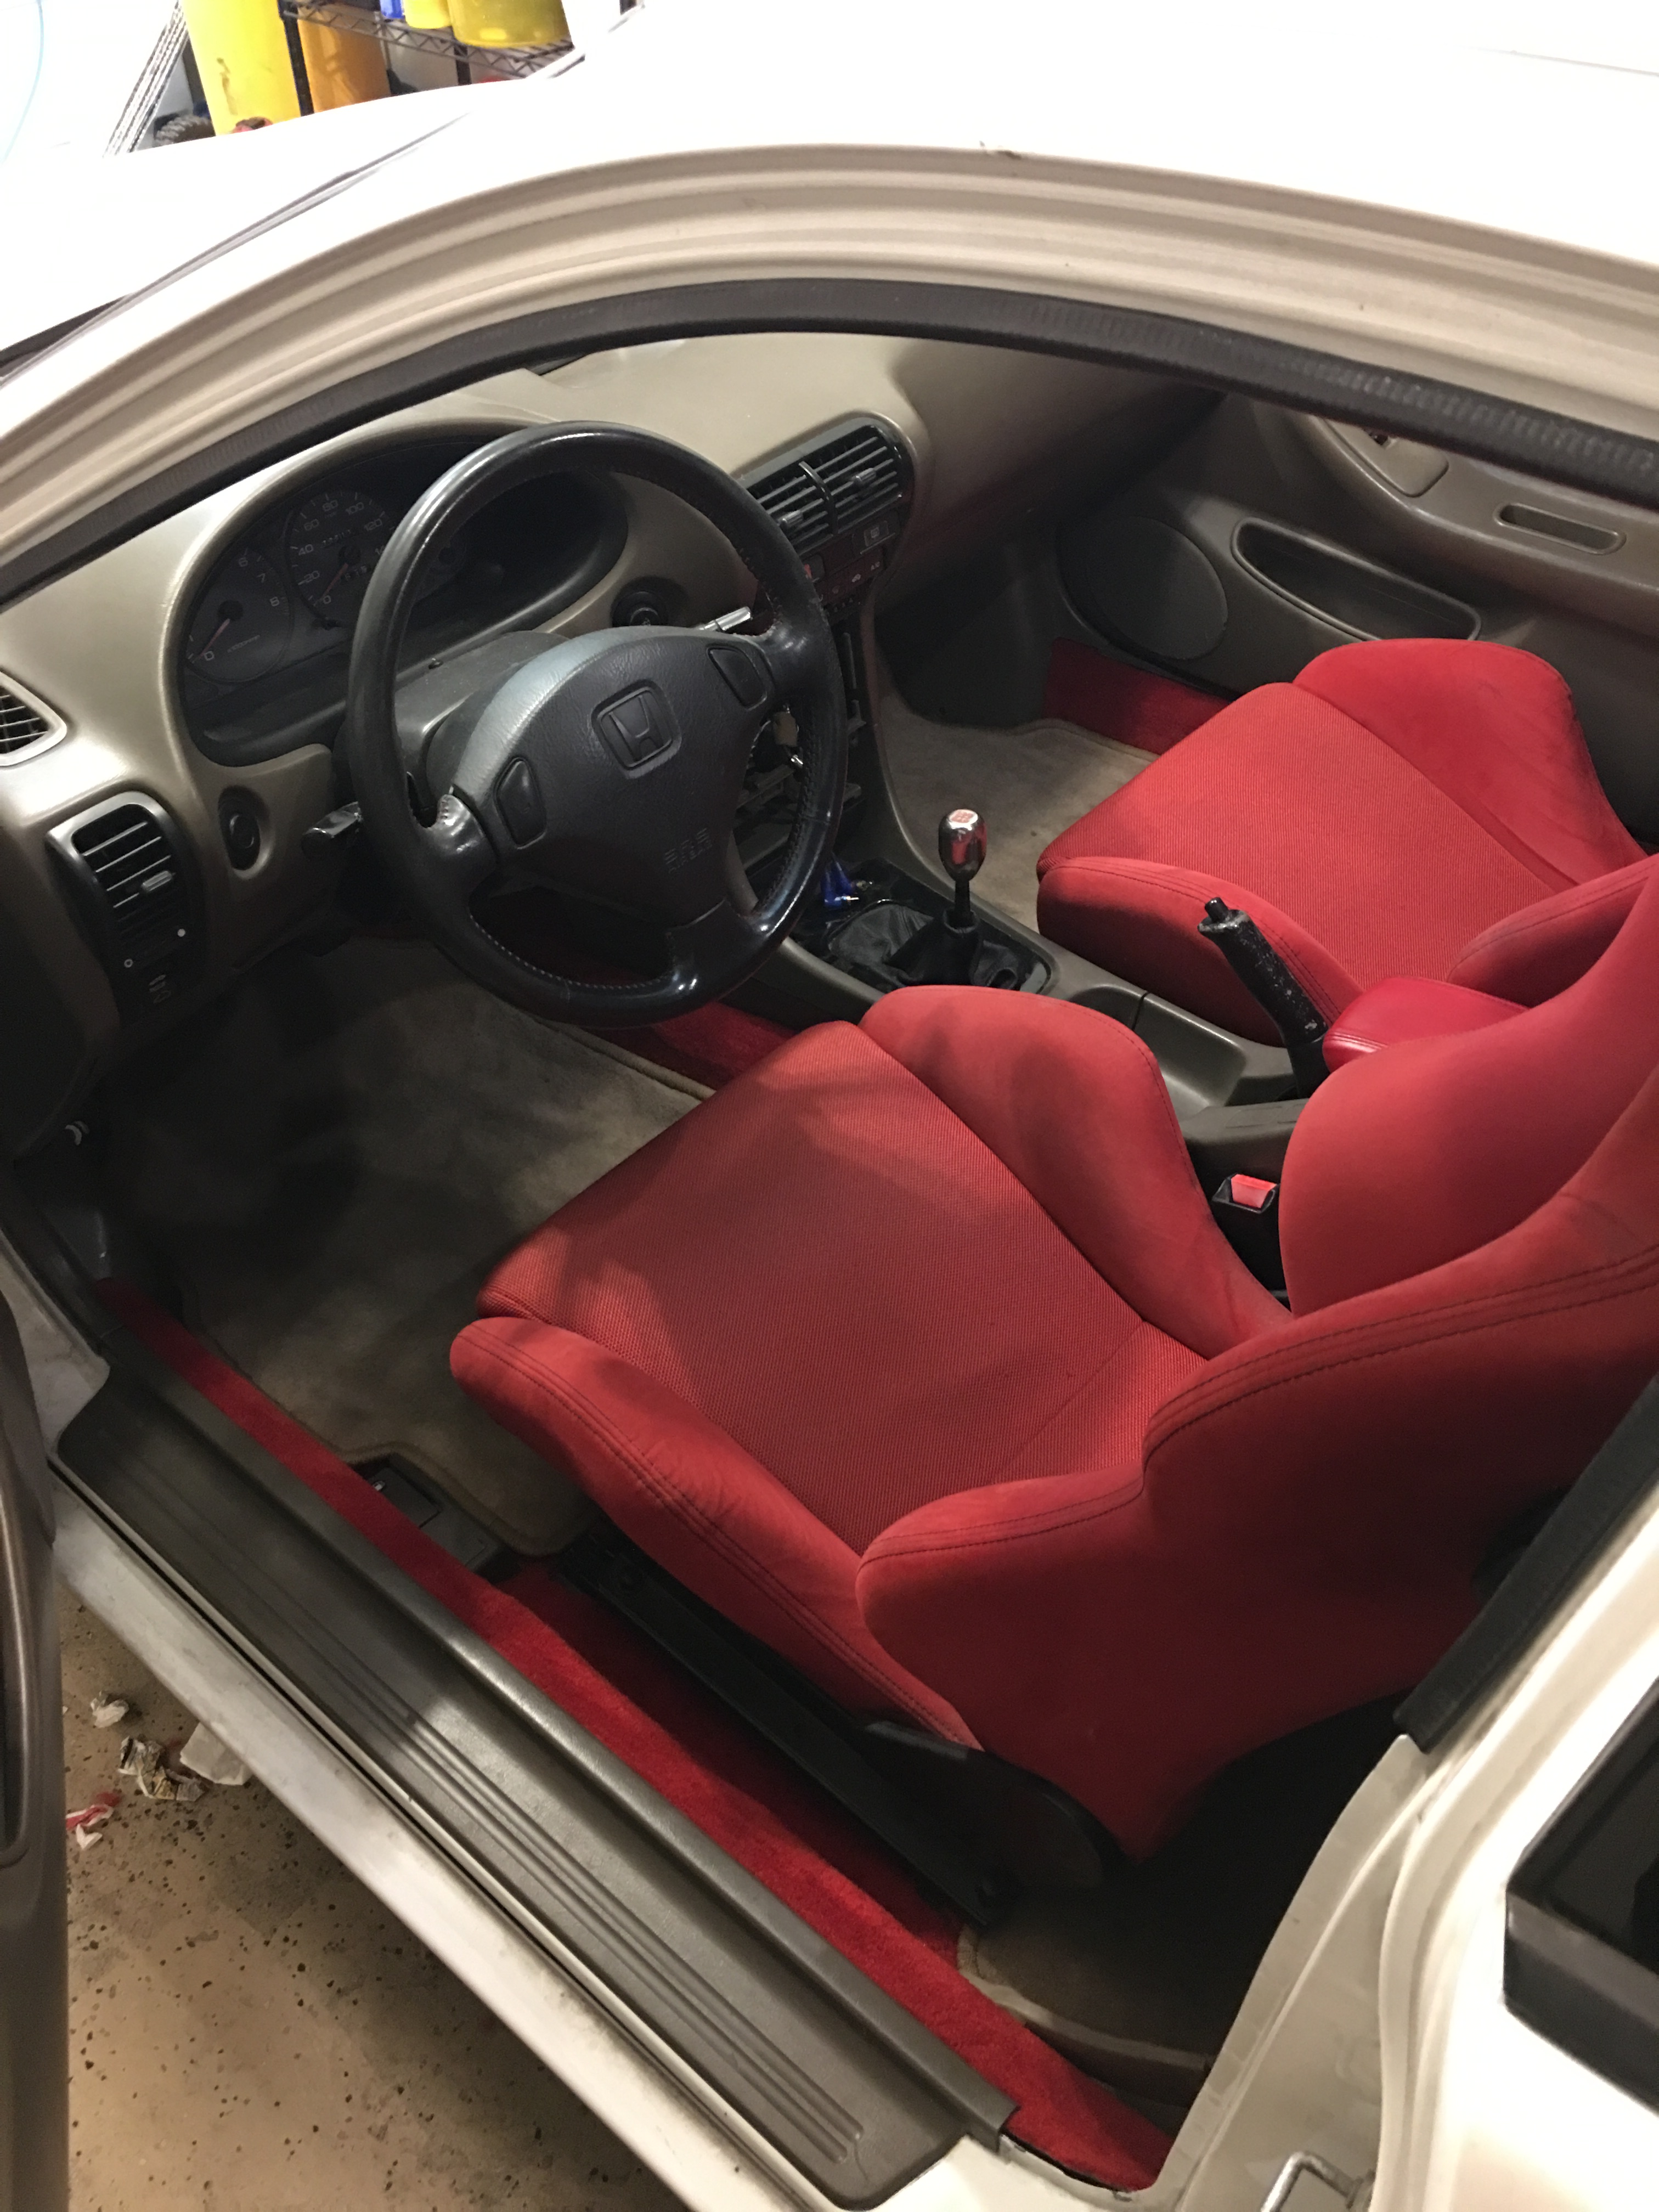
With the tan floor mats it's actually a somewhat subtle look. I might get some red mats to take care of that though.
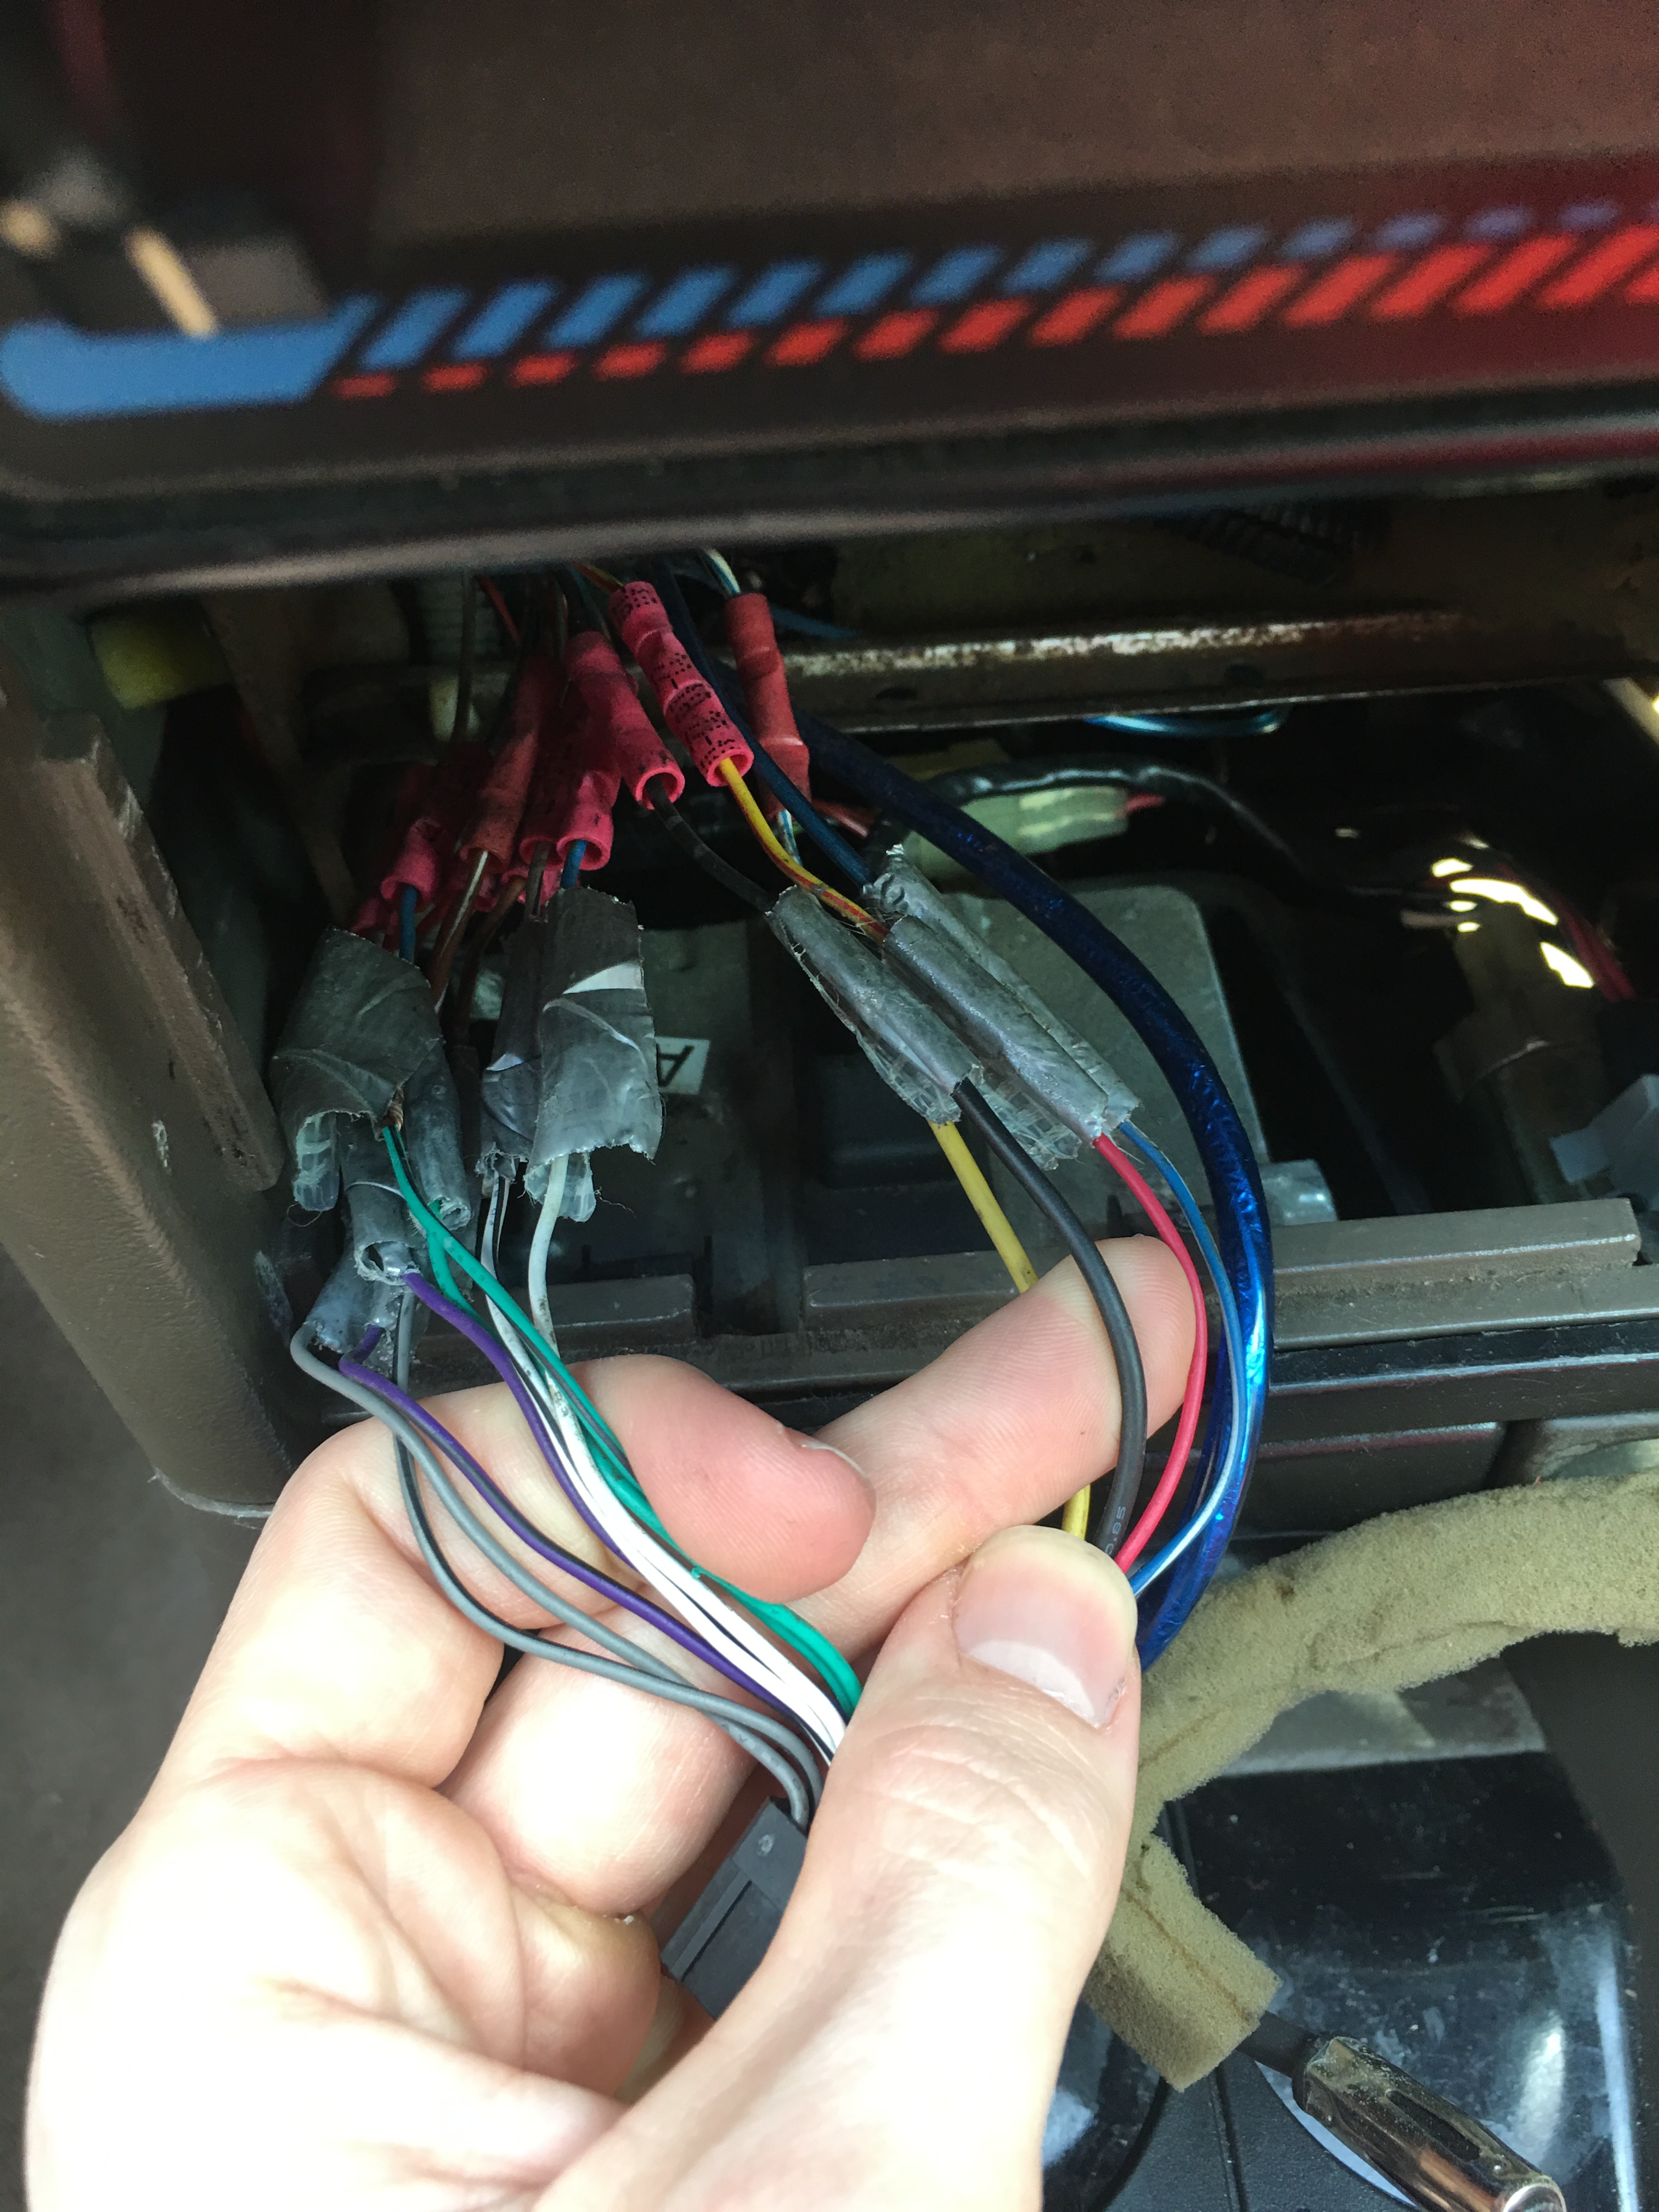
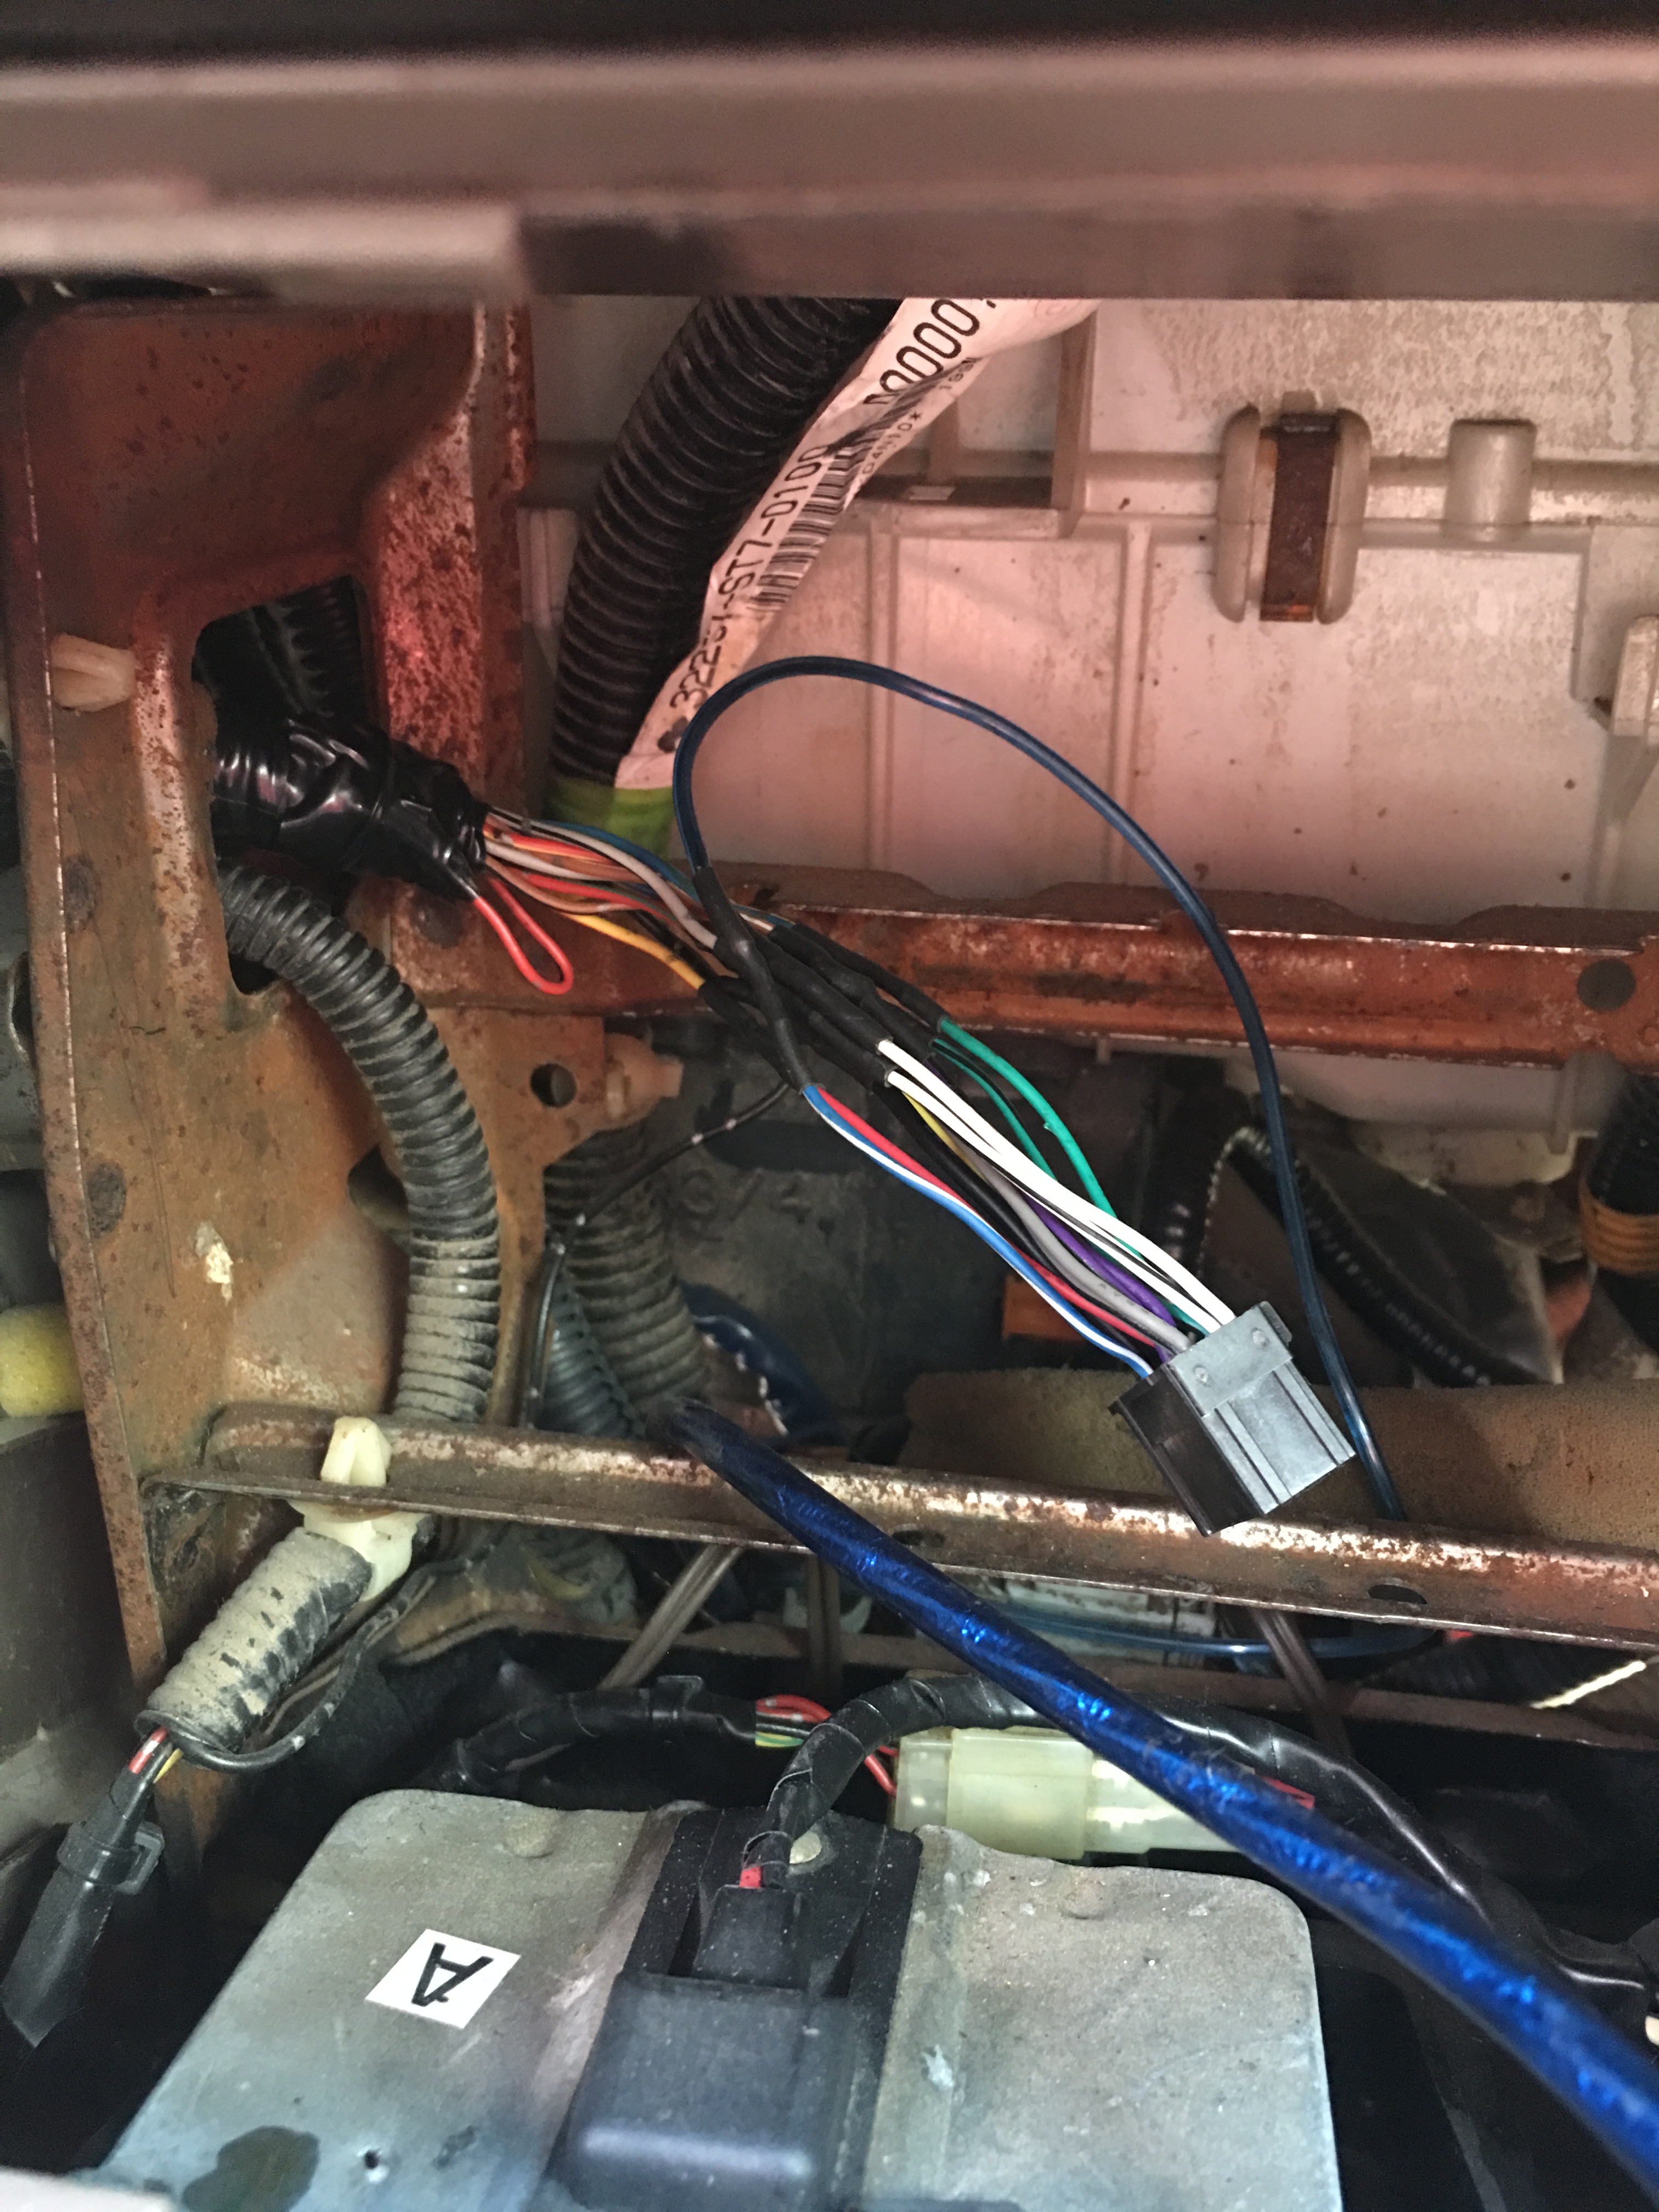
I also rewired my radio, when I did it the first time I was feeling lazy and just twisted the wires together and duct taped them up. It's quite embarassing really since my degree is in electrical engineering, but I can be a lot happier about the fixed version. I cut out all the crappy connections and soldered everything and used heat-shrink tubing to insulate it. The downside is that the connector isn't long enough to easily install the radio, but it's doable and it works a lot better now. Before my speakers would pop and cut out from time to time and that's completely fixed.
And finally, I ordered some dust covers for the holes in my steering wheel. I have a JDM Integra SiR-G wheel and it didn't come with the covers for the air bag wires and screws, and I didn't know where to get them since it wasn't a USDM part. When I started sourcing NSX parts from Japan and realized I could get the steering wheel parts from there too. No pictures because frankly it's not that interesting.
The factory battery terminals were getting pretty worn out so I picked up a set of universal terminals and installed them. I like them a lot better than the scrawny original terminals which tend to warp as you tighten them and eventually stop connecting very well.
I also bought some new carpet, I couldn't find any factory carpet worth buying so I ordered some from stockinteriors.com in Type-R red. Yes it's tacky, but that's what I'm going for, and I think it actually turned out pretty well. I went with the extra mass backing and the carpet made a huge difference in road noise, like it's a whole different car. I can actually have conversations at highway speed now.
With the tan floor mats it's actually a somewhat subtle look. I might get some red mats to take care of that though.
I also rewired my radio, when I did it the first time I was feeling lazy and just twisted the wires together and duct taped them up. It's quite embarassing really since my degree is in electrical engineering, but I can be a lot happier about the fixed version. I cut out all the crappy connections and soldered everything and used heat-shrink tubing to insulate it. The downside is that the connector isn't long enough to easily install the radio, but it's doable and it works a lot better now. Before my speakers would pop and cut out from time to time and that's completely fixed.
And finally, I ordered some dust covers for the holes in my steering wheel. I have a JDM Integra SiR-G wheel and it didn't come with the covers for the air bag wires and screws, and I didn't know where to get them since it wasn't a USDM part. When I started sourcing NSX parts from Japan and realized I could get the steering wheel parts from there too. No pictures because frankly it's not that interesting.
04-16-2018, 10:33 AM
#192
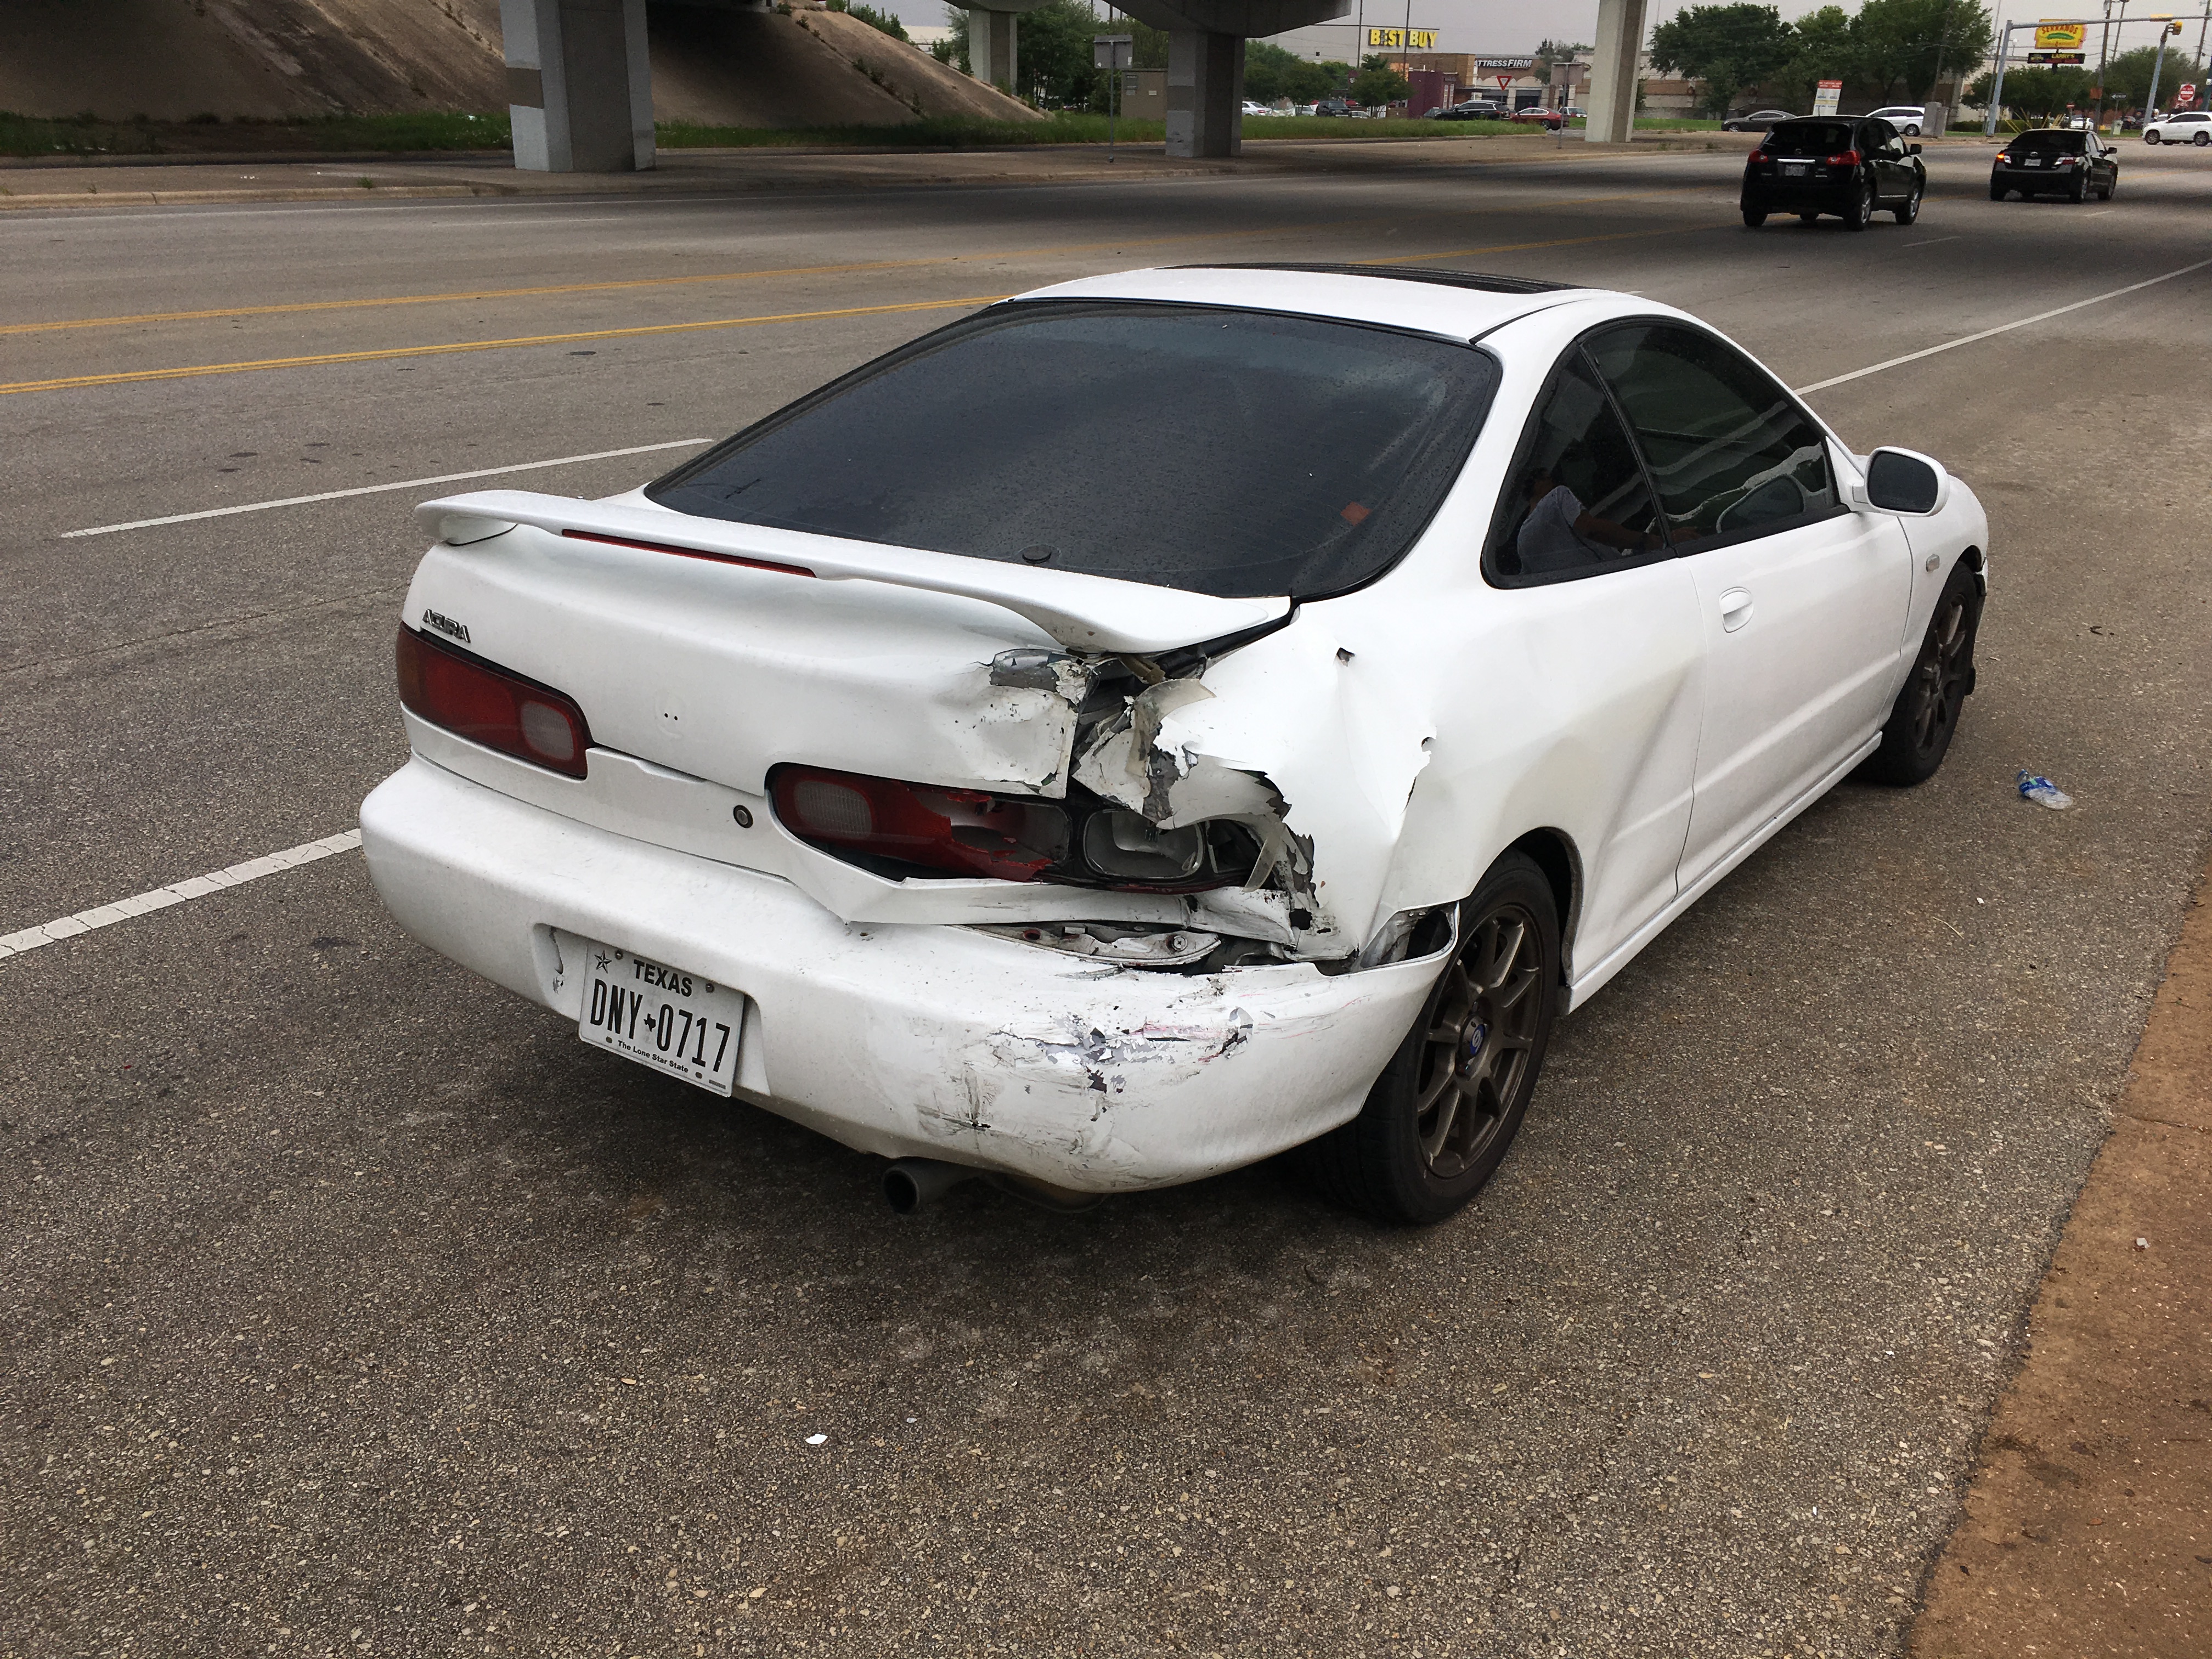
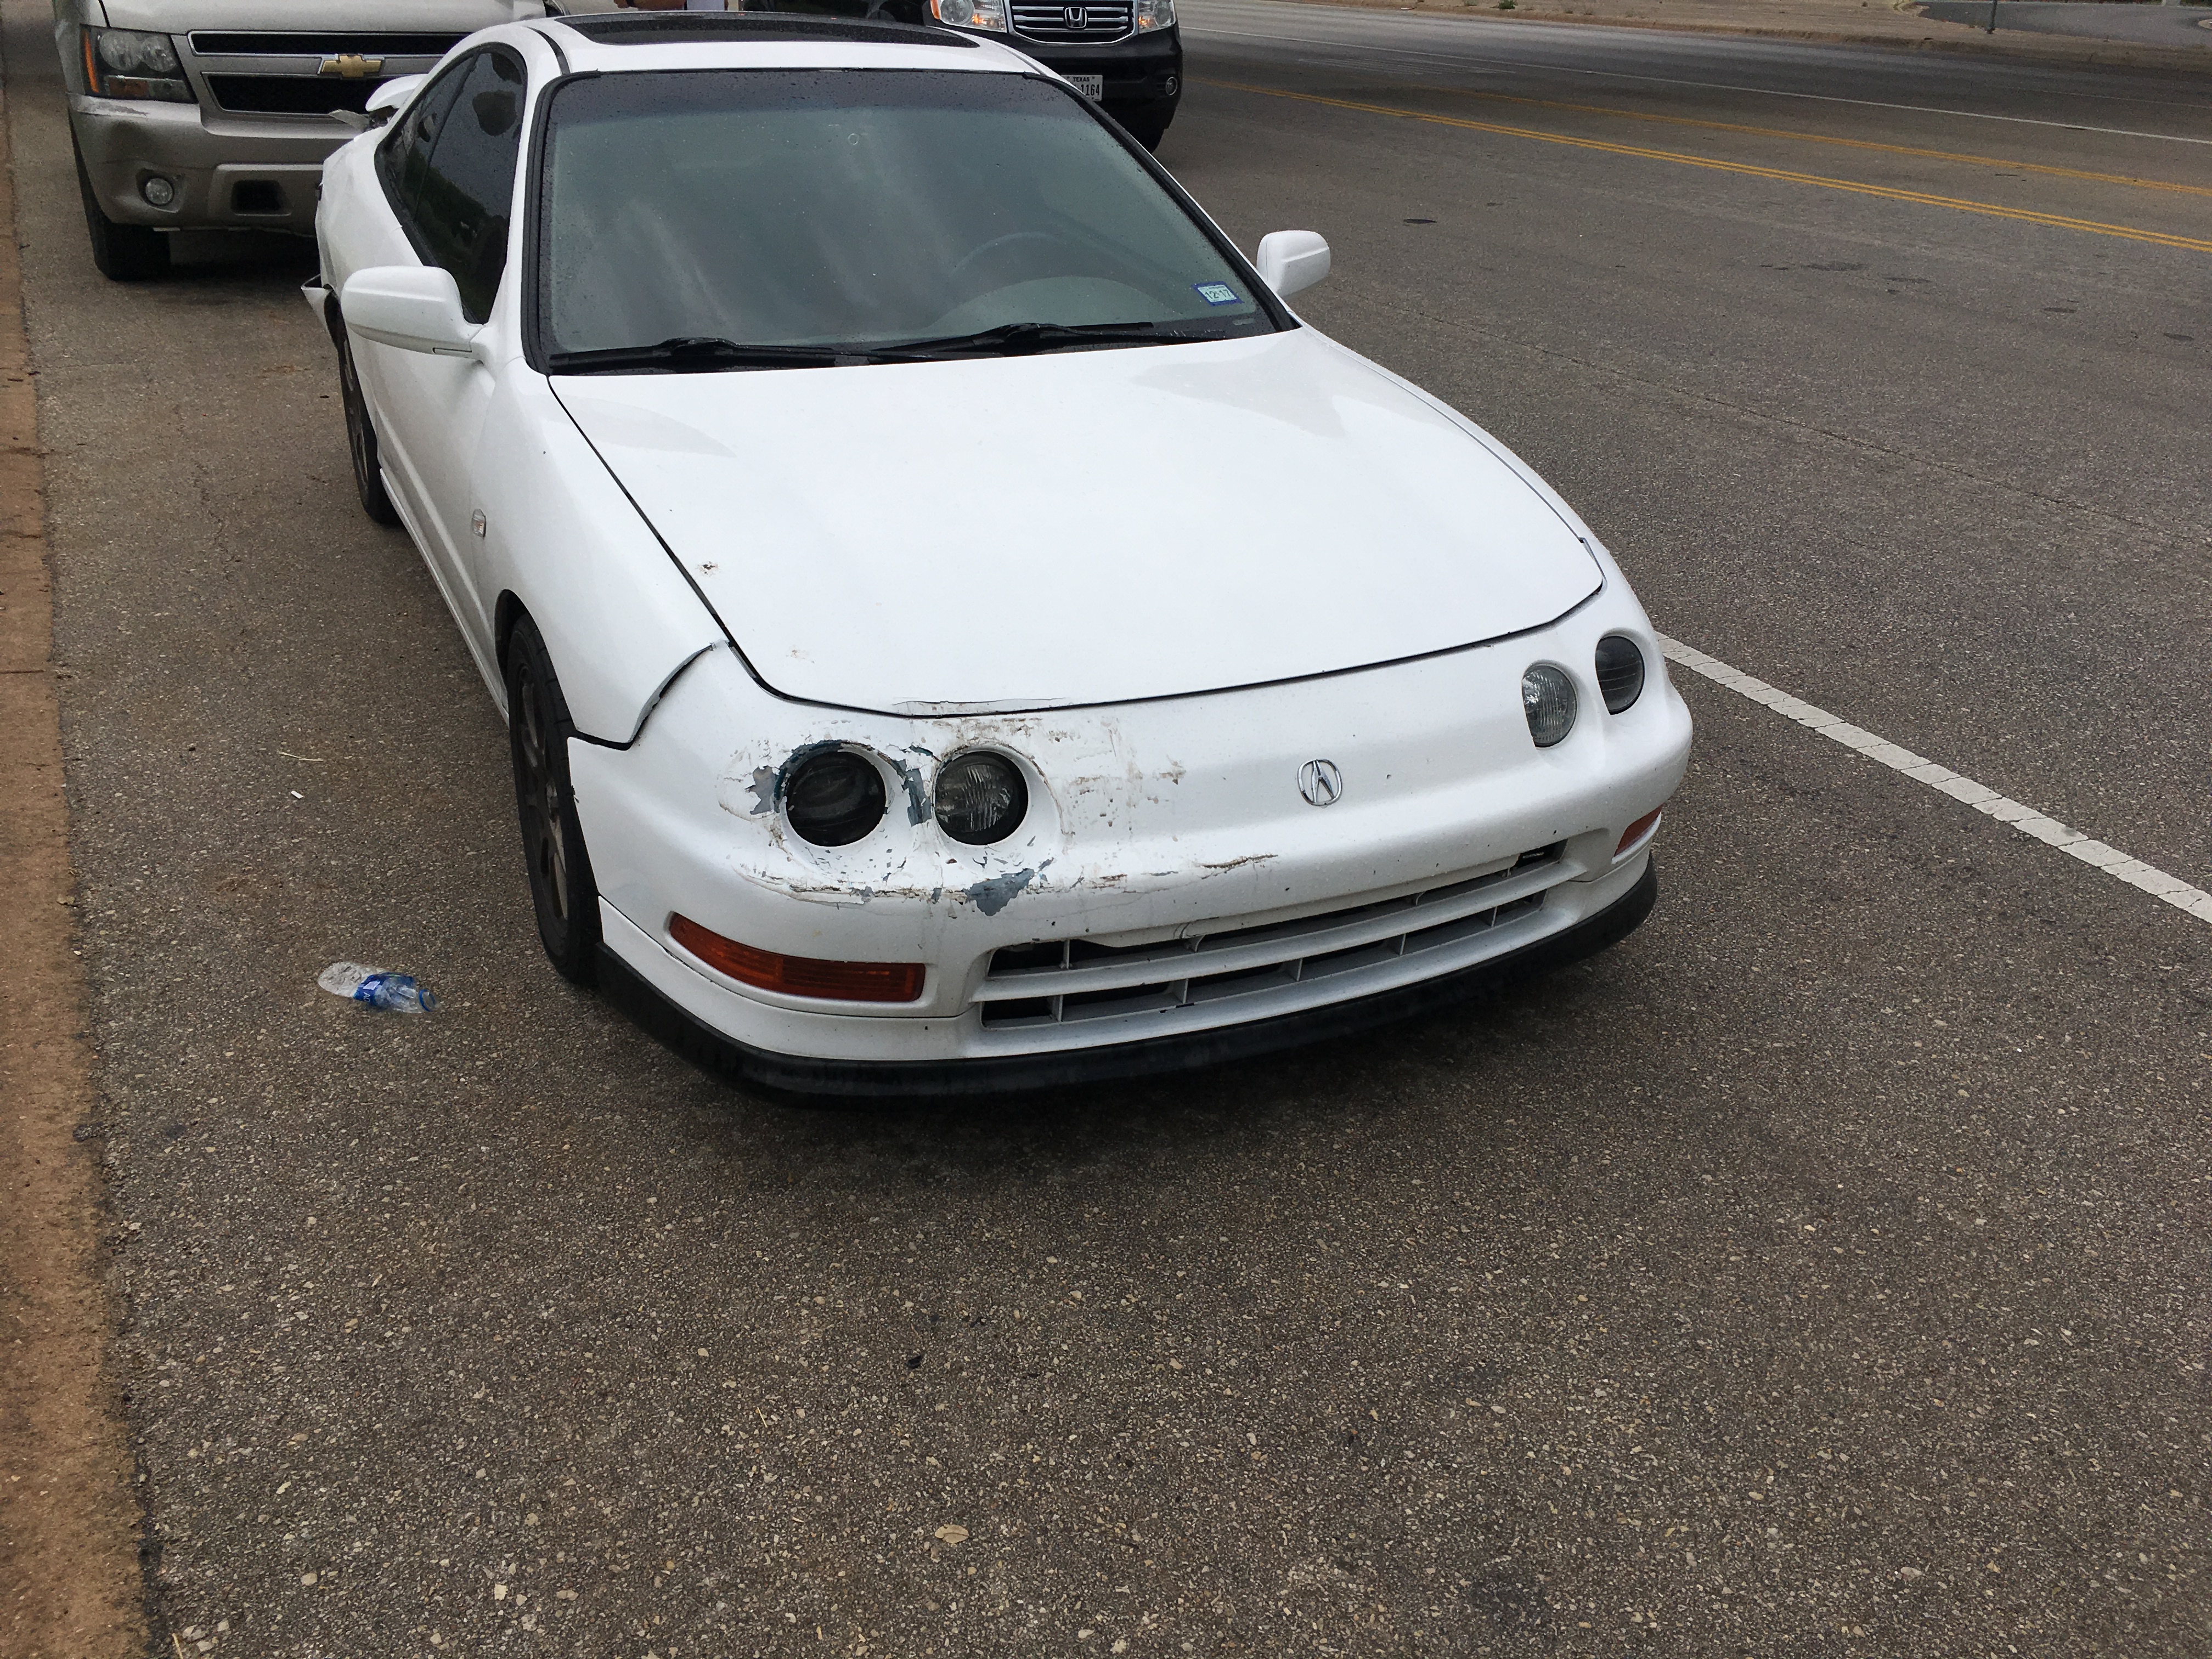
Well guys, I think this just might be the end for this car, I was rear ended at a stoplight by an SUV and pushed into the car in front of me, he tried to swerve to avoid hitting me but didn't quite make it and smashed in the back corner. Fortunately no one was injured.
The other guys insurance hasn't looked at the car yet, but knowing what it's worth and how much body work goes for in my area, there's no way it isn't totaled. The front structure was pushed back about an inch on the passenger side from hitting the car in front of me, and the bumper, fender, and hood are all pretty messed up, as well as the headlight and the front crash bar. The back end is a complete mess, the whole corner was smashed in. While I could probably buy it back from insurance and try to repair it, I just don't have the time or the space to do that, and I don't want to spend months daily-driving the NSX in the meantime.
I think best case scenario I can negotiate a decent payout with insurance, then buy it back and part it out before scrapping the shell, there's too many good parts left here to just let it get crushed or torn apart in a junkyard. This isn't how I imagined getting rid of this car, and I'd be lying if I said I didn't get a little teary eyed over it. I guess I always imagined myself selling it to some kid for a first car who would continue to build it up like I did.
04-18-2018, 08:23 PM
#196
Pretty much everything listed in this thread lol. Off the top of my head...
Drivetrain
JDM high compression B20B, all new OEM seals ~40k ago, all oil seals sleeved for good measure, MyHondaHabit oil pan/stud kit. No leaks whatsoever, leakdown numbers <10% on all cylinders.
LS transmission, rebuilt ~40k ago with Synchrotech carbon fiber synchros, OEM seals, OEM bearings, rebuilt OBX LSD. Would be great for a mild turbo setup with the longer LS gearing.
Exedy clutch, master/slave cylinders, ~40k miles.
Shift linkage rebuilt, sealed U-joint welded in.
OEM coolant hoses, all of them, ~40k miles on them.
OBD2A ECU w/internal crank sensor bypass and can be wired into an alarm system to not start unless properly disarmed
OBD1 ECU w/conversion harness
Exterior
White sedan rear door handles (no lock cylinders, looks really clean, fits front coupe doors perfectly)
White front door handles
White 98+ mirrors
Morimoto FXR HID retrofit lights
LED bulbs for everything else
Amber front corner lights, no condensation
Driver side tail light
Interior
Red ITR Recaro seats, passenger side bolster foam replaced so in near perfect condition, includes fitted seat covers.
Near perfect tan leather rear seats
Near new red carpet, has mass backing so is much quieter than factory carpet
Tan floor mats in okay shape
A bunch of OEM sunroof slider bits, should help if your sunroof is sticking or slow, still in the package.
JDM Integra SiR-G 3-spoke steering wheel with airbag, black w/red stitching.
Tan steering wheel in not great shape with airbag.
Tan passenger side airbag.
Red leather center console armrest.
Red leather door inserts.
Suspension/Brakes/Wheels
Sparco Assetto Gara wheels, 15x7, 4x100, bronze, zero scratches or curb rash, fit great on an Integra. Dunlop Direzza DZ102 tires, 205/50R15, replaced 8 months ago.
Poor mans BBK (Type R front calipers, RSX rear calipers) powdercoated red, rebuilt in December 2017 with new OEM seal kits, HPS brake pads full set with plenty of life left, HP+ front pads with 2 track days on them. Mini cooper front rotors, EP3 rear rotors.
All control arms with Hard Race bushings, ~50k miles on them. Blox front/rear camber kits.
KYB GR2 shocks/Eibach Pro Kit springs, rides great, nice slightly lowered look, and still handles pretty well for a budget setup.
OEM front wheel bearings from the dealer still in packaging.
And basically everything else you'd find in an Integra part out lol.
04-18-2018, 10:14 PM
#197

I just read through this whole thread and was loving the work that you have completed. Seeing the pictures makes me sick having been through a similar situation with my first EG. It makes me worry about daily driving my current EG with drivers getting less carless now a days. I hope that all works out well for you and people buy your stuff!
PS:I am envious of your NSX.
PS:I am envious of your NSX.