
D16z6 map sensor code
 06-21-2014, 09:48 PM
#1
Honda-Tech Member
Thread Starter

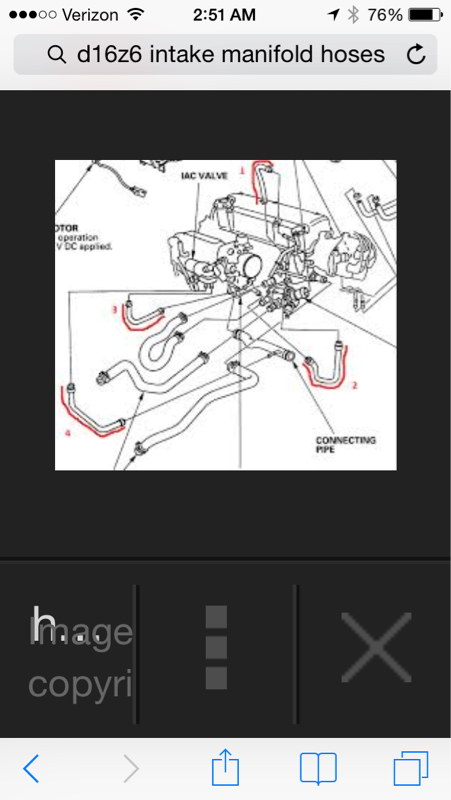
I have a 1995 civic ex sedan with a d16z6. I just had the motor rebuilt. The block is bored .20 over and the head is shaved 20 thousandths. I just dropped the motor in today and started for the first time. The first time i started it the car shut right back off. Then the second time i started the car it acted like it wanted to die then it leveled out but im getting a cel. I am getting 3 short flashes on the cel which i know is map sensor. I check to make sure i didnt get the tps plug mixed up which i didnt. I checked the voltage on each wire for the map sensor starting with the green and white wire and i got 4.9 volts. Got the same thing on the yellow in red wire. Then i checked the white wire and got 12.2. I know im getting power to the sensor so i tried a new map sensor. After i installed the sensor i reset the ecu by pulling the ecu fuse out. Im still getting the same problem. I rechecked the timing and its dead on. The car will idle fine. I get no change when i unplug the map sensor while the car is running. I went by a diagram to make sure i have all the hoses hooked up correctly which i believe i do. Ill post a pic of the diagram i used. Is there anything else i should look for other than a vacuum leak.

 06-22-2014, 04:04 AM
#3
06-22-2014, 06:55 AM
#4
Honda-Tech Member
Thread Starter
I was told that i didnt have to do anything to the ecu. I checked for vacuum leaks and havent found a leak. Ive pulled the map sensor out and started the car to check to see if i had vacuum which i do. If i hold my finger over the vacuum hole where the map sensor goes it sounds like the car idles better..
 06-22-2014, 07:03 AM
#7
Honda-Tech Member
Thread Starter
I was told that by the shop that did all the work. Yes the compression has been increased a little from what the shop said. Would a honda data tune really fix this problem?
Trending Topics
06-22-2014, 07:13 AM
#8
The Grumpiest
iTrader: (4)
Join Date: May 2008
Location: Oak Ridge, TN, USA
Posts: 28,333
Likes: 0
Received 16 Likes
on
15 Posts
I don't know if this helps but I felt like posting. As far as the tune. You just changed the configuration of the engine as far as fuel and air that the stock ECU probably cannot compensate for. I could see a milling of the head not being so bad but I was unsure as to the overbore and the piston/rod combo you are using being a factor so the shop may be correct.
Quite a few things can fool your Honda's PCM (Powertrain Control Module = fuel injection computer) into thinking the manifold absolute pressure (MAP) sensor is bad when it isn't.
Thankfully, testing the MAP sensor is pretty easy and in this tutorial I'll show you how to bench-test it using only a multimeter.
Here are the contents of this tutorial at a glance:

Symptoms of a Bad MAP Sensor
Since the MAP sensor's vacuum pressure input is used to calculate engine load and thus fuel injection and timing advance... when the MAP sensor fails, the PCM won't be able to keep your Honda Civic running smoothly. You'll see one or more of the following symptoms:
Check engine light (CEL) is shining nice and bright on the instrument cluster.
DTC P0107 MAP Sensor Circuit Low Voltage.
DTC P0108 MAP Sensor Circuit High Voltage.
Rough idle.
‘Rotten egg’ smell coming from the exhaust.
Won't pass the state mandated emissions test.
Bad gas mileage.
Lack of power, rough idle, or hesitation.
Engine cranks a long time before starting.
How the MAP Sensor Works
Your Honda Civic's fuel system is a speed density type. Which, in plain English means that your Honda's fuel injection computer needs to know the engine speed and the engine load to inject the proper amount of fuel (advance ignition timing, etc.).
The sensor that provides engine load information, to the PCM, is the manifold absolute pressure (MAP) sensor.
How does the MAP provide this engine load info? By measuring the amount of vacuum the engine is creating throughout the entire time it's operating.
The amount of vacuum pressure varies depending on engine load. Here are some more specifics:
At idle, manifold vacuum is higher.
When manifold vacuum is higher, the MAP sensor sends the PCM a higher voltage.
The PCM, using the inputs from the MAP sensor and other sensors, injects less fuel into all its cylinders.
Under load (let's say accelerating the engine to pass someone on the highway), manifold vacuum is lower.
When manifold vacuum is lower, the MAP sensor sends the PCM a smaller voltage.
The PCM, using the inputs from the MAP sensor and other sensors, injects more fuel into all its cylinders.
Circuit Descriptions of the MAP Sensor
How to Test the Honda Civic MAP sensor. Location of the MAP Sensor.
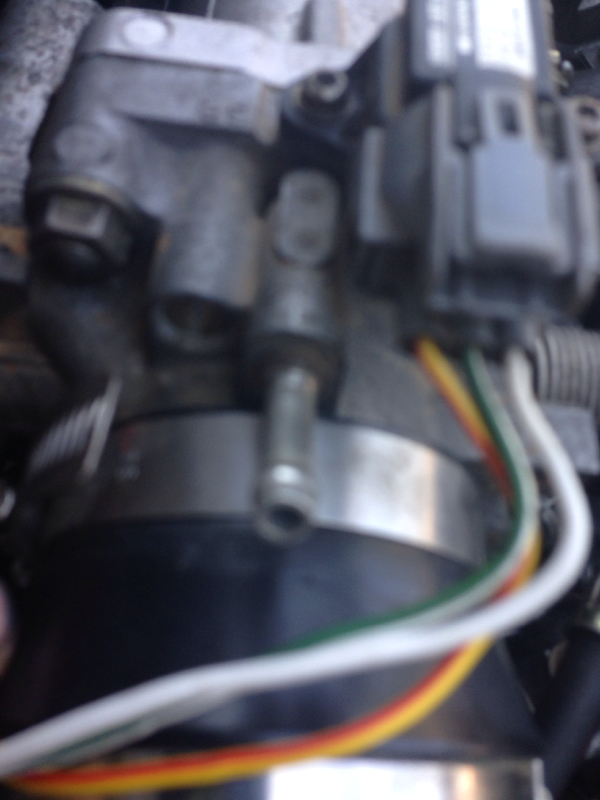
If you have already identified the manifold absolute sensor on your Honda Civic, you know that its connector has 3 wires coming out of it.
Each one of those wires (circuits) has a specific job to do.
These circuits are the ones that provide power, ground and return the MAP signal (that the manifold absolute pressure (MAP) sensor creates) to the PCM.
Here's a brief description of the function of each:
One wire supplies 5 Volts DC.
This is the MAP sensor's power source.
5 Volts are fed only with the Key On Engine OFF (KOEO) or Key On Engine Running (KOER).
The fuel injection computer (PCM) feeds these 5 Volts to the MAP sensor.
MAP sensor pin labeled with the number 1, in the image above, gets this power.
One wire feeds ground.
In tech circles, this circuit is know as the low reference circuit.
The PCM provides this ground internally.
Ground provided by the middle wire of the MAP sensor connector. MAP sensor pin labeled with the number 2, in the image above, gets this ground.
One wire is the MAP sensor signal circuit.
This wire sends the signal the MAP sensor creates to the computer (PCM).
MAP sensor pin labeled with the number 3, in the image above, outputs the MAP signal to the PCM.
START HERE: How to Diagnose the MAP Sensor
Bench testing the MAP sensor, with a multimeter, is the absolute best way to find out if the MAP sensor has failed or if something else is causing the PCM to think it has failed (when it hasn't).
Bench testing the MAP sensor involves: connecting your multimeter to the MAP signal wire, manually applying vacuum via a vacuum pump (or the ‘good ole' lungs’) and seeing the actual voltage output of the MAP sensor.
If the MAP sensor is fried... it won't be able to react to the vacuum you're applying to it. Don't worry, in the following pages I've explained how to do this test in a step-by-step way.
This is a brief summary of the 3 tests in this tutorial:
Verifying the MAP sensor is getting power.
We'll use a multimeter to make sure the MAP sensor is getting 5 Volts DC from the PCM.
TEST 1: Verifying the MAP Sensor Has Power.
Verifying that the MAP sensor has a good path to ground.
We'll be using a multimeter to verify this ground path.
TEST 2: Verifying the MAP Sensor Has Ground.
Manually apply and release vacuum to see if the MAP sensor responds to these changes in pressure.
You can either use a vacuum pump or the ‘good ole’ lungs’ for this simple test.
TEST 3: Verifying the MAP Signal with a Multimeter.
I recommend that you start with TEST 1: Verifying the MAP Sensor Has Power, but you can modify the following tests to fit your particular diagnostic needs.
TEST 1: Verifying the MAP Sensor Has Power
To get this show on the road, the first thing you need to do is to whip out your trusty multimeter and verify that the MAP sensor is being supplied with power.
As mentioned earlier, this power is in the form of 5 Volts DC and are fed to the MAP sensor by the PCM.
After confirming that power is being fed to the MAP sensor, the next step is to make sure it's getting ground.
NOTE: This test can be done with the MAP sensor connected or disconnected to its electrical connector.
Alright, this is what you’ll need to do:
1 Place your multimeter in Volts DC mode.
If you don't have a multimeter or need to upgrade yours, check out my recommendation here: Abe's multimeter Recommendation (at: easyautodiagnostics.com).
2 Probe the wire that connects to the pin labeled with the number 1, in the image viewer, with the red multimeter lead.
NOTE: If you probe the front of the connector... BE CAREFUL! Don't damage the female terminal or you'll have to replace the MAP sensor's connector.
3 Ground the multimeter’s black test lead on a clean and unpainted metal surface on the engine...or better yet, on the battery’s negative post.
4 Turn the Key On (but engine off).
Your multimeter should show you 5 Volts DC.
OK, now that the testing part is done... let’s take a look at what your results mean:
CASE 1: The multimeter registered 5 Volts: So far so good, since this is the correct and expected test result. The next step is to check that the MAP sensor is getting ground. For the ground test, go to TEST 2: Verifying the MAP Sensor Has Ground.
CASE 2: The multimeter DID NOT register 5 Volts: Double check your connections and retest. If you still don't see the 5 Volts... then this test result lets you know that the MAP sensor is not BAD, since without these 5 Volts DC, the MAP sensor can not function.
Although it’s beyond the scope of this article to troubleshoot the cause of these missing 5 Volts, you have now eliminated the MAP sensor as BAD. Resolving the issue that is keeping these 5 Volts from being supplied will solve the MAP sensor issue on your Honda Civic.
TEST 2: Verifying the MAP Sensor Has Ground
Testing your Honda's MAP sensor's ground circuit pretty much follows the same procedure as testing for its 5 Volt signal.
The only difference being that you're now connecting the red multimeter lead to the battery positive post and the black lead to the MAP sensor's ground circuit.
If this test confirms that your Honda's MAP sensor is getting ground, the next step is to verify that the MAP sensor can create a MAP signal (TEST 3).
IMPORTANT: Remember, this ground is provided directly by the PCM, so be very careful and don’t short this wire to battery power (12 Volts), or you WILL FRY the PCM.
Alright, this is what you’ll need to do:
1 With your multimeter still in Volts DC mode from the previous test and the Key On (but engine off).
2 Probe the middle wire of the MAP sensor connector with the black multimeter lead.
This is the wire that connects to the pin labeled with the number 2 of the MAP sensor.
You test the ground circuit with the connector connected to the MAP sensor or not.
3 Connect the multimeter’s red test lead to the battery’s positive (+) post.
4 Your multimeter should show 12 Volts DC.
OK, let’s take a look at what your results mean:
CASE 1: The multimeter registered 12 Volts. This is the normal and correct test result and lets you know that the PCM is providing a good path to ground for the MAP sensor.
The next step, and the last one, is see if the MAP sensor can react to the changes in air pressure while you apply (and release) vacuum to it. For this test go to: TEST 3: Verifying the MAP Signal with a Multimeter.
CASE 2: The multimeter DID NOT register 12 Volts. Double check your multimeter connections and repeat the test... if your multimeter still doesn't show 12 Volts, then the MAP is not fried and not the cause of the MAP Diagnostic Trouble Code (DTC) issue.
Here’s why: Without a good path to ground, that the PCM provides internally, the MAP sensor will not work. With this test result, you have eliminated the MAP sensor as BAD.
[B]TEST 3: Verifying the MAP Signal with a Multimeter
This test will require that you remove the MAP sensor from its spot on the intake manifold and while it's still connected to its connector... you'll manually apply vacuum to it.
The thing to remember, is that as you're applying vacuum to the sensor... the sensor should start to vary its MAP signal voltage (middle wire).
The more vacuum you apply, the smaller the voltage the MAP sensor will create. Releasing the vacuum should get the MAP sensor to increase the voltage signal to the original voltage you saw before applying vacuum.
If your Honda's MAP sensor is bad... it'll no longer create a varying MAP signal voltage. In other words: no matter what the amount of vacuum applied to it, its output voltage will stay fixed at one single voltage value.
Alright, this is what you need to do:
1 Remove the MAP sensor from the top of the intake manifold.
Reconnect the MAP sensor to its electrical connector, if you had to unplug it to remove it, since this test requires that the MAP sensor stay connected to its 3-wire electrical connector.
2 Connect your multimeter's red test lead to the wire that connects pin number 3 of the MAP sensor (see photo 2 of 2 in the image viewer).
You'll need to back-probe the MAP sensor connector or use a wire piercing probe to connect your multimeter to this circuit (to see what a wire piercing probe looks like, click here: Wire Piercing Probe).
3 Ground the black multimeter lead.
I suggest grounding the black multimeter lead directly on the battery negative terminal.
4 Turn the key on (but don't start the engine) and take a look at what voltage your multimeter is registering.
It should register around 2.9 volts (� 1 V). If your multimeter is registering something different at this point... don't panic because right now you're just setting up the test.
4 Attach a vacuum pump to the MAP sensor's vacuum inlet nipple using the appropriate size vacuum hose.
If you don't have a vacuum pump... you can use the ‘good ole' lungs’ and provide the necessary with your mouth.
5 The voltage, your multimeter is registering, should decrease as you apply vacuum with your vacuum pump (or with your mouth).
6 The MAP sensor's voltage, as registered on your multimeter, should increase back to the original voltage value you saw in step 4 as you release the vacuum you applied with the vacuum pump (or your mouth).
Let's take a look at what your test results mean:
CASE 1: The MAP sensor's voltage decreased and increased as you applied and released vacuum: This confirms that the MAP sensor is good and operating normally.
This test result completely eliminates the MAP sensor on your Honda Civic as bad. If you're still having the MAP sensor trouble code come back, take a look at: MAP sensor is Good but Code Doesn't Go Away!.
CASE 2: The MAP sensor's voltage DID NOT decrease or increase as you applied and released vacuum: This confirms that the MAP sensor is bad and needs to be replaced.
MAP Sensor is Good but Code Doesn't Go Away!
If you have bench-tested the MAP sensor and the bench test tells you that the MAP sensor is good and not the cause of the MAP sensor trouble code...
... Then there's something else fooling the PCM into thinking the MAP is bad when it's just reporting an actual true load condition.
Several things can prevent the engine from reaching an ideal load condition. Among them are:
Vacuum leaks.
An intake manifold gasket leak or a ruptured vacuum hose (especially a big one) that's leaking vacuum will have a direct impact on the MAP sensor readings.
Excessively worn out engine.
You'll need to do a compression test.
What you're looking for is uneven wear and tear between the cylinders. This means that the compression each cylinder is producing varies more than 15%.
Timing belt that's not synchronized correctly.
If you've just replaced the timing belt (or had to remove it for any reason), double check your timing marks.
MAP sensor isn't getting power and/or ground.
A short in the wiring between the MAP sensor and the PCM.
You'll need to check the continuity of the 3 wires between the MAP sensor and the PCM using the appropriate wiring diagram.
A bad PCM.
This is very rare, but it does happen.
A fuel system malfunction (that is also setting other trouble codes).
If there are any other trouble codes... you'll need to diagnose and repair these first (since they may be indirectly causing the MAP Sensor code).
You've replaced the throttle body gasket and used silicone sealer on it... and this sealer has plugged the MAP sensor's vacuum passage and/or orifice (I've seen this happen a lot!).
Quite a few things can fool your Honda's PCM (Powertrain Control Module = fuel injection computer) into thinking the manifold absolute pressure (MAP) sensor is bad when it isn't.
Thankfully, testing the MAP sensor is pretty easy and in this tutorial I'll show you how to bench-test it using only a multimeter.
Here are the contents of this tutorial at a glance:
Symptoms of a Bad MAP Sensor
Since the MAP sensor's vacuum pressure input is used to calculate engine load and thus fuel injection and timing advance... when the MAP sensor fails, the PCM won't be able to keep your Honda Civic running smoothly. You'll see one or more of the following symptoms:
Check engine light (CEL) is shining nice and bright on the instrument cluster.
DTC P0107 MAP Sensor Circuit Low Voltage.
DTC P0108 MAP Sensor Circuit High Voltage.
Rough idle.
‘Rotten egg’ smell coming from the exhaust.
Won't pass the state mandated emissions test.
Bad gas mileage.
Lack of power, rough idle, or hesitation.
Engine cranks a long time before starting.
How the MAP Sensor Works
Your Honda Civic's fuel system is a speed density type. Which, in plain English means that your Honda's fuel injection computer needs to know the engine speed and the engine load to inject the proper amount of fuel (advance ignition timing, etc.).
The sensor that provides engine load information, to the PCM, is the manifold absolute pressure (MAP) sensor.
How does the MAP provide this engine load info? By measuring the amount of vacuum the engine is creating throughout the entire time it's operating.
The amount of vacuum pressure varies depending on engine load. Here are some more specifics:
At idle, manifold vacuum is higher.
When manifold vacuum is higher, the MAP sensor sends the PCM a higher voltage.
The PCM, using the inputs from the MAP sensor and other sensors, injects less fuel into all its cylinders.
Under load (let's say accelerating the engine to pass someone on the highway), manifold vacuum is lower.
When manifold vacuum is lower, the MAP sensor sends the PCM a smaller voltage.
The PCM, using the inputs from the MAP sensor and other sensors, injects more fuel into all its cylinders.
Circuit Descriptions of the MAP Sensor
How to Test the Honda Civic MAP sensor. Location of the MAP Sensor.
If you have already identified the manifold absolute sensor on your Honda Civic, you know that its connector has 3 wires coming out of it.
Each one of those wires (circuits) has a specific job to do.
These circuits are the ones that provide power, ground and return the MAP signal (that the manifold absolute pressure (MAP) sensor creates) to the PCM.
Here's a brief description of the function of each:
One wire supplies 5 Volts DC.
This is the MAP sensor's power source.
5 Volts are fed only with the Key On Engine OFF (KOEO) or Key On Engine Running (KOER).
The fuel injection computer (PCM) feeds these 5 Volts to the MAP sensor.
MAP sensor pin labeled with the number 1, in the image above, gets this power.
One wire feeds ground.
In tech circles, this circuit is know as the low reference circuit.
The PCM provides this ground internally.
Ground provided by the middle wire of the MAP sensor connector. MAP sensor pin labeled with the number 2, in the image above, gets this ground.
One wire is the MAP sensor signal circuit.
This wire sends the signal the MAP sensor creates to the computer (PCM).
MAP sensor pin labeled with the number 3, in the image above, outputs the MAP signal to the PCM.
START HERE: How to Diagnose the MAP Sensor
Bench testing the MAP sensor, with a multimeter, is the absolute best way to find out if the MAP sensor has failed or if something else is causing the PCM to think it has failed (when it hasn't).
Bench testing the MAP sensor involves: connecting your multimeter to the MAP signal wire, manually applying vacuum via a vacuum pump (or the ‘good ole' lungs’) and seeing the actual voltage output of the MAP sensor.
If the MAP sensor is fried... it won't be able to react to the vacuum you're applying to it. Don't worry, in the following pages I've explained how to do this test in a step-by-step way.
This is a brief summary of the 3 tests in this tutorial:
Verifying the MAP sensor is getting power.
We'll use a multimeter to make sure the MAP sensor is getting 5 Volts DC from the PCM.
TEST 1: Verifying the MAP Sensor Has Power.
Verifying that the MAP sensor has a good path to ground.
We'll be using a multimeter to verify this ground path.
TEST 2: Verifying the MAP Sensor Has Ground.
Manually apply and release vacuum to see if the MAP sensor responds to these changes in pressure.
You can either use a vacuum pump or the ‘good ole’ lungs’ for this simple test.
TEST 3: Verifying the MAP Signal with a Multimeter.
I recommend that you start with TEST 1: Verifying the MAP Sensor Has Power, but you can modify the following tests to fit your particular diagnostic needs.
TEST 1: Verifying the MAP Sensor Has Power
To get this show on the road, the first thing you need to do is to whip out your trusty multimeter and verify that the MAP sensor is being supplied with power.
As mentioned earlier, this power is in the form of 5 Volts DC and are fed to the MAP sensor by the PCM.
After confirming that power is being fed to the MAP sensor, the next step is to make sure it's getting ground.
NOTE: This test can be done with the MAP sensor connected or disconnected to its electrical connector.
Alright, this is what you’ll need to do:
1 Place your multimeter in Volts DC mode.
If you don't have a multimeter or need to upgrade yours, check out my recommendation here: Abe's multimeter Recommendation (at: easyautodiagnostics.com).
2 Probe the wire that connects to the pin labeled with the number 1, in the image viewer, with the red multimeter lead.
NOTE: If you probe the front of the connector... BE CAREFUL! Don't damage the female terminal or you'll have to replace the MAP sensor's connector.
3 Ground the multimeter’s black test lead on a clean and unpainted metal surface on the engine...or better yet, on the battery’s negative post.
4 Turn the Key On (but engine off).
Your multimeter should show you 5 Volts DC.
OK, now that the testing part is done... let’s take a look at what your results mean:
CASE 1: The multimeter registered 5 Volts: So far so good, since this is the correct and expected test result. The next step is to check that the MAP sensor is getting ground. For the ground test, go to TEST 2: Verifying the MAP Sensor Has Ground.
CASE 2: The multimeter DID NOT register 5 Volts: Double check your connections and retest. If you still don't see the 5 Volts... then this test result lets you know that the MAP sensor is not BAD, since without these 5 Volts DC, the MAP sensor can not function.
Although it’s beyond the scope of this article to troubleshoot the cause of these missing 5 Volts, you have now eliminated the MAP sensor as BAD. Resolving the issue that is keeping these 5 Volts from being supplied will solve the MAP sensor issue on your Honda Civic.
TEST 2: Verifying the MAP Sensor Has Ground
Testing your Honda's MAP sensor's ground circuit pretty much follows the same procedure as testing for its 5 Volt signal.
The only difference being that you're now connecting the red multimeter lead to the battery positive post and the black lead to the MAP sensor's ground circuit.
If this test confirms that your Honda's MAP sensor is getting ground, the next step is to verify that the MAP sensor can create a MAP signal (TEST 3).
IMPORTANT: Remember, this ground is provided directly by the PCM, so be very careful and don’t short this wire to battery power (12 Volts), or you WILL FRY the PCM.
Alright, this is what you’ll need to do:
1 With your multimeter still in Volts DC mode from the previous test and the Key On (but engine off).
2 Probe the middle wire of the MAP sensor connector with the black multimeter lead.
This is the wire that connects to the pin labeled with the number 2 of the MAP sensor.
You test the ground circuit with the connector connected to the MAP sensor or not.
3 Connect the multimeter’s red test lead to the battery’s positive (+) post.
4 Your multimeter should show 12 Volts DC.
OK, let’s take a look at what your results mean:
CASE 1: The multimeter registered 12 Volts. This is the normal and correct test result and lets you know that the PCM is providing a good path to ground for the MAP sensor.
The next step, and the last one, is see if the MAP sensor can react to the changes in air pressure while you apply (and release) vacuum to it. For this test go to: TEST 3: Verifying the MAP Signal with a Multimeter.
CASE 2: The multimeter DID NOT register 12 Volts. Double check your multimeter connections and repeat the test... if your multimeter still doesn't show 12 Volts, then the MAP is not fried and not the cause of the MAP Diagnostic Trouble Code (DTC) issue.
Here’s why: Without a good path to ground, that the PCM provides internally, the MAP sensor will not work. With this test result, you have eliminated the MAP sensor as BAD.
[B]TEST 3: Verifying the MAP Signal with a Multimeter
This test will require that you remove the MAP sensor from its spot on the intake manifold and while it's still connected to its connector... you'll manually apply vacuum to it.
The thing to remember, is that as you're applying vacuum to the sensor... the sensor should start to vary its MAP signal voltage (middle wire).
The more vacuum you apply, the smaller the voltage the MAP sensor will create. Releasing the vacuum should get the MAP sensor to increase the voltage signal to the original voltage you saw before applying vacuum.
If your Honda's MAP sensor is bad... it'll no longer create a varying MAP signal voltage. In other words: no matter what the amount of vacuum applied to it, its output voltage will stay fixed at one single voltage value.
Alright, this is what you need to do:
1 Remove the MAP sensor from the top of the intake manifold.
Reconnect the MAP sensor to its electrical connector, if you had to unplug it to remove it, since this test requires that the MAP sensor stay connected to its 3-wire electrical connector.
2 Connect your multimeter's red test lead to the wire that connects pin number 3 of the MAP sensor (see photo 2 of 2 in the image viewer).
You'll need to back-probe the MAP sensor connector or use a wire piercing probe to connect your multimeter to this circuit (to see what a wire piercing probe looks like, click here: Wire Piercing Probe).
3 Ground the black multimeter lead.
I suggest grounding the black multimeter lead directly on the battery negative terminal.
4 Turn the key on (but don't start the engine) and take a look at what voltage your multimeter is registering.
It should register around 2.9 volts (� 1 V). If your multimeter is registering something different at this point... don't panic because right now you're just setting up the test.
4 Attach a vacuum pump to the MAP sensor's vacuum inlet nipple using the appropriate size vacuum hose.
If you don't have a vacuum pump... you can use the ‘good ole' lungs’ and provide the necessary with your mouth.
5 The voltage, your multimeter is registering, should decrease as you apply vacuum with your vacuum pump (or with your mouth).
6 The MAP sensor's voltage, as registered on your multimeter, should increase back to the original voltage value you saw in step 4 as you release the vacuum you applied with the vacuum pump (or your mouth).
Let's take a look at what your test results mean:
CASE 1: The MAP sensor's voltage decreased and increased as you applied and released vacuum: This confirms that the MAP sensor is good and operating normally.
This test result completely eliminates the MAP sensor on your Honda Civic as bad. If you're still having the MAP sensor trouble code come back, take a look at: MAP sensor is Good but Code Doesn't Go Away!.
CASE 2: The MAP sensor's voltage DID NOT decrease or increase as you applied and released vacuum: This confirms that the MAP sensor is bad and needs to be replaced.
MAP Sensor is Good but Code Doesn't Go Away!
If you have bench-tested the MAP sensor and the bench test tells you that the MAP sensor is good and not the cause of the MAP sensor trouble code...
... Then there's something else fooling the PCM into thinking the MAP is bad when it's just reporting an actual true load condition.
Several things can prevent the engine from reaching an ideal load condition. Among them are:
Vacuum leaks.
An intake manifold gasket leak or a ruptured vacuum hose (especially a big one) that's leaking vacuum will have a direct impact on the MAP sensor readings.
Excessively worn out engine.
You'll need to do a compression test.
What you're looking for is uneven wear and tear between the cylinders. This means that the compression each cylinder is producing varies more than 15%.
Timing belt that's not synchronized correctly.
If you've just replaced the timing belt (or had to remove it for any reason), double check your timing marks.
MAP sensor isn't getting power and/or ground.
A short in the wiring between the MAP sensor and the PCM.
You'll need to check the continuity of the 3 wires between the MAP sensor and the PCM using the appropriate wiring diagram.
A bad PCM.
This is very rare, but it does happen.
A fuel system malfunction (that is also setting other trouble codes).
If there are any other trouble codes... you'll need to diagnose and repair these first (since they may be indirectly causing the MAP Sensor code).
You've replaced the throttle body gasket and used silicone sealer on it... and this sealer has plugged the MAP sensor's vacuum passage and/or orifice (I've seen this happen a lot!).
06-22-2014, 04:24 PM
#9

On my 93 si I took off the MAP sensor and sprayed PB Blaster thru the vacuum hole and then went to ACE hardware and got a piece of 1/4 inch gas line hose and replaced the vacuum line from the MAP sensor to the vacuum canister on the fire wall. Spray PB on the electrical connector to the MAP sensor and reconnect. The MAP sensor isn't cheap. I seen a price of $135 or over $300 for two versions of it.
06-22-2014, 05:59 PM
#10
Honda-Tech Member
Thread Starter
After finding out i have power to the map sensor i went to the second test. Pulled the map sensor out hooking up a vacuum to it and watching to see if the volts dropped. Had no change. Went to autozone bought a new one for 80 bucks. Once i put it on the car started up perfect and the cel went off. I honestly didnt think it was bad because it was working fine with no cel before i pulled the motor out to rebuild it. Main thing is its running perfect now thanks to some tips from honda tech.
The following users liked this post:

Thread
Thread Starter
Forum
Replies
Last Post