

How-to: Front Lower Control Arm Bushing Replacement - LCA

Thread Starter
i HAS questions ?
Joined: Feb 2003
Posts: 7,850
Likes: 0
From: OH
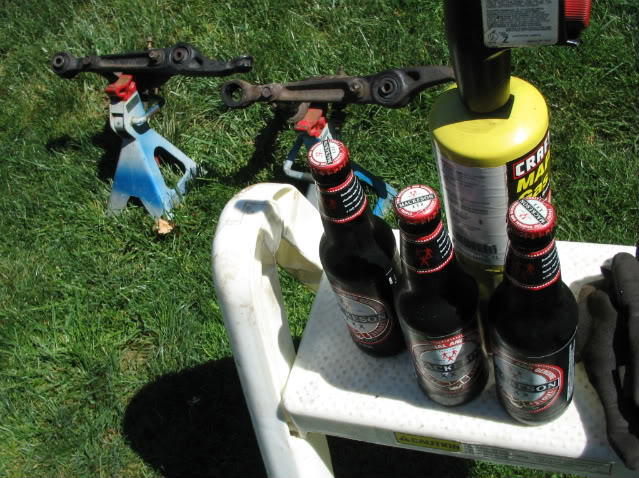
<FONT SIZE="3">Tools used:</FONT>
MAPP (or propane) Torch
Hammer
Screwdriver (preferably one you don't care too much about)
Reciprocating saw
Big *** C-clamp (Ball joint replacement kit rented from Autozone)
Large impact socket
Beer (I chose Mackelson Stout, a nice relaxing beer, goes well with fire on a sunny day)
<FONT SIZE="3">Steps</FONT>
1. Gather all the equipment you'll need.
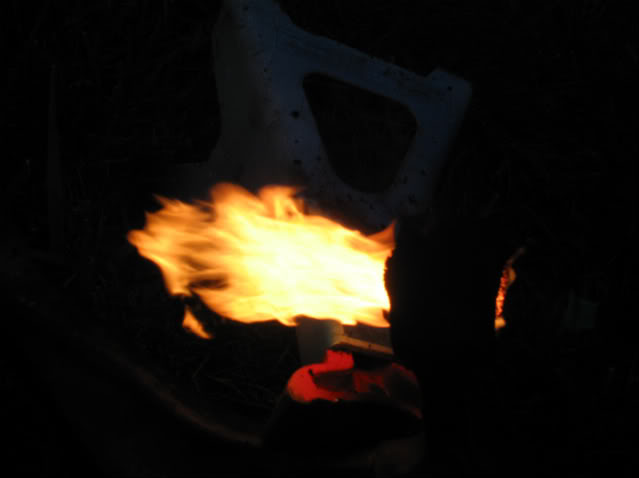
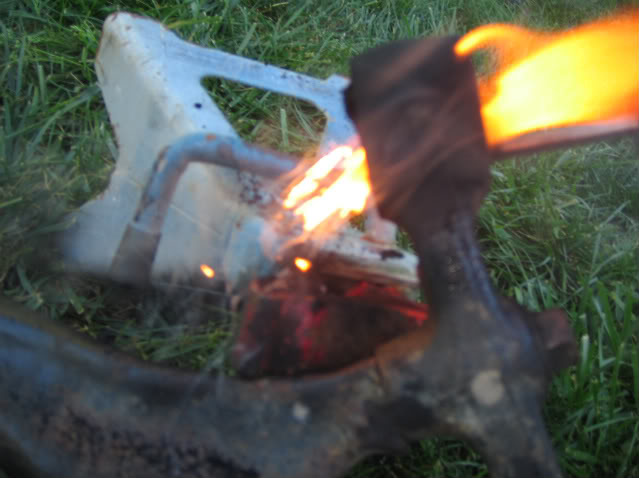
2. Use the torch to burn the rubber parts of all the bushings. This is probably the most fun step. It takes a good amount of time to really burn them, so make sure you have your torch in one hand and a beer in the other (beer doubles as a extinguisher).
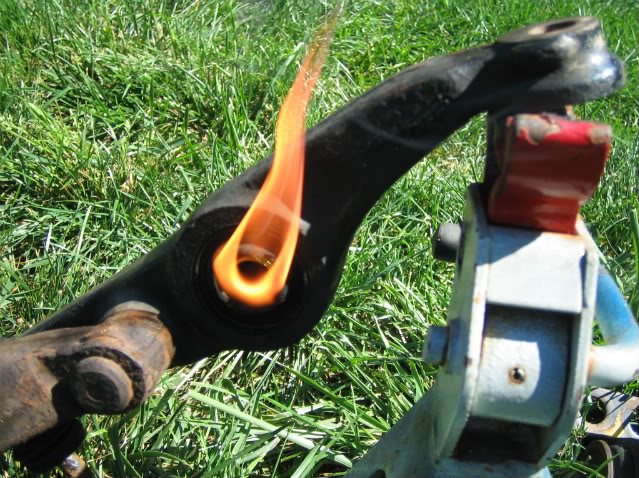
Another picture, cause playing with fire is fun.
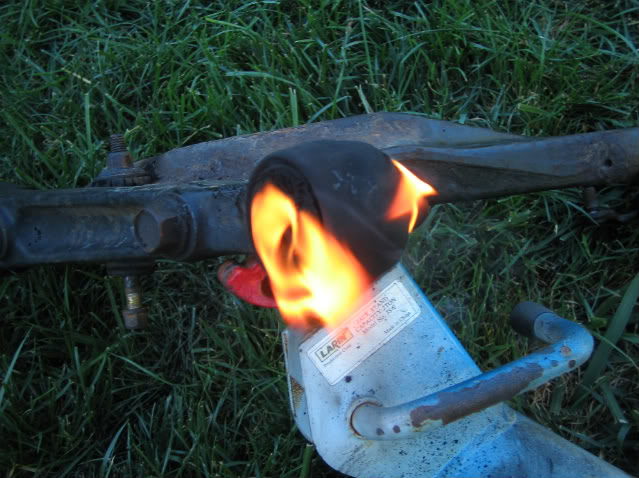
This one is badass.
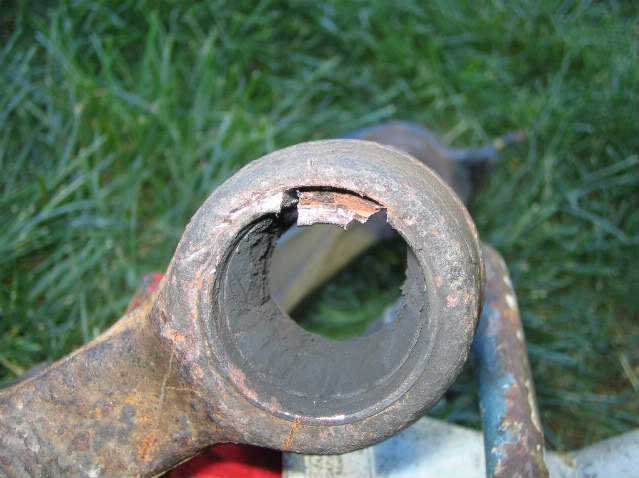
3. Use the screwdriver to scape out any extra rubber.
If you do this step while the rubber is still burning, it looks like this.
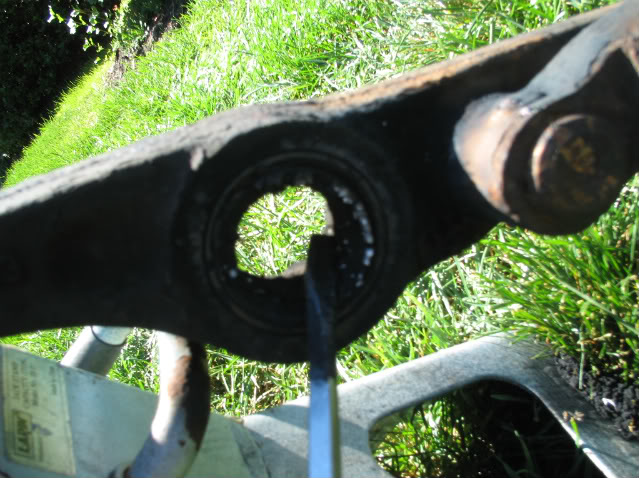
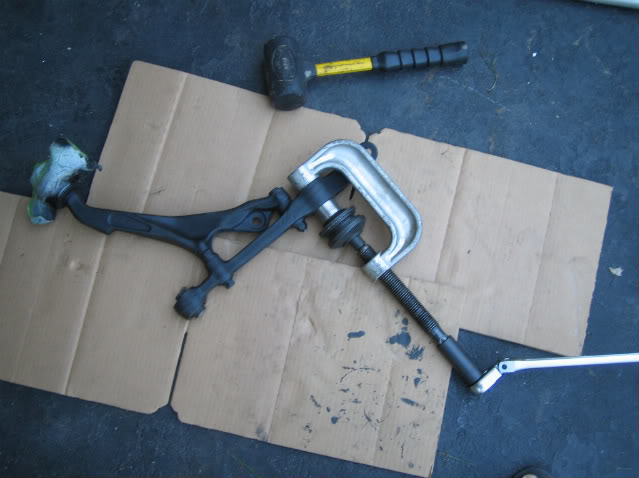
4. Once all the rubber has been scraped out, use the reciprocating saw to cut the metal insert. Be careful not to cut into the actual control arm.
5. Hammer the screwdriver between the bushing and control arm by where it was cut.
It should start to look like this.
Keep hammering at different spots on the insert until it starts to slide out.
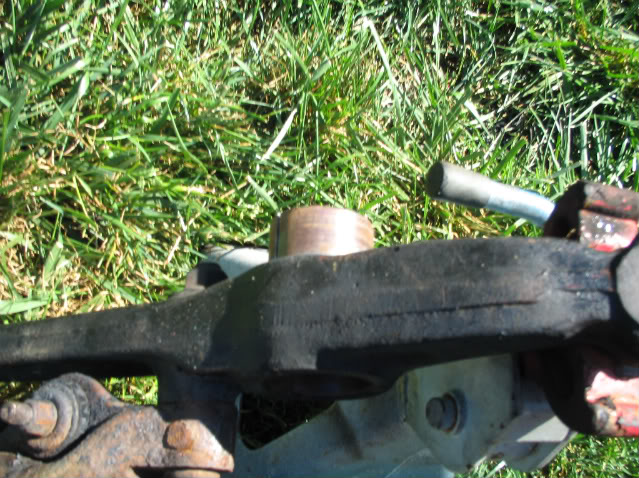
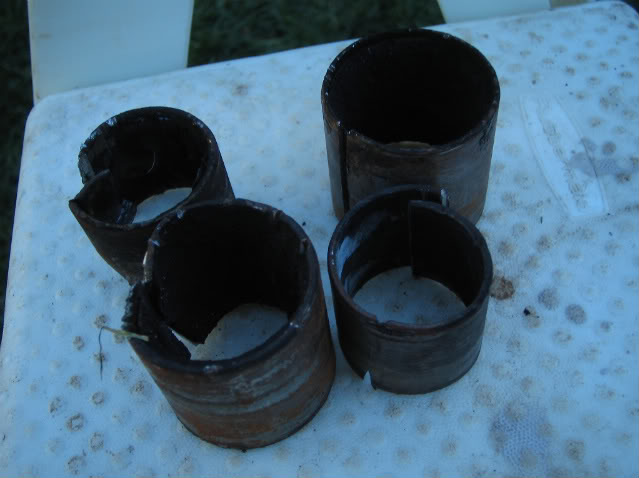
The insert should look something like this.

6. Repeat 3 more times.
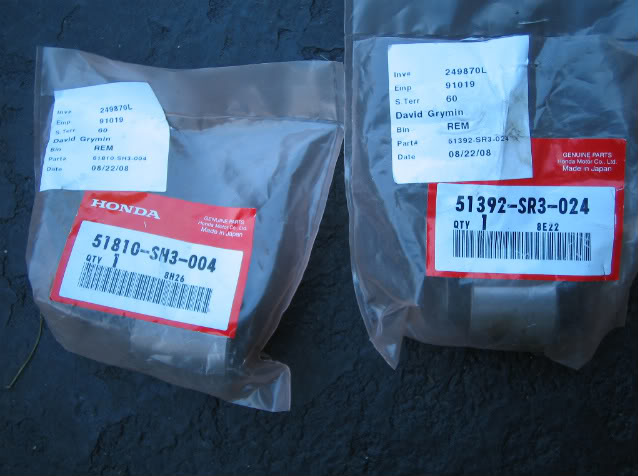
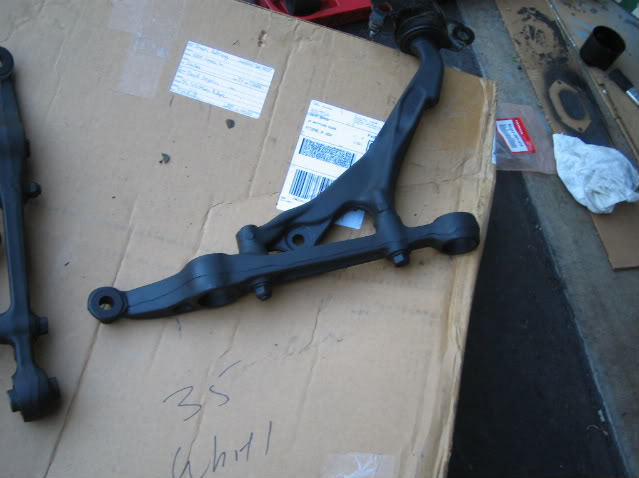
7. Order new bushings from Honda (these are for the part numbers for an EG/DC)
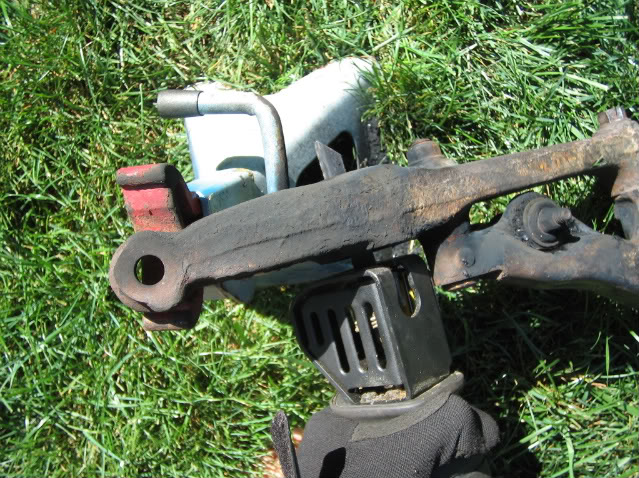
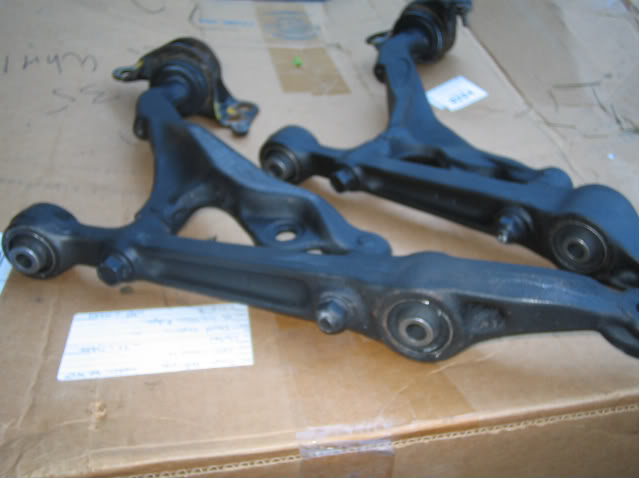
Freshly painted control arms.
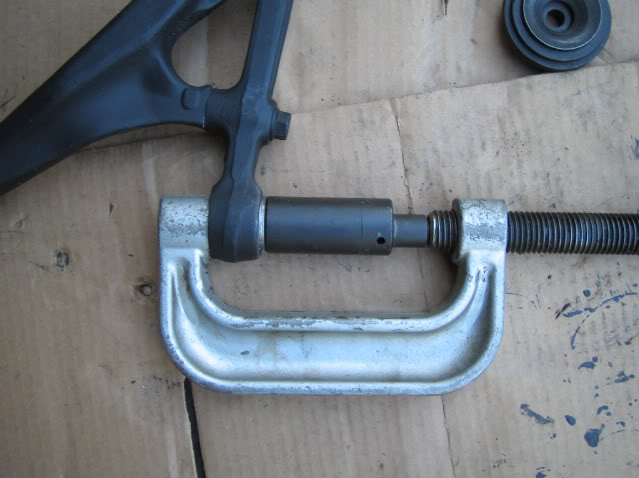
8. Use the large c-clamp press in the new bushings. The clamp I rented had these thick *** shims on the right in the picture. They were the perfect size so that it would only contact the outer part of the bushing and not press on the rubber inner part. This is where the shock fork mounts. Tighten the clamp and make sure it is pressing on the metal insert and not on the rubber or center portion of the bushing.

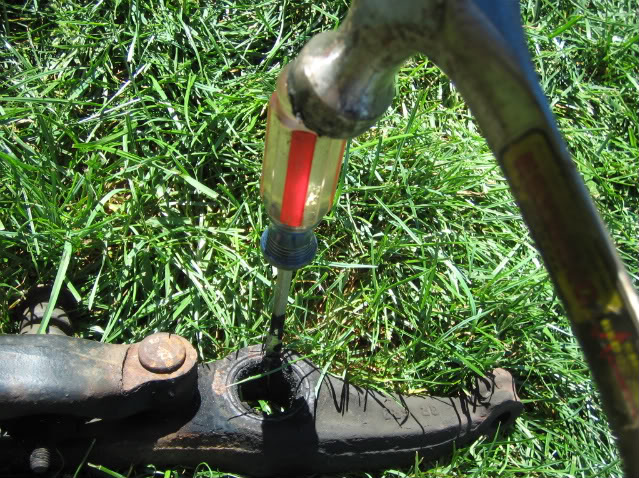
9. For where the LCA connects to the subframe, I used the c-clamp and an impact socket. Slightly ghetto, but it worked really well.
10. Repeat 3 more times.
11. ???
12. Profit.
Modified by .dave at 12:40 AM 10/19/2008
MAPP (or propane) Torch
Hammer
Screwdriver (preferably one you don't care too much about)
Reciprocating saw
Big *** C-clamp (Ball joint replacement kit rented from Autozone)
Large impact socket
Beer (I chose Mackelson Stout, a nice relaxing beer, goes well with fire on a sunny day)
<FONT SIZE="3">Steps</FONT>
1. Gather all the equipment you'll need.
2. Use the torch to burn the rubber parts of all the bushings. This is probably the most fun step. It takes a good amount of time to really burn them, so make sure you have your torch in one hand and a beer in the other (beer doubles as a extinguisher).
Another picture, cause playing with fire is fun.
This one is badass.
3. Use the screwdriver to scape out any extra rubber.
If you do this step while the rubber is still burning, it looks like this.
4. Once all the rubber has been scraped out, use the reciprocating saw to cut the metal insert. Be careful not to cut into the actual control arm.
5. Hammer the screwdriver between the bushing and control arm by where it was cut.
It should start to look like this.
Keep hammering at different spots on the insert until it starts to slide out.
The insert should look something like this.
6. Repeat 3 more times.
7. Order new bushings from Honda (these are for the part numbers for an EG/DC)
Freshly painted control arms.
8. Use the large c-clamp press in the new bushings. The clamp I rented had these thick *** shims on the right in the picture. They were the perfect size so that it would only contact the outer part of the bushing and not press on the rubber inner part. This is where the shock fork mounts. Tighten the clamp and make sure it is pressing on the metal insert and not on the rubber or center portion of the bushing.
9. For where the LCA connects to the subframe, I used the c-clamp and an impact socket. Slightly ghetto, but it worked really well.
10. Repeat 3 more times.
11. ???
12. Profit.
Modified by .dave at 12:40 AM 10/19/2008
Nice write up!
I personally like to use the press because i do not trust fire, but this is a great alternative to using a press
I personally like to use the press because i do not trust fire, but this is a great alternative to using a press


Joined: Jan 2002
Posts: 30,019
Likes: 59
From: Nowhere and Everywhere
Could you not use the C-clamp and impact socket to get the old ones out?
Also, what about the rear compliance bushing? Did you replace those, or does it involve stuff like this to replace it?
Also, what about the rear compliance bushing? Did you replace those, or does it involve stuff like this to replace it?
Junior Member
Joined: Nov 2003
Posts: 199
Likes: 0
From: Rockville, MD, 20852
The rear compliance bushing is just bolted on.

If you remove #22, the bushing will just slid off.
Anyway I just prefer to drill a bunch of holes in the rubber around the circumference as close to the outer shell as I can. Then you can just punch out the "core".
I find burning out the rubber makes a mess.
If you remove #22, the bushing will just slid off.
Anyway I just prefer to drill a bunch of holes in the rubber around the circumference as close to the outer shell as I can. Then you can just punch out the "core".
I find burning out the rubber makes a mess.
Thread Starter
i HAS questions ?
Joined: Feb 2003
Posts: 7,850
Likes: 0
From: OH
<TABLE WIDTH="90%" CELLSPACING=0 CELLPADDING=0 ALIGN=CENTER><TR><TD>Quote, originally posted by PatrickGSR94 »</TD></TR><TR><TD CLASS="quote">Could you not use the C-clamp and impact socket to get the old ones out?
Also, what about the rear compliance bushing? Did you replace those, or does it involve stuff like this to replace it?</TD></TR></TABLE>
Yeah, you probably could but I found it was more fun to burn them out.
I didn't replace the rear compliance bushings. Mine were in good condition, and they're listed as $75 a piece from Majestic Honda.
<TABLE WIDTH="90%" CELLSPACING=0 CELLPADDING=0 ALIGN=CENTER><TR><TD>Quote, originally posted by DrSeuss »</TD></TR><TR><TD CLASS="quote">
I find burning out the rubber makes a mess. </TD></TR></TABLE>
Its a lot more fun then just punching them out though.
Joined: Jan 2002
Posts: 30,019
Likes: 59
From: Nowhere and Everywhere
Sure wish I could find and afford a HardRace kit right now. It includes the compliance bushings and the RTA bushings as well as all the others for at or below $200
Thread Starter
i HAS questions ?
Joined: Feb 2003
Posts: 7,850
Likes: 0
From: OH
<TABLE WIDTH="90%" CELLSPACING=0 CELLPADDING=0 ALIGN=CENTER><TR><TD>Quote, originally posted by PatrickGSR94 »</TD></TR><TR><TD CLASS="quote">Sure wish I could find and afford a HardRace kit right now. It includes the compliance bushings and the RTA bushings as well as all the others for at or below $200 </TD></TR></TABLE>

Damn, I was looking at the HardRace stuff, but I didn't know it was that inexpensive. I just went with OEM as my car will see the street 80% of the time.
</TD></TR></TABLE> Damn, I was looking at the HardRace stuff, but I didn't know it was that inexpensive. I just went with OEM as my car will see the street 80% of the time.
Trending Topics
Joined: Jan 2002
Posts: 30,019
Likes: 59
From: Nowhere and Everywhere
heh my car sees the street 100% of the time, but I'm looking for HardRace bushings as a cheaper alternative to OEM, but without the squeeking, binding, and reliability problems of polyurethane bushings.
*edit here's a 99-00 Civic Si kit. That's the only full kit I see available at the moment.
http://cgi.ebay.com/Hardrace-S...wItem
Modified by PatrickGSR94 at 11:42 AM 10/21/2008
*edit here's a 99-00 Civic Si kit. That's the only full kit I see available at the moment.
http://cgi.ebay.com/Hardrace-S...wItem
Modified by PatrickGSR94 at 11:42 AM 10/21/2008
Thread Starter
i HAS questions ?
Joined: Feb 2003
Posts: 7,850
Likes: 0
From: OH
<TABLE WIDTH="90%" CELLSPACING=0 CELLPADDING=0 ALIGN=CENTER><TR><TD>Quote, originally posted by PatrickGSR94 »</TD></TR><TR><TD CLASS="quote">heh my car sees the street 100% of the time, but I'm looking for HardRace bushings as a cheaper alternative to OEM, but without the squeeking, binding, and reliability problems of polyurethane bushings.
*edit here's a 99-00 Civic Si kit. That's the only full kit I see available at the moment.
http://cgi.ebay.com/Hardrace-S...wItem
Modified by PatrickGSR94 at 11:42 AM 10/21/2008</TD></TR></TABLE>
Ah, ok. Yeah I'm running EG/DC front LCAs on a 98 DX coupe.
*edit here's a 99-00 Civic Si kit. That's the only full kit I see available at the moment.
http://cgi.ebay.com/Hardrace-S...wItem
Modified by PatrickGSR94 at 11:42 AM 10/21/2008</TD></TR></TABLE>
Ah, ok. Yeah I'm running EG/DC front LCAs on a 98 DX coupe.
Thread Starter
i HAS questions ?
Joined: Feb 2003
Posts: 7,850
Likes: 0
From: OH
<TABLE WIDTH="90%" CELLSPACING=0 CELLPADDING=0 ALIGN=CENTER><TR><TD>Quote, originally posted by PatrickGSR94 »</TD></TR><TR><TD CLASS="quote">those fit? I'm assuming you switched so you could run a front sway bar? Why not go with the Si LCA's?</TD></TR></TABLE>
Forgot to mention I'm running a DC subframe with Hasport EKK2 mounts.
Forgot to mention I'm running a DC subframe with Hasport EKK2 mounts.
Honda-Tech Member
Joined: Jul 2008
Posts: 24
Likes: 0
From: Sin City LV, NV, usa
<TABLE WIDTH="90%" CELLSPACING=0 CELLPADDING=0 ALIGN=CENTER><TR><TD>Quote, originally posted by DrSeuss »</TD></TR><TR><TD CLASS="quote">The rear compliance bushing is just bolted on.
If you remove #22, the bushing will just slid off.
Anyway I just prefer to drill a bunch of holes in the rubber around the circumference as close to the outer shell as I can. Then you can just punch out the "core".
I find burning out the rubber makes a mess. </TD></TR></TABLE>
You got any diagrams like this for the rear? Anyone know where I can find one?
Honda-Tech Member
Joined: Nov 2006
Posts: 2,531
Likes: 0
From: Santa Cruz, CA
<TABLE WIDTH="90%" CELLSPACING=0 CELLPADDING=0 ALIGN=CENTER><TR><TD>Quote, originally posted by .dave »</TD></TR><TR><TD CLASS="quote">
Ah, ok. Yeah I'm running EG/DC front LCAs on a 98 DX coupe.</TD></TR></TABLE>
http://www.specialprojectsms.c...ID=39
Ah, ok. Yeah I'm running EG/DC front LCAs on a 98 DX coupe.</TD></TR></TABLE>
http://www.specialprojectsms.c...ID=39
Thread Starter
i HAS questions ?
Joined: Feb 2003
Posts: 7,850
Likes: 0
From: OH
<TABLE WIDTH="90%" CELLSPACING=0 CELLPADDING=0 ALIGN=CENTER><TR><TD>Quote, originally posted by clem kevin »</TD></TR><TR><TD CLASS="quote">
http://www.specialprojectsms.c...ID=39</TD></TR></TABLE>
Are you referring to the front lower arms, or the entire bushing set?
http://www.specialprojectsms.c...ID=39</TD></TR></TABLE>
Are you referring to the front lower arms, or the entire bushing set?
Thread Starter
i HAS questions ?
Joined: Feb 2003
Posts: 7,850
Likes: 0
From: OH
<TABLE WIDTH="90%" CELLSPACING=0 CELLPADDING=0 ALIGN=CENTER><TR><TD>Quote, originally posted by scratchymaster »</TD></TR><TR><TD CLASS="quote">Inspiring</TD></TR></TABLE>
Thanks.
Thanks.
Honda-Tech Member
Joined: Sep 2002
Posts: 1,720
Likes: 0
From: In Training on Dagobah with Yoda
I am looking at running the Mugen hardend bushings in my EX front LCA's. Does anyone know if these will fit? They show that they are for 96-00 civic's.
I was going to run the PIC's but I spoke with them and their bushings for the front LCA's do not fit any model but the Si LCA's.
Can anyone point me in a direction where I can get a good bushing that will not bind or squeak that will work for this application?
I was going to run the PIC's but I spoke with them and their bushings for the front LCA's do not fit any model but the Si LCA's.
Can anyone point me in a direction where I can get a good bushing that will not bind or squeak that will work for this application?


Junior Member
Joined: Dec 2007
Posts: 651
Likes: 0
[QUOTE=DrSeuss;36019481]The rear compliance bushing is just bolted on.
Bring this back from the dead: I am about to kick off this project and was wondering what way is easiest to remove the control arm? should I just remove #22 or unbolt the 2 bolts from #8. I notice that the thread creater removed the 2 bolts from 8.
Bring this back from the dead: I am about to kick off this project and was wondering what way is easiest to remove the control arm? should I just remove #22 or unbolt the 2 bolts from #8. I notice that the thread creater removed the 2 bolts from 8.
Junior Member
Joined: Nov 2003
Posts: 199
Likes: 0
From: Rockville, MD, 20852
I've always removed the bolts from #8. I suppose you could remove #22 but I've never done it that way. Also #18 goes through the subframe and actually bolts to the unibody. You'll also have to remove the sway bar bracket if you have one.
Junior Member
Joined: Dec 2007
Posts: 651
Likes: 0
are the part numbers you posted for ej1 also?
I know I dont have a sway bar but is it possible for my ej1 to have a sway bar bracket?
the first part number is that sH3?
did you replace all the self locking nuts?
where do you have to grease the bushing? on the outside metal or just the rubber?
Last edited by driveslow; Mar 6, 2009 at 06:02 AM.
Junior Member
Joined: Nov 2003
Posts: 199
Likes: 0
From: Rockville, MD, 20852
ok, 5 things
are the part numbers you posted for ej1 also?
I know I dont have a sway bar but is it possible for my ej1 to have a sway bar bracket?
the first part number is that sH3?
did you replace all the self locking nuts?
where do you have to grease the bushing? on the outside metal or just the rubber?
are the part numbers you posted for ej1 also?
I know I dont have a sway bar but is it possible for my ej1 to have a sway bar bracket?
the first part number is that sH3?
did you replace all the self locking nuts?
where do you have to grease the bushing? on the outside metal or just the rubber?
I seriously doubt that you have the sway bar brackets. You'll probably have to buy them from Honda but there's only a couple of bucks. It doesn't sit flat so you can't use a universal sway bar bracket from ES. The sway bar bracket mounts to one stud on #8 and to a tapped hole in the subframe. When I installed my front sway bay I just cleaned out the hole and wire brushed the junk off the stud and mounted the bracket. You may also have to swap in different front LCA's since the stock LCA's may not have the mounting holes for the endlinks.
All my bushings were beat so I replaced them with an ES kit since it is relatively inexpensive. Since I was using ES bushings i lubed them both inside and out. But if you're using OEM bushing I don't believe you have to grease anything. Just put antisieze on the bolt so it doesn't rust the the inner shell. As the ES bushings wear out, I'll probably replace with OEM or Hardrace bushings.
Junior Member
Joined: Dec 2007
Posts: 651
Likes: 0
I noticed that in your diy that you used a socket and c clamp. How were you able to get the bushings to sit flush on the flat side of the clamp since the protruding end is not flush but the sleeve sticks out past the control arm?
especially on the inner. The sleeves sticks out way past the control arm hole.

especially on the inner. The sleeves sticks out way past the control arm hole.