Honda-Tech - Honda Forum Discussion
  • LOG IN
  • REGISTER
  • Forums
    • Meets & Greets!
      • Introduce Yourself
      • Meets & Events
    • Honda and Acura Model-Specific Technical Forums
      • Honda Accord 2018- Current
      • Honda Accord 2016- 2017
      • Honda Accord (2013 - 2015)
      • Honda Accord & Crosstour (2003 - 2012)
      • Honda Accord (1990 - 2002)
      • Honda Civic (2016 - Current)
      • Honda Civic (2006 - 2015)
      • Honda Civic (2001 - 2005)
      • Honda Civic / Del Sol (1992 - 2000)
      • Honda City
      • Honda CRX / EF Civic (1988 - 1991)
      • Honda CR-V & Element
      • Honda Fit
      • Honda Insight & CR-Z Hybrid
      • Honda Prelude
      • Honda Prologue
      • Honda S2000
      • Honda Minivans, Crossovers, and Trucks
      • Acura Integra
      • Acura Integra Type-R
      • Acura NSX
      • Acura RSX DC5 & Honda Civic EP3
      • Acura TL, RL & ZDX
      • Acura TSX
      • Classic Hondas
      • Honda Motorcycles
      • Honda Ruckus and Scooters
    • Honda and Acura Technical Forums
      • Forced Induction
      • All Motor / Naturally Aspirated
      • K Series
      • Engine Machining & Assembly
      • Hybrid / Engine Swaps
      • AWD Conversion Forum
      • Welding / Fabrication
      • Tech / Misc
      • Road Racing / Autocross & Time Attack
      • Drag Racing
      • Suspension & Brakes
      • Audio / Security / Video
      • Wheel and Tire
      • Paint and Body
      • Lighting
      • Engine Management and Tuning
      • Transmission & Drivetrain
    • Honda-Tech Marketplace
      • For Sale
      • Want to Buy
      • Classifieds: Forced Induction
      • Vehicles for sale
      • Motorcycles
      • Wheels
      • Sales Feedback
    • Regional Classifieds
      • Northern California (Sales)
      • Southern California (Sales)
      • Florida (Sales)
      • Texas -OK -LA (Sales)
      • Northwest (Sales)
      • Southwest (Sales)
      • Mid-West (Sales)
      • Mid-Atlantic (Sales)
      • Northeast (Sales)
      • Southeast (Sales)
      • Canada (Sales)
      • Hawaii (Sales)
      • Free Stuff
    • Sponsor Marketplace
      • Performance
      • Miscellaneous - Appearance - Lighting
      • Wheels, Tires, Brakes, and Suspension
      • Forced Induction
    • Honda and Acura Appearance / Cosmetic Forums
      • Honda / Acura
      • Other Make Vehicles
      • Appearance Build Threads
      • Group Threads
      • Detailing
    • Community Forums
      • Honda-Tech News
      • Regional Forums and Meets
  • News
  • Marketplace
    • Vendor Directory
    • Become a Vendor
    • Site Store
  • Membership
  • New Posts
  • Tools
    • Car Payment Calculator
    • Tire Rim Calculator
    • Vin Decoder
    • Recalls
    • Technical Service Bulletins (TSBs)
    • Members List
    • Live Feed
  • How-Tos
  • Gallery
  • View Dark Mode
    • Please register or login to enable Dark Mode.
  • Log In
  • Register
Honda-Tech - Honda Forum Discussion
    • Threads
      • Advanced
Dark Mode

Please register or login to enable Dark Mode.

Log In

Forgot your Password?

By logging into your account, you agree to our Terms of Use and Privacy Policy, and to the use of cookies as described therein.
or
 
  • Recent
  • Commented
  • Albums
  • My Pictures

My Post Pictures

LeeMajors19082
September 22, 2015
 504
 0
Sort:
Most Recent
  • Default
  • Most Recent
9/64 drill bit for pilot holes
0 2016/11/17 16:39:13 LeeMajors1
I forgot to get a pic of the inside before replacing the baffle plate. But I used a very small bead of Hondabond between jam nuts and VC and between the baffle plate and VC before tightening everything down.
0 2016/11/17 15:27:10 LeeMajors1
0 2016/11/17 15:26:51 LeeMajors1
Close-up before replacing the baffle plate
0 2016/11/17 15:26:27 LeeMajors1
tapping holes for the baffle plate
0 2016/11/17 15:13:12 LeeMajors1
Taped off the drill bit a little over 1/2in to drill the pilot holes for the tap
0 2016/11/17 15:12:56 LeeMajors1
0 2016/11/17 15:12:41 LeeMajors1
0 2016/11/17 15:12:23 LeeMajors1
Here you can see once modified they were able to sit flush against the openings within the VC
0 2016/11/17 15:12:07 LeeMajors1
0 2016/11/17 15:11:01 LeeMajors1
0 2016/11/17 15:10:49 LeeMajors1
The jam nuts had to be modified in order to accommodate the interior angles of the VC
0 2016/11/17 15:10:38 LeeMajors1
9/64 Drill bit to drill pilot holes for the tap
0 2016/11/17 15:05:11 LeeMajors1
10-24 Tap for the baffle plate screws
0 2016/11/17 15:05:02 LeeMajors1
-10AN to 7/8-14 fuel fittings with rubber washers
(definitely could've gone smaller on the 7/8 side but I was just trying to make sure I'd get full -10AN flow)
-10AN to 7/8-14 fuel fittings with rubber washers (definitely could've gone smaller on the 7/8 side but I was just trying to make sure I'd get full -10AN flow)
0 2016/11/17 15:04:52 LeeMajors1
7/8-14 aluminum jam nuts
0 2016/11/17 15:04:40 LeeMajors1
0 2016/11/17 15:04:28 LeeMajors1
3/8in screws to reconnect the baffle plate
0 2016/11/17 15:04:19 LeeMajors1
This is from the other chamber and was much easier... very little material had to be removed here iirc it was just a single small nub.
0 2016/11/17 15:03:43 LeeMajors1
Still in the PCV area. This is where the small "wall" was removed
0 2016/11/17 15:03:27 LeeMajors1
Also from the area next to the OEM PCV valve. The grinder is directly above the nub which was removed and then filled via a screw from the outside.
0 2016/11/17 15:03:12 LeeMajors1
Here and in the 3 pics that follow I needed to remove material, a small "wall", and 2 nubs from the inside of the VC in order to accommodate the large jam nuts. This pic is taken from the section directly to the left of the opening for the OEM PCV valve.
0 2016/11/17 15:02:57 LeeMajors1
This pic is to reference the position of the holes in the baffle plate vs the holes for the fittings. This part is VERY IMPORTANT. The fittings need to be positioned in opposite chambers from the holes in the baffle plate. Which will force the gasses to travel the full length of the baffle chambers before entering to hoses leading to your catch/breather tank. Otherwise you'll just be blowing oil directly out of your VC into your catch/breather tanks.
0 2016/11/17 15:02:35 LeeMajors1
Then I used a 7/8in hole bit to drill out the holes for the -AN fittings
0 2016/11/17 15:02:16 LeeMajors1
First I had to use a sanding disc on the die grinder to grind off the rivet heads in order to remove the baffle plate
0 2016/11/17 14:58:37 LeeMajors1
And here I just used zip-ties to hold each of the tanks together, which made it much easier to mount them on the firewall
0 2016/11/17 14:56:07 LeeMajors1
Stainless mesh for top
0 2016/11/17 14:55:00 LeeMajors1
Here you can see the stainless scouring pad material used in the main baffle chamber.
0 2016/11/17 14:54:45 LeeMajors1
I forget the size of these fittings?...maybe 3/4in npt? Whatever it is, it fits VERY snuggly into -10AN stainless hose from Vibrant.
0 2016/11/17 14:54:32 LeeMajors1
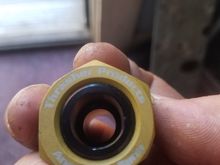
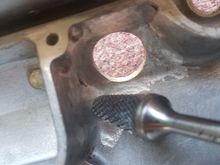
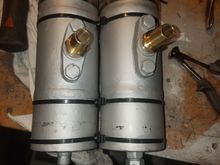
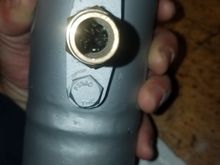
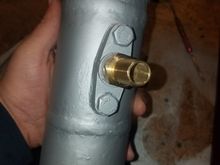
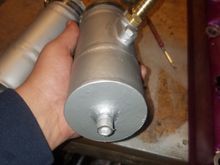
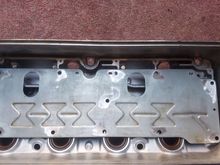
These are 3 piece/chamber tanks. The middle has the main baffle material (stainless brillo), the top has an air filter material (charcoal filter), and the bottom is just a drainage tank (with a 5/16 nut welded on and plugged w/bolt and rubber washer, for emptying it)
0 2016/11/17 14:53:51 LeeMajors1
9/64 bit to drill pilot holes for the tap
0 2016/11/17 14:40:31 LeeMajors1
0 2016/11/17 14:31:55 LeeMajors1
Then used a 7/8in bit to drill out the holes for the fittings.
0 2016/11/17 14:31:11 LeeMajors1
0 2016/11/17 14:30:51 LeeMajors1
0 2016/11/17 14:30:34 LeeMajors1
Took this pic to note the position of the holes in the baffle plate vs the holes in the actual VC that I drilled. This is VERY IMPORTANT... The holes you make in the VC have to be in the chambers opposite the holes in the baffle plate so that the gasses are forced through the baffle chambers. Otherwise you'd just be blowing oil out of your VC and into your catch tanks.
0 2016/11/17 14:30:15 LeeMajors1
I used a sanding disc on the angle grinder to grind off the tops of the rivets in order to remove the baffle plate.
0 2016/11/17 14:29:56 LeeMajors1
And here I just used zip-ties to hold each of the tanks together, which made it much easier to mount them on the firewall.
0 2016/11/17 14:16:19 LeeMajors1
Stainless mesh for top
0 2016/11/17 14:14:46 LeeMajors1
Here you can see the stainless scouring pad material used in the main baffle chamber.
0 2016/11/17 14:14:32 LeeMajors1
First
Page
4 of 13
Last
Go To
Page
  • 1
  • 2
  • 3
  • 4
  • 5
  • 6
  • 7
  • ...
  • 13
4 of 13
Go To GO
Go to page of 13 pages
  • 1
  • 2
  • 3
  • 4
  • 5
  • 6
  • 7
  • ...
  • 13

Top
Honda-Tech - Honda Forum Discussion
  • Contact Us
  • FAQ
  • Archive
  • Advertising
  • Cookie Policy
  • Privacy Statement
  • Terms of Service
  • About Us
  • Your Privacy Choices
  • Manage Preferences

© 2026 MH Sub I, LLC dba Internet Brands

Follow Us        


When you click on links to various merchants on this site and make a purchase, this can result in this site earning a commission. Affiliate programs and affiliations include, but are not limited to, the eBay Partner Network.