
Beginners blog: fabrication life progression
 12-06-2014, 01:46 PM
#1
moderator emeritus
Thread Starter

I'd like to thank everyone here first and foremost. After all the years of reading this forum and soaking in all the information possible, I got the guts to make an investment on a tig welder and fabrication tools. So thank you to everyone of you who posts information and pictures that inspire so many people!
I always found metal working interesting but never had the proper tools to really do the job correctly. So I was forced, like others, to make due. My first part I ever did was a header for my prelude which was mig welded and absolutely ugly looking although it performed very well. I then made a turbo manifold with a mig welder and it just didn't give me the satisfaction and I always felt the need to wrap it to hide the ugly welds.

The dissatisfaction led me to purchase a Miller synchrowave 210 and literally "Weld Every Damn Day" and try something new everyday. In a moment, I will give some pictures of my initial welds and my progression after practice and purchasing the right parts.
I have been watching the weldingtipsandtricks.com videos for quite some time and as much a visual aid helps you understand what it's supposed to look like, nothing beats practicing and hands-on coaching.
So here is my first bit of SS 304 tubing:

Yea, not too pretty LOL. Did a lot of research and asked a lot of questions and it came down to not enough gas coverage, too much amperage and moving way too slow.
This led me to purchase the large gas lens and #12 cups which significantly helped:

Color is better but what is missing here? The gray in the weld is showing heat and insufficient gas coverage. Bumped the gas flow up to compensate for the large cup:
Much better even though the bead spacing is off along with many other aspects that I'm sure I could be coached on. I didn't quite understand why I was not getting the color many of you are getting to make the piece so appealing so I did some research. The color is the cooling effect of the weld during post-flow which I had set to 0. Bumped the post flow to 3 seconds and my what a difference! I also changed from 3/32 filler rod to 1/16" filler rod and it's much easier to keep the puddle together. The 3/32" tried to kill my puddle being it was just too much filler rod for the puddle size I was running.

Bead spacing and height were drastically better and the general feel was better. The biggest difference on the bottom bead was using the tig finger to support my torch hand. It allowed me to get comfortable as I manuevered around the tube. Being comfortable is a high priority in the beginning stages. I'd imagine later on as my hand control increases that the comfort factor will be squashed a bit.
I'll get a couple pictures later to show how much work I have put into learning what I have learned so far.
At this point I was feeling a bit more comfortable and wanted to join some pipe together. I had a 4' section of 1.5" sch 10 so I began to cut and prep the metal. Found out really quickly how important metal prep is and peeping more than te base metal but the filler rod as well. I am using a 80grit flapper wheel along with denatured alcohol and clean cloth.
Top and bottom welds were my first attempts to join the pipes together which were meh and not worthy of mentioning lol.
Came back the next day and did the two middle beads. Middle bottom being the last after working on getting my torch speed and dabbing times properly which still needs a lot of work.
I made a video as well which I am going to attempt to make one at least twice a month
https://www.youtube.com/watch?v=YKoS...ature=youtu.be
I am forever thankful for many of you and many of you are the reasons I am motivated to become more than just a hobbyist.
Thanks for looking!
Next I'll get into my progression with AL and how my first experience joining dirty cast aluminum to .125" 6061 was something I'll never forget.
I always found metal working interesting but never had the proper tools to really do the job correctly. So I was forced, like others, to make due. My first part I ever did was a header for my prelude which was mig welded and absolutely ugly looking although it performed very well. I then made a turbo manifold with a mig welder and it just didn't give me the satisfaction and I always felt the need to wrap it to hide the ugly welds.

The dissatisfaction led me to purchase a Miller synchrowave 210 and literally "Weld Every Damn Day" and try something new everyday. In a moment, I will give some pictures of my initial welds and my progression after practice and purchasing the right parts.
I have been watching the weldingtipsandtricks.com videos for quite some time and as much a visual aid helps you understand what it's supposed to look like, nothing beats practicing and hands-on coaching.
So here is my first bit of SS 304 tubing:

Yea, not too pretty LOL. Did a lot of research and asked a lot of questions and it came down to not enough gas coverage, too much amperage and moving way too slow.
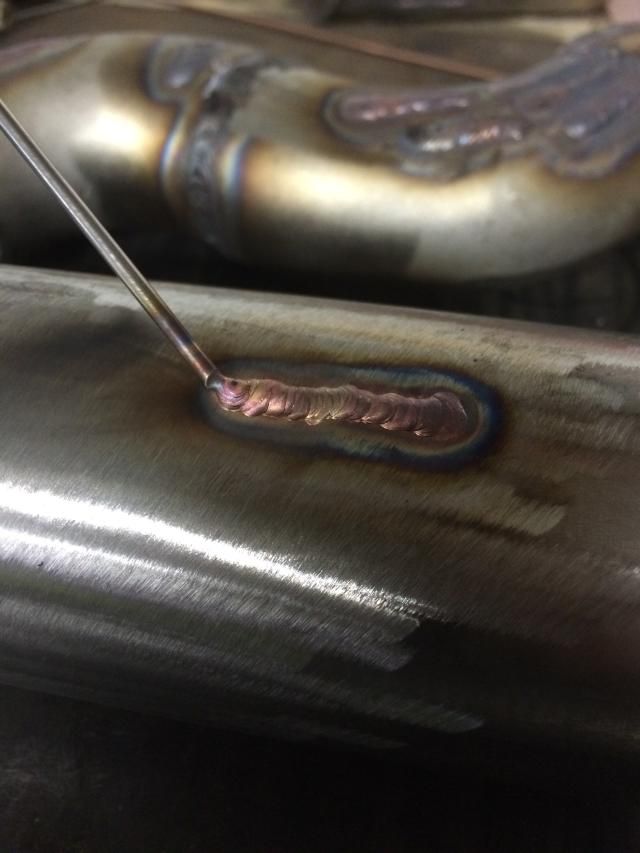
This led me to purchase the large gas lens and #12 cups which significantly helped:

Color is better but what is missing here? The gray in the weld is showing heat and insufficient gas coverage. Bumped the gas flow up to compensate for the large cup:

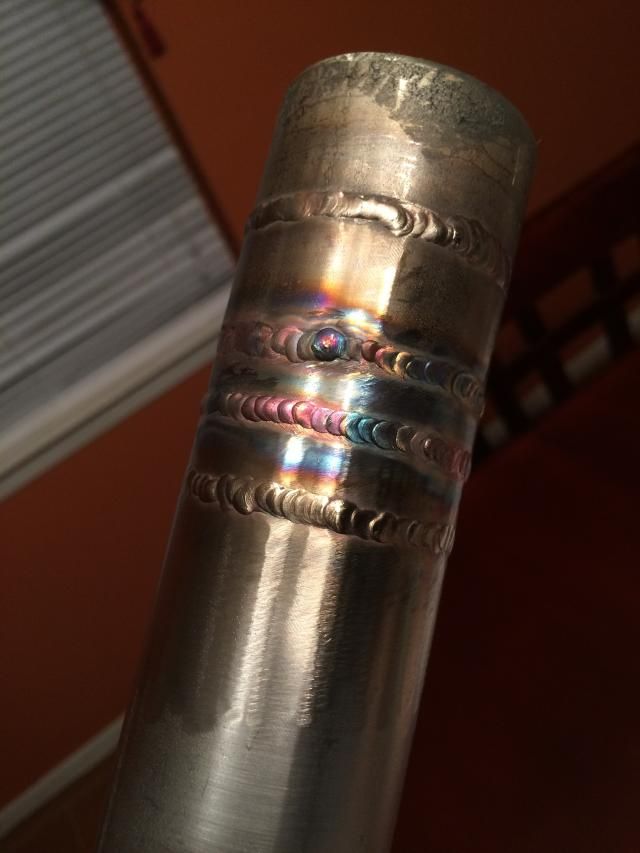
Much better even though the bead spacing is off along with many other aspects that I'm sure I could be coached on. I didn't quite understand why I was not getting the color many of you are getting to make the piece so appealing so I did some research. The color is the cooling effect of the weld during post-flow which I had set to 0. Bumped the post flow to 3 seconds and my what a difference! I also changed from 3/32 filler rod to 1/16" filler rod and it's much easier to keep the puddle together. The 3/32" tried to kill my puddle being it was just too much filler rod for the puddle size I was running.

Bead spacing and height were drastically better and the general feel was better. The biggest difference on the bottom bead was using the tig finger to support my torch hand. It allowed me to get comfortable as I manuevered around the tube. Being comfortable is a high priority in the beginning stages. I'd imagine later on as my hand control increases that the comfort factor will be squashed a bit.
I'll get a couple pictures later to show how much work I have put into learning what I have learned so far.
At this point I was feeling a bit more comfortable and wanted to join some pipe together. I had a 4' section of 1.5" sch 10 so I began to cut and prep the metal. Found out really quickly how important metal prep is and peeping more than te base metal but the filler rod as well. I am using a 80grit flapper wheel along with denatured alcohol and clean cloth.

Top and bottom welds were my first attempts to join the pipes together which were meh and not worthy of mentioning lol.
Came back the next day and did the two middle beads. Middle bottom being the last after working on getting my torch speed and dabbing times properly which still needs a lot of work.
I made a video as well which I am going to attempt to make one at least twice a month
https://www.youtube.com/watch?v=YKoS...ature=youtu.be
I am forever thankful for many of you and many of you are the reasons I am motivated to become more than just a hobbyist.
Thanks for looking!
Next I'll get into my progression with AL and how my first experience joining dirty cast aluminum to .125" 6061 was something I'll never forget.
Last edited by 98vtec; 12-07-2014 at 07:07 AM.
 12-06-2014, 05:02 PM
#2
Anti-GDD White Knight Simp
Great job, I look forward to more from this thread. You're one (or two) steps ahead of me, I've been interested in metal working for a while now. I have some exhaust work I would like to accomlish myself, so the time is coming soon for me to get in the game. This may be the inspiration that pushes me to finally do it.
12-07-2014, 06:30 AM
#3
moderator emeritus
Thread Starter
Great job, I look forward to more from this thread. You're one (or two) steps ahead of me, I've been interested in metal working for a while now. I have some exhaust work I would like to accomlish myself, so the time is coming soon for me to get in the game. This may be the inspiration that pushes me to finally do it.
It's definitely a nice tool to have even if the business side doesn't turn out like I want it to. I have put a lot of time into it for the past month ans I'm eager to see how the future unfolds.
Don't get frustrated is all I can recommend.
12-07-2014, 06:51 AM
#5
-Intl Steve Krew
I too want to build SS exhaust systems and intercooler piping and whatnot. I took a beginner arc/gas (acetelyne) welding class at the local CC. I was going to continue at the CC but due to life I have an opportunity to go to a local trade school and get certified. I'm subscribing to this thread to see your progression!
 12-07-2014, 04:10 PM
#6
Anti-GDD White Knight Simp
Link works 
"It's definitely a nice tool to have even if the business side doesn't turn out like I want it to."
My thoughts exactly
"It's definitely a nice tool to have even if the business side doesn't turn out like I want it to."
My thoughts exactly
12-07-2014, 04:32 PM
#7
Honda-Tech Member
Join Date: Apr 2002
Posts: 2,126
Likes: 0
Received 0 Likes
on
0 Posts
cool try a .045 filler see how you like it >> https://honda-tech.com/welding-fabri...dvice-2817492/
Trending Topics
12-10-2014, 11:03 AM
#8
Honda-Tech Member

Join Date: Nov 2009
Posts: 135
Likes: 0
Received 0 Likes
on
0 Posts
Congrats! I love tig welding and was self taught. Youre spacing and puddle width is on par. Just try a smaller filler as mentioned and bring the spacing closer a bit then youll be happy!
12-11-2014, 08:12 AM
#9
moderator emeritus
Thread Starter
I too want to build SS exhaust systems and intercooler piping and whatnot. I took a beginner arc/gas (acetelyne) welding class at the local CC. I was going to continue at the CC but due to life I have an opportunity to go to a local trade school and get certified. I'm subscribing to this thread to see your progression!
cool try a .045 filler see how you like it >> https://honda-tech.com/welding-fabri...dvice-2817492/
the speed and timing is something i have been working hard on. I still need to take a picture of how much SS practice I have put in. Just a little bit of time every day.
12-11-2014, 08:40 AM
#10
moderator emeritus
Thread Starter
here are a couple Aluminum things I have done so far.
While i was in school, i picked up on aluminum pretty quickly but it was only on flat surfaces and we didnt put anything together that semester with aluminum. some practice before doing putting together any pieces:


not the greatest but at least somewhat consistent. looks like i had a little too much heat and the metal was a little dirty with the grainy look to it. being clean is something i learned has been pretty important. cleaning the actual piece as well as the filler rod.
Question:
when the aluminum gets the burned look and the tungsten did not hit, what is that a symptom of?
this is the mount setup I made for my kayak in order to run a trolling motor on the back (screw paddling!!!) Before having the welder, i had to make due and riveted the mount together. well it had a lot of slop in it with the pieces still being able to slightly move and bit and welding them together made it very sturdy.


So I decided to start on my crankcase tank:


water test!

I ran into a lot of problems with this piece and i still do not know why exactly other than having very small gaps in the fitment where the edge was not completely flat from being cut on the shears. I tried keeping the weld surface as clean as possible with denatured alcohol and a stainless steel brush dedicated to AL. on one side i would puddle and have a nice weld. you would be able to see the puddle spread out from the surface beginning to really heat up to know to back off the amperage or back off completely and allow the surface to cool some.
Well i would come back to the weld and it would act like it was contaminated or unclean...i dont know. it would weld like crap and Im not sure if its me or just the type of aluminum i am working with. I brushed it down so the mill scale was off the surface. Then in other parts i was try to tack the two pieces together and start my weld and a hole would form and I would have to attempt to fill the hole before continuing and that was an event all by itself. I really should have taken a picture of what it was doing. It was a continuous trend of grinding down and rewelding in particular sections and it was very annoying to say the least. I am pretty sure it had to do with my fitment and not leaving an edge to work with. The picture i have with the fitting is an area that did not have a problem welding but i left an overlapping edge to work off of whereas the other edges were flush with the joining pieces.
anyone offer advice? I tried pure, lanthanated, thoriated tungsten, 3/32 and 1/16 4043 and 3/32" 5356. I tried pulsing at 33pps (as recommended by weldingtipsandtricks.com on edges) which appeared to help but still had a lot of problems. I tried changing the balance for more cleaning action and less penetration but that didnt change anything). 33pps at 125amps seemed to be the right where it wanted. (.125" sheet) I tried all this to see if either of them would seemingly "fix" the problem but nothing really changed.
12-11-2014, 02:36 PM
#12

I just recently started TIG welding also. I've been working on it for about 2 months now. Here is a custom fit meth tank for my car that I have been working on:


I made it out of 0.100" 6061 aluminum and welded it with 1/16" 2% lanthanated tungsten (ground to "crayon" tip) using 3/32" 4043 filler at 100 amps without using pulse. I don't know if that is the best setup, but it seemed to work really well for me.
This is the way I fit my joints together:

I didn't have any good pictures, so I found that one via Google images.
12-11-2014, 04:55 PM
#13
Honda-Tech Member
that alum is clean let the machine do the work. Ive never even though of cleaning filler rod, waste of time
and id prob never clean alum either unless its oily or painted
and id prob never clean alum either unless its oily or painted
12-11-2014, 07:29 PM
#14
Honda-Tech Member
Join Date: Oct 2007
Location: dexter, mo., usa
Posts: 95
Likes: 0
Received 0 Likes
on
0 Posts
Take a pic of the "burned look" and post it. I'm sure we can help. Also, in most cases I don't like any kind of a gap on the weld seam. It can be corner to corner so you can fill the valley, but no gaps.
12-12-2014, 12:19 AM
#15
Honda-Tech Member

Join Date: Aug 2014
Posts: 391
Likes: 0
Received 0 Likes
on
0 Posts
Notice the cleaning between your welds and the google picture. It looks as if you are moving a little too slow or too much heat. Try moving faster with the same amperage or turn up and move way faster. Maybe smaller lens and tungsten with less amperage.
Also your puddle needs to drop before adding to the puddle slightly. You can set your pulse to your rhythm.
Try using a magnifier.
Metal that blows out may be contaminated. Use acetone or alkaline etch and water to clean parts. Wire brush will contaminate welds and tungsten.
Also your puddle needs to drop before adding to the puddle slightly. You can set your pulse to your rhythm.
Try using a magnifier.
Metal that blows out may be contaminated. Use acetone or alkaline etch and water to clean parts. Wire brush will contaminate welds and tungsten.
12-12-2014, 12:23 AM
#16
Honda-Tech Member
Join Date: Aug 2014
Posts: 391
Likes: 0
Received 0 Likes
on
0 Posts
Post and preflow may need to be adjusted. On your tacks slowly lower amperage and cool before moving to the next tack. Maybe your tacks are getting oxidized causing problems when you go back over with the bead.
12-12-2014, 05:55 AM
#17
moderator emeritus
Thread Starter
I watched this video yesterday and I think the balance may be a part of my problem along with not properly grinding the tungsten. I noticed last night that i had to put a lot of pedal into it in order to pin point the arc. I could literally see it arcing from above the tungsten sharpened point and i believe that to be because my tungsten grind area was very short. I'll take a picture of that later as well and test that theory.
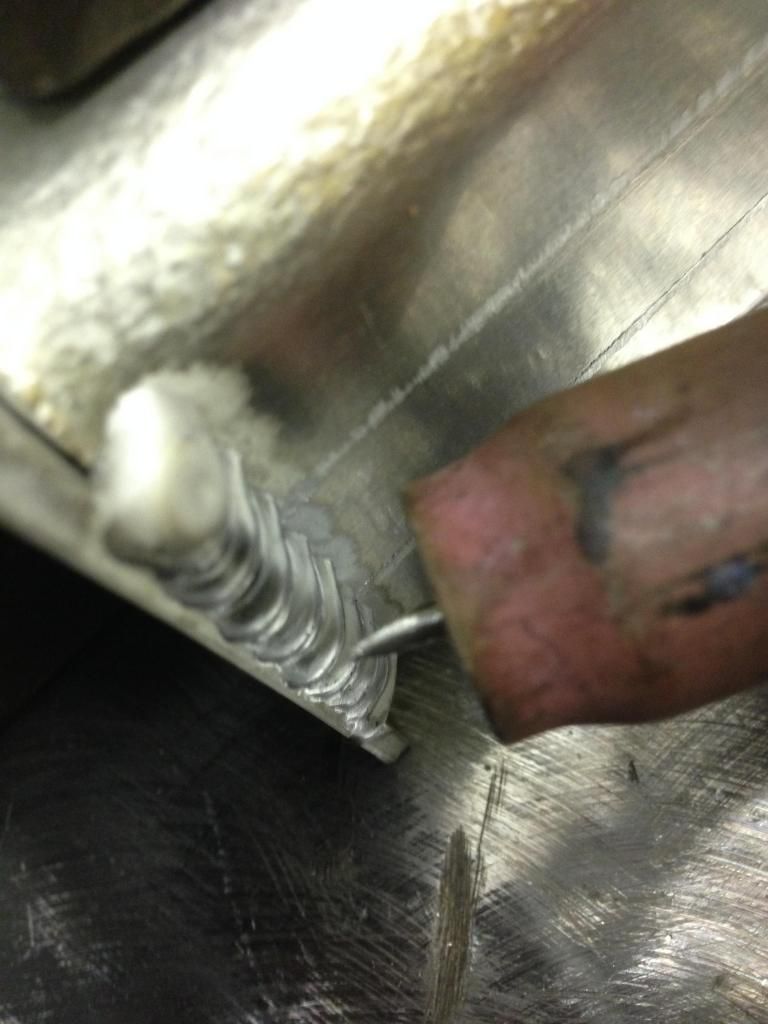
but here is what i was talking about originally:


this was cleaned with a wire brush and wiped with acetone on some scrap. The two pieces appeared to join together perfectly without any filler while tacking. But as I came to the end where this tack is, it spread out and got really nasty. at that point, there was nothing i could do with it. It would not puddle and it would not clean up. this is the exact problem i ran into with the catch can and it has to be that I come to a spot that has a slight gap and the puddle cannot keep it together.
I saw that jody says the machine should be able to do nearly every bit of cleaning based on the AC balance and im going to do some test sheets like he did in the video above and see what happens. I think i may change the gas lens as well. that did wonders in the video for him and im beginning to wonder if even though i am running the proper CFH, if im still not getting appropriate coverage.
12-12-2014, 09:29 AM
#18
Honda-Tech Member
Join Date: Apr 2002
Posts: 2,126
Likes: 0
Received 0 Likes
on
0 Posts
try doing 1 pps and set the background and peak to factory. I think it will help you learn your rhythm...that is why the pulsers are great because you can take someone who is learning to weld,turn on the pulsar and all they have to do is add filer and you end up with great welds. The 33 doesnt give you the pulse effect.
12-12-2014, 09:38 AM
#19
moderator emeritus
Thread Starter
try doing 1 pps and set the background and peak to factory. I think it will help you learn your rhythm...that is why the pulsers are great because you can take someone who is learning to weld,turn on the pulsar and all they have to do is add filer and you end up with great welds. The 33 doesnt give you the pulse effect.
I watched another video of Jody's and I noticed he likes to use the torch to clean the area before thinking about making a puddle and then he will make a puddle and dab the filler to tack. I also noticed that on some of his pieces, he does not have an air tight gap yet his puddle stays consistent and doesnt try to spread. He uses large gas lens but with with #7 cups for aluminum. I am using a standard lens with a #8 standard cup. I ordered a #8 large cup to see the effect of more gas coverage. I am going to try the cleaning technique he used tonight and see how it does.
12-12-2014, 10:27 AM
#20
moderator emeritus
Thread Starter
essex, i am not sure what you mean by background and peak. my machine isnt like a dynasty with a bunch of adjustments. for AC I have balance, pps, and post flow.
12-12-2014, 10:34 AM
#21
Honda-Tech Member
Join Date: Oct 2007
Location: dexter, mo., usa
Posts: 95
Likes: 0
Received 0 Likes
on
0 Posts
Looks like your too hot. At the end of the seam you have to really watch your heat. Basically you have a burn thru and then get contaminants from the air on the underside of the weld.
12-12-2014, 11:47 AM
#22
moderator emeritus
Thread Starter
Along with the new gas nozzle, i ordered a 90* fixture so i can use a bit more precision on fitup to get the edge i am looking for and i think that will help a lot.
12-12-2014, 11:50 AM
#23
moderator emeritus
Thread Starter
i just now noticed this but:

the cleaning action around the weld is incredibly narrow for the bead width and it just looks dirty. something i did not notice the first time glancing at the picture. I believe i had it set for max cleaning so im not really sure why its so narrow.
the cleaning action around the weld is incredibly narrow for the bead width and it just looks dirty. something i did not notice the first time glancing at the picture. I believe i had it set for max cleaning so im not really sure why its so narrow.
12-12-2014, 03:09 PM
#24
Honda-Tech Member
dont use pulse. and for alum Id never even think of using it. alum cools way to fast it will leave areas with no penetration. trust me I know and Ive done it before. If you want to pulse pulse at 30-1000pps. thats the only way Id ever pulse.
your **** is contaminated, you are either dipping the tungsten without knowing or mixing it with filler, improper gas. The alum looks damn near clean I woulnt even touch it because what you are doing is probably contaminating it with the brush.
Let the machine do the cleaning and practice. almost 100% of the time my cleaning is at 80%. what tungsten are you using. with that dynasty I use a grey tungsten sharpened to a point then grind the point a bit flat and weld.
I use the same machine for alum but a bit bigger
your **** is contaminated, you are either dipping the tungsten without knowing or mixing it with filler, improper gas. The alum looks damn near clean I woulnt even touch it because what you are doing is probably contaminating it with the brush.
Let the machine do the cleaning and practice. almost 100% of the time my cleaning is at 80%. what tungsten are you using. with that dynasty I use a grey tungsten sharpened to a point then grind the point a bit flat and weld.

I use the same machine for alum but a bit bigger
12-13-2014, 08:40 AM
#25
Honda-Tech Member
Join Date: Aug 2014
Posts: 391
Likes: 0
Received 0 Likes
on
0 Posts
I spotted a small piece of advise.
Your tungsten looks rough. Taper it more on a wheel dedicated for aluminum. Then turn balance up and ball your tungsten over a thick piece of stainless.
I ball tungsten for aluminum and keep it sharp for stainless/titanium.
Your tungsten looks rough. Taper it more on a wheel dedicated for aluminum. Then turn balance up and ball your tungsten over a thick piece of stainless.
I ball tungsten for aluminum and keep it sharp for stainless/titanium.