


Resource: Measuring Parasitic Current Draw

Thread Starter
H-T White Ops
Joined: Feb 2004
Posts: 17,603
Likes: 22
From: USA
Measuring Parasitic Current Draw
Parasitic current draw: Think of it as the price we pay for all of that high-tech car stuff we’ve grown so accustomed to. It’s the low but constant draw of current on the battery caused by the memory registers in ECM/PCMs, radios, clocks, security systems, multiplex and most control systems.
Normally, this current draw is so small that you need to measure it in milliamps (one thousandth of an amp). Newer models draw between 3 mA and 13 mA, but older models can draw as much as 50 mA. And a current draw of more than 50 mA can discharge the battery.
If you drive the vehicle daily, parasitic current draw really isn’t an issue; the charging system does its job and juices up the battery. But it can become a problem if you let the vehicle sit for a long time, especially if the battery was partially discharged when you parked the vehicle, or the parasitic current draw was high. Left unchecked, the current draw on the battery can drain it to the point where the engine doesn’t start.
If you have a weak or drained battery after the vehicle’s been sitting for a while, here’s a simple procedure to measure the amount of parasitic current draw:
1. Make sure all switches are turned off, then remove the ignition key. Wait at least 5 minutes for all current reduction timers to turn off (sleep mode).
2. Loosen (but don’t remove) the negative battery cable.
3. Set your ammeter to the 10A scale if it doesn’t have an auto-range capability.
4. Use an alligator clip to connect your ammeter’s positive lead to the negative battery terminal.
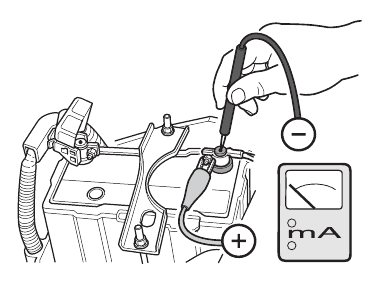
5. Hold the ammeter’s negative lead firmly against the negative battery post.
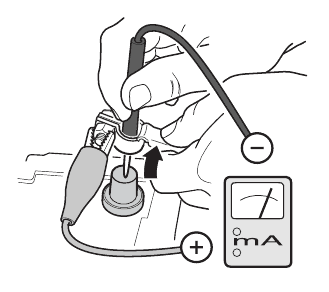
6. Slide the negative battery terminal over your ammeter’s negative lead, and read the current draw. If your ammeter’s range is too high to accurately read milliamps, lower the range so you can.
To isolate the parasitic current draw to a single circuit, remove fuses in the circuit one at a time until the current draw drops. Refer to the appropriate ETM to identify the components on the circuit. Unplug components one at a time to find the cause of the high parasitic current draw.
For more info on alternators and parasitic current draw, refer to S/B 92-001, Charging System Testing, found under Electrical, and to the article “Parasitic Draw Test Clarifications” in the March ’92 issue of ServiceNews.
Expected Parasitic Draw (milliamps)
----------------------------------
1986-1989 Accord DX/LX: 10-15
1990-1992 Accord DX/LX: 15-25
1986-1992 Accord LXi/EX: 15-25
1991-1992 Accord Wagon LX: 15-25
1991-1992 Accord Wagon EX: 30-35
----------------------------------
1986-1991 Civic: 8-15
1992 Civic: 5-15
----------------------------------
1986-1990 Integra: 15-20
1991-1992 Integra: 15-25
----------------------------------
1986-1987 Legend 4-d: 20-30
1988-1990 Legend 4-d: 30-45
1991-1992 Legend 4-d: 20-25
1987-1990 Legend 2-d: 30-45
1991-1992 Legend 2-d: 20-25
----------------------------------
1991-1992 NSX: 23-26
----------------------------------
1986-1990 Prelude S: 10-15
1992 Prelude S: 8-15
1986-1991 Prelude Si: 15-25
1992 Prelude Si: 8-15
----------------------------------
1992 Vigor: 20-25
----------------------------------
I'll try to add more of these if I find them from Honda! These might help as far as guidelines though.
Parasitic current draw: Think of it as the price we pay for all of that high-tech car stuff we’ve grown so accustomed to. It’s the low but constant draw of current on the battery caused by the memory registers in ECM/PCMs, radios, clocks, security systems, multiplex and most control systems.
Normally, this current draw is so small that you need to measure it in milliamps (one thousandth of an amp). Newer models draw between 3 mA and 13 mA, but older models can draw as much as 50 mA. And a current draw of more than 50 mA can discharge the battery.
If you drive the vehicle daily, parasitic current draw really isn’t an issue; the charging system does its job and juices up the battery. But it can become a problem if you let the vehicle sit for a long time, especially if the battery was partially discharged when you parked the vehicle, or the parasitic current draw was high. Left unchecked, the current draw on the battery can drain it to the point where the engine doesn’t start.
If you have a weak or drained battery after the vehicle’s been sitting for a while, here’s a simple procedure to measure the amount of parasitic current draw:
1. Make sure all switches are turned off, then remove the ignition key. Wait at least 5 minutes for all current reduction timers to turn off (sleep mode).
2. Loosen (but don’t remove) the negative battery cable.
3. Set your ammeter to the 10A scale if it doesn’t have an auto-range capability.
4. Use an alligator clip to connect your ammeter’s positive lead to the negative battery terminal.
5. Hold the ammeter’s negative lead firmly against the negative battery post.
6. Slide the negative battery terminal over your ammeter’s negative lead, and read the current draw. If your ammeter’s range is too high to accurately read milliamps, lower the range so you can.
To isolate the parasitic current draw to a single circuit, remove fuses in the circuit one at a time until the current draw drops. Refer to the appropriate ETM to identify the components on the circuit. Unplug components one at a time to find the cause of the high parasitic current draw.
For more info on alternators and parasitic current draw, refer to S/B 92-001, Charging System Testing, found under Electrical, and to the article “Parasitic Draw Test Clarifications” in the March ’92 issue of ServiceNews.
Expected Parasitic Draw (milliamps)
----------------------------------
1986-1989 Accord DX/LX: 10-15
1990-1992 Accord DX/LX: 15-25
1986-1992 Accord LXi/EX: 15-25
1991-1992 Accord Wagon LX: 15-25
1991-1992 Accord Wagon EX: 30-35
----------------------------------
1986-1991 Civic: 8-15
1992 Civic: 5-15
----------------------------------
1986-1990 Integra: 15-20
1991-1992 Integra: 15-25
----------------------------------
1986-1987 Legend 4-d: 20-30
1988-1990 Legend 4-d: 30-45
1991-1992 Legend 4-d: 20-25
1987-1990 Legend 2-d: 30-45
1991-1992 Legend 2-d: 20-25
----------------------------------
1991-1992 NSX: 23-26
----------------------------------
1986-1990 Prelude S: 10-15
1992 Prelude S: 8-15
1986-1991 Prelude Si: 15-25
1992 Prelude Si: 8-15
----------------------------------
1992 Vigor: 20-25
----------------------------------
I'll try to add more of these if I find them from Honda! These might help as far as guidelines though.
Last edited by NOFX; Feb 4, 2011 at 06:06 PM.

Honda-Tech Member


Joined: Mar 2004
Posts: 4,840
Likes: 37
From: Looking for SloMofo....
This is reversed. Newer models draw more current. The increased complexities and additional modules steadily increased the draw over the years. Industry standard is still 50ma but there are more and more exceptions to this rule emerging. Also non intrusive testing is a better recommendation as disconnecting the neg batt cable on CAN/OBD 2 vehicles can necessitate relearn procedures, reset monitors and erase any diagnostic data stored. An inductive amp clamp is better.
Thread Starter
H-T White Ops
Joined: Feb 2004
Posts: 17,603
Likes: 22
From: USA
This is reversed. Newer models draw more current. The increased complexities and additional modules steadily increased the draw over the years. Industry standard is still 50ma but there are more and more exceptions to this rule emerging. Also non intrusive testing is a better recommendation as disconnecting the neg batt cable on CAN/OBD 2 vehicles can necessitate relearn procedures, reset monitors and erase any diagnostic data stored. An inductive amp clamp is better.
You can also see the vehicles that Honda specifically recommended this for at the end of the test.
This test can be used for any model. Though there might be other tests which can be done, this can easily be taken care of at home without special equipment.
Last edited by NOFX; Feb 6, 2011 at 12:09 AM.
Honda-Tech Member
Joined: Mar 2004
Posts: 4,840
Likes: 37
From: Looking for SloMofo....
Get current kid.
Thread Starter
H-T White Ops
Joined: Feb 2004
Posts: 17,603
Likes: 22
From: USA
You're right. I should only post information that's perfect for every Honda model out there.
If you read it again you'll see I have the applicable vehicles.
Also, from what I'm seeing, the LH41A might not be a great idea for most people to purchase. Kind of pricey for your average person who just wants to check one car.
No need to call me a kid just because you disagree with an article that can still help plenty of people.
Seagull Management
Joined: Jun 2008
Posts: 15,150
Likes: 26
From: Miramichi, NB, Canada
I dont need to call Honda. The service news article you posted is 9 years old. The information is out dated as it pertains to current model year vehicles. In fact you will not find published acceptable draw measurements for any Honda vehicle now because the model line up all have various control modules and battery sizes. The only specification listed by Honda is anything under 50 mA. Honda also now advises the use of the special tool # LH41A (an inductive amp clamp) for use in measuring parasitc draw. Your attempt at helping others is noble, but the information is lacking....
Get current kid.
Get current kid.
Trending Topics
Honda-Tech Member
Joined: Mar 2004
Posts: 4,840
Likes: 37
From: Looking for SloMofo....
Right but your post does not imply that the testing procedures are only applicable to the cars listed.
Also, from what I'm seeing, the LH41A might not be a great idea for most people to purchase. Kind of pricey for your average person who just wants to check one car.
http://www.amazon.com/s/ref=nb_sb_ss...efix=amp+clamp
Instead of asking me ANY type of question as to why I posted what i did, you ASSumed I was wrong, and merely directed me to call "Honda Motor Company" If you are not completly educated on information you are postig then perhaps it is better left unposted until you do your homework on the subject.
Honda-Tech Member
Joined: Mar 2004
Posts: 4,840
Likes: 37
From: Looking for SloMofo....

B*a*n*n*e*d
Joined: Oct 2011
Posts: 1,022
Likes: 0
Hi, I have this very same problem (parasitic drain) and I think I know how to locate it, but what to do after I have found it? Do I just replace the fuse?
Please help.
Please help.

After you've found the circuit with the large draw find what component is drawing to much current and either repair or replace.
If a component has an internal short it will draw more current than intended.
If a component has an internal short it will draw more current than intended.
B*a*n*n*e*d
Joined: Oct 2011
Posts: 1,022
Likes: 0
Testing components? I thought you were to only test the fuses. But should I test the components? There is one component which would warrant a test, that is my speed sensor. My S light told me that it was bad. This could be whats causing the power drain. So I should test it and the fuse box too? If so , how do I test the speed sensor?

Thread
Thread Starter
Forum
Replies
Last Post
techme
Honda Accord & Crosstour (2003 - 2012)
3
May 23, 2015 10:49 AM