

Heart surgery for 01-1058-NHBP : A new owner, and new <3

Thread Starter

Joined: Jul 2008
Posts: 2,163
Likes: 0
From: Howcome we park on driveways, and drive on parkways?
So last weekend I went and grabbed a dead NHBP 01-1058 a few hours away. She has only been through a few hands and is still in great shape both inside and out. She started in VA, then moving to PA, from there to Colorado, and back to same owner in PA 6 months after sale. Although heR body and interior are solid as ever, heR heart has decided she's seen enough and spun a bearing on Cylinder 3. Not the worst I've seen, but the bottom end would be needing some work before re-assembly. Previous owner didn't want to tackle this job and decided it would be better off to pass on. Well swooping right in came little old me, cash in hand, ready to make a deal. We settled on a price, and I made the drive to go scoop heR up.

No time was wasted once we got her back to the shop, thats for sure! I went right to it the next day and got the old heart torn right out of heR. She did not have a VIN matching block when I purchased heR, it was previously replaced by Acura under warranty by first owner. If it was original, I obviously would have re-built it to keep all numbers matching throughout. However, I have had a JDM B18C-R motor from a build a few years ago sitting in storage in my warehouse waiting for this exact situation. So out with the old it is!!

She came out without a snag, just had to take extra care working around security setup and its wiring into the harness. From there it was full speed ahead to prep my old motor to wake up for daily duty once again! I figured since I had everything out of the car and wasn't in a rush this time, I would do it right. Take my time, double and triple check everything, and make sure everything is in order so there were minimal/no issues.
*******************
*******************
Since this is a JDM B18C-R going into a 2001 ITR chassis, there are a few things that need to be done to make this swap work with no CEL's, no VTEC engagement issues, and being able to pass NYS inspection. There are also a few different ways this can be done.
The way I will be doing it involves swapping over or ordering a few parts so the harness and USDM ECU communicate properly.
- The USDM engine and harness have a CKF sensor on the oil pump. The JDM B18C-R does not. I opted for buying a brand new USDM Oil Pump and swapping over the CKF sensor from the motor that came out. If ordering these parts, you would need the following items.
Oil Pump - 15100-P72-A01 - #2 In Diagram $112
CKF Sensor Assembly - 37500-P72-A01 - #14 In Diagram $115
Oil Strainer Gasket - 15221-PW0-S01 - #4 In Diagram $1.75
Oil Pump O-Ring - 91308-P3R-T01 $18 In Diagram $.88

Not done yet!! There are still a few more parts that are needed. When you take the crank pulley off to get to the Oil pump, there is a small gear between the Crank and the oil pump. The JDM gear DOES NOT have the mageto collar to send the signal to the CKF sensor. The USDM unit does. (Visible in diagram below) I was able to remove this from the blown USDM engine that came out of car originally but here is what you would need.
Crank Pulley Gear - 13621-P72-A01 - #15 in Diagram $65
Gear Guide - 13622-PR3-000 - #16 In Diagram $3.50

Now. ALL OF THIS CAN BE BYPASSED. I personally didn't want to do that since I'm using the stock USDM harness and dont want to have stray plugs all around. THATS JUST ME. There is whats called the "CKF Trick". What you are doing is tricking the computer to get the reading it would normally get form this magneto from another sensor on the engine. Many say this works just fine and is obviously cheaper and easier than removing all of these or ordering these components. Here is a link to some more about the "CKF Trick".
http://ff-squad.com/wp/?p=309
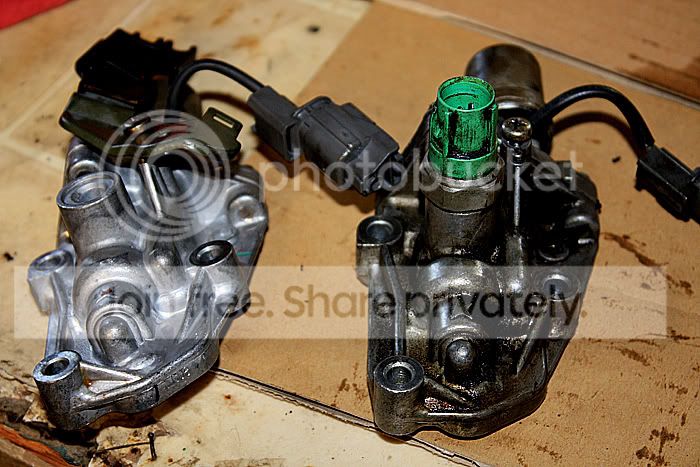
Lastly, if you have a JDM engine, your VTEC solenoid will be different than a USDM one. USDM vtec solenoids have a oil pressure switch that is on the outside of the solenoid and it connects to a green plug on the harness. (The only green plug connected to the head, and only green plug on engine harness) JDM VTEC solenoids have the switch internally on the unit, negating the need for the plug on the harness. Heres what the solenoids look like side by side.
Again, there are 2 ways you can get around this. You can get a new USDM VTEC solenoid, or you can bypass the oil pressure switch by bridging a single wire in the engine harness right before the ECU. If you want to buy the solenoid, this is what you would need.
USDM Vtec Solenoid - 15810-P30-005 - #9 In Diagram

I'm choosing to go with bridging the wire at the ECU Plugs. There's a bunch of information on doing this bypass, BUT MAKE SURE YOU ARE READING THE CORRECT DIAGRAM!! Since my car is a 2001, it is OBD2B. The pinouts and wiring for a OBD2A vehicle and OBD1 vehicle ARE COMPLETELY DIFFERENT!. MAKE SURE YOU READ AND KNOW WHAT YOU ARE DOING!
Here is a link showing the ECU pinout and labels for a OBD2B ECU:
http://www.ff-squad.com/technet/wiring.obd2b.htm
What needs to be done is you need to bridge the VTEC solenoid line (B12) to the VTEC pressure switch (C10). This will give the ECU the reading it needs to engage and monitor VTEC through the solenoid. If you search for "Oil pressure bypass" in google it will bring up a bunch of threads and search results, but most show the OBD1 process which involves different ECU pinouts. **READ READ READ**
I will show pictures of me bridging these wires once I do it. It is very simple! Once this is done, you can simply tuck back that green plug in the engine bay and you're good to go!!
*******************
*******************
Once I was done with working out all of this, it was time to clean heR up and get the motor all set in. Heres what she looked like when I pulled her out of storage.

A bunch of elbow grease, some good cleaners, some time, and a bunch of brushes. SHAZAM!!! Looks good as new!

After that was all done, I plugged up the harness and laid heR into heR new home!! She was accepting and didnt give me any grief! I did have to order a new driver side engine post for the engine mount? Seems the distance between the mount pegs is different? Waiting to get my new part confirm that, but the USDM driver side mount wasn't even close to hitting both post holes.
Here she is sitting right at home.

Came out fantastic and Im glad I took my time to get it all done right. I'm just waiting on a few little things to tighten heR up and then she's out on the road for daily duty. Super anxious to get heR going and test everything out. Here's a few more pics to show shes clean inside and out!!


Stay tuned for more updates, upgrades, and I'm sure I will be snapping some pictures of heR once shes out on the road!!
No time was wasted once we got her back to the shop, thats for sure! I went right to it the next day and got the old heart torn right out of heR. She did not have a VIN matching block when I purchased heR, it was previously replaced by Acura under warranty by first owner. If it was original, I obviously would have re-built it to keep all numbers matching throughout. However, I have had a JDM B18C-R motor from a build a few years ago sitting in storage in my warehouse waiting for this exact situation. So out with the old it is!!
She came out without a snag, just had to take extra care working around security setup and its wiring into the harness. From there it was full speed ahead to prep my old motor to wake up for daily duty once again! I figured since I had everything out of the car and wasn't in a rush this time, I would do it right. Take my time, double and triple check everything, and make sure everything is in order so there were minimal/no issues.
*******************
*******************
Since this is a JDM B18C-R going into a 2001 ITR chassis, there are a few things that need to be done to make this swap work with no CEL's, no VTEC engagement issues, and being able to pass NYS inspection. There are also a few different ways this can be done.
The way I will be doing it involves swapping over or ordering a few parts so the harness and USDM ECU communicate properly.
- The USDM engine and harness have a CKF sensor on the oil pump. The JDM B18C-R does not. I opted for buying a brand new USDM Oil Pump and swapping over the CKF sensor from the motor that came out. If ordering these parts, you would need the following items.
Oil Pump - 15100-P72-A01 - #2 In Diagram $112
CKF Sensor Assembly - 37500-P72-A01 - #14 In Diagram $115
Oil Strainer Gasket - 15221-PW0-S01 - #4 In Diagram $1.75
Oil Pump O-Ring - 91308-P3R-T01 $18 In Diagram $.88
Not done yet!! There are still a few more parts that are needed. When you take the crank pulley off to get to the Oil pump, there is a small gear between the Crank and the oil pump. The JDM gear DOES NOT have the mageto collar to send the signal to the CKF sensor. The USDM unit does. (Visible in diagram below) I was able to remove this from the blown USDM engine that came out of car originally but here is what you would need.
Crank Pulley Gear - 13621-P72-A01 - #15 in Diagram $65
Gear Guide - 13622-PR3-000 - #16 In Diagram $3.50
Now. ALL OF THIS CAN BE BYPASSED. I personally didn't want to do that since I'm using the stock USDM harness and dont want to have stray plugs all around. THATS JUST ME. There is whats called the "CKF Trick". What you are doing is tricking the computer to get the reading it would normally get form this magneto from another sensor on the engine. Many say this works just fine and is obviously cheaper and easier than removing all of these or ordering these components. Here is a link to some more about the "CKF Trick".
http://ff-squad.com/wp/?p=309
Lastly, if you have a JDM engine, your VTEC solenoid will be different than a USDM one. USDM vtec solenoids have a oil pressure switch that is on the outside of the solenoid and it connects to a green plug on the harness. (The only green plug connected to the head, and only green plug on engine harness) JDM VTEC solenoids have the switch internally on the unit, negating the need for the plug on the harness. Heres what the solenoids look like side by side.
Again, there are 2 ways you can get around this. You can get a new USDM VTEC solenoid, or you can bypass the oil pressure switch by bridging a single wire in the engine harness right before the ECU. If you want to buy the solenoid, this is what you would need.
USDM Vtec Solenoid - 15810-P30-005 - #9 In Diagram
I'm choosing to go with bridging the wire at the ECU Plugs. There's a bunch of information on doing this bypass, BUT MAKE SURE YOU ARE READING THE CORRECT DIAGRAM!! Since my car is a 2001, it is OBD2B. The pinouts and wiring for a OBD2A vehicle and OBD1 vehicle ARE COMPLETELY DIFFERENT!. MAKE SURE YOU READ AND KNOW WHAT YOU ARE DOING!
Here is a link showing the ECU pinout and labels for a OBD2B ECU:
http://www.ff-squad.com/technet/wiring.obd2b.htm
What needs to be done is you need to bridge the VTEC solenoid line (B12) to the VTEC pressure switch (C10). This will give the ECU the reading it needs to engage and monitor VTEC through the solenoid. If you search for "Oil pressure bypass" in google it will bring up a bunch of threads and search results, but most show the OBD1 process which involves different ECU pinouts. **READ READ READ**
I will show pictures of me bridging these wires once I do it. It is very simple! Once this is done, you can simply tuck back that green plug in the engine bay and you're good to go!!
*******************
*******************
Once I was done with working out all of this, it was time to clean heR up and get the motor all set in. Heres what she looked like when I pulled her out of storage.
A bunch of elbow grease, some good cleaners, some time, and a bunch of brushes. SHAZAM!!! Looks good as new!
After that was all done, I plugged up the harness and laid heR into heR new home!! She was accepting and didnt give me any grief! I did have to order a new driver side engine post for the engine mount? Seems the distance between the mount pegs is different? Waiting to get my new part confirm that, but the USDM driver side mount wasn't even close to hitting both post holes.
Here she is sitting right at home.
Came out fantastic and Im glad I took my time to get it all done right. I'm just waiting on a few little things to tighten heR up and then she's out on the road for daily duty. Super anxious to get heR going and test everything out. Here's a few more pics to show shes clean inside and out!!
Stay tuned for more updates, upgrades, and I'm sure I will be snapping some pictures of heR once shes out on the road!!
 &
& 
Honda-Tech Member
iTrader: (1)
Joined: Jul 2001
Posts: 5,071
Likes: 1
From: ainrofilac, Anti Stickers
The R looks very clean.
I'd like to know details on how you were able to get all that grime off the motor.
I'd like to know details on how you were able to get all that grime off the motor.

Trending Topics
Honda-Tech Member
Joined: Oct 2012
Posts: 1,858
Likes: 4
From: Orlando, FL
Its paint... Hopefully it was prepped properly, or it wont last very long at all. Speaking from personal experience on that one... But the car does look extremely clean!
Thread Starter
Joined: Jul 2008
Posts: 2,163
Likes: 0
From: Howcome we park on driveways, and drive on parkways?
Thanks fellas!! I cant wait to get heR on the road!!
Prepped it with Orange clean, brillo pads and brushes. Allowed to dry then hit with a few coats of VHT high temp paint.
Not a big deal to me. Looks 100000x better than it did. Im happy with the end result.
Once I pass inspection with USDM ECU and emission, I will be buying a OBD2B to OBD1 conversion harness so I can run the JDM P73.
I already sold the whole swap complete with the Spun bearing. Only intake manifold I have laying around is a Edlebrock Victor X for a GSR head. :/ Sorry!
I think it will hold up for a while, but even if it doesnt, it will look better than it did when it was in storage!! I have seen the VHT paint work very well in an application like this. We will see how it holds up!!
Honda-Tech Member
Joined: Oct 2012
Posts: 1,858
Likes: 4
From: Orlando, FL
I have found that you really need a good bare-metal primer under the VHT to get the best adhesion. I did a trans about a year ago, and it held up ok, but did flake in a few spots. Luckily, the trans was already pretty clean under the paint, so it wasnt that noticeable.

Honda-Tech Member
Joined: Jan 2005
Posts: 9,813
Likes: 0
From: Look hard, VA, United States
you prolly had the si post mount instead of the dc2 one and look to be your green vtec pressure switch plug is plugged into your coolant temp sensor

Thread
Thread Starter
Forum
Replies
Last Post
phatboycrxhf
Welding / Fabrication
21
Sep 26, 2007 10:39 PM
Free Agent
Honda Motorcycles
8
Dec 12, 2005 02:06 PM
pcorad
Acura Integra Type-R
3
Oct 27, 2005 05:20 AM