

90-93 Acura Integra AC Removal


Thread Starter
Honda-Tech Member
Joined: Mar 2012
Posts: 117
Likes: 0
From: Seacoast, NH
This weekend I will be removing the AC unit from my 91 DA Integra Gs, my system was never converted to r134 and is stil r12 however it is bone dry , and rather than getting it serviced and converted I'm choosing to remove it all. This thread is just going to be me posting pictures of what I am removing , any comments about why I am removing it or people criticizing my choice to remove it will just be ignored, ill post pics as soon as I get it done!
Thread Starter
Honda-Tech Member
Joined: Mar 2012
Posts: 117
Likes: 0
From: Seacoast, NH
Alright First things first, Make sure your A/C system is discharged and empty before you go removing ANYTHING, i dont want to be responsible for people discharging the refrigerant into the atmosphere and their faces. Dont drain it in your backyard just bring it to a shop and get it done the right way...
My system was the original r12 and bone dry empty i had it checked by my local garage and got the go ahead to remove...
Some of these pictures have some parts already taken out cause i started while my phone was still inside , ill try to describe as much as i can..
Heres your engine bay, looks something like this? good.

I started by removing the bolts on the two bulky hoses that are connected to the ac pump, that cover up so much space


I had to use about 8" of extensions on my ratchet to fit down there to unbolt those, and on the right side one, i had to use a swivel joint because i still have powersteering, which may give you a couple problems but nothing that cant be done!
i believe this hose was a 22mm wrench size on the left and i used an adjustable on the right just to break it free, then spun it off and disconnected the hose, now you can take the right side out of the engine bay

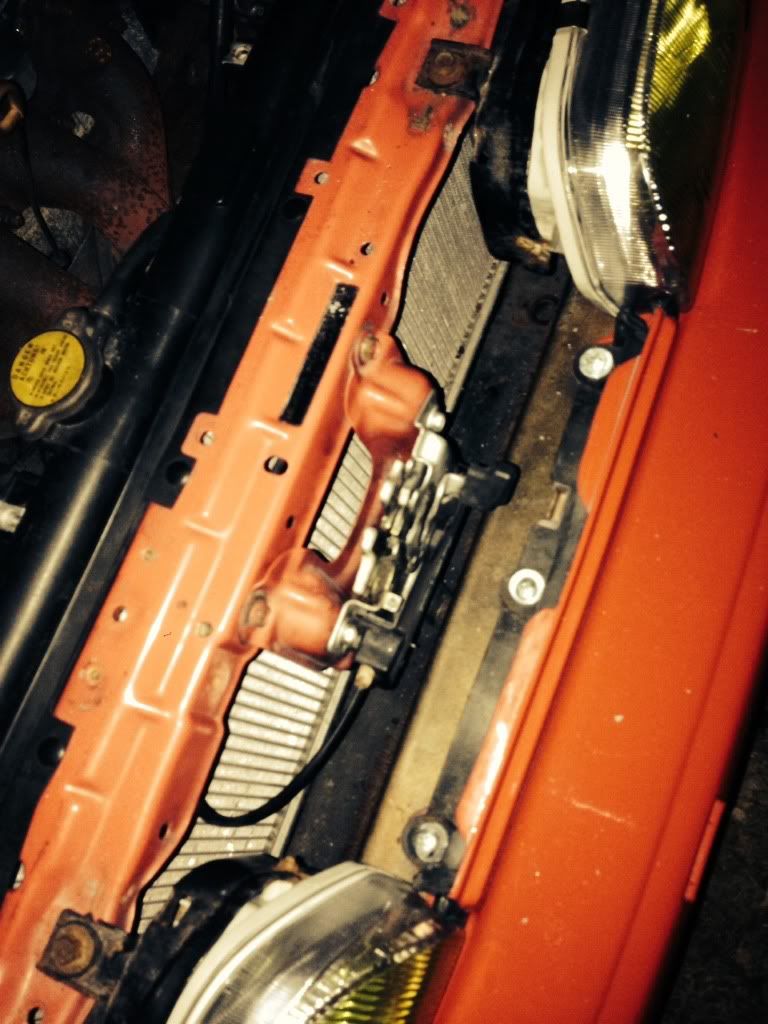
Inbetween your headlight bulb and radiator is this hose fitting for the condensor , this is also the other end of one of the first bolts and hoses you removed.

I honestly dont know what this is, some kind of reserve tank or something but as a heads up, remove the hoses before unbolting the brackets, youll save yourself some of the frustration i encountered

after taking the hoses and brackets off, try to support it while taking the bolts off the brackets so it doesnt fall in your bumper area down below.

And it should look like this when removed, you might encounter some struggle with the hoses, if you still have your P/S, i recommend moving your Coolant Overflow, and your PS reservoir over a bit to help ease and allow wiggle room.


On to the firewall hoses, the end of the 22mm nut we took off earlier and removed..
i think the wrenches i used were somewhere around a 19 and a 18mm, and a 21 and adjustable on the bigger side..


the smaller hose is a COMPLETE BEE ATCH, its skinny, and has alot of bends, also goes to the lower portion of the condensor. which goes all around the front bumper and stuff... i cut it to be honest and it made the removal alot less stressful after trying to be easy with it... i didnt want to drain my coolant and remove my radiator, or remove my bumper..
There are two 10mm bolts by each radiator stay which hold the condenser down, unbolt those , you can slide the radiator back, take out the condenser and you are golden, while you have that stuff out of the way, remove the wiring harness that is held onto the radiator support behind the radiator running from the ac fan, to the other side of the radiator... i will show some pics of the harness and its bulkyness tomorrow when i remove the rest.


My system was the original r12 and bone dry empty i had it checked by my local garage and got the go ahead to remove...
Some of these pictures have some parts already taken out cause i started while my phone was still inside , ill try to describe as much as i can..
Heres your engine bay, looks something like this? good.

I started by removing the bolts on the two bulky hoses that are connected to the ac pump, that cover up so much space


I had to use about 8" of extensions on my ratchet to fit down there to unbolt those, and on the right side one, i had to use a swivel joint because i still have powersteering, which may give you a couple problems but nothing that cant be done!
i believe this hose was a 22mm wrench size on the left and i used an adjustable on the right just to break it free, then spun it off and disconnected the hose, now you can take the right side out of the engine bay

Inbetween your headlight bulb and radiator is this hose fitting for the condensor , this is also the other end of one of the first bolts and hoses you removed.

I honestly dont know what this is, some kind of reserve tank or something but as a heads up, remove the hoses before unbolting the brackets, youll save yourself some of the frustration i encountered

after taking the hoses and brackets off, try to support it while taking the bolts off the brackets so it doesnt fall in your bumper area down below.

And it should look like this when removed, you might encounter some struggle with the hoses, if you still have your P/S, i recommend moving your Coolant Overflow, and your PS reservoir over a bit to help ease and allow wiggle room.


On to the firewall hoses, the end of the 22mm nut we took off earlier and removed..
i think the wrenches i used were somewhere around a 19 and a 18mm, and a 21 and adjustable on the bigger side..


the smaller hose is a COMPLETE BEE ATCH, its skinny, and has alot of bends, also goes to the lower portion of the condensor. which goes all around the front bumper and stuff... i cut it to be honest and it made the removal alot less stressful after trying to be easy with it... i didnt want to drain my coolant and remove my radiator, or remove my bumper..
There are two 10mm bolts by each radiator stay which hold the condenser down, unbolt those , you can slide the radiator back, take out the condenser and you are golden, while you have that stuff out of the way, remove the wiring harness that is held onto the radiator support behind the radiator running from the ac fan, to the other side of the radiator... i will show some pics of the harness and its bulkyness tomorrow when i remove the rest.


Old Fart
Joined: May 2004
Posts: 26,173
Likes: 18
From: kelowna, bc, canada
The "tank" is the filter/dryer.
In most cases, wrench sizes for knuckel fittings will be two sizes apart, EG; on the 22mm the other will be either a 20mm or a 24mm, again in most cases on A/C systems on any car.
Are you leaving the evaporatoror have you already picked up the duct that takes the place of the evaporator housing? 94
In most cases, wrench sizes for knuckel fittings will be two sizes apart, EG; on the 22mm the other will be either a 20mm or a 24mm, again in most cases on A/C systems on any car.
Are you leaving the evaporatoror have you already picked up the duct that takes the place of the evaporator housing? 94
Thread Starter
Honda-Tech Member
Joined: Mar 2012
Posts: 117
Likes: 0
From: Seacoast, NH
i removed the evaporator, and blocked off the firewall with the OEM plug, i was having problems with my heat , and after taking some of the clips off the evaporator casing/box, i found probably about half a grocery bag full of leaves and debris, after removing all the dirt and leaves etc, i plugged my blower motor back in, and oh my gosh it blew so much better, i found out my evaporators lower box part was cracked so im waiting for a new one to come in before i put the interior back together.
Old Fart
Joined: May 2004
Posts: 26,173
Likes: 18
From: kelowna, bc, canada
Do not reinstall the evap. box, instead get the piece of duct that goes there instead.
#7...
http://www.acuraautomotiveparts.org/...ystemcomp=List All&vinnoT=&trim=&trans=&view=normal
It is not as "bulky" as the evap. case, all the below is related to A/C, and can be removed..
http://www.acuraautomotiveparts.org/...ystemcomp=List All&vinnoT=&trim=&trans=&view=normal 94
#7...
http://www.acuraautomotiveparts.org/...ystemcomp=List All&vinnoT=&trim=&trans=&view=normal
It is not as "bulky" as the evap. case, all the below is related to A/C, and can be removed..
http://www.acuraautomotiveparts.org/...ystemcomp=List All&vinnoT=&trim=&trans=&view=normal 94
Thread Starter
Honda-Tech Member
Joined: Mar 2012
Posts: 117
Likes: 0
From: Seacoast, NH
The non ac duct for the 90-93 is discontinued maybe I can find one at a junkyard and just use some of my extra change to go pick one up thanks for the tip
Thread Starter
Honda-Tech Member
Joined: Mar 2012
Posts: 117
Likes: 0
From: Seacoast, NH
getting back a little late but i ended up using the top half of the evaporator box , and then buying a new bottom half from acura since i wasnt able to find and da/db/dc at the junkyard with salvagable parts, heat blows fine no leaks just evaporator box w/o evaporator

Thread
Thread Starter
Forum
Replies
Last Post
Blacknight117
Honda Civic / Del Sol (1992 - 2000)
7
Aug 15, 2011 07:48 PM
POS89CivicLX
Honda CRX / EF Civic (1988 - 1991)
5
Jun 12, 2002 09:40 AM