

UK based 96 JDM DC2

Thread Starter
Junior Member
Joined: Oct 2005
Posts: 74
Likes: 0
From: London, UK, United Kingdom
......
Okay ladies, firstly apologies for lack of pics at this moment in time, they will come soon.
Thought i would throw a thread up here to show you the progress of the latest toy.
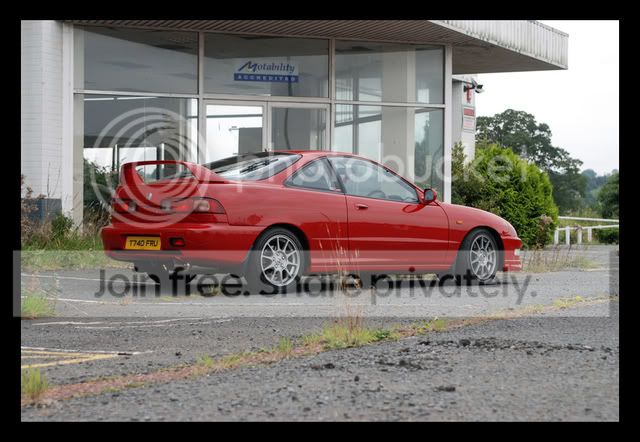
After my last integra, i swore i wouldnt build another one, i always end up thousands of pounds in debt and use way too much fuel for my bank account to cope with. Anyway, for those who havent seen the last one, here she is:

So i shall start with The Overview:
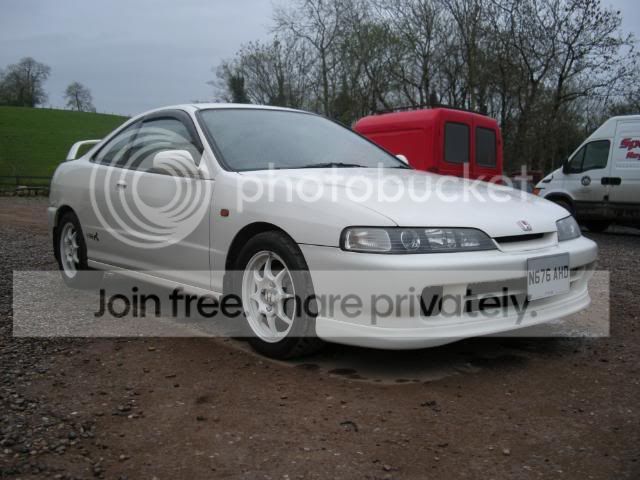
96 JDM Integra
Absolutely bog standard!!!
The plan:
Entire nut bolt and washer replacement with new items
Entire bush replacement throughout
98 Spec Shock Absorbers
Eibach Pro-Kit Springs (-30mm)
All suspension components removed, chemical blasted, galvanised/plated, then painted or powder coated
282mm front brake conversion
Calipers to be stripped, chemically blasted, refinished, then rebuilt
262mm rear brake conversion
Calipers to be stripped, chemically blasted, refinished, then rebuilt
Goodridge Flexible Brake Hoses front and rear
Ferodo DS2500 pads in front, Honda standard replacement pads in rear.
Anti-roll bars removed, replaced with 98 Spec items, treated, and refinished, rebushed, then refitted.
Wheel arches and inner wings to be stone chipped, then repainted in championship white
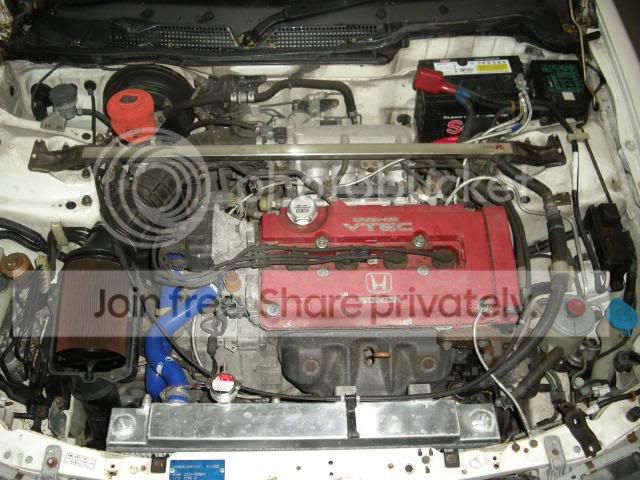
Engine Bay stripped bare, steam cleaned and repainted if necessary.
Engine to be chemically blasted, polished, and laquered
98 Spec manifold, all ancillaries blasted, treated and painted as required.
Cambelt, adjust tappets, drain and flush oil and coolant systems
New thermostat, dip stick, oil cap and rad cap
ALL engine bay brackets removed, blasted treated and refitted
all brake lines removed, cleaned, treated and refitted as required
New reservoirs for brake, clutch and washer
Light tucking of wires in engine bay
Remove resonator box
Fit Koyo Alloy radiator
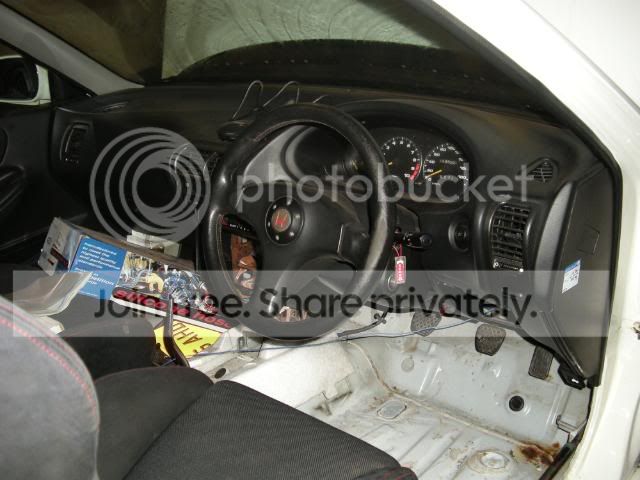
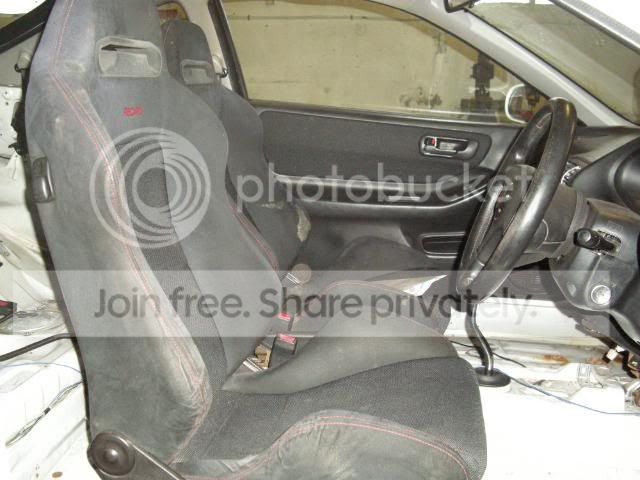
Interior stripped, all seats wet vacuum'd (new bolsters not required), re-dye red stitching and recaro logo
Carpets to be dyed black throughout
New mats fitted
Seat rails blasted, treated, repainted and regreased
Interior metalwork cleaned, buffed and repainted if required
5 wheels refurbished in CW with new yoko parada spec 2 tyres all round (inc spare)
Lights removed, lenses polished front and rear.
HID kit to be fitted
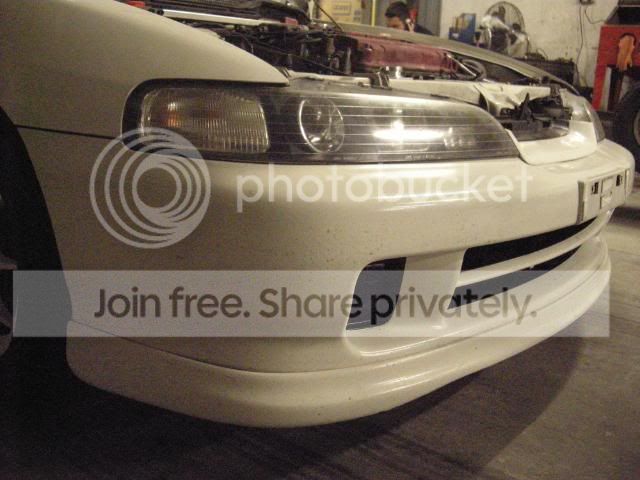
98 Spec Rear Bumper
Wind deflectors removed and plastic polished then refitted
All glass to be cut back and repolished
All bodywork fully detailed to show how flawless and original is actually is.
So as you can see this is quite a lot of work ahead of me, i get the car on thursday (i hope) and i wont even get to drive it before i strip it, but hey ho, thats how it goes.
Anyway, the end result should be a genuinely immaculate Integra - again going too far purely to say my car is infact a mint example and not another run of the mill car with a randomly high price tag
Keep an eye out, each night there will be updates once i get the car back to the workshop and stripped down to its bare essentials.
Thanks for reading
Pete
Okay ladies, firstly apologies for lack of pics at this moment in time, they will come soon.
Thought i would throw a thread up here to show you the progress of the latest toy.
After my last integra, i swore i wouldnt build another one, i always end up thousands of pounds in debt and use way too much fuel for my bank account to cope with. Anyway, for those who havent seen the last one, here she is:
So i shall start with The Overview:
96 JDM Integra
Absolutely bog standard!!!
The plan:
Entire nut bolt and washer replacement with new items
Entire bush replacement throughout
98 Spec Shock Absorbers
Eibach Pro-Kit Springs (-30mm)
All suspension components removed, chemical blasted, galvanised/plated, then painted or powder coated
282mm front brake conversion
Calipers to be stripped, chemically blasted, refinished, then rebuilt
262mm rear brake conversion
Calipers to be stripped, chemically blasted, refinished, then rebuilt
Goodridge Flexible Brake Hoses front and rear
Ferodo DS2500 pads in front, Honda standard replacement pads in rear.
Anti-roll bars removed, replaced with 98 Spec items, treated, and refinished, rebushed, then refitted.
Wheel arches and inner wings to be stone chipped, then repainted in championship white
Engine Bay stripped bare, steam cleaned and repainted if necessary.
Engine to be chemically blasted, polished, and laquered
98 Spec manifold, all ancillaries blasted, treated and painted as required.
Cambelt, adjust tappets, drain and flush oil and coolant systems
New thermostat, dip stick, oil cap and rad cap
ALL engine bay brackets removed, blasted treated and refitted
all brake lines removed, cleaned, treated and refitted as required
New reservoirs for brake, clutch and washer
Light tucking of wires in engine bay
Remove resonator box
Fit Koyo Alloy radiator
Interior stripped, all seats wet vacuum'd (new bolsters not required), re-dye red stitching and recaro logo
Carpets to be dyed black throughout
New mats fitted
Seat rails blasted, treated, repainted and regreased
Interior metalwork cleaned, buffed and repainted if required
5 wheels refurbished in CW with new yoko parada spec 2 tyres all round (inc spare)
Lights removed, lenses polished front and rear.
HID kit to be fitted
98 Spec Rear Bumper
Wind deflectors removed and plastic polished then refitted
All glass to be cut back and repolished
All bodywork fully detailed to show how flawless and original is actually is.
So as you can see this is quite a lot of work ahead of me, i get the car on thursday (i hope) and i wont even get to drive it before i strip it, but hey ho, thats how it goes.
Anyway, the end result should be a genuinely immaculate Integra - again going too far purely to say my car is infact a mint example and not another run of the mill car with a randomly high price tag
Keep an eye out, each night there will be updates once i get the car back to the workshop and stripped down to its bare essentials.
Thanks for reading
Pete
Thread Starter
Junior Member
Joined: Oct 2005
Posts: 74
Likes: 0
From: London, UK, United Kingdom
right
well thursday night came round quicker than we thought, other projects had us flat out all week and then last minute we measured the trailer width to find it was 12cm too skinny for the teg to fit
So, after much blagging and running round like blue arsed flies we managed to find ourselves a trailer we could use. Thanks to Stephen Potts for the lend of the trailer :D
Despite the many hours we used to drive to get things, people and cars when over in england, it is amazing just how unmotivating it is when you know you have to drive the the width of NI to get your car in the pissing rain.
So, we arrived at our destination and found this...
After a banter filled journey, with lots of cakes, **** food and fizzy drinks we were home with the wee car.
Scooby towing teg, was a nice sight, although i wasnt quick enough to call shotgun for the homeward journey.
Thanks to Will for supply the tow vehicle, time and workshop

and thanks to Dooley for nicking my ****ing seat on the way home

Here is how she sat upon arriving at her new temporary home:
Nice and clean ??? Dont think so, covered in tree sap, and generally looking sorry for itself.
However, it is spot on, no mismatched panel colours, absolutely no signs of accident damage, NO RUST :D and very very original.
anyway, i will just add pics to show the beginning of the strip down now as no doubt thats all you lot want to see anyway.....
Only managed 2 hours at her tonight, as we are building a concourse Mg Midget which at the minute gets priority.
well thursday night came round quicker than we thought, other projects had us flat out all week and then last minute we measured the trailer width to find it was 12cm too skinny for the teg to fit
So, after much blagging and running round like blue arsed flies we managed to find ourselves a trailer we could use. Thanks to Stephen Potts for the lend of the trailer :D
Despite the many hours we used to drive to get things, people and cars when over in england, it is amazing just how unmotivating it is when you know you have to drive the the width of NI to get your car in the pissing rain.
So, we arrived at our destination and found this...
After a banter filled journey, with lots of cakes, **** food and fizzy drinks we were home with the wee car.
Scooby towing teg, was a nice sight, although i wasnt quick enough to call shotgun for the homeward journey.
Thanks to Will for supply the tow vehicle, time and workshop
and thanks to Dooley for nicking my ****ing seat on the way home
Here is how she sat upon arriving at her new temporary home:
Nice and clean ??? Dont think so, covered in tree sap, and generally looking sorry for itself.
However, it is spot on, no mismatched panel colours, absolutely no signs of accident damage, NO RUST :D and very very original.
anyway, i will just add pics to show the beginning of the strip down now as no doubt thats all you lot want to see anyway.....
Only managed 2 hours at her tonight, as we are building a concourse Mg Midget which at the minute gets priority.
Well, if you're truly worried about time and money spent on these cars, why not just avoid it all and not preform those unnecessary tasks? Pulling off all those componets, bushings, suspensions etc. is so not worth it. Unless the car has a hard 100k+ miles on it, its not really needed. I never quite understood, unless its a full blown show car or for bragging rights, why peeps preform such tasks. Just do the simple stuff, clean her up and drive the **** out of her!
Junior Member
Joined: Oct 2008
Posts: 31
Likes: 0
From: Toronto, Canada
My Father is from England and when he restores a car he does it the exact same way.. Pulls it down to nothing then rebuilds it completely over.... Great Project Man Keep It Up...
Thread Starter
Junior Member
Joined: Oct 2005
Posts: 74
Likes: 0
From: London, UK, United Kingdom
Well, if you're truly worried about time and money spent on these cars, why not just avoid it all and not preform those unnecessary tasks? Pulling off all those componets, bushings, suspensions etc. is so not worth it. Unless the car has a hard 100k+ miles on it, its not really needed. I never quite understood, unless its a full blown show car or for bragging rights, why peeps preform such tasks. Just do the simple stuff, clean her up and drive the **** out of her!
The idea behind it is that we as the builders and drivers, our customers, etc etc all have 100% confidence in the car they are in. If every aspect of the car has had the once over then i can be confident i know none of it will let me down.
Dont you worry about having the **** driven out of it, if i wanted to build a trailer queen id have built somthing that doesnt handle, and is much much prettier than the integra.
Hopefully you can see that this level of detail means a high level of confidence no matter what the car is to be used for.
Your method however, is exactly what happens to my daily passat B4 wagon, annual service, and fix what breaks, oh and put fuel in it, thats about it.
Trending Topics


dude, my life is spent pretty much building competition cars, we have a reputation of building some of the best presented cars on the scene.
The idea behind it is that we as the builders and drivers, our customers, etc etc all have 100% confidence in the car they are in. If every aspect of the car has had the once over then i can be confident i know none of it will let me down.
Dont you worry about having the **** driven out of it, if i wanted to build a trailer queen id have built somthing that doesnt handle, and is much much prettier than the integra.
Hopefully you can see that this level of detail means a high level of confidence no matter what the car is to be used for.
Your method however, is exactly what happens to my daily passat B4 wagon, annual service, and fix what breaks, oh and put fuel in it, thats about it.
Regarding a car thats safe and well built, Im fairly confident in saying that Honda did it just fine from the factory, especially on the Type R's. In fact, I'd be less confident in a car rebuilt from the ground up, suspension wise unless every part/nut/bolt was replaced with oem Honda or better and torqued to exact Honda specs with a new high grade torque wrench. I'd give everything on there thats stock, a once over and call it good, personally.
Lastly, do you really choose the integra because of its "superior" handling ability over other cars?! Personally, I choose the Integra first, for the overall exterior/interior design and status, before its handling capability. There are plenty of cars out there that can/do handle far better. Hell, if youre tearing the thing apart and replacing all the suspension anyways, a standard EG/EK civic, Miata, etc will do just as well if not better and be 1/4th of the price lol.
Sorry if it appears that I am "hating", but I believe its just constructive criticism, an attempt to see what you've really done and practical reasoning to be met. Hell, its not my money/time
Honda-Tech Member
Joined: Dec 2003
Posts: 200
Likes: 0

Honda-Tech Member
Joined: Jan 2002
Posts: 3,872
Likes: 0
From: 54� 57� 05�N 7� 44� 13"W Europe.
He speaks the truth but maybe isnt admitting everything, he builds rally cars (engines, body, suspension etc etc) so his cars may be the best presented on the scene, but the scene is tarmac championship rallying and not 'JDM' or Import scene

Thread Starter
Junior Member
Joined: Oct 2005
Posts: 74
Likes: 0
From: London, UK, United Kingdom
i have no reason, nor want to "prove" myself to anyone on forums, nevermind someone who will probably never have any effect of my life.
however, Mr.OB*GYN_Rhett, i do take on board what you are saying, and you do have some valid points. What you have to remember was that back in the 40's, 50's 60's etc etc the cars at the time were at the pinnacle of design, there were people then saying the same things about those cars that you are now about the integra. The integra chassis design is now 15 or 16 years old i believe. There can always be improvements!!!!
Thread Starter
Junior Member
Joined: Oct 2005
Posts: 74
Likes: 0
From: London, UK, United Kingdom
Ah sweet, how;s it hanging, about to do the update over on ITR now.
As for "haters" the likelyhood of me caring is slim to none, the only thing i may lose sleep over is working on the car, not someone on a forum with a mouth that engages before brain.
As for "haters" the likelyhood of me caring is slim to none, the only thing i may lose sleep over is working on the car, not someone on a forum with a mouth that engages before brain.
Thread Starter
Junior Member
Joined: Oct 2005
Posts: 74
Likes: 0
From: London, UK, United Kingdom
okay,
Day 2 - although once again only managed a couple of hours as other projects take priority but here we go.
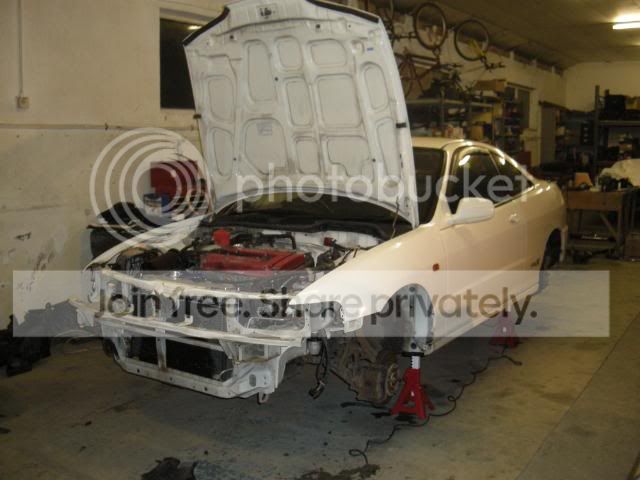
Got the front right suspension stripped out of her, along with most of the engine bay bracketry, what remains will be lifted out when the engine is out, hopefully tomorrow.
typically a lot of the bolts were stiff as hell, and my buzz gun broke, so manually doing everything felt like bit of a chore
Still have to get the rear part of the lower arm out and she is done for this side. The further break down the hub and start prepping it all once all 4 corners are off.


Took a few panels off too just to prevent any damage whilst working on the arches, etc

New radiator, although not sure if i want to use it or not

Both the teg and the scoob getting some loving today

The engine bay shot just as we were leaving, all in prep for wire tuck too, although really not sure if i should bin the ABS or not yet.

A few of the rear arches to show just how clean they are for a 13 year old motor


Only marks there are dirt, no bubbles, no broken paint, and no rust around the bumper mounting hole either :D
4 tyres for sale

More to follow tomorrow night
Day 2 - although once again only managed a couple of hours as other projects take priority but here we go.
Got the front right suspension stripped out of her, along with most of the engine bay bracketry, what remains will be lifted out when the engine is out, hopefully tomorrow.
typically a lot of the bolts were stiff as hell, and my buzz gun broke, so manually doing everything felt like bit of a chore
Still have to get the rear part of the lower arm out and she is done for this side. The further break down the hub and start prepping it all once all 4 corners are off.
Took a few panels off too just to prevent any damage whilst working on the arches, etc
New radiator, although not sure if i want to use it or not
Both the teg and the scoob getting some loving today
The engine bay shot just as we were leaving, all in prep for wire tuck too, although really not sure if i should bin the ABS or not yet.
A few of the rear arches to show just how clean they are for a 13 year old motor
Only marks there are dirt, no bubbles, no broken paint, and no rust around the bumper mounting hole either :D
4 tyres for sale
More to follow tomorrow night
Thread Starter
Junior Member
Joined: Oct 2005
Posts: 74
Likes: 0
From: London, UK, United Kingdom
Well big-bit-itis kicked in today,
finally have an update where it looks like a lot of work has been done.
Unfortunately i forgot the camera, so i will have to update with pics tomorrow.
Started this morning, got the remaining bits of loom out, power steering, aircon and ABS, then sat back, had a cigarette and chilled out for 5 mins.
Engine was next on the list, and with the aid of 2 towels managed to remove the engine without a single scratch to the paintwork in the engine bay :D
Once removed, i dumped it off to one side, got me a tub of petrol and an autoglym wheel brush and started into cleaning the engine bay.
This took a whole lot longer than i thought it would, seems 13 years of road grime is quite happy where it is
So here is the end result of the engine bay
Before:

After:
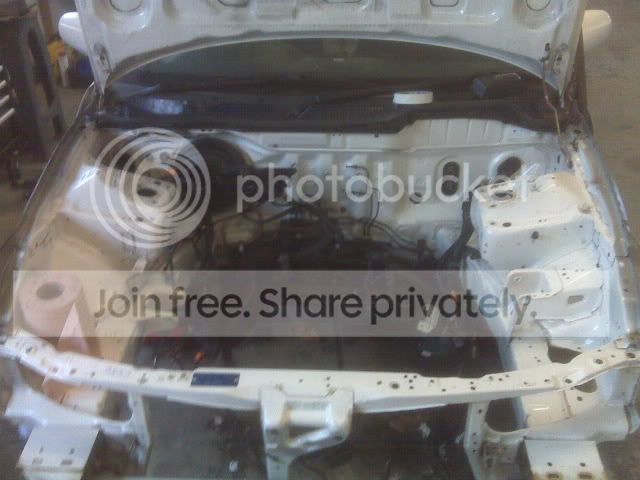
Much to my delight, i found that all the paint (as and where Honda could actually be bothered to throw some ) was in great shape and prime for some cleaning action.
Really happy how it turned out, i then started on to the arches with the petrol too. Lets just say they were clean enough to warrant the effort and pain in my arms from that damn brush.
Will get some more photos for you tomorrow
Thanks for reading
Pete
finally have an update where it looks like a lot of work has been done.
Unfortunately i forgot the camera, so i will have to update with pics tomorrow.
Started this morning, got the remaining bits of loom out, power steering, aircon and ABS, then sat back, had a cigarette and chilled out for 5 mins.
Engine was next on the list, and with the aid of 2 towels managed to remove the engine without a single scratch to the paintwork in the engine bay :D
Once removed, i dumped it off to one side, got me a tub of petrol and an autoglym wheel brush and started into cleaning the engine bay.
This took a whole lot longer than i thought it would, seems 13 years of road grime is quite happy where it is
So here is the end result of the engine bay
Before:
After:
Much to my delight, i found that all the paint (as and where Honda could actually be bothered to throw some
) was in great shape and prime for some cleaning action.Really happy how it turned out, i then started on to the arches with the petrol too. Lets just say they were clean enough to warrant the effort and pain in my arms from that damn brush.
Will get some more photos for you tomorrow
Thanks for reading
Pete
Thread Starter
Junior Member
Joined: Oct 2005
Posts: 74
Likes: 0
From: London, UK, United Kingdom
Just a quickie
the engine bay cleaned

comparison of the arches
before

after

engine half stripped of all ancillaries and brackets

some bits for the tuck

so much for the CRX boys loving their astra estates

Passats are the way forward
some of the old bolts

and of course how the car is sitting as an overview

if i get a chance over the weekend i will add more writing and descriptives to this, if you can be arsed to read it
the engine bay cleaned
comparison of the arches
before
after
engine half stripped of all ancillaries and brackets
some bits for the tuck
so much for the CRX boys loving their astra estates
Passats are the way forward
some of the old bolts
and of course how the car is sitting as an overview
if i get a chance over the weekend i will add more writing and descriptives to this, if you can be arsed to read it

Thread
Thread Starter
Forum
Replies
Last Post