

PLZ HELP..................camshaft rubber plug

Thread Starter
Honda-Tech Member
Joined: Sep 2008
Posts: 644
Likes: 0
From: CHICAGO USA
hey i got a 95 gsr and I wanted to change ou the camshaft plug that is on the right side near the vtec cylinoid. I believe it on the exhaust camshaft side.
I just want to know if I need to take off the camshaft long thing that holds the camshaft down. If I do(which I think I do) then is there a certain torque spech for those bolts?
Also do I need to do anything with the timing belt or will the camshaft move or anything.
P.S. Is it hard to change out the dizzy O ring?
THANKS GUYS!!!
Honda-Tech Member
Joined: Aug 2002
Posts: 3,048
Likes: 0
From: Westslope, CO, United States
Have oil leaking down the passenger side front of the engine block? It's more than likely your exhaust cam seal. This is known to be a culprit for a lot of leaks and a lot of aftermarket companies make replacements that utilize o-rings for a more effective seal. This is pretty simple and easy so save yourself a few bucks and do it yourself.
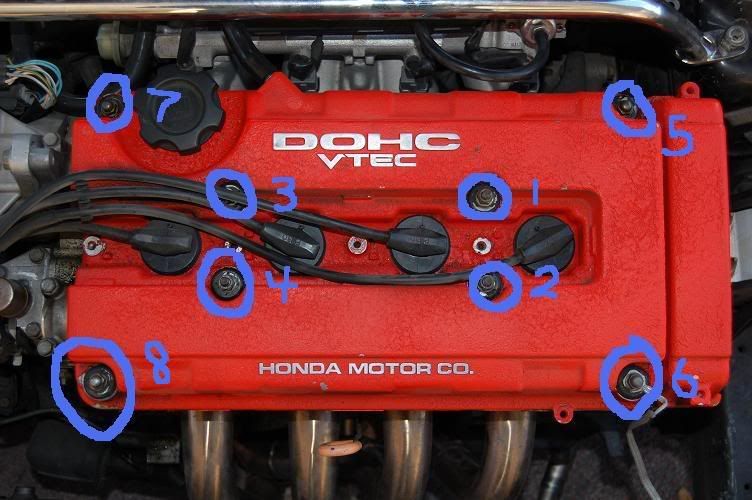
First pop your hood and this is what you should see. See how the front of my block is all nasty and covered in oil. We are going to fix that!

Next remove all spark plug wires and the nuts circled in blue. They are a 10mm head. After the nuts are removed there will still be a washer stuck to the valve cover. Use a screwdriver or needle nose pliers to pull them off. You don't need to keep track of the order of the wires. The length is pretty self explanatory on install. Torque specs for the valve cover nuts are 7.2lb/ft in numeric sequence
Next remove the breather line from the valve cover. You might need needle nose pliers to remove a clamp that holds this line onto some valve covers

Now the valve cover is ready to come off, just wiggle it a little bit and it should pop right off. Then you should see this. Remove the bolts circled in blue to remove the oil rail
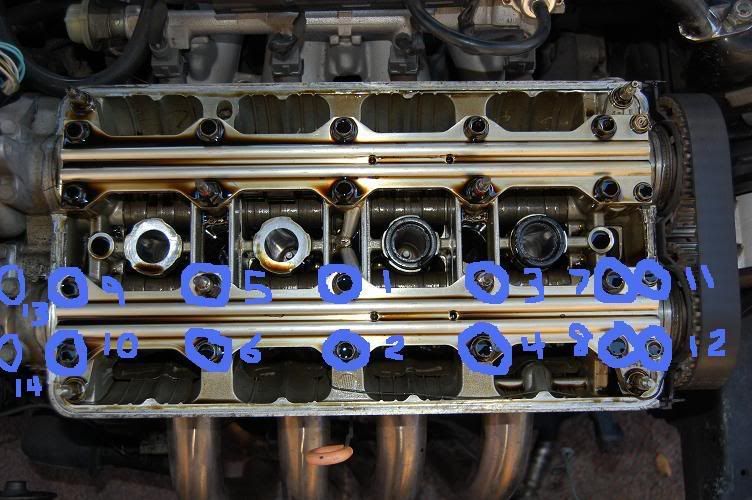
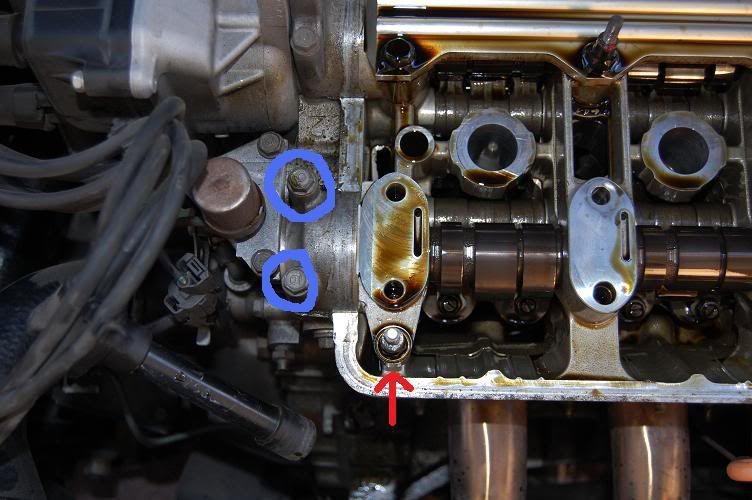
After the oil rail is off, simply remove the very last cam cap. If you are looking at the engine is on the exhaust side on your left hand side. Remove the two bolts that hold it. You don't need to remove the stud. After the bolts are out, pry with a flat screwdriver against the head VERY LIGHTLY where the red arrow is to separate the cap from dowels in the head. It doesn't take much so be gentle. Torque specs for bolts 1-10 is 20lb/ft and 11-14 are 7.2 lb/ft
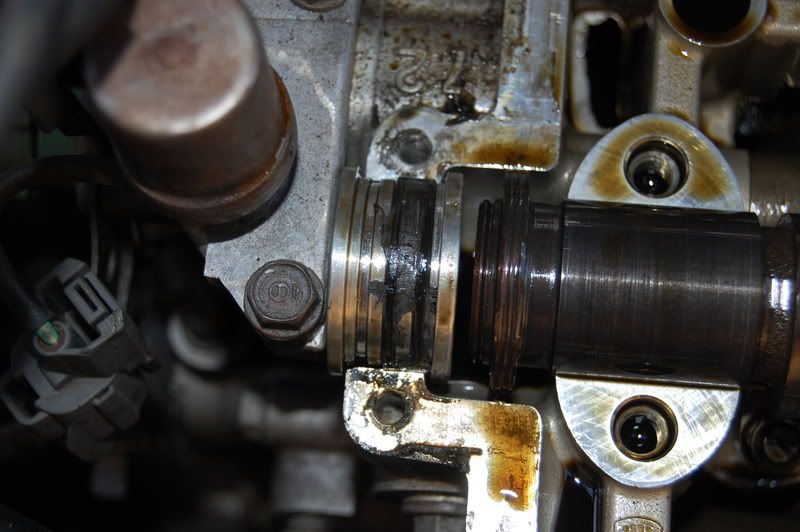
Underneath it is the cam seal. My car happens to have a golden eagle aftermarket seal and as you can see the o-rings have seen better days. I took it to a local carquest autoparts store and found replacements. I'd suggest an aftermarket one if you are going to tear into it this far. They are much better than the OEM ones in this case
Install is just the opposite of removal. Install the cam seal, put the cam cap and the two bolts back in. Torque those two bolts. Install the oil rail and bolts. Torque those bolts. Clean off the mating surface of the cylinder head and Honda suggests to use a new valve cover gasket but as long as the seal is soft I usually reuse them. Never had any issues. Honda also suggests to apply HondaBond to the four corners of the head shown in this pic to help against leaks.

Install the washers and nuts for the valve cover. The longer studded nuts go in the middle for your spark plug cover. Install your breather line and you are done. Remember to ALWAYS torque internal bolts. You might get away with hand tightening some bolts but I've seen tons of these bolts snapped so take the extra time and torque them. If you guys want any other tech articles just let me know I'll do my best to do some for you. Thanks
-Kris
Copyright 2008 IpbRacing Productions
First pop your hood and this is what you should see. See how the front of my block is all nasty and covered in oil. We are going to fix that!
Next remove all spark plug wires and the nuts circled in blue. They are a 10mm head. After the nuts are removed there will still be a washer stuck to the valve cover. Use a screwdriver or needle nose pliers to pull them off. You don't need to keep track of the order of the wires. The length is pretty self explanatory on install. Torque specs for the valve cover nuts are 7.2lb/ft in numeric sequence
Next remove the breather line from the valve cover. You might need needle nose pliers to remove a clamp that holds this line onto some valve covers
Now the valve cover is ready to come off, just wiggle it a little bit and it should pop right off. Then you should see this. Remove the bolts circled in blue to remove the oil rail
After the oil rail is off, simply remove the very last cam cap. If you are looking at the engine is on the exhaust side on your left hand side. Remove the two bolts that hold it. You don't need to remove the stud. After the bolts are out, pry with a flat screwdriver against the head VERY LIGHTLY where the red arrow is to separate the cap from dowels in the head. It doesn't take much so be gentle. Torque specs for bolts 1-10 is 20lb/ft and 11-14 are 7.2 lb/ft
Underneath it is the cam seal. My car happens to have a golden eagle aftermarket seal and as you can see the o-rings have seen better days. I took it to a local carquest autoparts store and found replacements. I'd suggest an aftermarket one if you are going to tear into it this far. They are much better than the OEM ones in this case
Install is just the opposite of removal. Install the cam seal, put the cam cap and the two bolts back in. Torque those two bolts. Install the oil rail and bolts. Torque those bolts. Clean off the mating surface of the cylinder head and Honda suggests to use a new valve cover gasket but as long as the seal is soft I usually reuse them. Never had any issues. Honda also suggests to apply HondaBond to the four corners of the head shown in this pic to help against leaks.
Install the washers and nuts for the valve cover. The longer studded nuts go in the middle for your spark plug cover. Install your breather line and you are done. Remember to ALWAYS torque internal bolts. You might get away with hand tightening some bolts but I've seen tons of these bolts snapped so take the extra time and torque them. If you guys want any other tech articles just let me know I'll do my best to do some for you. Thanks
-Kris
Copyright 2008 IpbRacing Productions
Thread Starter
Honda-Tech Member
Joined: Sep 2008
Posts: 644
Likes: 0
From: CHICAGO USA
Honda-Tech Member
Joined: Aug 2002
Posts: 3,048
Likes: 0
From: Westslope, CO, United States
Trending Topics


Joined: Jan 2002
Posts: 30,048
Likes: 59
From: Nowhere and Everywhere
The aftermarket plugs are not necessary. Honda redesigned the plug in the mid-90's from a solid rubber plug to a plastic plug with o-rings. I installed the redesigned plastic plug on my car back around 2002 with about 115K on the car. Now I'm at 276K miles and have had no leaks whatsoever from that location.


hey i got a 95 gsr and I wanted to change ou the camshaft plug that is on the right side near the vtec cylinoid. I believe it on the exhaust camshaft side.
I just want to know if I need to take off the camshaft long thing that holds the camshaft down. If I do(which I think I do) then is there a certain torque spech for those bolts?
Also do I need to do anything with the timing belt or will the camshaft move or anything.
P.S. Is it hard to change out the dizzy O ring?
THANKS GUYS!!!
I just want to know if I need to take off the camshaft long thing that holds the camshaft down. If I do(which I think I do) then is there a certain torque spech for those bolts?
Also do I need to do anything with the timing belt or will the camshaft move or anything.
P.S. Is it hard to change out the dizzy O ring?
THANKS GUYS!!!
Member
Joined: Jun 2004
Posts: 4,558
Likes: 0
From: Somewhere in MD, MD, USA
You guys could just honda bond around the outside of the plug, make it look neat, and not have to go through the hassle of pulling the plug out or taking the valve cover off, etc...however if you go through all that, just run some honda bond around that plug before re-installing. I've never had a leak doing it this way with about 40,000 miles on a very high performance motor now making 600 hp
Honda-Tech Member
Joined: Jan 2008
Posts: 144
Likes: 0
From: CALISUX, CA, USA
You guys could just honda bond around the outside of the plug, make it look neat, and not have to go through the hassle of pulling the plug out or taking the valve cover off, etc...however if you go through all that, just run some honda bond around that plug before re-installing. I've never had a leak doing it this way with about 40,000 miles on a very high performance motor now making 600 hp
I can't believe you would skimp on a $10 part with 600 hp motor. It only takes 30 minutes to change out.
Member
Joined: Jun 2004
Posts: 4,558
Likes: 0
From: Somewhere in MD, MD, USA
You probably didn't do it adequately or allow enough dry time before heating up the motor. I have built and rebuilt motors more times than I can count now. There is no need to replace the cam plug each time you take the head apart. If its in good condition just pull it out, run some honda bond around it, and then torque everything back down properly. I've never once had a leak and even if I got a brand new plug I'd still use honda-bond for a sure seal.
Honda-Tech Member
Joined: Jan 2009
Posts: 163
Likes: 0
From: sunnyside, wa
Have oil leaking down the passenger side front of the engine block? It's more than likely your exhaust cam seal. This is known to be a culprit for a lot of leaks and a lot of aftermarket companies make replacements that utilize o-rings for a more effective seal. This is pretty simple and easy so save yourself a few bucks and do it yourself.
First pop your hood and this is what you should see. See how the front of my block is all nasty and covered in oil. We are going to fix that!

Next remove all spark plug wires and the nuts circled in blue. They are a 10mm head. After the nuts are removed there will still be a washer stuck to the valve cover. Use a screwdriver or needle nose pliers to pull them off. You don't need to keep track of the order of the wires. The length is pretty self explanatory on install. Torque specs for the valve cover nuts are 7.2lb/ft in numeric sequence

Next remove the breather line from the valve cover. You might need needle nose pliers to remove a clamp that holds this line onto some valve covers

Now the valve cover is ready to come off, just wiggle it a little bit and it should pop right off. Then you should see this. Remove the bolts circled in blue to remove the oil rail

After the oil rail is off, simply remove the very last cam cap. If you are looking at the engine is on the exhaust side on your left hand side. Remove the two bolts that hold it. You don't need to remove the stud. After the bolts are out, pry with a flat screwdriver against the head VERY LIGHTLY where the red arrow is to separate the cap from dowels in the head. It doesn't take much so be gentle. Torque specs for bolts 1-10 is 20lb/ft and 11-14 are 7.2 lb/ft

Underneath it is the cam seal. My car happens to have a golden eagle aftermarket seal and as you can see the o-rings have seen better days. I took it to a local carquest autoparts store and found replacements. I'd suggest an aftermarket one if you are going to tear into it this far. They are much better than the OEM ones in this case

Install is just the opposite of removal. Install the cam seal, put the cam cap and the two bolts back in. Torque those two bolts. Install the oil rail and bolts. Torque those bolts. Clean off the mating surface of the cylinder head and Honda suggests to use a new valve cover gasket but as long as the seal is soft I usually reuse them. Never had any issues. Honda also suggests to apply HondaBond to the four corners of the head shown in this pic to help against leaks.

Install the washers and nuts for the valve cover. The longer studded nuts go in the middle for your spark plug cover. Install your breather line and you are done. Remember to ALWAYS torque internal bolts. You might get away with hand tightening some bolts but I've seen tons of these bolts snapped so take the extra time and torque them. If you guys want any other tech articles just let me know I'll do my best to do some for you. Thanks
-Kris
Copyright 2008 IpbRacing Productions
First pop your hood and this is what you should see. See how the front of my block is all nasty and covered in oil. We are going to fix that!
Next remove all spark plug wires and the nuts circled in blue. They are a 10mm head. After the nuts are removed there will still be a washer stuck to the valve cover. Use a screwdriver or needle nose pliers to pull them off. You don't need to keep track of the order of the wires. The length is pretty self explanatory on install. Torque specs for the valve cover nuts are 7.2lb/ft in numeric sequence
Next remove the breather line from the valve cover. You might need needle nose pliers to remove a clamp that holds this line onto some valve covers
Now the valve cover is ready to come off, just wiggle it a little bit and it should pop right off. Then you should see this. Remove the bolts circled in blue to remove the oil rail
After the oil rail is off, simply remove the very last cam cap. If you are looking at the engine is on the exhaust side on your left hand side. Remove the two bolts that hold it. You don't need to remove the stud. After the bolts are out, pry with a flat screwdriver against the head VERY LIGHTLY where the red arrow is to separate the cap from dowels in the head. It doesn't take much so be gentle. Torque specs for bolts 1-10 is 20lb/ft and 11-14 are 7.2 lb/ft
Underneath it is the cam seal. My car happens to have a golden eagle aftermarket seal and as you can see the o-rings have seen better days. I took it to a local carquest autoparts store and found replacements. I'd suggest an aftermarket one if you are going to tear into it this far. They are much better than the OEM ones in this case
Install is just the opposite of removal. Install the cam seal, put the cam cap and the two bolts back in. Torque those two bolts. Install the oil rail and bolts. Torque those bolts. Clean off the mating surface of the cylinder head and Honda suggests to use a new valve cover gasket but as long as the seal is soft I usually reuse them. Never had any issues. Honda also suggests to apply HondaBond to the four corners of the head shown in this pic to help against leaks.
Install the washers and nuts for the valve cover. The longer studded nuts go in the middle for your spark plug cover. Install your breather line and you are done. Remember to ALWAYS torque internal bolts. You might get away with hand tightening some bolts but I've seen tons of these bolts snapped so take the extra time and torque them. If you guys want any other tech articles just let me know I'll do my best to do some for you. Thanks
-Kris
Copyright 2008 IpbRacing Productions
not to go out of the conversation but wath type of cam is that i noticed the grooves on it is it a type r cam what year of type r
Honda-Tech Member
Joined: Feb 2006
Posts: 700
Likes: 0
From: 717
just wondering. i have a golden eagle plug sitting here in the house waiting to be put in.

Thread
Thread Starter
Forum
Replies
Last Post
ADerks12
Honda Prelude
11
Jul 29, 2008 06:56 AM
pancake
Honda Civic / Del Sol (1992 - 2000)
4
Feb 10, 2005 01:50 PM