When you click on links to various merchants on this site and make a purchase, this can result in this site earning a commission. Affiliate programs and affiliations include, but are not limited to, the eBay Partner Network.
Definitely take the belt off the cam sprockets. Loosen the tensioner first.
I will be a timing belt changing fool by the time I am done with this! The guys at the O'Reilly will be like "you want that crank pulley socket again? Did you get another Honda?" and I'll be all like "No..."
Do you put a little extra tension on the tensioner when you are setting t-belt?
I will be a timing belt changing fool by the time I am done with this! The guys at the O'Reilly will be like "you want that crank pulley socket again? Did you get another Honda?" and I'll be all like "No..."
Same...
Originally Posted by 94 Civic Si
Do you put a little extra tension on the tensioner when you are setting t-belt?
Yeah, my experience is: if you're not prying on the tensioner with a screw driver, it's not taking the slack out. That's with all new everything. Follow the instructions in the FSM and when it gets to the "retighten the tensioner" step (after two to three full rotations to seat the belt and then rotating the cams three teeth past TDC), lightly pry the tensioner back and hold it there while you tighten. At that point, the slack should haven been between the water pump and intake cam pulley. Prying on the tensioner should rotate the water pump clockwise ever so slightly and take the slack out. Afterwards, the belt shouldn't pop up between the two cam pulleys. Don't muscle the tensioner back too much.
Got my LMAs out. I'll rebuild everything tomorrow or over the next few days.
I have NOT pulled the head. I'm hoping my oil leak was my VTEC solenoid gasket. There was a very light sheen around the back side of it when I was taking the head down. Everywhere else was bone dry.
Honestly, I don't recommend this repair. It may have been useful years ago on a lower mileage engine but, nowadays it's probably better to just replace them with the newer style beehive spring LMAs. For mine, the insides of the cylinders were obviously worn on one side more than the other so I'll probably continue to experience some binding and need to replace them. However, I did notice some improvement in how smoothly they travel.
The first one took a little while to disassemble but the last one took 15 seconds. Super easy once you know what you're doing.
Disassembled Piston Style GSR LMA (Lost Motion Assembly).
After refurbishing the LMAs, I also cleaned and inspected the pistons in my rocker arm assembles. Everything looked good so I got everything back together. Getting the cam caps and oil rails in within 5 minutes is fun.
I never removed the crank pulley so I over bent a hook into an old rod from a spare hatch latch mechanism to make it look like this:
Hooked Rod used to pull on timing belt tensioner.
Then, I went through the normal FSM timing belt procedure. Except, at the step where it tells you to tighten the tensioner, I hooked the end of the rod around the tensioner and pulled the pulley towards the exhaust side of the engine until the slack was out of the intake side of the belt. This is the step where you've already rotated three teeth past TDC on the cam pulleys. The slack should be between the intake cam pulley and the water pump.
Using a hooked rod to take the slack out of the timing belt without removing the crank pulley.
All back together. All back together.
I haven't fired the engine, yet. Gonna let it sit for a little while. Besides, it's late and I don't want to be an ******* neighbor.
Other things that happened:
Dropped a valve cover nut into a spark plug tube. Took forever to fish it out with a coat hanger.
Dropped one of the rocker arm seal bolts into the lower timing belt cover and couldn't fish it out without going to the store to get a grabber tool.
Realized I was leaning on my open tube of engine assembly lube too late. Fortunately the mess was contained by the towel I had it laying on.
Finally burst the bottom out of my tube of Hondabond.
Got all the LMAs apart and used the following video to clean them up. Video
Honestly, I don't recommend this repair. It may have been useful years ago on a lower mileage engine but, nowadays it's probably better to just replace them with the newer style beehive spring LMAs. For mine, the insides of the cylinders were obviously worn on one side more than the other so I'll probably continue to experience some binding and need to replace them. However, I did notice some improvement in how smoothly they travel.
Your observation seems to indicate the casing doesn't rotate, in theory. If it's possible to index the casing on removal, in theory you could install them 180 degrees out of index and be running on the less worn side after the clean up. Much like how some CV joints are rebuilt/refurbished.
Today's my 5 year anniversary of my engine pull. I was pushing hard to finish this phase of the build by today but, I wasn't able to make it happen. Oh well. Soon.
Dropped a valve cover nut into a spark plug tube. Took forever to fish it out with a coat hanger.
Dropped one of the rocker arm seal bolts into the lower timing belt cover and couldn't fish it out without going to the store to get a grabber tool.
Realized I was leaning on my open tube of engine assembly lube too late. Fortunately the mess was contained by the towel I had it laying on.
I thought I was the only one who worked on cars like that!
Today's my 5 year anniversary of my engine pull. I was pushing hard to finish this phase of the build by today but, I wasn't able to make it happen. Oh well. Soon.
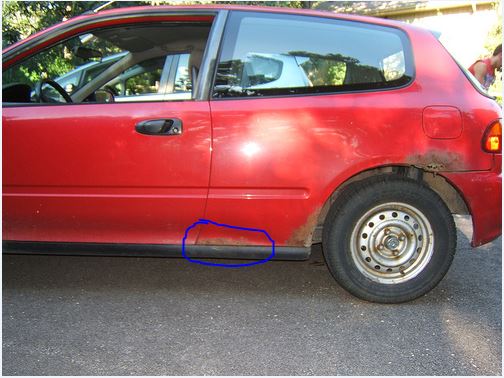
I am sorry for asking so late in your progress about this but I didn't notice this in the rust repair pictures until recently.
On your drivers side panel there is the same rust showing down by the rockers very close to the door. Same exact place and side as mine, yet the passenger side seems free of this area of rust.
And then looking at the other pictures, it doesn't look as if you cut out that portion or that the replacement panel even went that far.
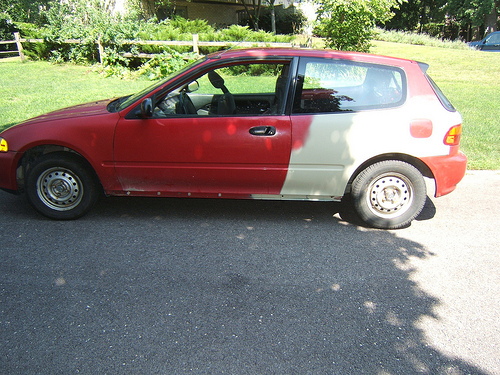
And then the finished picture shows the body filler etc on the completed product.
I was just wondering (being mine looks almost identical) if that area didn't need new metal or whatnot. The picture documents don't really show or say much about the forward rust and how it's dealt with.
Any insight is greatly welcomed as I think this area might be more common than most think and the replacement panels don't seem to be big enough to reach that far forward.
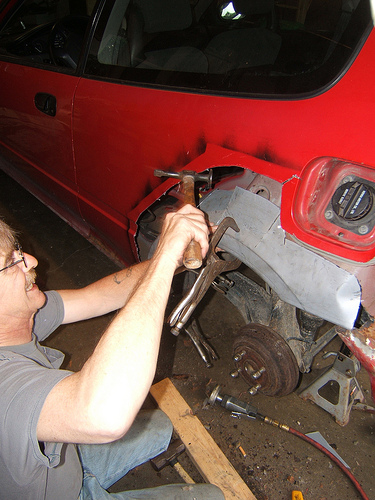
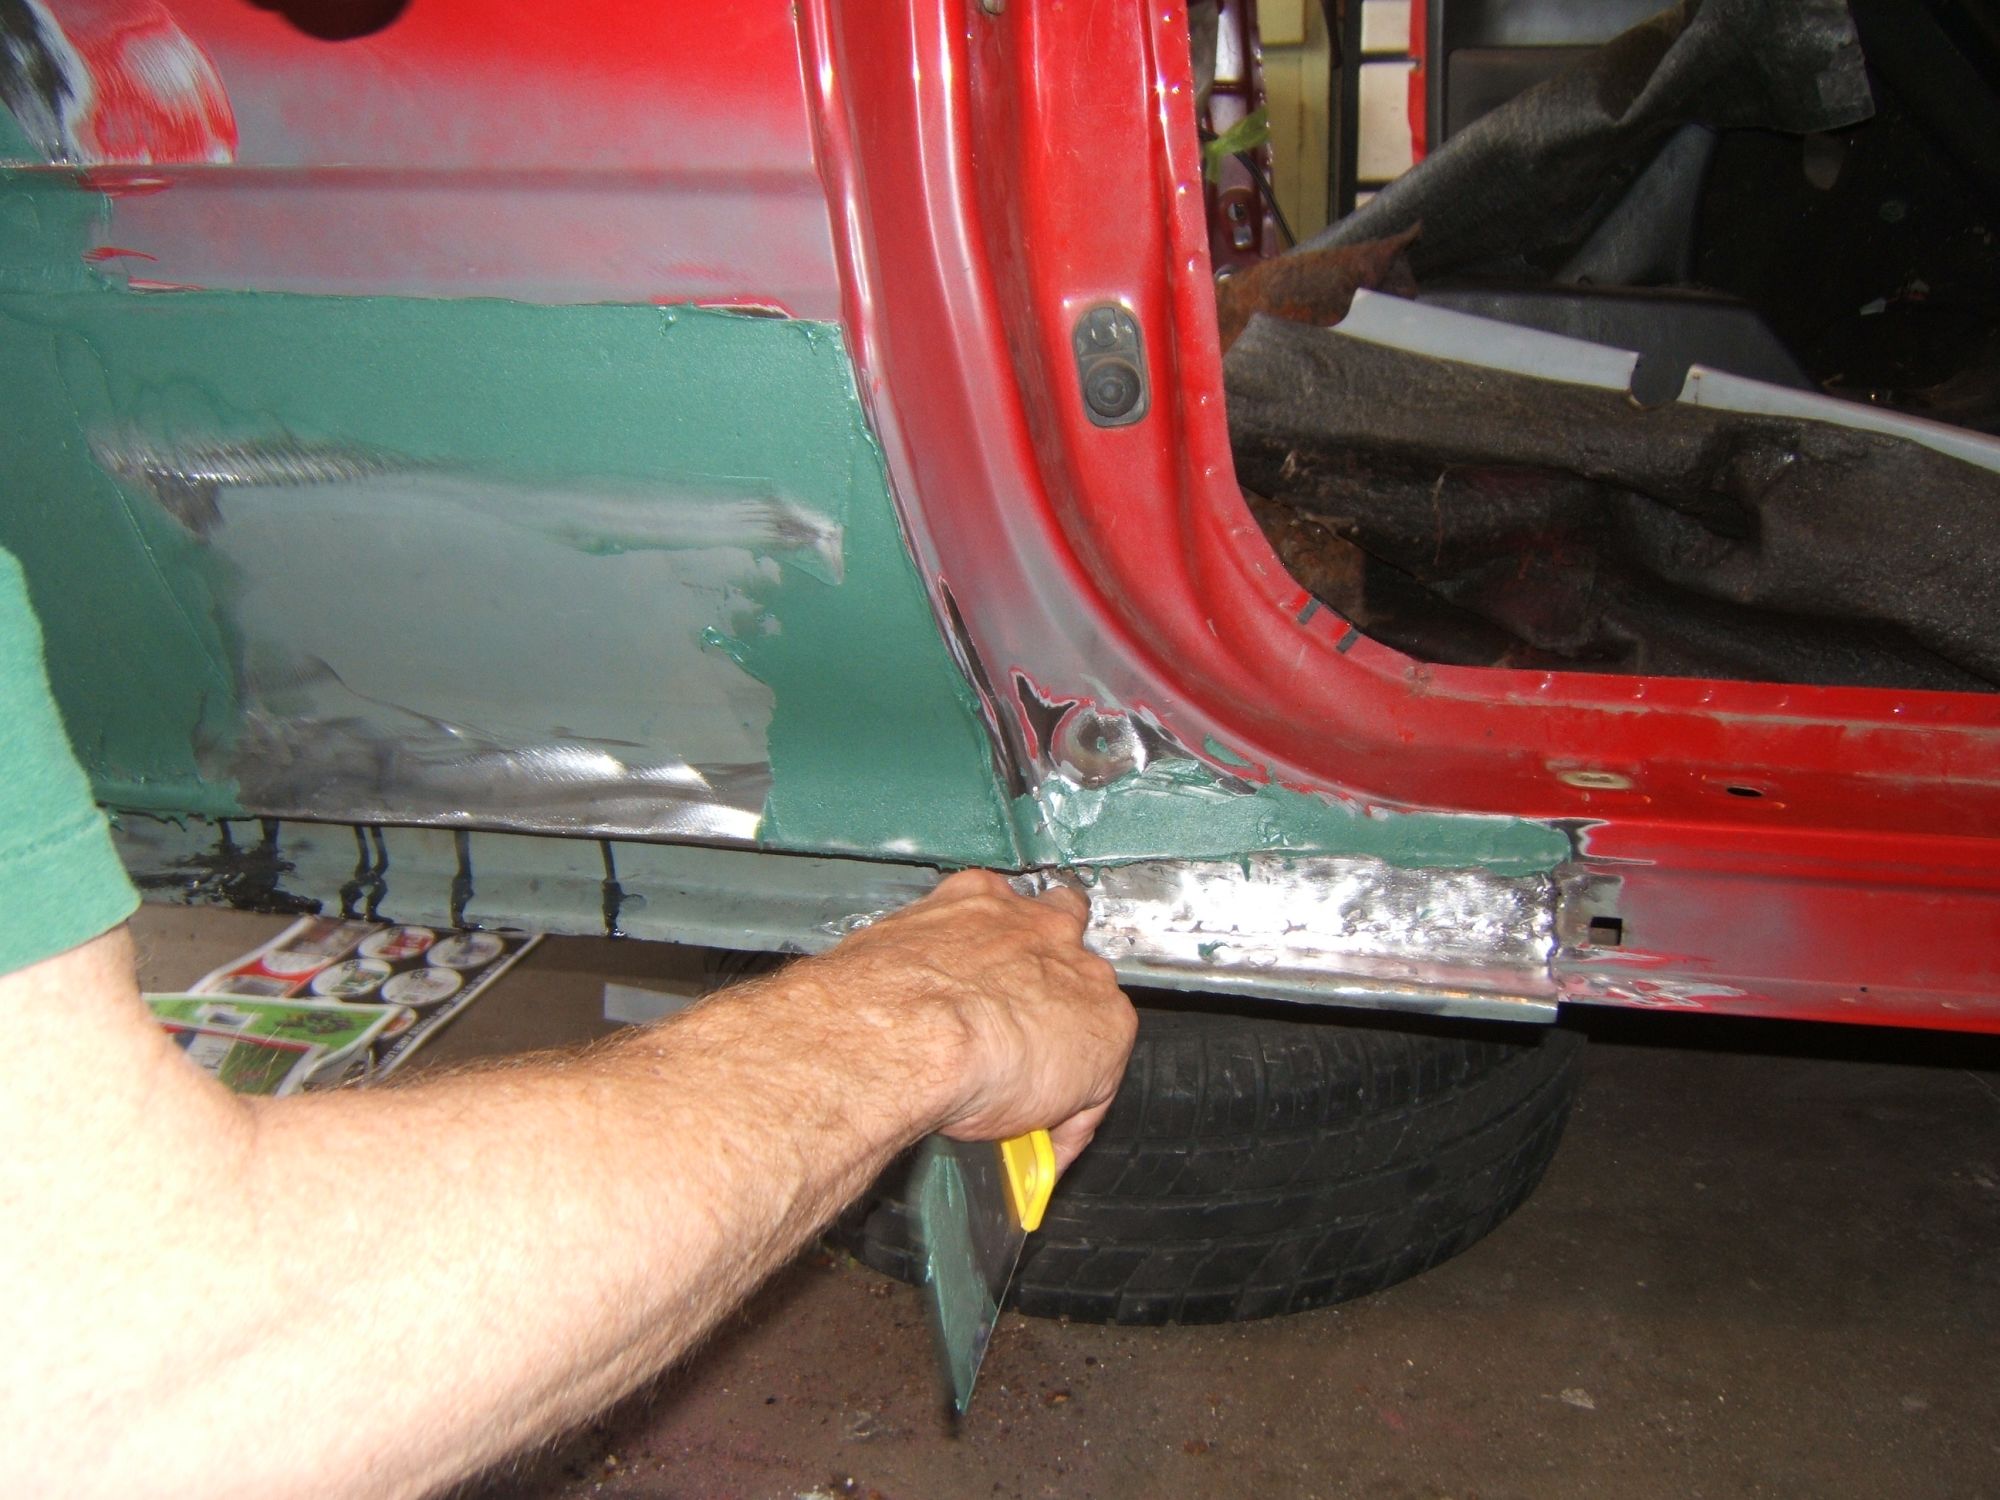
We fabricated patch panels and welded them in.
From 7-25-09
Thank you for letting me know you had to manually fabricate panels for those spots.
Not sure why you deleted the post.
It will be helpful information for future searchers as I see that spot messed up on many of the hatchbacks driving around. Usually stands out on the white ones more than the other colors but seems to be very common and the patch panels you can buy don't reach that spot.
Very helpful information.
And I noticed on mine, it's on both sides too. I thought it was only the one side but no such luck. Now I know what's in store to repair it.
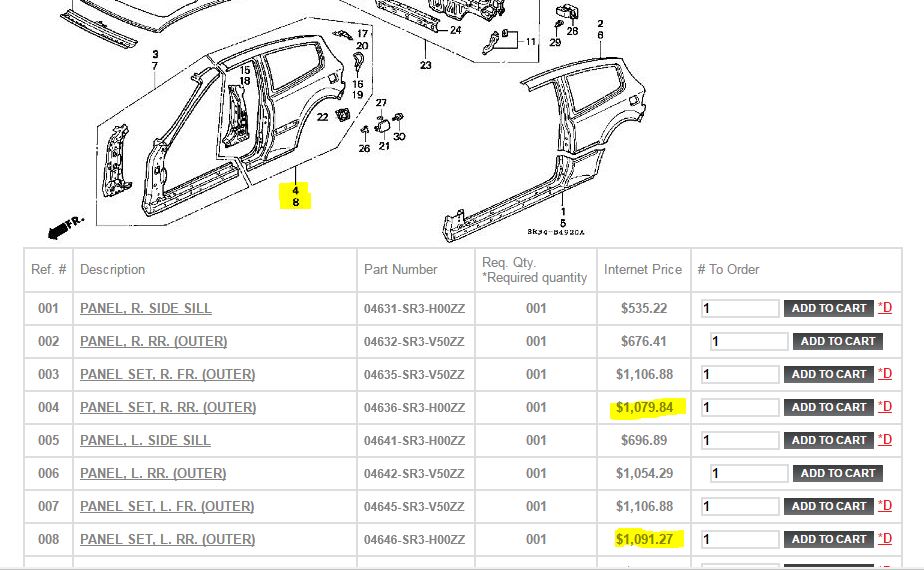
Been wondering if the cost of the full rear panels from Honda are worth the expense. Seems toronto may still have some in stock:
Or maybe do just the sills #1 and #5 and use after market patch panels..... That might be the most economical.... Of course that's assuming there is stock left of any of that at torontohondaparts.com or any of my local dealers.
Last edited by TomCat39; Mar 12, 2017 at 08:04 AM.
Tom don't you live on the western side of the country? There's still a fair amount of these cars in the junkyards between Saskatchewan and BC that have decent quarters. I managed to get a set shipped out here a few years back.
Tom don't you live on the western side of the country? There's still a fair amount of these cars in the junkyards between Saskatchewan and BC that have decent quarters. I managed to get a set shipped out here a few years back.
Without a long travel, we only have one self serve yard where you can actually see the cars in person now a days. The going green trend is growing massively in the Greater Vancouver Region so it's becoming harder and harder to do anything with automobiles. Even disposal is becoming harder.
Anyways, every time I've been at the yard, every hatch has had rust on the rear quarters to some degree. Can probably find the area the patch panels don't touch in good condition though.
Great idea there. Thanks!
Just knowing that metal has to be replaced in that area, when you see it like the photo's Adam shared, is good to know.
I've been too busy lately to attempt tackling any major problems so I decided to look into my malfunctioning speedometer problem.
I did a fair amount of research before diving into diagnosing. There are tons of threads detailing the procedure(s), there's a "How-To" on this site, and the Helms manual is fairly detailed. So, I will not go into detail. Plus, I didn't take pictures or videos of the process. The only tip I can provide is I used a large safety pin to "back probe" C126 when diagnosing the VSS.
Fuse 1 was fine and I had continuity from the VSS to the gauge cluster. The VSS pulsed as expected (I've an LSD so I didn't need to block one wheel. If you've an open differential, block or have someone hold your wheel). Therefore, my problem was with the gauge cluster itself.
So, I pulled it and opened it up.
The first thing I noticed, as you will see in the second picture, was that each gauge had a 200x date on it. Kinda funny for a "Genuine" 92-95 Civic Cluster... Looks like I got hosed when I bought it.
Speedometer
Back side of Speedometer with PCB removed. Note the 10-06-2004 date.
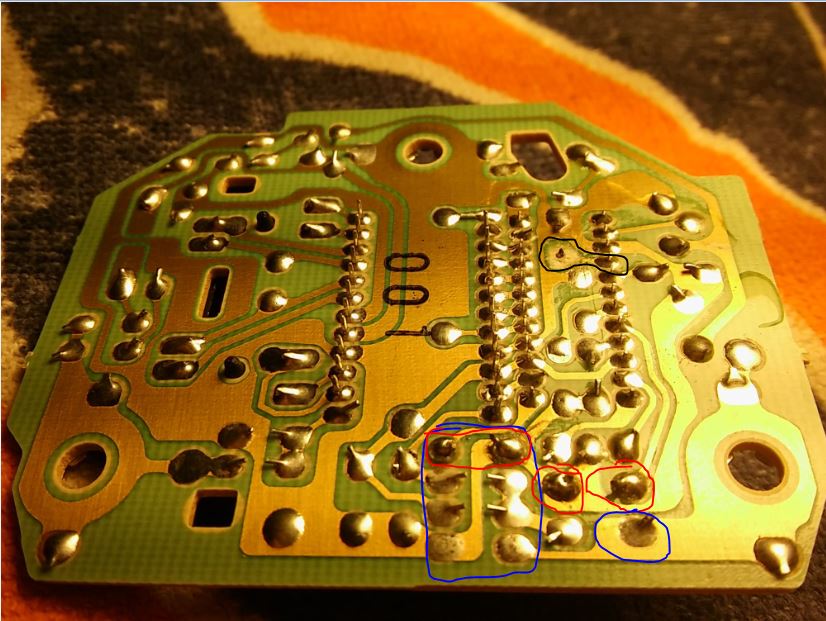
Speedometer PCB
Speedometer PCB
Speedometer PCB
I'll borrow a soldering iron and try and repair the gauge. If that doesn't work, I've my old gauge cluster that I can scavenge an alternative speedometer or speedometer PCB board.
Wow, that looks pretty bad. With the dating I would suspect someone swapped out the old one as it had issues and really did a number on the swap.
As I am sure you are probably already aware, the sections in blue look like possible cold solder joints, the sections in red look like they were already re-soldered but with the work seen on the board it may be questionable.
And the section in black you noted where they scraped the **** out of the trace (thank god the PCB's are single layer trace design) it looks like you are going to have to use a strand of copper wire to connect and solder the two posts back together.
I'm sure you can get it working again, but I do not know how particular you are. Is a copper wire trace replacement acceptable for you? Or would you feel better if you raped your old speedo for the PCB and re-soldered the whole thing? Or is there a reason you can't just grab your old speedo and odometer?
Well, I took the last two weeks off due to other commitments taking up all my time. I'm hoping to get back at it this weekend but, my DD needs some love and I told a friend I'd help him replace his leaking power steering rack. So, we'll see.
I re-soldered my speedo PCB but the jumper pin I was trying to solder to barely passed through the board and, as a result, my solder had nothing to stick to and the joint sucked. So, I de-soldered and pulled the chip covering the jumper and then de-soldered and removed the jumper. I still need to replace the jumper, reinstall the chip, and re-solder. At this point I just want to see if I can fix it. Soldering is kinda fun. In the meantime, I said "**** it" and reinstalled by old speedometer.
I need to buy a new head gasket and pull the head. Hopefully I can borrow a straight edge from someone and check the head and block. If they're still straight, I'll grind down the pins and put it all back together. I might use copper spray or gasket sealer around the oil galleys. I might not. I haven't decided.
[QUOTE=CX-Adam;51243648 I might use copper spray or gasket sealer around the oil galleys. I might not. I haven't decided.[/QUOTE]
I have a friend who swears by copper spray, he puts it on every head gasket he does. I started doing the same, and I have to say, it seems to make a difference. I don't normally have head gaskets leak after replacing them, but I do have more peace of mind with the copper spray. I use it over the entire gasket, but especially around the cylinders. Let it dry to "tacky" and then carefully put it on. It never really seems to dry more than that.
I have a friend who swears by copper spray, he puts it on every head gasket he does. I started doing the same, and I have to say, it seems to make a difference. I don't normally have head gaskets leak after replacing them, but I do have more peace of mind with the copper spray. I use it over the entire gasket, but especially around the cylinders. Let it dry to "tacky" and then carefully put it on. It never really seems to dry more than that.
That seems to be the common method. Thanks for the input.
Anyways, a GHG100-81 Golden Eagle Head Gasket should be on the way shortly.
The engine sounds much quitter with the lash set, too. It sounded like a bucket of bolts before compared to how it sounds now.
Did you go skinny, or fat? The FSM calls for clearances of .006 - .007 for intake, and .007 to .008 for the exhaust side, I went .007 & .008 and she is a little noisy. I think I might go skinnier next time I am in there...