

My 95 Civic CX hatch build

Thread Starter
talks to himself


Joined: Apr 2009
Posts: 2,122
Likes: 79
From: Where YOU live?
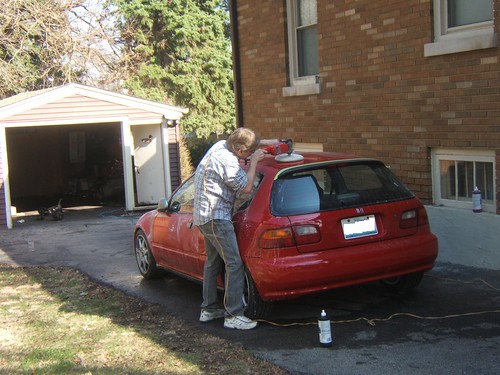
Here's a little update from some work I did over the summer. I don't have a tripod for the camera so there aren't any pictures of me working but I swear I did all the sanding.
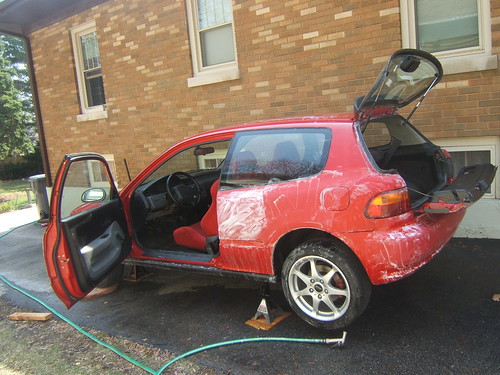
Because the whole car was painted, it also need to be water sanded. The whole process took me about 2 days to sand and my dad about 1 day to buff. I ****ed up the water sanding on the front bumper cover and burned through the paint at one point...
A don't remember the grades of paper I used but I think I started out with 1500 then went to 2000 grit. The buffing was a two step process as well and started with a wool pad then a sponge pad. Then the whole car was waxed.

Here's a picture of an unsanded paint job:

And, after sanding:

And, after the first pass with the buffer. No wax.

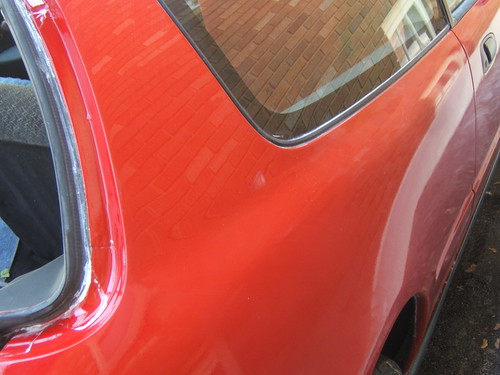
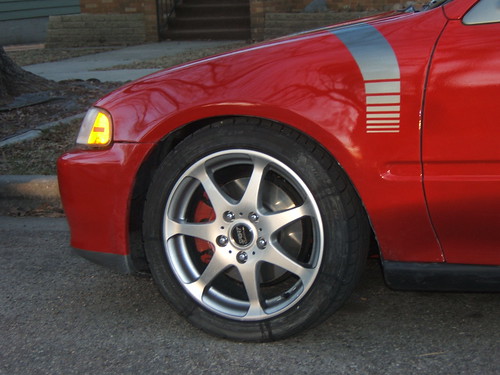
Here's a nice little before and after picture. The top of the C-pillar has been sanded and buffed. Above the wheel well has not.


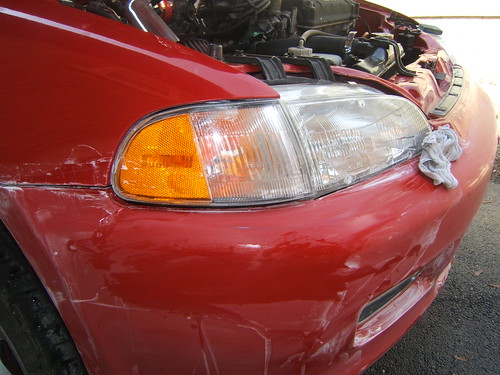
You can see where I messed up in this next picture. It was seriously a "let me just touch up this one last spot" situation when I burned through the paint...


Because the whole car was painted, it also need to be water sanded. The whole process took me about 2 days to sand and my dad about 1 day to buff. I ****ed up the water sanding on the front bumper cover and burned through the paint at one point...
A don't remember the grades of paper I used but I think I started out with 1500 then went to 2000 grit. The buffing was a two step process as well and started with a wool pad then a sponge pad. Then the whole car was waxed.
Here's a picture of an unsanded paint job:
And, after sanding:
And, after the first pass with the buffer. No wax.
Here's a nice little before and after picture. The top of the C-pillar has been sanded and buffed. Above the wheel well has not.
You can see where I messed up in this next picture. It was seriously a "let me just touch up this one last spot" situation when I burned through the paint...
Last edited by CX-Adam; Mar 15, 2012 at 06:53 PM.
Thread Starter
talks to himself
Joined: Apr 2009
Posts: 2,122
Likes: 79
From: Where YOU live?
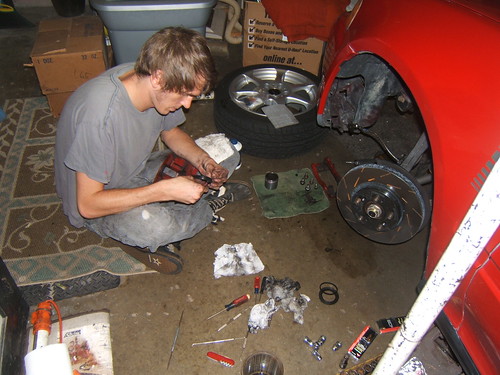
Ok, I also did a brake re-build and rotor replacement.

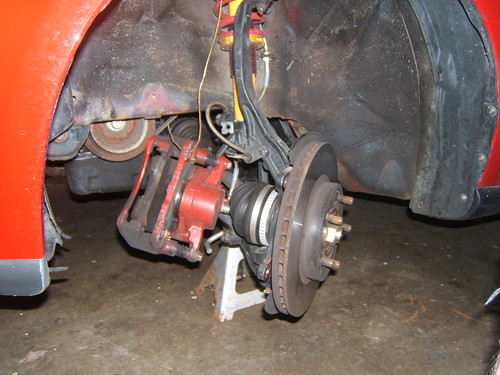
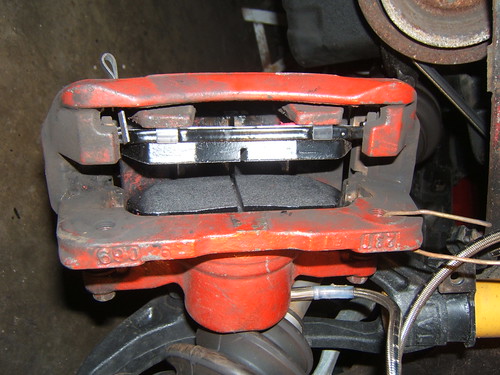
This is what the inside of my driver side brake caliper looked like. The wetness is from leaking brake fluid. You can see where the dust shield is bulging. The actual seal must have been ripped or twisted.


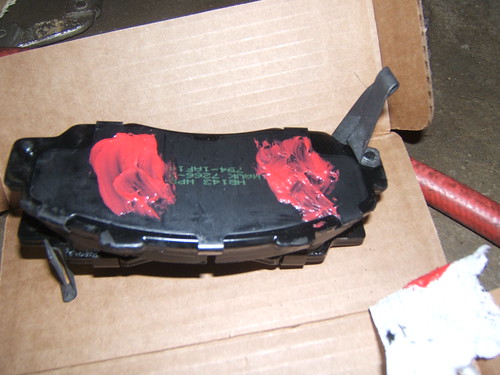
Ok, this next picture, is VERY WRONG. Notice the location of the brake pad tab. It's on the OUTSIDE of the caliper. This WILL HIT YOUR WHEEL. Luckily, I noticed this before I started driving down the road. I had to take it all apart agian and switch the pads.

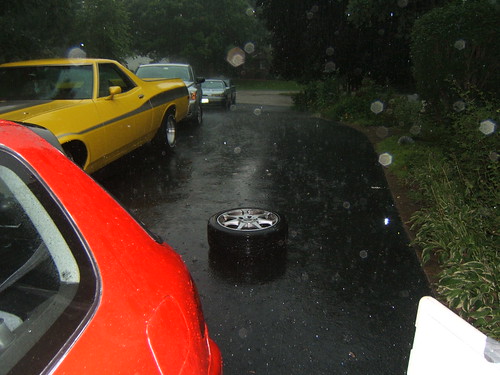
Chicago-land weather
This is what the inside of my driver side brake caliper looked like. The wetness is from leaking brake fluid. You can see where the dust shield is bulging. The actual seal must have been ripped or twisted.
Ok, this next picture, is VERY WRONG. Notice the location of the brake pad tab. It's on the OUTSIDE of the caliper. This WILL HIT YOUR WHEEL. Luckily, I noticed this before I started driving down the road. I had to take it all apart agian and switch the pads.
Chicago-land weather
Last edited by CX-Adam; Mar 15, 2012 at 06:52 PM.
Thread Starter
talks to himself
Joined: Apr 2009
Posts: 2,122
Likes: 79
From: Where YOU live?
It's a Ferd F-teenthousand!
http://www.youtube.com/watch?v=d4bJs...layer_embedded
Or, a Ford Ranchero...
http://www.youtube.com/watch?v=d4bJs...layer_embedded
Or, a Ford Ranchero...
Thread Starter
talks to himself
Joined: Apr 2009
Posts: 2,122
Likes: 79
From: Where YOU live?
Do these cams look like they're in good condition? I'm hesitant of buying used cams.
http://hondamarketplace.com/showthread.php?t=3009920
http://hondamarketplace.com/showthread.php?t=3009920

Honda-Tech Member
Joined: Feb 2012
Posts: 3
Likes: 0
From: Northeast Indiana
When are you gonna put on the last batch of parts you bought a few months back? I'm trying to get that 97' Prelude roller but he hasn't gotten back to me yet. Hopefully it's not sold already.
Ek Forever y0!
Joined: May 2005
Posts: 16,712
Likes: 8
From: Beating people with a stick, GA
Do these cams look like they're in good condition? I'm hesitant of buying used cams.
http://hondamarketplace.com/showthread.php?t=3009920
http://hondamarketplace.com/showthread.php?t=3009920


Thread Starter
talks to himself
Joined: Apr 2009
Posts: 2,122
Likes: 79
From: Where YOU live?
Because of your inspiring post, I decided to brave the unseasonably warm weather and do something to my car tonight. I now have a gauge cluster with a tachometer thanks to a Civic EX donor car.
No pictures because my camera is dead.
Thanks, dude. I have a 97 Hatch now, as well. I can see the appeal over a 5th gen. It's nice having cup holders that aren't crap and intermittent wipers on the CX model. The 6th gens are much more fast food eating American commuter friendly.
Honda-Tech Member
Joined: Feb 2005
Posts: 5
Likes: 0
From: Orlando, FL, USA
man this is a nice car.. i hoppppe i can get this done one day.. i just picked up a bone stock 92 si hatch and reading all these posts here on honda tech make me wanna take everything apart and start fresh.. so much time and money involved though... have you counted how much you've spent all together... not including your dad being a body man... he does some awesome work man.. nice nice post. i gotta figure out how to subscribe so i can read more when you guys have updates 
Thread Starter
talks to himself
Joined: Apr 2009
Posts: 2,122
Likes: 79
From: Where YOU live?
man this is a nice car.. i hoppppe i can get this done one day.. i just picked up a bone stock 92 si hatch and reading all these posts here on honda tech make me wanna take everything apart and start fresh.. so much time and money involved though... have you counted how much you've spent all together... not including your dad being a body man... he does some awesome work man.. nice nice post. i gotta figure out how to subscribe so i can read more when you guys have updates
Yes, I've kept a detailed record of every dime I've spent on the car in MSExcel. I also have the next stages planned out in the same spreadsheet. And, I can confirm that it is, in fact, expensive. The materials alone that went into the body work alone cost about $1,000. However, I could have saved a decent amount if I had only bought the replacement wheel arches and not the panels AND the wheel arches.
I also wasted a **** load of money trying to find the proper replacement bearing for the ****ing JDM 36mm knuckle assembly. I think I bought 3 sets of bearings and they aren't cheap. I don't recommend this swap. It serves no performance function. It's only for "baller status" or some crap like that and I must have had my head up my *** when I bought it.

If you're patient and realistic with what you want to do you can save a lot of money. For the most part I've been able to do this but, I've had my hasty moments. I'm also VERY fortunate to have the connections that I have. Having access to tools and a skilled body man made an impossible job possible. I feel like a dirty cheater when I read the threads of people who do all this work in their apartment complex's parting lot. Those people are badasses.
Also, I swear I did work on the car. I didn't just stand there and watch!
 I did a fair amount of the block sanding and a decent amount of the hammering. My dad just doesn't give a **** about taking pictures and bragging online like I do. He's old school like that. Like, eats iron and spits nails oldschool.
I plan on taking advantage of today's nice weather and getting some work done tonight. I'll try and borrow a camera and take pictures.

Joined: Jan 2012
Posts: 164
Likes: 0
Very nice build! You and your Dad did a very very good job on it so far. It looks like a totally brand new car. I especially love the 5 lug conversions first conversion I seen on a Honda eg. The hard work and dedication really shows in your build. Can't wait to see what you do to it next.
Happy Building!
Happy Building!
Thread Starter
talks to himself
Joined: Apr 2009
Posts: 2,122
Likes: 79
From: Where YOU live?
I tried to get some work done tonight on the car. I've slowly been acquiring parts as I try and figure out what I'm doing with my engine.
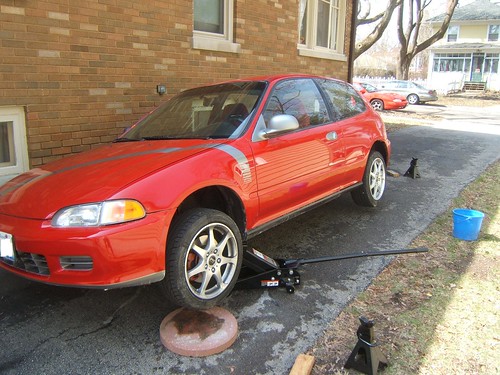
I bought a rear sway bar and a subframe brace off a Honda-Tech member a month ago. I started the install tonight. I didn't finish because the last bolt I was threading in was feeling like it was cross-threading. Not wanting to ruin the part, I stopped. I'll have to take everything apart this weekend and clean up the threads.
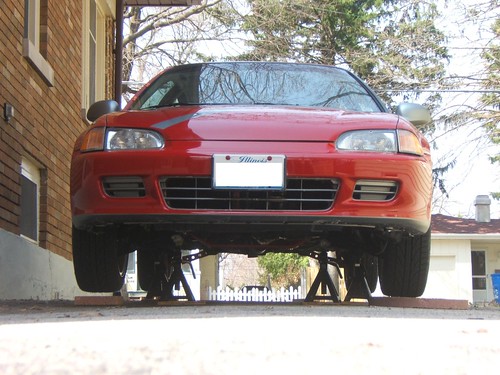
Ok here's what I started with (always block off your front wheels if leaving them on the ground):

Here's what I ended up with (not done):

Hopefully it's ok to post links to other forums but I used this website as a guide for the install: http://www.civic-eg.com/viewtopic.php?t=956
Once I have the threads cleaned up I'll still need to figure out my end-link situation. I've read that the OEM ones are the best and I've also read that, due to the hole placement on Blox LCAs, aftermarket adjustable end-links are the best. Why aftermarket adjustable end-links? Well, because (from what I've read on the internet) the end-link connection holes on the Blox Rear LCAs are too low. If I were to use the stock end-links, the sway-bar would be pitched at an angle instead of parallel to the ground while at rest. Basically, the suspension won't be optimized.
I just searched for 10 minutes and I can't find the exact link I'm thinking of where I read all this... But, there IS a reason why all the other aftermarket rear LCAs and, more importantly, the OEM rear LCA have the holes along the top edge. Basically, read anything by PatrickGSR94 here: https://honda-tech.com/forums/showth...lox+lca&page=2
I regret buying after market LCAs. They look nice but they're unnecessary.
I bought a rear sway bar and a subframe brace off a Honda-Tech member a month ago. I started the install tonight. I didn't finish because the last bolt I was threading in was feeling like it was cross-threading. Not wanting to ruin the part, I stopped. I'll have to take everything apart this weekend and clean up the threads.
Ok here's what I started with (always block off your front wheels if leaving them on the ground):
Here's what I ended up with (not done):
Hopefully it's ok to post links to other forums but I used this website as a guide for the install: http://www.civic-eg.com/viewtopic.php?t=956
Once I have the threads cleaned up I'll still need to figure out my end-link situation. I've read that the OEM ones are the best and I've also read that, due to the hole placement on Blox LCAs, aftermarket adjustable end-links are the best. Why aftermarket adjustable end-links? Well, because (from what I've read on the internet) the end-link connection holes on the Blox Rear LCAs are too low. If I were to use the stock end-links, the sway-bar would be pitched at an angle instead of parallel to the ground while at rest. Basically, the suspension won't be optimized.
I just searched for 10 minutes and I can't find the exact link I'm thinking of where I read all this... But, there IS a reason why all the other aftermarket rear LCAs and, more importantly, the OEM rear LCA have the holes along the top edge. Basically, read anything by PatrickGSR94 here: https://honda-tech.com/forums/showth...lox+lca&page=2
I regret buying after market LCAs. They look nice but they're unnecessary.
Last edited by CX-Adam; Mar 15, 2012 at 06:50 PM.

Thread Starter
talks to himself
Joined: Apr 2009
Posts: 2,122
Likes: 79
From: Where YOU live?
Saturday morning I took the sway bar and brace back off and chased the threads from the opposite side of the brace. The threads cleaned up and I was able to get everything on the car with no problems!
Now to get end links and get the front sway bar on.
Now to get end links and get the front sway bar on.


Thread Starter
talks to himself
Joined: Apr 2009
Posts: 2,122
Likes: 79
From: Where YOU live?
No pretty pictures in this update fellas. Sorry.
I started the engine tear-down tonight. I had hoped to remove the transmission but I wasn't able to based on how the engine is sitting on the cart.
Instead, I started to work on the vacuum and wiring systems. I managed to get the whole engine harness off as well as the fuel rail and the injectors. No broken plugs so far. Although, I couldn't figure out how to unplug the injectors from the wiring harness so I just pulled them out of the ports with the harness...hopefully they'll be easier to remove now that they're off the engine.
Overall I was surprised at how easily all the bolts came out. I was afraid I was going to run into another nightmare situation like the suspension. But, all the bolts came out really easily!
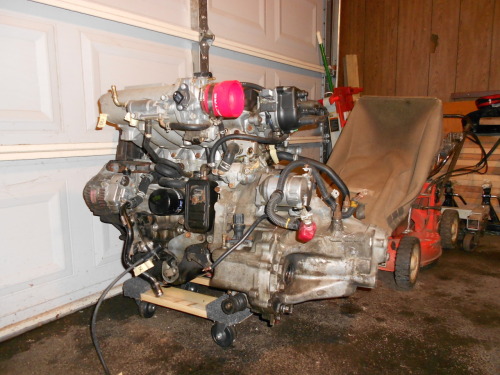
Sometime this week I'll remove the intake manifold.
Also, I'm already kicking myself for not loosing the crank pulley while the engine was in the car...
I started the engine tear-down tonight. I had hoped to remove the transmission but I wasn't able to based on how the engine is sitting on the cart.
Instead, I started to work on the vacuum and wiring systems. I managed to get the whole engine harness off as well as the fuel rail and the injectors. No broken plugs so far. Although, I couldn't figure out how to unplug the injectors from the wiring harness so I just pulled them out of the ports with the harness...
hopefully they'll be easier to remove now that they're off the engine.Overall I was surprised at how easily all the bolts came out. I was afraid I was going to run into another nightmare situation like the suspension. But, all the bolts came out really easily!
Sometime this week I'll remove the intake manifold.
Also, I'm already kicking myself for not loosing the crank pulley while the engine was in the car...
Honda-Tech Member
Joined: Feb 2012
Posts: 31
Likes: 0
From: Oakland, CA
Use a small flathead screwdriver and push the metal clip holding the plug on the injector outward, slowly wiggle the injector out being sure that both sides of the metal clip clear the plastic tabs on the injector. Looks great, subscribed!