

String Alignment

As soon as i replace the front springs and raise up the front and rear it will be time to finally learn this once and for all.
After reading all this and of course your reassurance Im not going to fight this anymore.
Honda-Tech Member
Joined: May 2002
Posts: 7,812
Likes: 1
Here is a thread that Slapsmak posted in the ITR forum not too long ago. I liked his idea for the steering wheel stay.
I have been doing my own aligments for a long time now as it is way cheaper and given some care, much more accurate than the dipshits who only care if it is "within specs" at the tire installers.
I actually had a readout on my wifes truck from a couple of years ago that was toe out on the passenger side and toe in on driver side. the dealership told me it was within spec, so the left it. of course the truck was drifting to the right all the time as both tires were pointing to the right all the time. Trying to explain that concept to the service manager was like explaining space flight to a hampster...
Anyway, I have always used the string box method, which is a pita to set up and keep straight if you roll the car back and forth between adjustments. I was thinking about how to keep the strings in the same position on the car, even if the car moves. i know everyone has seen or heard of smart strings, but that is more cash than i am willing to spend. I came up with a solution which costs a total of 10$.
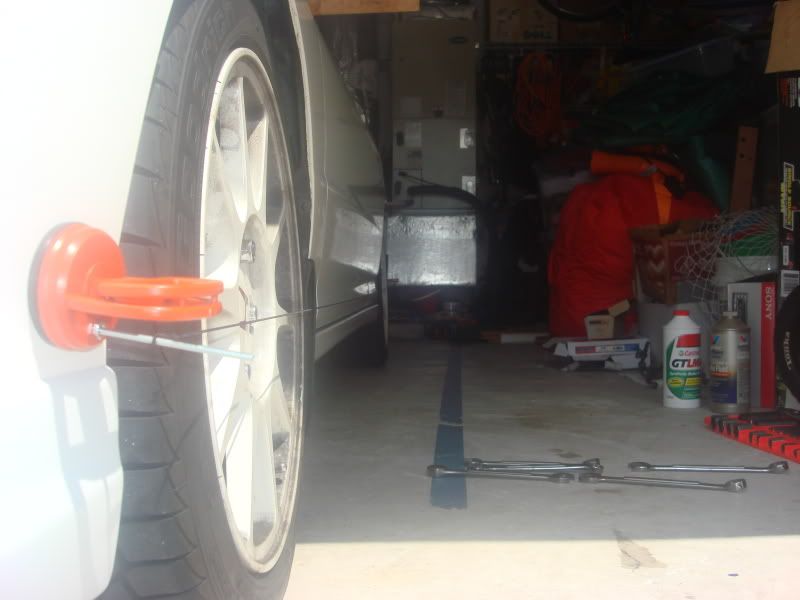
(4) 2" Mini suction cup (quick release) Item # 46900 (on sale for $.99)
http://www.harborfreight.com/cpi/cta...emnumber=46900
(2) sections 7' of elastic string $1.29 from joanne fabric
(4) 4" machine screws and nuts (fine tread)
I dissasembled the suction cups, drilled a hole and inserted the screws, securing them with the bolts.
I attach the suction cups to the car, positioning the bolts about level with the front and rear hubs, suction cups to the sides of the front and rear bumpers.
Knot the elastic string and slide it over the bolt.
Using a 1/32"/1mm graduated metal ruler, measure to the center hubs to set up the string. Front track on an integra is 10mm wider, so the rear measurement will have to each be 5mm outset from the front measure (string to hub)
I finalized on 40mm front, 45mm rear
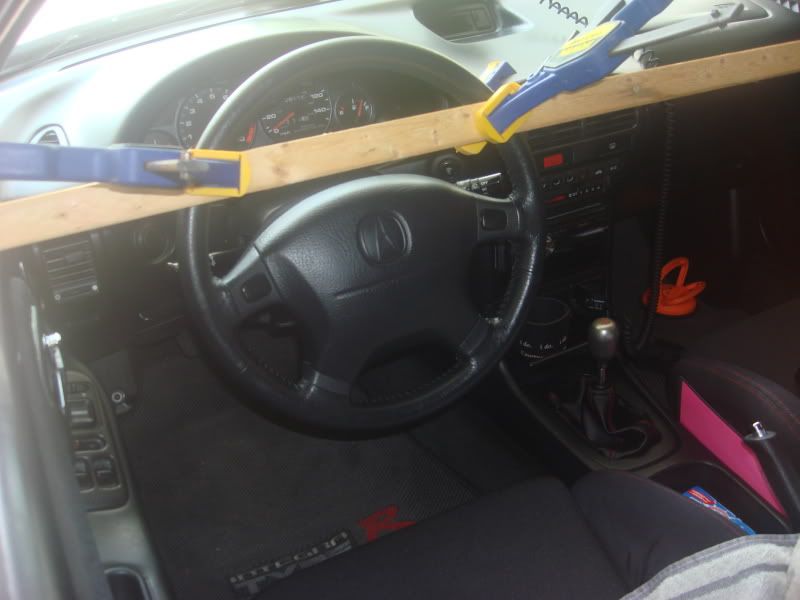
center the steering wheel and secure with a deadman (see pics below, 1 long piece of wood, 2 clamps)
Using paper and pencil (or a cool spreadsheet i made in excel if you are me), measure from the front edge to string and back edge to string of the wheel. take the difference. if the wheel towards the front of the car is a larger number than the back of the wheel measurement, then you have toe in on that wheel.
at the front of the car, loosen the lock nut (17mm open end wrench) and turn the tie rod adjustment arm to make your change (14mm wrench). roll the car back and forth and re-measure.
at the rear, you will need to loosen the bolt on the compensator arm and move it in or out depending on initial measurement.
I finished out with 1/16" toe out each side for total toe 1/8" out
rear finished 0 toe
total time 45 minutes
suction cup front driver fell off once, i licked it, never fell off again. Note to self, use water next time as it tasted like ***.
see pics below:
Dead Man Steering Wheel Holder:
Driver side front Suction cup:
Driver side read suction cup:

I actually had a readout on my wifes truck from a couple of years ago that was toe out on the passenger side and toe in on driver side. the dealership told me it was within spec, so the left it. of course the truck was drifting to the right all the time as both tires were pointing to the right all the time. Trying to explain that concept to the service manager was like explaining space flight to a hampster...
Anyway, I have always used the string box method, which is a pita to set up and keep straight if you roll the car back and forth between adjustments. I was thinking about how to keep the strings in the same position on the car, even if the car moves. i know everyone has seen or heard of smart strings, but that is more cash than i am willing to spend. I came up with a solution which costs a total of 10$.
(4) 2" Mini suction cup (quick release) Item # 46900 (on sale for $.99)
http://www.harborfreight.com/cpi/cta...emnumber=46900
(2) sections 7' of elastic string $1.29 from joanne fabric
(4) 4" machine screws and nuts (fine tread)
I dissasembled the suction cups, drilled a hole and inserted the screws, securing them with the bolts.
I attach the suction cups to the car, positioning the bolts about level with the front and rear hubs, suction cups to the sides of the front and rear bumpers.
Knot the elastic string and slide it over the bolt.
Using a 1/32"/1mm graduated metal ruler, measure to the center hubs to set up the string. Front track on an integra is 10mm wider, so the rear measurement will have to each be 5mm outset from the front measure (string to hub)
I finalized on 40mm front, 45mm rear
center the steering wheel and secure with a deadman (see pics below, 1 long piece of wood, 2 clamps)
Using paper and pencil (or a cool spreadsheet i made in excel if you are me), measure from the front edge to string and back edge to string of the wheel. take the difference. if the wheel towards the front of the car is a larger number than the back of the wheel measurement, then you have toe in on that wheel.
at the front of the car, loosen the lock nut (17mm open end wrench) and turn the tie rod adjustment arm to make your change (14mm wrench). roll the car back and forth and re-measure.
at the rear, you will need to loosen the bolt on the compensator arm and move it in or out depending on initial measurement.
I finished out with 1/16" toe out each side for total toe 1/8" out
rear finished 0 toe
total time 45 minutes
suction cup front driver fell off once, i licked it, never fell off again. Note to self, use water next time as it tasted like ***.
see pics below:
Dead Man Steering Wheel Holder:
Driver side front Suction cup:
Driver side read suction cup:
Honda-Tech Member

Joined: Feb 2003
Posts: 2,271
Likes: 3
From: Quebec, Canada
Could you guys correct me if I am wrong.
1. Park the car on a flat surface
2. Place 2 strings on stands on each side of the car.
3. Measure hub to string equal at 4 corners. Let's say you space the strings 6 inches from the hub at each 4 wheels.
4. Make sure stand to stand is equal (ie, left to right stands in front are distant from the same space than the rear two)
5. Measure the difference, at hub height, of space between string and front/rear of the tire, ie determine your toe.
6. Adjust.
Is that it ?
STN
you have to account for different track front
to rear. Otherwise you will drive yourself crazy trying to figure out why the strings are wider at one end. What I did to eliminate one varable was to get some angle stock from the industrial supply. I clamped it together and cut some notches in both pieces to rest the strings in. No matter what you do the strings are parallel.
I used some jack stands to try it out the first time. It's a pain to get the strings tight without moving the rig. Strechey string from the suction cup method is on the shopping list. Brackets to hold it to the car will be the next project. Kind of a pain because the bottom of the rear bumper cover is above the center of the hubs. I got it secured to the rear with about 5 pieces of scrap and a box of C clamps. Have not done the front yet because the bumper cover is off right now. A couple of bucks for some pre made brackets might be a good investmet.
Honda-Tech Member
Joined: May 2002
Posts: 13,483
Likes: 0
From: cali
It's much much much better IMO to use to strips of metal/PVC/anything that is rigid and equal length and place them in front and behind the car. This makes "squaring" up the box much much much easier. And then mark out 1", 2", and 3" off of each end, you will want all 4 of your "strings" to be on the same inch marker all the way around.
A friend of mine uses some roll cage tubing zip-tied to jack stands.
It works good, but makes it tough because you can't roll the car.
http://www.smartracingproducts.com/c.../alignment.htm
is what i mentioned earlier.
Once you get the hang of it, it is really easy to use.
A friend of mine uses some roll cage tubing zip-tied to jack stands.
It works good, but makes it tough because you can't roll the car.
http://www.smartracingproducts.com/c.../alignment.htm
is what i mentioned earlier.
Once you get the hang of it, it is really easy to use.
Honda-Tech Member
Joined: Feb 2003
Posts: 2,271
Likes: 3
From: Quebec, Canada
1. Park the car on a flat surface
2. Place 2 strings on stands on each side of the car.
3. Measure hub to string equal at 4 corners. Let's say you space the strings 6 inches from the hub at each 4 wheels.
4. Make sure stand to stand is equal (ie, left to right stands in front are distant from the same space than the rear two)
5. Measure the difference, at hub height, of space between string and front/rear of the tire, ie determine your toe.
6. Adjust.
1. Park the car on a flat surface
2. Place 2 strings on stands on each side of the car.
3. Measure hub to string equal at 4 corners to start with. Strings will be like that : \ CAR /
4. Measure both stand-to-stand ends to the same value
5. Adjust string-to-hub distance in the front, then in the rear, to make sure the strings are //s.
6 Measure stand to stand distance again. It will take a few times (I guess) but it would be all set within a few minutes.
Is this better ? It accounts for the track witdh difference F/R, plus the //ism of the strings to the car.
You also get the witdh diff. F/R wich could serve if you want to build a string set-up that attachs to the car.
Please correct me again if I am wrong, thanks !
Honda-Tech Member
Joined: Jun 2004
Posts: 1,160
Likes: 1
From: Bay Area, CA, usa
IMO laser pointers mounted to the wheels give a more accurate alignment and less chance of error, as long as you roll the car 1/2 a wheel rotation to get the pointers to point both forwards and back.
Last edited by beanbag; Nov 30, 2009 at 03:45 PM.
Honda-Tech Member
Joined: May 2002
Posts: 7,812
Likes: 1
Parrallel, on each side, length of the car.

Total Width
Front: 1480mm
Rear: 1475mm
5mm difference from left to right (front). Individual distances should vary by only 2.5mm PER WHEEL.
So if you space the string from the rear hub 75mm, the spacing from the front hub should only be 72.50mm Make sense?
Yes. It is important to keep the steering wheel in place. Adjusting the tie rods WILL move your steering wheel.
Yep.
Honda-Tech Member
Joined: Jan 2003
Posts: 977
Likes: 2
From: Bay Area, CA, usa
Honda-Tech Member
Joined: Jan 2004
Posts: 2,350
Likes: 1
From: Cerritos, CA, USA
Honda-Tech Member
Joined: May 2002
Posts: 7,812
Likes: 1
Honda-Tech Member
Joined: May 2002
Posts: 13,483
Likes: 0
From: cali
you want the measurement from the axle/wheel/whateveryoumeasure off of to the string, to be equal on the Front Left(FL) and Front Right (FR). And completely independent of that, you want the axle/wheel/whateveryoumeasure off of to the string, to be equal on the Rear Left (RL) and Rear Right (RR).
Once FL=FR and RL=RR your "box" is square.
The OE track measurements do little good for most of us. As we don't run the same offset/size wheel as the car came with. And that plays into the track width.
Having the strings all connected makes doing this easier because when you decrease the FL, you increase the FR.
Get the front measurements close to equal, then get the rears close to equal.
Then you can get the front perfect then the rear.
Honda-Tech Member
Joined: Jan 2003
Posts: 1,979
Likes: 0
From: Cogito ergo sum, Canada
No, that is not correct. Front hub (or wheel center) distances equal to each other, rear hub (or wheel center) distances equal to each other, not equal all around.
Just make a parallel "box" with 2 conduits and some fishing line. It costs less than 10 dollars and takes about 10 minutes. All you have to do is drill 4 holes, put the fishing line through, tie some knots. Then choose your favorite way to hold them in line with the axle centerlines.
Just make a parallel "box" with 2 conduits and some fishing line. It costs less than 10 dollars and takes about 10 minutes. All you have to do is drill 4 holes, put the fishing line through, tie some knots. Then choose your favorite way to hold them in line with the axle centerlines.
Honda-Tech Member
Joined: May 2002
Posts: 7,812
Likes: 1
The only reason why you need to find track is simply to find differences, thats all.
I measure my differences from the front axle nut and rear hub nut. It works out to be 5mm total difference on an ITR.
Honda-Tech Member
Joined: May 2002
Posts: 13,483
Likes: 0
From: cali
I understand mike, I was saying that because people seem to get hung up on it.
Many newer cars run much lower offset then stock. The race 06+ SI's run around 1 to 1.5 inchs more track width up front then OE. Same with the TSXs that used to run.
The major, #1 thing to worry about/be sure of is this.
String to hub/axle is equal on FR and FL.
Independantly of that
String to hub/axle is equal on RR and RL
How to KNOW you don't have it right
If your measurement are the same front to back.
That means something is messed up.
This has to be one of the hardest topics/things to explain through writing.
Do *** descartes said, buy some conduit, and give it a shot. It might take awhile but you should figure out what's going on.
Honda-Tech Member
Joined: Nov 2003
Posts: 228
Likes: 0
I haven't read all of the posts here, but I have only used the alignment kit from Smart String Racing. It consists of two poles with grooves cut in increments. One pole is mounted transversely on the front of the car and one at the rear in the same configuration. First, both poles mount into a pair of bars that allow the poles to be raised or lowered so that they are equadistant to the ground and center to center with the wheels.
Second, the strings are attached to the poles in the groove that will allow the strings to be as close to the wheel as possible without touching. We used fishing spools instead of the supplied strings which makes things easier.
Third, make the box square by measuring from the center of the wheel to the string. Both sides should be the same distance from the string: Left front = right front, and left rear = right rear.
Now that you have your box you are ready for your alignment. Oh, you asked about where to measure. Measure at the wheel, not the tire. It also works best to have a pair of nice metal metric rulers and a second trustworthy friend to help. They can measure and call out toe in/out to you so that you can work more efficiently. Also, remember to roll the car back and forth a few feet after each adjustment.
Here are the instructions from Smart String Racing: http://www.smartracingproducts.com/p...ngs_manual.pdf
Have fun!


Honda-Tech Member
Joined: Aug 2007
Posts: 1,576
Likes: 0
From: SF, CA, USA
Lots of good info in here  I had never considered/thought about track. "Seems" easy enough. Just compensate for the difference in the back and push the string out further (5mm or whatever it is depending on the car). Right?
I want to try the method below. The post above confuses me though since the car is obviously elevated above the ground and there is no weight in the car:
http://www.c-speedracing.com/howto/a.../alignment.php
I had never considered/thought about track. "Seems" easy enough. Just compensate for the difference in the back and push the string out further (5mm or whatever it is depending on the car). Right?I want to try the method below. The post above confuses me though since the car is obviously elevated above the ground and there is no weight in the car:
http://www.c-speedracing.com/howto/a.../alignment.php
Last edited by wakaranai; Dec 22, 2009 at 11:27 AM.
Honda-Tech Member
Joined: Jan 2005
Posts: 7,015
Likes: 7
From: b00sting my D16s, SoWis, USA
I used a similar method on my last EF last year & it worked great. It was the "parallel box" methog. I put a band of tape across each rim to measure to the best center (IMO), and made the distance equal on each side for f&r (f-to-f equal, then r-to-r equal). F-R will be different due to track, obviously. This will align them with the body, but if that's different from the suspension center, your car needs to go a chassis rack to be fixed...
I used two 1/2" steel conduits with a groove cut into them via copper pipe cutter EXACTLY the same distance, then mounted them to old license plates & wood (adjustable sideways & for height). I also put it up on 8 cinderblocks (2 per rim) with sheet metal shims & sand between, and wood chocks bolted to them - very safe. I had the benifit of a self-leveling laser level my dad borrowed from work. Made aligning it very easy. Obviously it's more time consuming because you adjust & recheck everything, and have to be careful to not bump the string, but the results speak for themself.
I did this after replacing the previous owner's ebay coilovers, which ended up cutting 3/16" of tread off in 1k miles before doing this, due the resulting toe-in. Afterward aligning it, there was no measurable change in wear after 8k miles...

Thread
Thread Starter
Forum
Replies
Last Post
GSX TO CX
Honda Civic / Del Sol (1992 - 2000)
8
May 10, 2005 07:03 PM
LX4CYL
Road Racing / Autocross & Time Attack
13
Jun 27, 2004 09:36 AM