The RAVEN: A journey for an 8s DD Automatic AWD Beast (4G63)
#26
Honda-Tech Member
Thread Starter
Join Date: Jul 2003
Location: Sacramento, CA, United States
Posts: 2,575
Likes: 0
Received 0 Likes
on
0 Posts
Alrighty, so the show must go on...
This engine bay just isn't going to work for me. Its bad enough how dirty it is but these wires are every where.. the engine already had a bunch, but now due to gauges and sensors it has even more..
No worries, I'm the man for the job.
The big debate right now is what route to go with the harness... Part of me wants to rip it out and strip it bare (I mean I have plenty of time to do so... But then the other part of me thinks it'd be a waste of time. When I can achieve a wire tuck, without relocating the fuse box to the interior like I did with my Dirty Birdie build..
Years of building these cars have showed me there are more than 1 way to do things, and sometimes previous owner "mods" help. On this car when it was equipped with a 42r, it sat in the corner where the PS reservoir use to be. A large hole was cut to allow the piping to run through that opening. My new setup wont be like this so his hole will be patched and or welded. But it was just big enough to fit the fuse box through.. what this accomplishes is the ability to tuck the harness completely out side of the engine bay, WITHOUT splicing it.
Hmmm, at this point, the only reason to do a complete harness relocation is if I was bored... lol. Here are some pics to illustrate. Don't mind the dirty engine bay, after I figure out what route I am going with the harness I'll be shaving all the holes and once I finish doing that then I'll be cleaning and respraying it black.
Starting point-

I need more room to work so everything in the way such as the radiator and hood need to GTFO!-
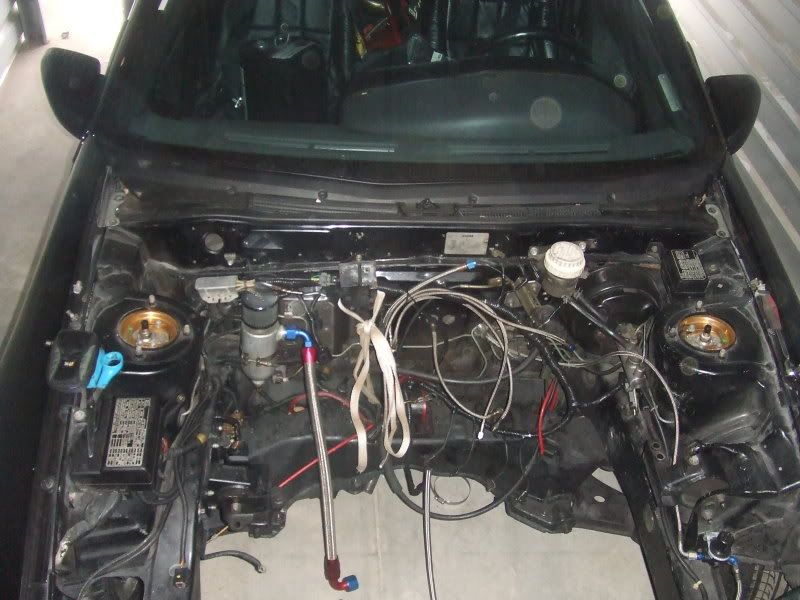
Me, a pair a scissors, and a 10mm socket/ratchet. DO WORK SON!-
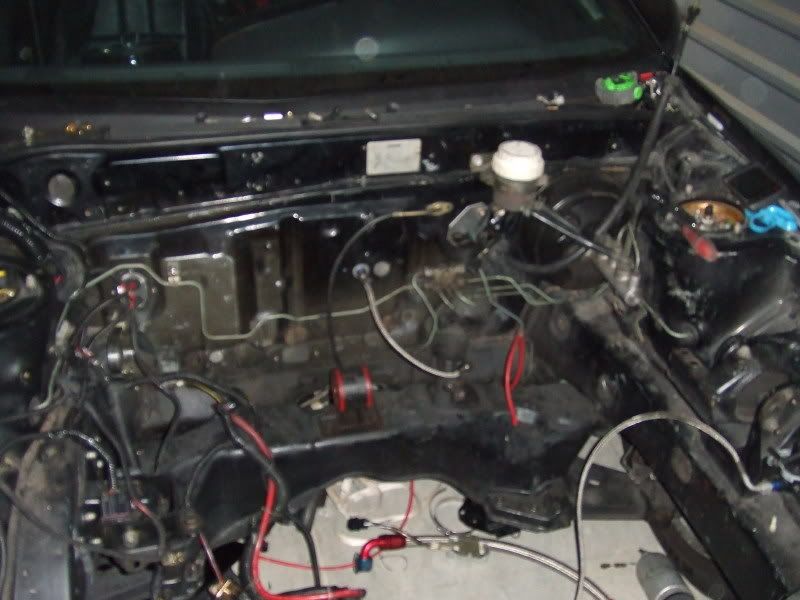
Fenders and lights gotta go too-

A lot better, still dirty tho-

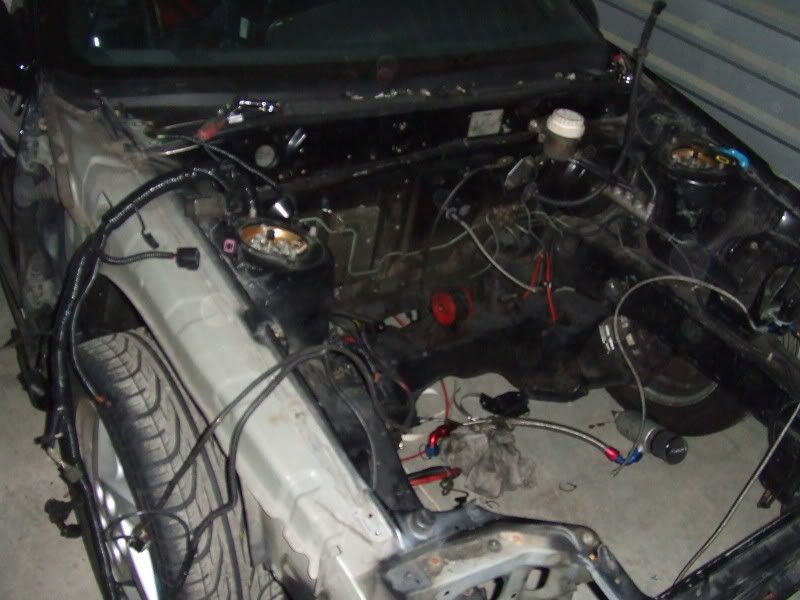
Fuse box pulled back to the drivers side where it comes from-
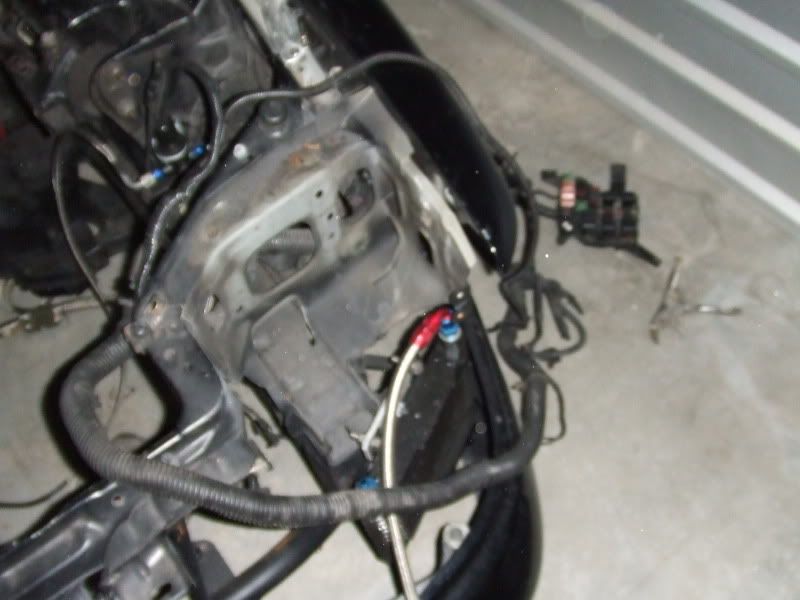
Dirty birdie part 2?-
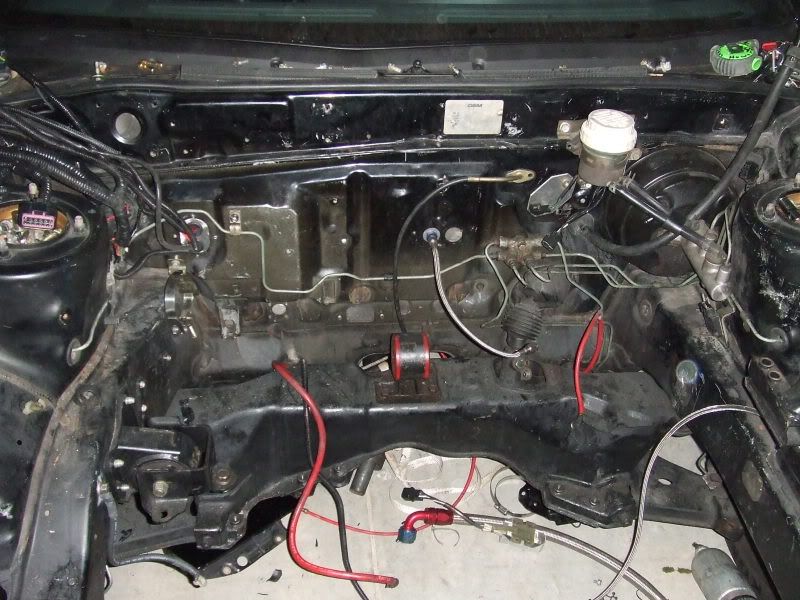
No more harness in the engine bay FTW-
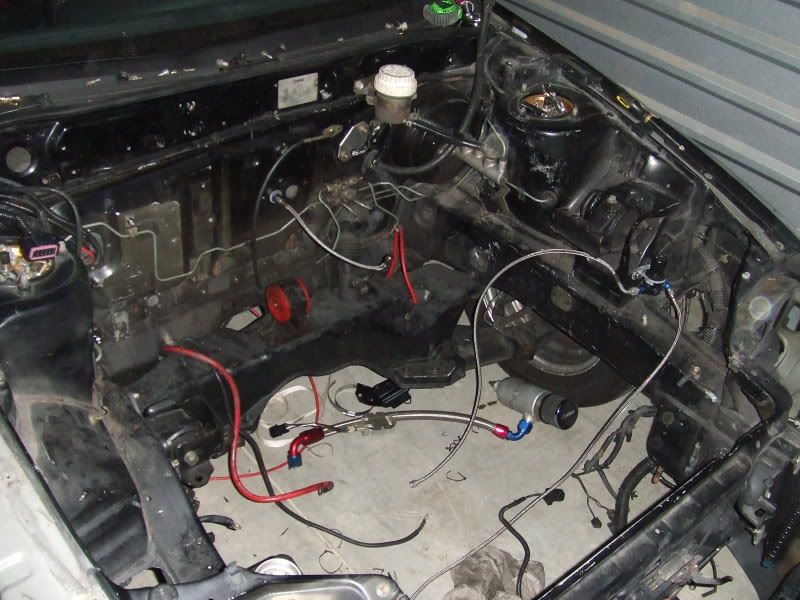
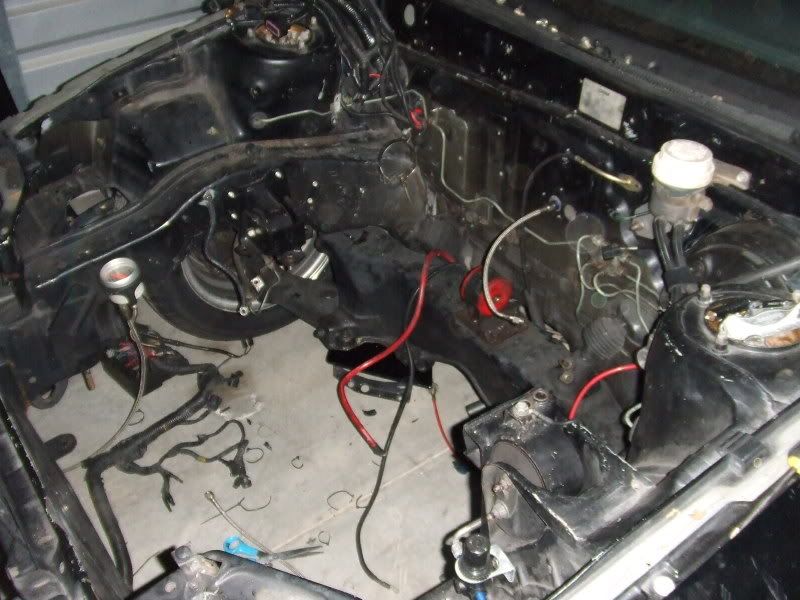
Engine harness dropped under the Brake lines. Lines, valves, screws and all will be painted black, they'll be pretty much invisible once its said and done.

And that took all of about maybe 30minutes -1hr... I've done these so many times its like second nature by now. This car just adds more complication due to the extra wires and the vacuum lines being stainless and of course the nitrous lines. In the end however it'll look that much more crisp.
I've been dying to use mu ProClassic black braided lines for a while and I've decided to go back and swap out all the SS vac. lines with the black PCs. This should help me re route them in a less visible manner, at the same time where visible they will be clean, go with the flow of the braided lines and of course look uber blingin'.
More to come.
This engine bay just isn't going to work for me. Its bad enough how dirty it is but these wires are every where.. the engine already had a bunch, but now due to gauges and sensors it has even more..
No worries, I'm the man for the job.
The big debate right now is what route to go with the harness... Part of me wants to rip it out and strip it bare (I mean I have plenty of time to do so... But then the other part of me thinks it'd be a waste of time. When I can achieve a wire tuck, without relocating the fuse box to the interior like I did with my Dirty Birdie build..
Years of building these cars have showed me there are more than 1 way to do things, and sometimes previous owner "mods" help. On this car when it was equipped with a 42r, it sat in the corner where the PS reservoir use to be. A large hole was cut to allow the piping to run through that opening. My new setup wont be like this so his hole will be patched and or welded. But it was just big enough to fit the fuse box through.. what this accomplishes is the ability to tuck the harness completely out side of the engine bay, WITHOUT splicing it.
Hmmm, at this point, the only reason to do a complete harness relocation is if I was bored... lol. Here are some pics to illustrate. Don't mind the dirty engine bay, after I figure out what route I am going with the harness I'll be shaving all the holes and once I finish doing that then I'll be cleaning and respraying it black.
Starting point-

I need more room to work so everything in the way such as the radiator and hood need to GTFO!-

Me, a pair a scissors, and a 10mm socket/ratchet. DO WORK SON!-

Fenders and lights gotta go too-

A lot better, still dirty tho-


Fuse box pulled back to the drivers side where it comes from-

Dirty birdie part 2?-

No more harness in the engine bay FTW-


Engine harness dropped under the Brake lines. Lines, valves, screws and all will be painted black, they'll be pretty much invisible once its said and done.

And that took all of about maybe 30minutes -1hr... I've done these so many times its like second nature by now. This car just adds more complication due to the extra wires and the vacuum lines being stainless and of course the nitrous lines. In the end however it'll look that much more crisp.
I've been dying to use mu ProClassic black braided lines for a while and I've decided to go back and swap out all the SS vac. lines with the black PCs. This should help me re route them in a less visible manner, at the same time where visible they will be clean, go with the flow of the braided lines and of course look uber blingin'.
More to come.
#27
Honda-Tech Member
Join Date: Jul 2008
Location: the moon
Posts: 382
Likes: 0
Received 0 Likes
on
0 Posts
how much about will the car weigh when its done?i have a 91 galant vr4 shell sitting in my yard and i dont know if i want to mess with it cause i know its a pig lol
#30
Honda-Tech Member
Thread Starter
Join Date: Jul 2003
Location: Sacramento, CA, United States
Posts: 2,575
Likes: 0
Received 0 Likes
on
0 Posts
VR4s are marvelous cars and true sleepers. Potential is endless.
#31
Honda-Tech Member
Thread Starter
Join Date: Jul 2003
Location: Sacramento, CA, United States
Posts: 2,575
Likes: 0
Received 0 Likes
on
0 Posts
Thanks guys!
So whats new guys?
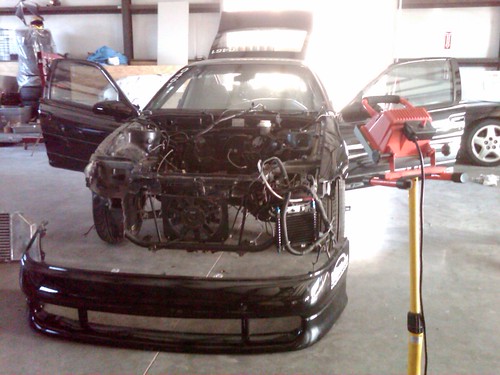
With my new found space I can actually get in there and do a lot of the things I simply haven't had the space to do. One of those being finishing the wire tuck and shaving the engine bay.
It all starts off with removing a bulk of the seam putty, making sure you leave the putty covering the seam creases but getting enough off so that when you glass or bondo it back you will have a smooth transition giving you the "Brazilian" look.
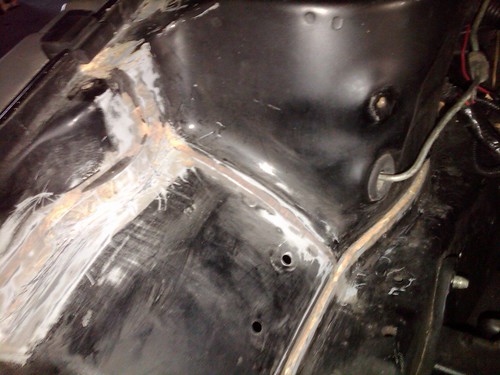


Next up you wanna prep the holes by sanding them and getting into the threads (if they have them) so that the welder can penetrate better.

Next up, pull out the welder and go to work.

Grind it all smooth.
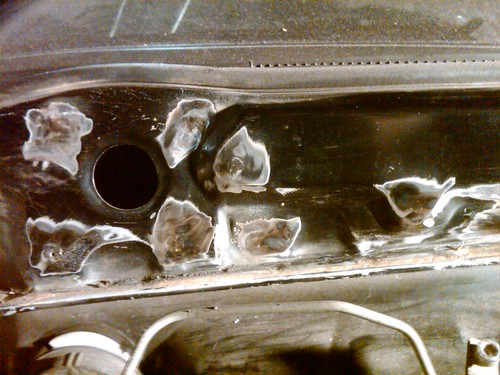
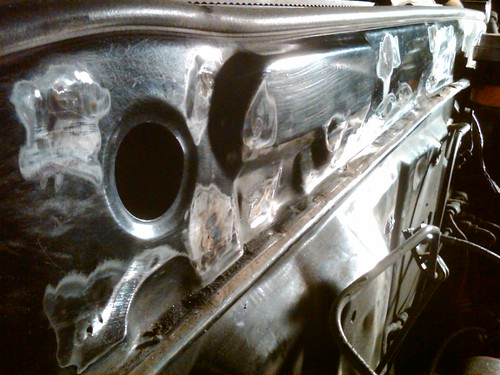
And then simply make sure its prepped for the next step. (Going to sand the rest of the engine bay down before I respray it) Its a tedious task (I estimated roughly 60+ holes that I welded closed) but the end result will more than out weigh the hard work.
More to come stay tuned.
So whats new guys?

With my new found space I can actually get in there and do a lot of the things I simply haven't had the space to do. One of those being finishing the wire tuck and shaving the engine bay.
It all starts off with removing a bulk of the seam putty, making sure you leave the putty covering the seam creases but getting enough off so that when you glass or bondo it back you will have a smooth transition giving you the "Brazilian" look.


Next up you wanna prep the holes by sanding them and getting into the threads (if they have them) so that the welder can penetrate better.

Next up, pull out the welder and go to work.

Grind it all smooth.


And then simply make sure its prepped for the next step. (Going to sand the rest of the engine bay down before I respray it) Its a tedious task (I estimated roughly 60+ holes that I welded closed) but the end result will more than out weigh the hard work.
More to come stay tuned.
#32
Honda-Tech Member
Thread Starter
Join Date: Jul 2003
Location: Sacramento, CA, United States
Posts: 2,575
Likes: 0
Received 0 Likes
on
0 Posts
I few old pics of the shell at an Endless Motoring car meet:






#34
Honda-Tech Member
Thread Starter
Join Date: Jul 2003
Location: Sacramento, CA, United States
Posts: 2,575
Likes: 0
Received 0 Likes
on
0 Posts
Awesome, thanks bro! I thought I'd let them know how the big boys get down.
More updates:
As some of you may or may not know rules have been getting a little more strict and even more-so out here in CA and especially Sacramento. The cage inspectors and licensing guys pay a lot more attention to details. The first order of business was refitting my door swing-outs. They were too low considering my height so they needed to be modified. They still look great and work beautifully which was a worry I had when I went in there with the cutoff wheel, wire brush, plasma cutter and tig welder.
I definitely enjoy the "capping" design on the door bars:

Window net and what not (feels like I have been waiting an eternity for this minor stuff..)

Also the rest of my 4" cust. 4" exhaust. It starts off as a 4" stainless down pipe and connects via v-band to the SS flex/wideband section and then via V band that connects to the rest of the piping which is aluminum saving about %60 of the weight, again that connects via v-band to the SS muffler.
SS DP:
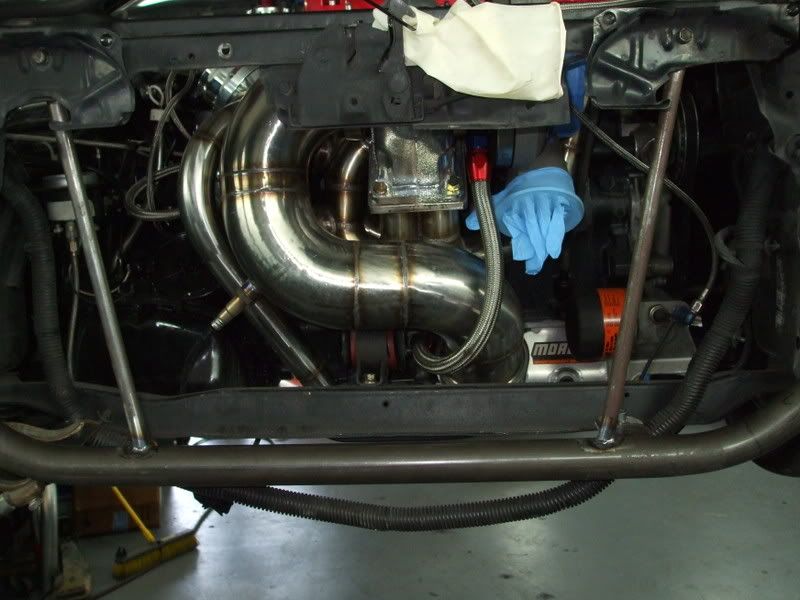
to the flex section:

to the aluminum pipe section:
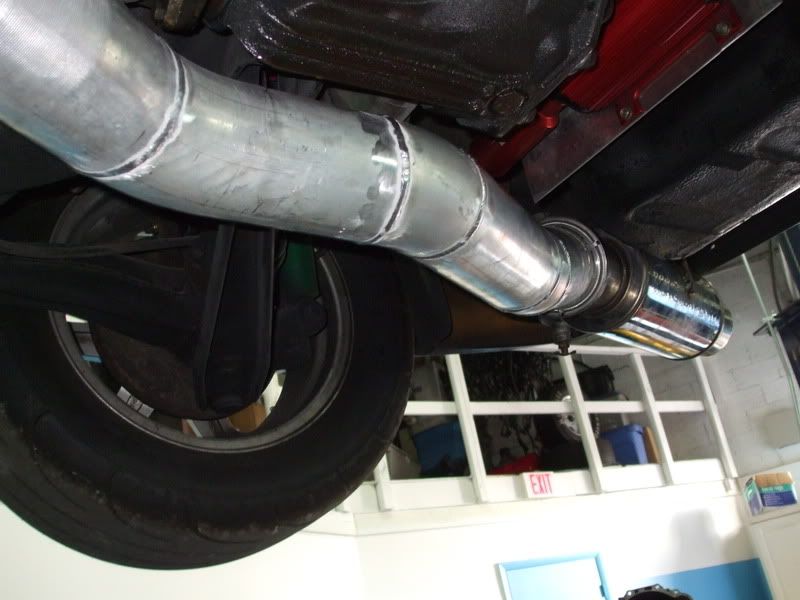
and out into the muffler.
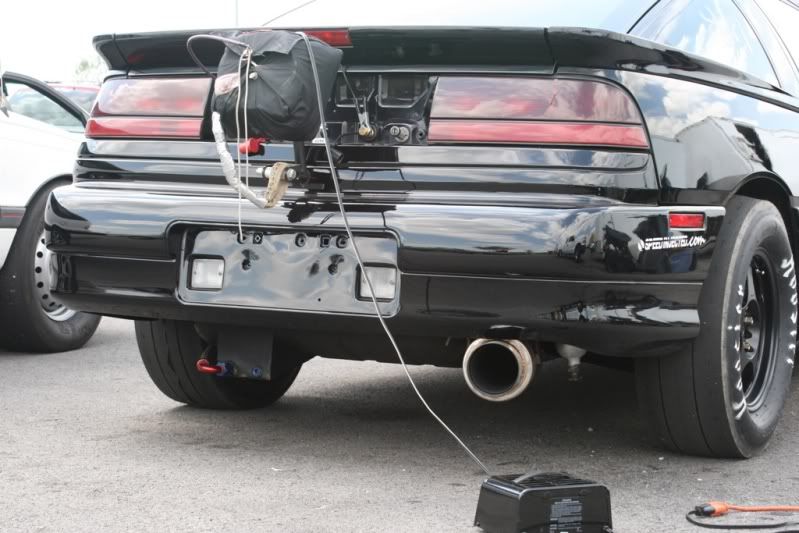
I don't think people really understand just how huge a 4" exhaust is, imagine the difference that you noticed between your stock exhaust and going 3", its that drastic to a 4" setup, especially a full 4" setup out the back. Wess Hess and the ASAP guys are real deal.
#36
Honda-Tech Member
Thread Starter
Join Date: Jul 2003
Location: Sacramento, CA, United States
Posts: 2,575
Likes: 0
Received 0 Likes
on
0 Posts
Thanks, at this point I'm piecing things together. I just need to stop being distracted by all my other car projects. I promised I'd finish this one first but apart from getting a new house, I just cant seem to stop tinkering with the other toys.
Slowly but surely.
Slowly but surely.
#38
Honda-Tech Member
Thread Starter
Join Date: Jul 2003
Location: Sacramento, CA, United States
Posts: 2,575
Likes: 0
Received 0 Likes
on
0 Posts
So the Galant is ready to start and had been taking most of the time out of the Talon build (as always) but I got around to doing something I had been meaning to do since I got the car.
The car came with a horrid stock 1g steering wheel (I hate em, been racing too long around tracks and far too use to proper wheels and hand placement as well as comfort)
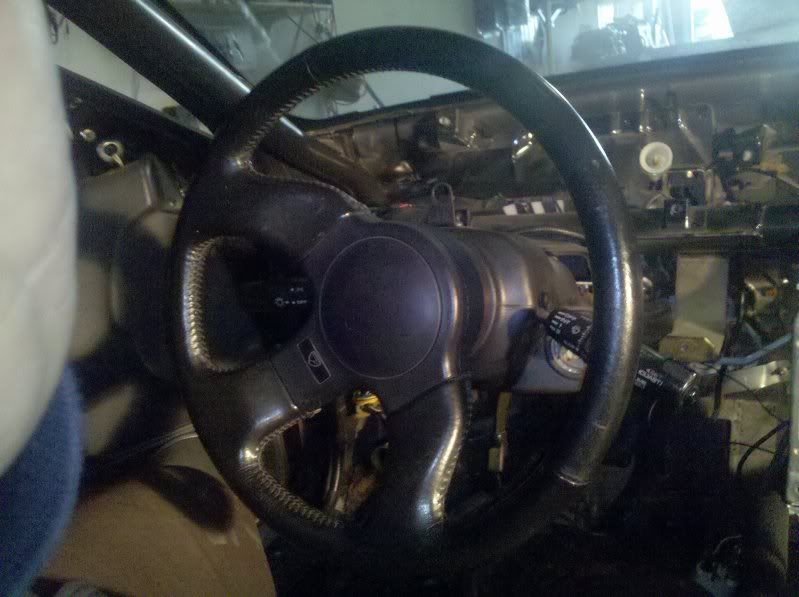
I had custom made a hub adapter for the wheel at a buddies shop:

I didn't have my Momo with me so I had to use one of his funky wheels until I got it back home:

The idea was to do a quick disconnect setup to help with the ease of getting in and out of the car. Most are familiar with the standard "multi ball" 'pull' type QD hubs. I've personally had them and after a while they start vibrating a lot and they get a little sloppy as the steel ***** begin wearing away at the aluminum hub. It also tends to stick out too far and makes your steering wheel heavy with the large hub attached to it. I will admit, the price is great on them!

So with help of said friend again I managed to source some goooooold! :D


Oh yes, the twist lock slim hub. :rockon:
This thing is badass and damn near weightless:
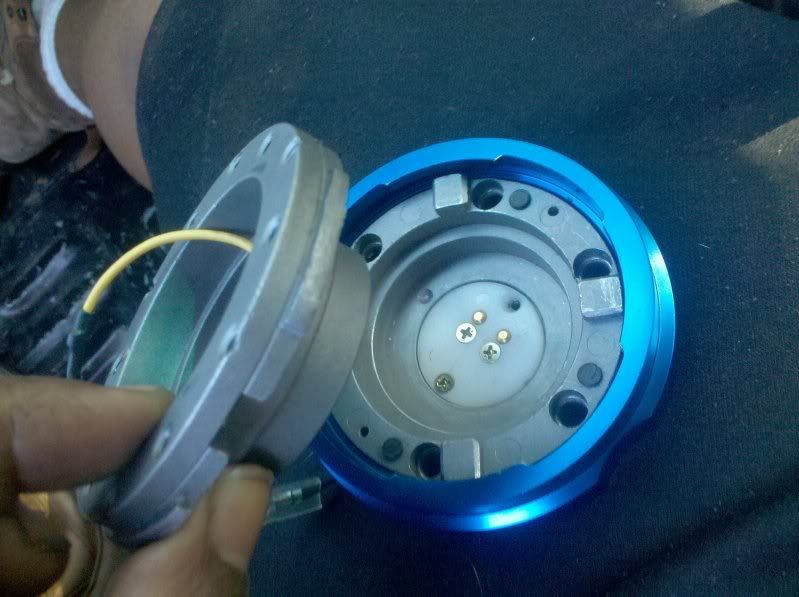
A long while back I lucked out and got my hands on a legit Momo wheel. Its my favorite item and has been with me since day one of my first DSM. Its a nice wheel that you still see a lot of replicas of today but regardless it has a wonderful feel:

Not to mention it isn't half sized like a lot of these other aftermarket setups:
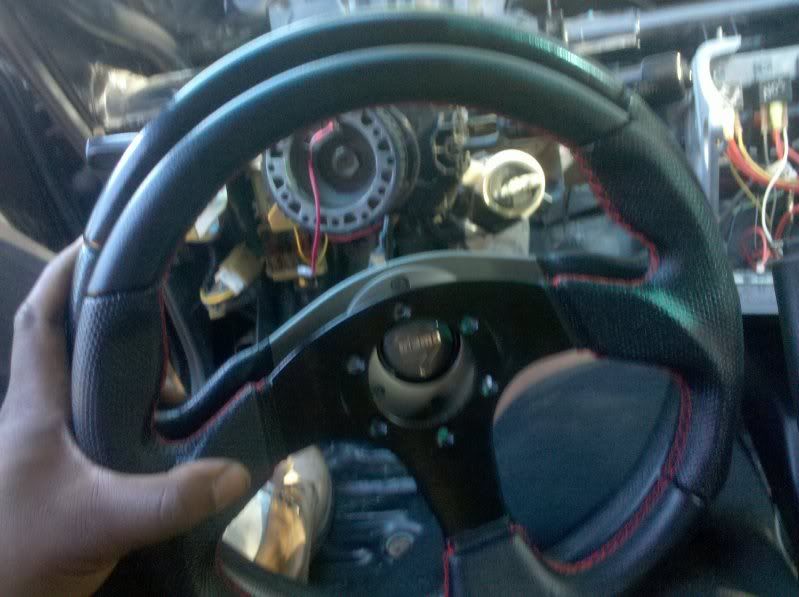
Well to get this all to fit we had a problem, the stationary hub and the QD hub don't fit. :sosad: No biggies, just meant I needed to modify the stationary adapter hub by smoothing the inner steps:

And then turn down the diameter of the QD hub:

Easy-peasy:

Viola!:

And then attach the acceptor hub to the wheel:

Ready to go, no freaking "bearing" locks:

Twist to open and close:

Yay!:

On a side note, that took WAAAAY more work than I thought it would. I would have assumed it was a matter of finding an adapter hub, slapping on one nut, then slapping the slim hub on and the wheel and 30min later, good to go. Yeeeeah right. Fkin thing to a lot more fabrication that I'd figure, but I am pleased with the results. :cool:
I guess this part of the post is where I reply to PMs.
I was asked about the cage main hoop and a pillar bars so I took a few more pics and hopefully these are the ones you wanted... :hmm:
As far as the main hoop, yes it does pretty much touch the body. I'm not sure of any rules that say there must be a specific amount of gap there, but I did get certified previously if that means anything:
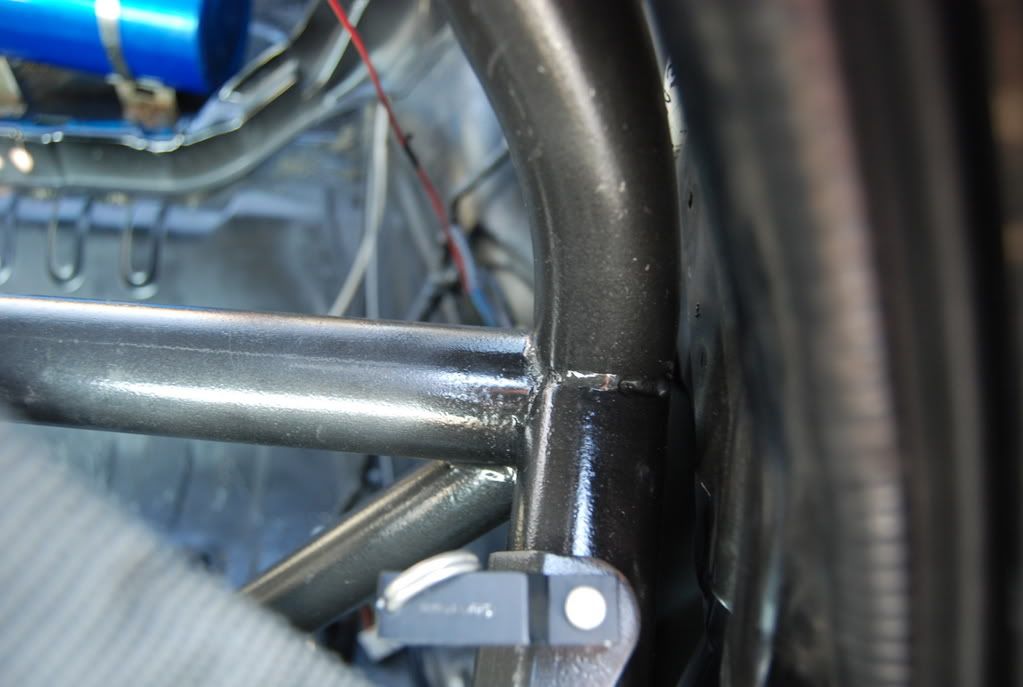
Also from that picture you can see how the door bars are designed. They don't swing out. (The bar does pivot though so that when you take that top pin out the bar will fall down towards the floor making it easy to get in and out) I like the way swingouts work allowing you to get in and out of the car bur due to operate size/height the main hoop sit farther back than most which inturn makes it invisible from outside the car:
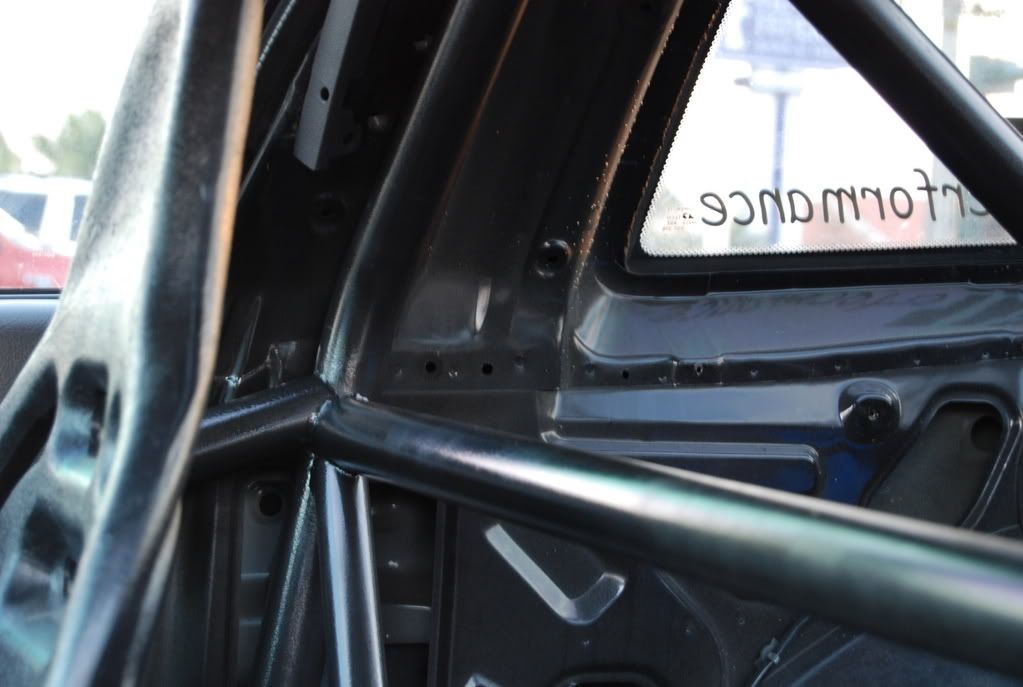
As far as the A pillar bars, they are pretty crazy... They ride down, hugging the pillar than due to the body shape they are slightly bent to clear behind the dash and then angle down:

Attention to detail is on an OCD level but I can appreciate it, I need all the space I can get and the stealthiness helps with the cops.
The last interior related question I was asked was about the separate fuse box and what its for/ where it goes.
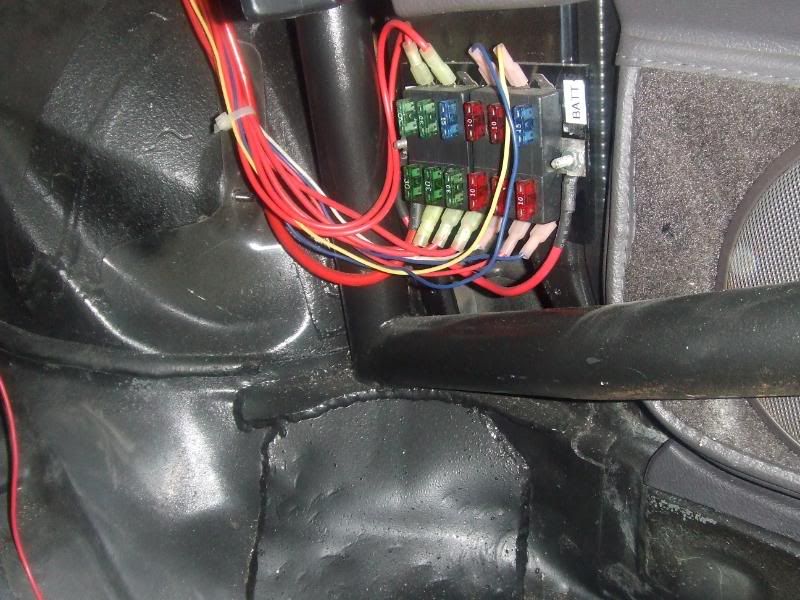
Well that particular fuse box is for all the accessories such as gauges, fans, the NOS system, etc etc. Nothing nonOEM is wired into the sh*tty factory wiring harness.
Plenty of those wires lead to the relay panel behind the A/C controls:

Those guys are then hooked to the front "fire" panel:
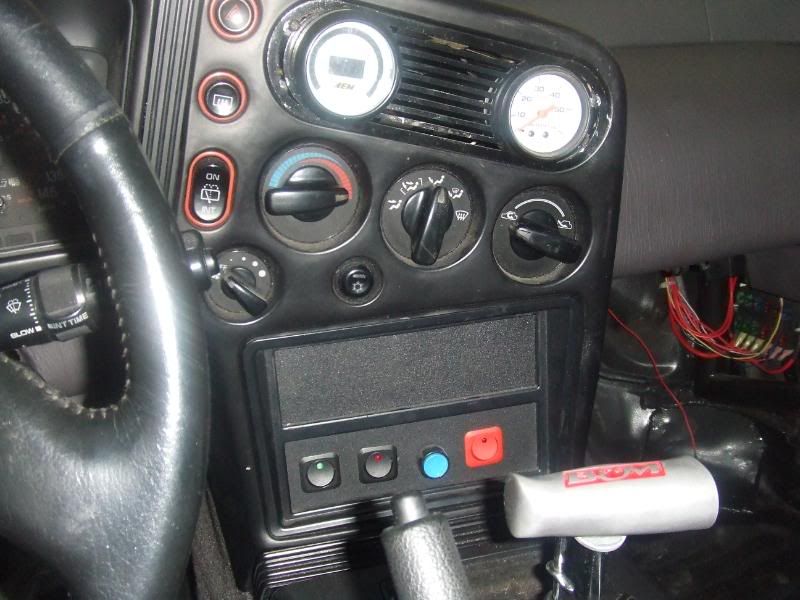
Hopefully that answered your questions, if they didn't PM me again and post up with possibly some pics so I know what you were asking.
Thanks for your time guys.. The next stretch of progress will most likely be on finishing up the wiring for the engine bay wire tuck and shave.
Next up however will be some Galant updates since she's almost ready to fire.
The car came with a horrid stock 1g steering wheel (I hate em, been racing too long around tracks and far too use to proper wheels and hand placement as well as comfort)

I had custom made a hub adapter for the wheel at a buddies shop:

I didn't have my Momo with me so I had to use one of his funky wheels until I got it back home:

The idea was to do a quick disconnect setup to help with the ease of getting in and out of the car. Most are familiar with the standard "multi ball" 'pull' type QD hubs. I've personally had them and after a while they start vibrating a lot and they get a little sloppy as the steel ***** begin wearing away at the aluminum hub. It also tends to stick out too far and makes your steering wheel heavy with the large hub attached to it. I will admit, the price is great on them!

So with help of said friend again I managed to source some goooooold! :D


Oh yes, the twist lock slim hub. :rockon:
This thing is badass and damn near weightless:

A long while back I lucked out and got my hands on a legit Momo wheel. Its my favorite item and has been with me since day one of my first DSM. Its a nice wheel that you still see a lot of replicas of today but regardless it has a wonderful feel:

Not to mention it isn't half sized like a lot of these other aftermarket setups:

Well to get this all to fit we had a problem, the stationary hub and the QD hub don't fit. :sosad: No biggies, just meant I needed to modify the stationary adapter hub by smoothing the inner steps:

And then turn down the diameter of the QD hub:

Easy-peasy:

Viola!:

And then attach the acceptor hub to the wheel:

Ready to go, no freaking "bearing" locks:

Twist to open and close:

Yay!:

On a side note, that took WAAAAY more work than I thought it would. I would have assumed it was a matter of finding an adapter hub, slapping on one nut, then slapping the slim hub on and the wheel and 30min later, good to go. Yeeeeah right.
 Fkin thing to a lot more fabrication that I'd figure, but I am pleased with the results. :cool:
I guess this part of the post is where I reply to PMs.
I was asked about the cage main hoop and a pillar bars so I took a few more pics and hopefully these are the ones you wanted... :hmm:
As far as the main hoop, yes it does pretty much touch the body. I'm not sure of any rules that say there must be a specific amount of gap there, but I did get certified previously if that means anything:

Also from that picture you can see how the door bars are designed. They don't swing out. (The bar does pivot though so that when you take that top pin out the bar will fall down towards the floor making it easy to get in and out) I like the way swingouts work allowing you to get in and out of the car bur due to operate size/height the main hoop sit farther back than most which inturn makes it invisible from outside the car:

As far as the A pillar bars, they are pretty crazy... They ride down, hugging the pillar than due to the body shape they are slightly bent to clear behind the dash and then angle down:

Attention to detail is on an OCD level but I can appreciate it, I need all the space I can get and the stealthiness helps with the cops.
The last interior related question I was asked was about the separate fuse box and what its for/ where it goes.

Well that particular fuse box is for all the accessories such as gauges, fans, the NOS system, etc etc. Nothing nonOEM is wired into the sh*tty factory wiring harness.
Plenty of those wires lead to the relay panel behind the A/C controls:

Those guys are then hooked to the front "fire" panel:

Hopefully that answered your questions, if they didn't PM me again and post up with possibly some pics so I know what you were asking.
Thanks for your time guys.. The next stretch of progress will most likely be on finishing up the wiring for the engine bay wire tuck and shave.
Next up however will be some Galant updates since she's almost ready to fire.
#40
Honda-Tech Member
Thread Starter
Join Date: Jul 2003
Location: Sacramento, CA, United States
Posts: 2,575
Likes: 0
Received 0 Likes
on
0 Posts
#41
Honda-Tech Member
Thread Starter
Join Date: Jul 2003
Location: Sacramento, CA, United States
Posts: 2,575
Likes: 0
Received 0 Likes
on
0 Posts
Ask and yee shall receive!
To do a recap on where we last left off I had begun the tedious task of pulling the wiring harness to ready myself for stripping down the harness and getting it race/ tuck ready. This process will include removing a MAJORITY, yes, more sh*t is removed than kept, of the unneeded bull crap from the harness. Relocating it to a more hidden location ad above all else actually rerouting the wires so that they can better be branched from a central location rather than the OEM method that is beyond embarrassing to lay eyes upon for anyone with even a minor any any type of engineering that branches into electrical. :chair:
And here was our stopping point when I last posted:

Intimidating to say the least but confidences is key. If you are familiar with these cars it makes it a LOT easier but you'll definitely want to use our available tech articles (which are a b*tch to find *especially for the 1Gs so I'ma do you a favor and post em for ya.
The primary 2 sites I used were: Project Zero G -
http://www.projectzerog.com/wiring-how_to.shtml
This site is the main site that gives you the lay out of the secondary plugs on the engine harness than other places like VFAQ totally ignore. If you look through the menu you will find the ECU harness pin out as well -
http://www.projectzerog.com/wiring_info.shtml
Now a site I ignored at first but later became my bible was this one here from the mirage-performance tech guys -
http://tech.mirage-performance.com/1...neHarness.html
With that site you can identify every single plug and relay on the harness which at some point will come in handy just in case you get a little carried away. I have done a few 1GB harness before but I was thrown off by this 90 harness (first 90 harness I have messed with) and since it had been a minute since I uninstalled all of it I forgot that there are lots of differences so I WASTED a lot of time looking for connectors and wires that were right in front of my face but were different sized/type of connectors or were wired slightly different.
Another helpful one that I didn't need but some others might benefit from is this site that shows you the Engine harness pinout with the color coded wires off to the sides... Very useful for those less familiar with the wiring. -
http://www.dsmtalk.com/gallery/data/...2_Model_1_.jpg
Now as for you 2G guys.. you have an ABUNDANT amount of info to do your tuck. Regardless of having more wires it is a lot easier. There are threads for 2Gs that have damn near every single plug identified and decade long threads dedicated solely to tucking 2Gs.. Ef you guys!
 1Gs still look better in the end.
Ok, now onto the work...
To do a recap on where we last left off I had begun the tedious task of pulling the wiring harness to ready myself for stripping down the harness and getting it race/ tuck ready. This process will include removing a MAJORITY, yes, more sh*t is removed than kept, of the unneeded bull crap from the harness. Relocating it to a more hidden location ad above all else actually rerouting the wires so that they can better be branched from a central location rather than the OEM method that is beyond embarrassing to lay eyes upon for anyone with even a minor any any type of engineering that branches into electrical. :chair:
And here was our stopping point when I last posted:

Intimidating to say the least but confidences is key. If you are familiar with these cars it makes it a LOT easier but you'll definitely want to use our available tech articles (which are a b*tch to find *especially for the 1Gs so I'ma do you a favor and post em for ya.

The primary 2 sites I used were: Project Zero G -
http://www.projectzerog.com/wiring-how_to.shtml
This site is the main site that gives you the lay out of the secondary plugs on the engine harness than other places like VFAQ totally ignore. If you look through the menu you will find the ECU harness pin out as well -
http://www.projectzerog.com/wiring_info.shtml
Now a site I ignored at first but later became my bible was this one here from the mirage-performance tech guys -
http://tech.mirage-performance.com/1...neHarness.html
With that site you can identify every single plug and relay on the harness which at some point will come in handy just in case you get a little carried away. I have done a few 1GB harness before but I was thrown off by this 90 harness (first 90 harness I have messed with) and since it had been a minute since I uninstalled all of it I forgot that there are lots of differences so I WASTED a lot of time looking for connectors and wires that were right in front of my face but were different sized/type of connectors or were wired slightly different.
Another helpful one that I didn't need but some others might benefit from is this site that shows you the Engine harness pinout with the color coded wires off to the sides... Very useful for those less familiar with the wiring. -
http://www.dsmtalk.com/gallery/data/...2_Model_1_.jpg
Now as for you 2G guys.. you have an ABUNDANT amount of info to do your tuck. Regardless of having more wires it is a lot easier. There are threads for 2Gs that have damn near every single plug identified and decade long threads dedicated solely to tucking 2Gs.. Ef you guys!

 1Gs still look better in the end.
Ok, now onto the work...
#42
Honda-Tech Member
Thread Starter
Join Date: Jul 2003
Location: Sacramento, CA, United States
Posts: 2,575
Likes: 0
Received 0 Likes
on
0 Posts
So now the dirty work begins, I assembled a nice set of tools to begins tripping the harness:

1. Med-large box
2. Gloves
3. Utility scissors
4. Razor blade
5. 1/2-3/4" masking tape
6. Netbook/Laptop/IPad/Desktop
In this picture you'll see a nice sized box naturally to put all the crap in.. Get rid of the wires as you take em off or else they will only help to confuse you later on.
Next up is a pair of gloves. My harness was fairly clean but either way you'll be dealing with either dirt and or sticky residue from the tape when you pull it off which will leave your fingers icky and black and will get on anything you touch and just make you miserable.
I chose utility scissors over snips just because of the ease of use. and the ability to cut multiple wires at ones which can help you line up a bunch of wires for some clean work. Also once you get to the point where you are cutting anything they do a hell of a lot better job at cutting through rubber boots etc than the blade.
The blade is the speed tool. Find the groove in the harness cover and run the blade along it to open it up quick and fast like gutting a fish. Also using the blade with finesse allows you to open up the loom with out fear of cutting through wires like you would with the scissors as well as getting into tight spots.
Don't do what I did and start off with friggin' 2" wide tape. It WILL **** you off and slow you down. At this size it is perfect for everything from labeling wires to connectors to bundling the harness to help you organize the chaos. Very important! I chose the masking tape over the Painters tape because it comes off easier. It hats the dirt and the electrical tape goo and it will stick once and only once and come off with ease but only when you want it to.
And finally some type of computer. You WILL run into a snag and need to look it up. Don't guess, spend the extra time and do it right the first time!
First up.. Remove all of the wire wire loom...

The method I used for the engine harness was to use the sites I mentioned before to find the pins and snip the wires at the connector and fish em out. (I can always slice back into those connectors later on if I want to use them for anything.. Specifically the solenoids which I will be using to control my nitrous) Be careful because plenty of them are bundled so don't get too happy. The Project Zero site actually shows you everything you can remove in a basic harness tuck. I went above and beyond so it took em having a better understanding on what I needed and didn't to make it happen.:

Take your time and never get over whelmed, if you get antsy, take a break and come back, don't rush this. It'll be a million times worse if you have to trouble shoot when its all said and done. Keep your removed wires out of the way and out of sight. NO DISTRACTIONS! Once you get to a point where you are ready to lay out your harness begin taping the harness to keep it under control. The masking tape is hard enough that it will allow you to still pull wires through them without losing shape or breaking which is awesome!:

Before you know it you will have something that half way resembles a wiring harness of some sort.. In the picture you'll notice that my harness is wired similar to stock where the coolant lines are at the end of the harness which will force you to loop it. Also a few other issues with the way the stock harness is setup just wont work for what I want so plan it out in your head like I did or if it helps you you can draw it out and then get your final layout down:

The injectors begin the harness, the coil pack si relocated since I use a COP and the MSD anyways, everything will be very much hidden underneath the massive Magnus manifold. The coolant lines have been relocated so they can branch out on their own in a thin harness branch that will be easy to hide and if I can I'll have my sensors relocated to the rear of the housing to make it even easier, we'll see..
Look at that rats nest I removed!

You might notice some special things about the harness.. Yes I have my AEM map sensor wired in the harness. My IAT wires are there I just don't yet have the pig tail. All of the branches are untouched and much longer than they will be when I put the flex loom on. You'll notice too that the injector plugs are the updated plugs with the built in clips:

Out of all of those plugs 2 of them are check wires (speed/tach and fuel) and they will be tucked away so I reduced a 40 connector harness to a handful of connectors which is what you want. I also managed to re rout things so that the Ignition relay is right inside the firewall out of sight. The 90 wire harness allows you to tuck your harness a little more simply because there are no plugs on top of the TPS or the CAS.
Now, for the main harness/ chassis harness/ fusebox harness... OR what ever the hell you want to call it, my methods changed.
There are no layouts of the connectors so instead I chose to begin my sniping at the fuse box itself. Tracing from this centralized point made life a lot easier.. Ironically removing my fog lights alone got rid of damn near an entire connector. Pull the retaining tab and go to work. Remove the fuses and relays as you delete said items.


Do work son! This harness is most likely cut (you have to cut it to remove it) so if you have it labeled well you can delete wires on the fuse box side and trace it on over to the harness end. Again, try to work clean and focus on the task.

What a difference that makes on both ends! *Notce the box-o-wires! :eek:*

Its getting there but remember that this harness begins on the drivers side of the car and travels to the front, along the front core, up the frame and all the way to the passenger shock tower. Naturally its LONG!:

Time to once again, mock up your wire path in the actual car, in your head or on a piece of paper and determine where you can safely cut the harness of course remembering you will have to extend the headlight wires. If your like me and relocating your alternator to behind the motor you'll find your alternator connector is WAY too long as well..
Re tag your wires so work with your newly desired length and snip-snip. Look how much more was removed!:


Yes, I literally hacked the harness in half if not more! Now the fun part begins..

1. Med-large box
2. Gloves
3. Utility scissors
4. Razor blade
5. 1/2-3/4" masking tape
6. Netbook/Laptop/IPad/Desktop
In this picture you'll see a nice sized box naturally to put all the crap in.. Get rid of the wires as you take em off or else they will only help to confuse you later on.
Next up is a pair of gloves. My harness was fairly clean but either way you'll be dealing with either dirt and or sticky residue from the tape when you pull it off which will leave your fingers icky and black and will get on anything you touch and just make you miserable.
I chose utility scissors over snips just because of the ease of use. and the ability to cut multiple wires at ones which can help you line up a bunch of wires for some clean work. Also once you get to the point where you are cutting anything they do a hell of a lot better job at cutting through rubber boots etc than the blade.
The blade is the speed tool. Find the groove in the harness cover and run the blade along it to open it up quick and fast like gutting a fish. Also using the blade with finesse allows you to open up the loom with out fear of cutting through wires like you would with the scissors as well as getting into tight spots.
Don't do what I did and start off with friggin' 2" wide tape. It WILL **** you off and slow you down. At this size it is perfect for everything from labeling wires to connectors to bundling the harness to help you organize the chaos. Very important! I chose the masking tape over the Painters tape because it comes off easier. It hats the dirt and the electrical tape goo and it will stick once and only once and come off with ease but only when you want it to.
And finally some type of computer. You WILL run into a snag and need to look it up. Don't guess, spend the extra time and do it right the first time!
First up.. Remove all of the wire wire loom...

The method I used for the engine harness was to use the sites I mentioned before to find the pins and snip the wires at the connector and fish em out. (I can always slice back into those connectors later on if I want to use them for anything.. Specifically the solenoids which I will be using to control my nitrous) Be careful because plenty of them are bundled so don't get too happy. The Project Zero site actually shows you everything you can remove in a basic harness tuck. I went above and beyond so it took em having a better understanding on what I needed and didn't to make it happen.:

Take your time and never get over whelmed, if you get antsy, take a break and come back, don't rush this. It'll be a million times worse if you have to trouble shoot when its all said and done. Keep your removed wires out of the way and out of sight. NO DISTRACTIONS! Once you get to a point where you are ready to lay out your harness begin taping the harness to keep it under control. The masking tape is hard enough that it will allow you to still pull wires through them without losing shape or breaking which is awesome!:

Before you know it you will have something that half way resembles a wiring harness of some sort.. In the picture you'll notice that my harness is wired similar to stock where the coolant lines are at the end of the harness which will force you to loop it. Also a few other issues with the way the stock harness is setup just wont work for what I want so plan it out in your head like I did or if it helps you you can draw it out and then get your final layout down:

The injectors begin the harness, the coil pack si relocated since I use a COP and the MSD anyways, everything will be very much hidden underneath the massive Magnus manifold. The coolant lines have been relocated so they can branch out on their own in a thin harness branch that will be easy to hide and if I can I'll have my sensors relocated to the rear of the housing to make it even easier, we'll see..
Look at that rats nest I removed!

You might notice some special things about the harness.. Yes I have my AEM map sensor wired in the harness. My IAT wires are there I just don't yet have the pig tail. All of the branches are untouched and much longer than they will be when I put the flex loom on. You'll notice too that the injector plugs are the updated plugs with the built in clips:

Out of all of those plugs 2 of them are check wires (speed/tach and fuel) and they will be tucked away so I reduced a 40 connector harness to a handful of connectors which is what you want. I also managed to re rout things so that the Ignition relay is right inside the firewall out of sight. The 90 wire harness allows you to tuck your harness a little more simply because there are no plugs on top of the TPS or the CAS.
Now, for the main harness/ chassis harness/ fusebox harness... OR what ever the hell you want to call it, my methods changed.
There are no layouts of the connectors so instead I chose to begin my sniping at the fuse box itself. Tracing from this centralized point made life a lot easier.. Ironically removing my fog lights alone got rid of damn near an entire connector. Pull the retaining tab and go to work. Remove the fuses and relays as you delete said items.


Do work son! This harness is most likely cut (you have to cut it to remove it) so if you have it labeled well you can delete wires on the fuse box side and trace it on over to the harness end. Again, try to work clean and focus on the task.

What a difference that makes on both ends! *Notce the box-o-wires! :eek:*

Its getting there but remember that this harness begins on the drivers side of the car and travels to the front, along the front core, up the frame and all the way to the passenger shock tower. Naturally its LONG!:

Time to once again, mock up your wire path in the actual car, in your head or on a piece of paper and determine where you can safely cut the harness of course remembering you will have to extend the headlight wires. If your like me and relocating your alternator to behind the motor you'll find your alternator connector is WAY too long as well..
Re tag your wires so work with your newly desired length and snip-snip. Look how much more was removed!:


Yes, I literally hacked the harness in half if not more! Now the fun part begins..

#43
Honda-Tech Member
Thread Starter
Join Date: Jul 2003
Location: Sacramento, CA, United States
Posts: 2,575
Likes: 0
Received 0 Likes
on
0 Posts
Onto our next tool/item list...

1. Soldering iron
2. Quality solder
3. Heat shrink - Multiple lengths and sizes
4. Heat gun
5. Good set of multi-use wire stripers/crimpers.. (I have the auto ones as well but it all works the same)
6. Zipties
This list is pretty much self explanatory. Make sure to use heat shrink and not electrical tape. Don't ghetto rig such a vital part of your car and risk some big issues down the line that WILL come from using electrical tape. Do it right and solder the wires as well as heat shrinking the connection. As always, try to stagger as many of the connections as possible.

The finish em off:

And viola!

What a CRAZY difference... Just looking under the fuse box you can see how much was removed alone from there.

Both harnesses together:

The mass of wires removed from both harnesses filled up that entire box!:

7 LBS removed in wires alone!

So this is how the wire harnesses will stay until everything else is installed. Then the harness is placed and the final measurements and routes for the wires and set in and the masking tape then turns into electrical tape and zipties (more permanent) and finally the Flex loop will be applied to finish it off. Hopefully you wont see it regardless.. While I am patiently waiting on more parts to come in and the motor progress I am tempted to pull the entire interior harness as well and go to town. I've almost 100% decided on doing it although there isn't much to gain from it since its pretty isolated. All in all when you consider that all I need are my wires for the rear lights and fuel pump and that all the other wires are useless.. I'm still on the fence as to whether I got manual windows or not, I still need to find the final numbers on how much weight I'll save. Not until then will I make the decision to strip the interior harness too. Literally all it needs is ignition, fuel pump (actually only like 2-3 out of the 15 fuel pump wires) the rare lights and the rest can go... Having m dash board off and having to star at the huge harness every time I get in doesn't help..

1. Soldering iron
2. Quality solder
3. Heat shrink - Multiple lengths and sizes
4. Heat gun
5. Good set of multi-use wire stripers/crimpers.. (I have the auto ones as well but it all works the same)
6. Zipties
This list is pretty much self explanatory. Make sure to use heat shrink and not electrical tape. Don't ghetto rig such a vital part of your car and risk some big issues down the line that WILL come from using electrical tape. Do it right and solder the wires as well as heat shrinking the connection. As always, try to stagger as many of the connections as possible.

The finish em off:

And viola!

What a CRAZY difference... Just looking under the fuse box you can see how much was removed alone from there.

Both harnesses together:

The mass of wires removed from both harnesses filled up that entire box!:

7 LBS removed in wires alone!

So this is how the wire harnesses will stay until everything else is installed. Then the harness is placed and the final measurements and routes for the wires and set in and the masking tape then turns into electrical tape and zipties (more permanent) and finally the Flex loop will be applied to finish it off. Hopefully you wont see it regardless.. While I am patiently waiting on more parts to come in and the motor progress I am tempted to pull the entire interior harness as well and go to town. I've almost 100% decided on doing it although there isn't much to gain from it since its pretty isolated. All in all when you consider that all I need are my wires for the rear lights and fuel pump and that all the other wires are useless.. I'm still on the fence as to whether I got manual windows or not, I still need to find the final numbers on how much weight I'll save. Not until then will I make the decision to strip the interior harness too. Literally all it needs is ignition, fuel pump (actually only like 2-3 out of the 15 fuel pump wires) the rare lights and the rest can go... Having m dash board off and having to star at the huge harness every time I get in doesn't help..
#47
Honda-Tech Member
Thread Starter
Join Date: Jul 2003
Location: Sacramento, CA, United States
Posts: 2,575
Likes: 0
Received 0 Likes
on
0 Posts
Thanks for the kind words guys!
Yeah its a pain at times but its all worth it in the end. Its a dirty job but someone has to do it I suppose lol.
BUILT NOT BOUGHT!
More updates comin soon.
Yeah its a pain at times but its all worth it in the end. Its a dirty job but someone has to do it I suppose lol.
BUILT NOT BOUGHT!
More updates comin soon.
#48
Honda-Tech Member
Thread Starter
Join Date: Jul 2003
Location: Sacramento, CA, United States
Posts: 2,575
Likes: 0
Received 0 Likes
on
0 Posts
And the show must go on!
While I am doing all of this I figured it'd be a great time to get the machine work started on the motor:

Heads off, now its time to get those nuts off of the oil pan studs and goto work!

The crank.. Or whats left of it.

Time to get my 12pt and start goin to town on these ARP fasteners!


Tap-Tap.

Here's a shot of the clearancing needed on the mains for Aluminum rods:

Now time to get those pesky rods off...

Groden/Ross:
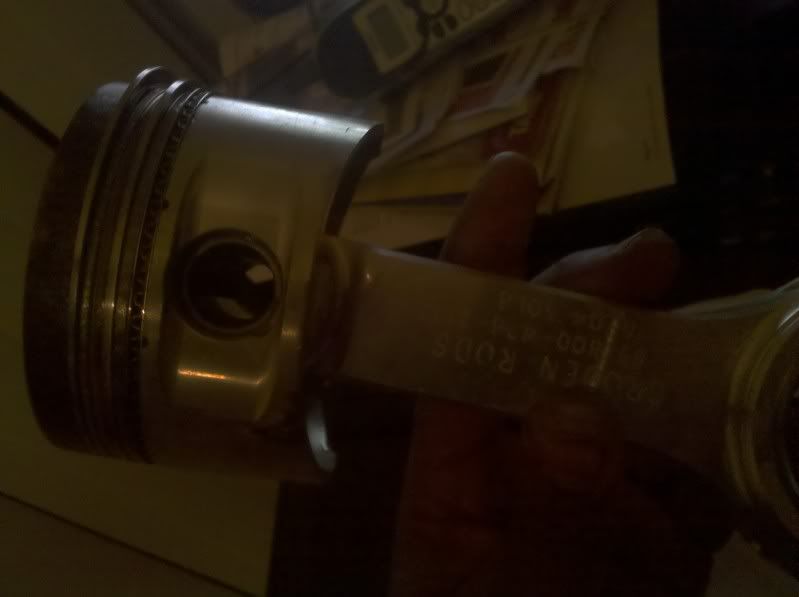
As mentioned before I will be going high compression so I opted out of the 9:1 Ross for something a little more "custom"

MmmMm beefy!


A little comparison; My HD pins vs standard:

And just a little gauge you can use to guess the compression of my new pistons vs my old Ross:


While I am doing all of this I figured it'd be a great time to get the machine work started on the motor:

Heads off, now its time to get those nuts off of the oil pan studs and goto work!

The crank.. Or whats left of it.


Time to get my 12pt and start goin to town on these ARP fasteners!


Tap-Tap.

Here's a shot of the clearancing needed on the mains for Aluminum rods:

Now time to get those pesky rods off...

Groden/Ross:

As mentioned before I will be going high compression so I opted out of the 9:1 Ross for something a little more "custom"

MmmMm beefy!


A little comparison; My HD pins vs standard:

And just a little gauge you can use to guess the compression of my new pistons vs my old Ross:


#49
Botched thread poll
Join Date: Sep 2002
Location: Helena, MT
Posts: 2,164
Likes: 0
Received 0 Likes
on
0 Posts
man you are crazy, taking on a dsm build like that, good work!
I hope I see you out at sac raceway this spring, I'll say whats up.
I hope I see you out at sac raceway this spring, I'll say whats up.


