

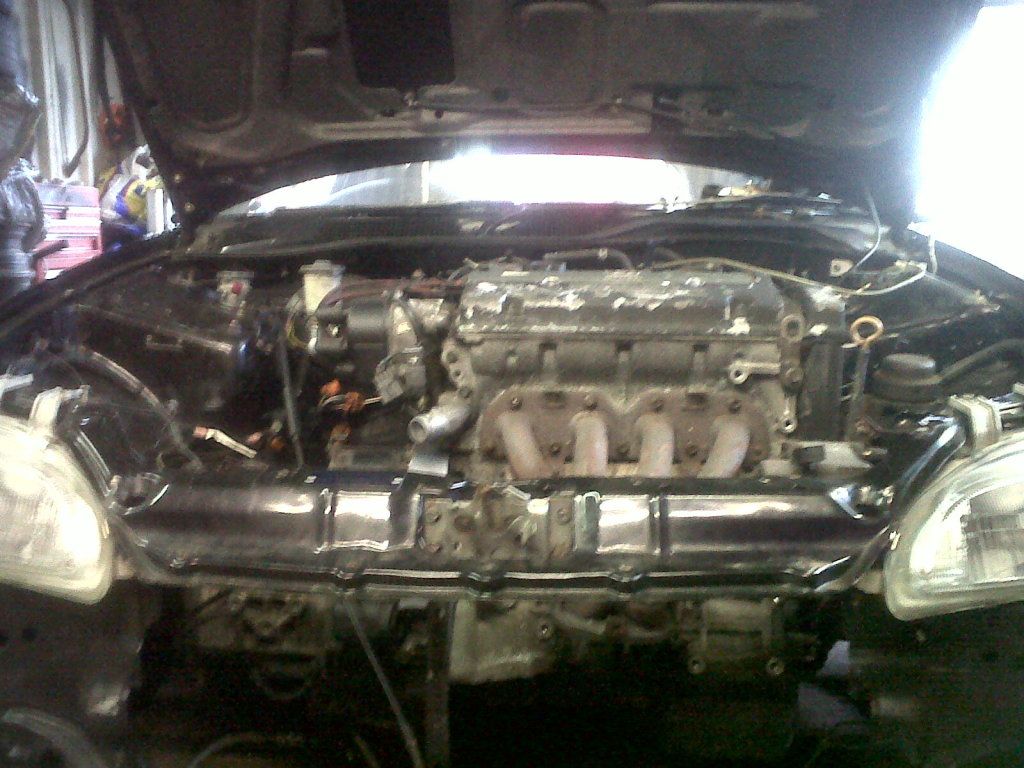
H2B EF (NO KIT) PERFECT HOOD CLEARENCE
 10-13-2012, 06:06 PM
#51
Honda-Tech Member
Join Date: Mar 2007
Location: Atlanta, Ga, USA
Posts: 199
Likes: 0
Received 0 Likes
on
0 Posts
Damn thanks for the feedback, but there are numerous people who have done this swap without the kit and had no issues and very reliable results. The OP, Soloturbo, knows it can be done and I just need to get some solid directions on how to do it. If everyone someone asked if something could be done and they gave up once the general consensus was that it couldn't be done, we would still be in caves. H2B swaps have been running for almost 10 years now. It can be done without the plate, and it's a reasonable option since I have an EF.
 10-13-2012, 06:24 PM
#52
Honda-Tech Member
Join Date: Feb 2006
Location: Utica, NY
Posts: 256
Likes: 0
Received 0 Likes
on
0 Posts
Damn thanks for the feedback, but there are numerous people who have done this swap without the kit and had no issues and very reliable results. The OP, Soloturbo, knows it can be done and I just need to get some solid directions on how to do it. If everyone someone asked if something could be done and they gave up once the general consensus was that it couldn't be done, we would still be in caves. H2B swaps have been running for almost 10 years now. It can be done without the plate, and it's a reasonable option since I have an EF.
I'm pretty sure to put it in an EF you need the driverside H22 Swap mount. Its the drivers side mount you get when you do a normal swap with both an H22 Tranny & Motor.
In my DC2 I used a 2-hole EG D/S Mount and all the other mounts were the ones my Integra already had in it. Rear T-Bracket was still my stock B18 one. You really just gotta get creative. I wish I would of did a write-up back when I did mine. Everyone just bashed on the whole idea and said it wasn't gonna work.
You also have to grind a little pin or dowel sticking out of the H22 Crank for the B-Series Flywheel to sit flush. Might not be the case for all the H22's but I used an F20B JDM Motor so that's what I had to do.
10-13-2012, 07:04 PM
#53
Honda-Tech Member
Join Date: Mar 2007
Location: Atlanta, Ga, USA
Posts: 199
Likes: 0
Received 0 Likes
on
0 Posts
I'm not too worried about the mounts. It's the half-shaft and block drilling that im interested in figuring out. From the few pictures i've seen, I get how the block and tranny mount up on the top and front. It's the back that concerns me.
10-14-2012, 04:41 PM
#55
Honda-Tech Member
Join Date: Feb 2006
Location: Utica, NY
Posts: 256
Likes: 0
Received 0 Likes
on
0 Posts
Nope, only with a adapter plate. This method you just have to pray you have the input shaft centered or you are probably going shred your bearings...
alot of people place their motor on its side and put the tranny on vertically. so its not offset as much as if you were just putting it on horizontally and letting it hang from the input shaft since you have no dowels to support it.
alot of people place their motor on its side and put the tranny on vertically. so its not offset as much as if you were just putting it on horizontally and letting it hang from the input shaft since you have no dowels to support it.
10-14-2012, 05:21 PM
#56
Honda-Tech Member
the motor alone is sitting at the regular position as if you were doing a normal H-swap in a non-H chassis using a swap mount. Thus, results in flush hood fitment.
with the tranny lined up to the engine's clutch. the center line for the input shaft to meet the crankshaft is achieved.
from there you probably orient the tranny to sit in the normal B-series position and mount it with regular B-series tranny mount.
then you have to get creative with some sort of fastener to hold the tranny and engine together. drill holes and use long bolts and nuts.
I'm guessing you can use the (2) bolts on the rear tranny T-bracket because they bolt to the transmission but idk about the top one.
anyone have any thoughts?
10-14-2012, 05:29 PM
#57
Honda-Tech Member
Join Date: Feb 2006
Location: Utica, NY
Posts: 256
Likes: 0
Received 0 Likes
on
0 Posts
I had made one of the first adapter plates about a decade ago. I had the transmission clocked. Not the greatest idea for oil reasons. The above build has me worried. Clutch engagement and transmission backing off motor lol. Would not recommend this nor no one try it. Too much work. Just get the kit.
yes I actually ran that setup in the most dangerous way ever with only (2) bolts holding it together and i took it out after 3 months. the reason was I wasn't prepared to shell out the cash for the kit unless the swap was worth it. So to test the H2B configuration out I used a hack-job method. the engine was incredible quick and had lots of torque with only a throttle body being a modification and 3 inch exhaust.
axle angles were off due to running the engine with the half-shaft just hanging..
nonetheless it was very short-lived experience and although H2B is something I would recommend for a swap. This method not so much.
Very scary having to worry your motor is going to fall out especially as heavy as H-Series are
10-15-2012, 10:18 AM
#58
Honda-Tech Member
Join Date: Mar 2007
Location: Atlanta, Ga, USA
Posts: 199
Likes: 0
Received 0 Likes
on
0 Posts
I talked to soloturbo and I've pretty much got this thing figured out. If I could get my hands on a half shaft adapter plate, I wouldn't need the plate between the engine and tranny. With the way he does it, I can get all five bolts to hook up with very little grinding and modifications.
 10-18-2012, 04:15 AM
#60
Honda-Tech Member
Join Date: Nov 2003
Location: Kitchener, Ontario, CANADA
Posts: 5,986
Likes: 0
Received 2 Likes
on
2 Posts

 10-19-2012, 01:17 AM
#62
Honda-Tech Member
Join Date: Dec 2005
Posts: 325
Likes: 0
Received 0 Likes
on
0 Posts
i use a b series gear box and rear mount then i used a lude h22 engine side mount, sat the engine spot on.
you have to cut up the rear L bracket and get welding.
put the clutch and fly in then line up the bolt in the starter, that will be the position of the engine and box.
drill the hole in the block throught the hole in the gear box, then you have 2 bolting points .
i used a scat shield on mine that the other bolts bolted to ,also looked alot neeter
half shaft mounting, i made a spacer same as the qsd guys do
you do have to cut off the rear mounting point were the h22 box would bolt to so the half shaft will go in the box and you do have to grinde the rear of the block but no were near as much as with the qsd kit
axels sit in the oem position because the gear box is sat in the oem posiotion
so there are 6 bolting pints.
how strong is it well i fixed the box to a crane with the engine bolted up and droped it 5 times ..... as i thought nothing moved

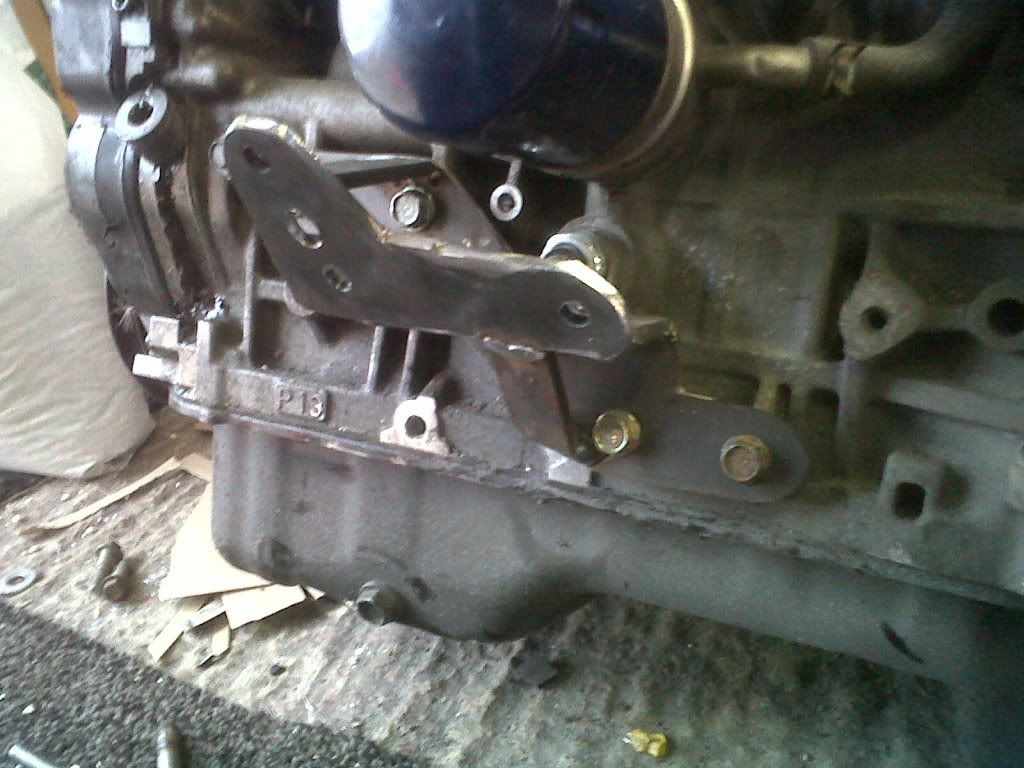
not my pic but you can see how the bolt goes through the block and one of the mounting points

prelude mount sits the engine flat as it should
you have to cut up the rear L bracket and get welding.
put the clutch and fly in then line up the bolt in the starter, that will be the position of the engine and box.
drill the hole in the block throught the hole in the gear box, then you have 2 bolting points .
i used a scat shield on mine that the other bolts bolted to ,also looked alot neeter
half shaft mounting, i made a spacer same as the qsd guys do
you do have to cut off the rear mounting point were the h22 box would bolt to so the half shaft will go in the box and you do have to grinde the rear of the block but no were near as much as with the qsd kit
axels sit in the oem position because the gear box is sat in the oem posiotion
so there are 6 bolting pints.
how strong is it well i fixed the box to a crane with the engine bolted up and droped it 5 times ..... as i thought nothing moved
not my pic but you can see how the bolt goes through the block and one of the mounting points
prelude mount sits the engine flat as it should
 10-19-2012, 05:07 PM
#64
Honda-Tech Member
Join Date: Aug 2008
Location: Quantico, VA
Posts: 1,117
Likes: 0
Received 0 Likes
on
0 Posts
I had made one of the first adapter plates about a decade ago. I had the transmission clocked. Not the greatest idea for oil reasons. The above build has me worried. Clutch engagement and transmission backing off motor lol. Would not recommend this nor no one try it. Too much work. Just get the kit.
10-20-2012, 12:52 AM
#66
Honda-Tech Member
Join Date: Dec 2005
Posts: 325
Likes: 0
Received 0 Likes
on
0 Posts
 09-02-2015, 05:25 AM
#69
Honda-Tech Member
Thread Starter
Join Date: Nov 2007
Location: brooklyn, ny, us
Posts: 72
Likes: 0
Received 0 Likes
on
0 Posts
09-02-2015, 06:09 AM
#70
Looks nice. I have a CRX H2b with the QSD. Here is my out dated build thread https://honda-tech.com/hybrid-engine...build-3169415/ It is a great set-up, but I don't like the angle of the engine and the general lack of clearance for the harmonic balancer/crank pulley against the frame rail. I was able to "make clearance" but I would like more because I am changing my set-up. If you ever get bored and feel generous I (as well as a few others I am sure) would really appreciate a write-up.
09-02-2015, 08:05 AM
#71
Honda-Tech Member
Thread Starter
Join Date: Nov 2007
Location: brooklyn, ny, us
Posts: 72
Likes: 0
Received 0 Likes
on
0 Posts
one of my good friends all motor eg. never ever had issues with clutch tranny or anything in regards to the custom h2b connection. car made alot of power, not the highest but a lot for a non kit h2b
09-13-2015, 08:16 PM
#72
Honda-Tech Member
Join Date: Mar 2007
Location: Atlanta, Ga, USA
Posts: 199
Likes: 0
Received 0 Likes
on
0 Posts
Dope.
Brough is the most recent to package the "plateless" kit as a reliable product. They show you where to cut, and the kit comes with there custom plate.
Might try it in my four door.
Brough is the most recent to package the "plateless" kit as a reliable product. They show you where to cut, and the kit comes with there custom plate.
Might try it in my four door.
09-26-2015, 08:02 PM
#73
Honda-Tech Member

Join Date: Sep 2015
Posts: 4
Likes: 0
Received 0 Likes
on
0 Posts
I searched everywhere for info on this swap. Thank you for having this thread.
I plan on using the Brough kit in my EF, for the F2B with a H22 head. Anybody know if I will have any hood clearance issues with this setup? Im assuming not but just want to double check.
I plan on using the Brough kit in my EF, for the F2B with a H22 head. Anybody know if I will have any hood clearance issues with this setup? Im assuming not but just want to double check.
05-15-2016, 02:19 PM
#74
Honda-Tech Member
im considering that route but havent seen any reviews from Brough kit users on its reliability.
I'm hoping to achieve more clearance in a crx if i went the plateless method.
also, is it possible to retain a/c ?
05-16-2016, 06:26 AM
#75
Yes it is possible in the sense that anything is possible with enough planning and work. Practicality is an entirely different matter. I almost did this in my CRX but ran out of patience.
Here is a general rundown:
1) remove balance shaft and gear.
2) Shave inside of harmonic balancer.
3) Bang out frame rail for clearance.
4) Install a traction bar with good clearance like an ESP, but really you probably want to make one custom for this (see step 7)
5) Custom alternator pulley that runs a D16 alternator and moves the alternator closer to the header.
6) Make a custom A/C bracket that holds the compressor closer to the block and closer to the header (i.e. further from the frame rail).
7) Check clearance between A/C compressor pulley/clutch assembly to the frame rail. Right now it should be touching the bolts that hold the traction bar in place. You will need to figure out a way to fix this. This could involve anything from altering the frame rail (better know what you are doing), to altering the traction bar and bolt locations so that it attaches from the other side (better know what you are doing) or even both. I say "or even both" because it is super tight and you want want enough clearance to allow you to actually drive the car. A "piece of paper" isn't enough for peace of mind.
In the end, it is doable, but there is a reason why no one does it. I found that out the hard way.
Consideration: this was with the QSD kit, so the Brough might give you enough clearance to take away some of the headache.
Remember there are remote electronic A/C kits as well.
Last edited by 1991_crxsi; 05-16-2016 at 06:43 AM.

Thread
Thread Starter
Forum
Replies
Last Post
CRXherbie91
Honda CRX / EF Civic (1988 - 1991)
15
10-24-2008 02:25 AM