
Progress 22mm rear sway install with pics!
 07-06-2004, 10:09 AM
#1
Thread Starter
Join Date: Sep 2003
Location: Emo Town, CA, 90804
Posts: 1,826
Likes: 0
Received 0 Likes
on
0 Posts
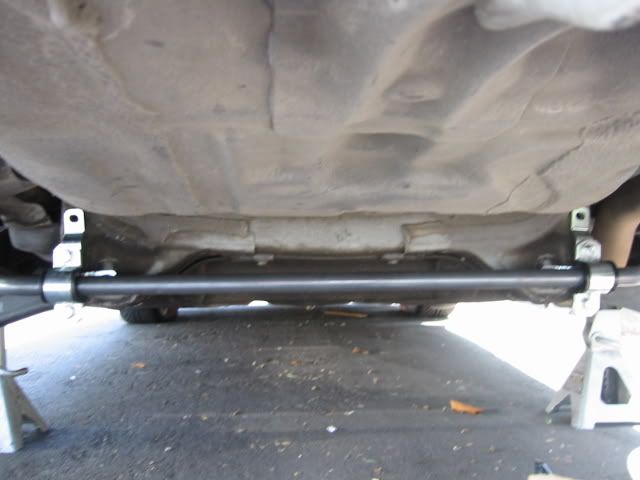
Heres my half assed write up on the installation of the 22mm Progress rear sway bar on my DX EJ8. Everything went really smooth, and only took me about an hour and a half or so. I went and bought the two bolts and nuts to attach the brackets to the sub frame since I don't want to use the self tapping screws they provide. Here are some pics:
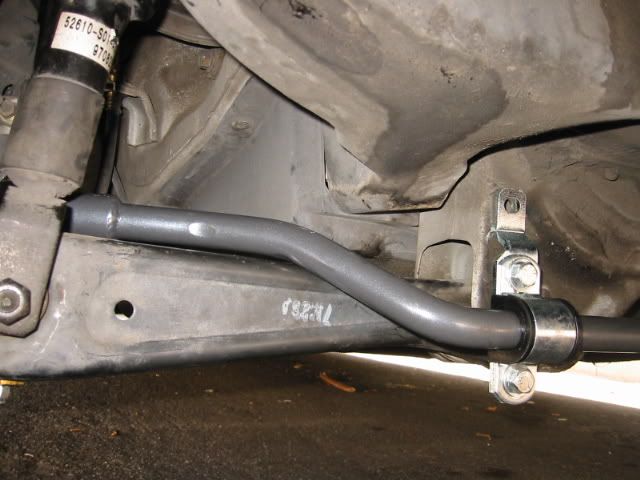
Install is really easy. First you need to rotate the rear shocks so that the welded nut faces towards the rear. When you put the bolt back through, you need to attach the endlink bracket first. This is where the endlinks will attach. Next you need to remove LCA pivot bolt and attach the supplied brackets with the bolt provided. Once both brackets are bolted up, you can lube the bushings and mount the bar to the chassis. Next, assemble the endlinks, and attach them to the brackets attached to the shock bolt. Tighten everything just snug, lower the car and roll it back and forth a few times. Now you can tighetn everything down to spec.
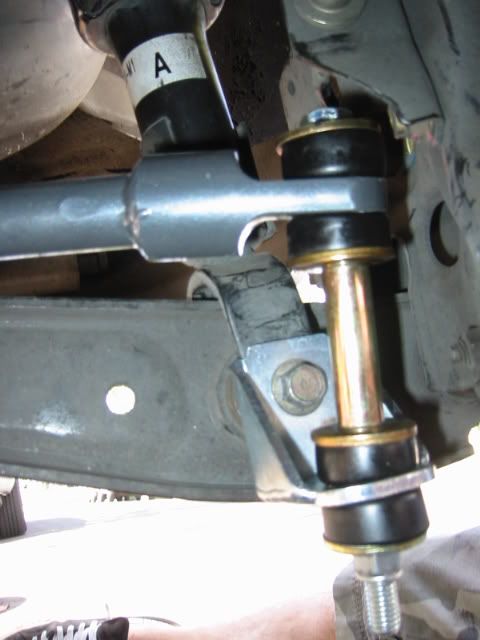
LCA Pivot brackets mounted. Note that I had not yet put on the upper bolts
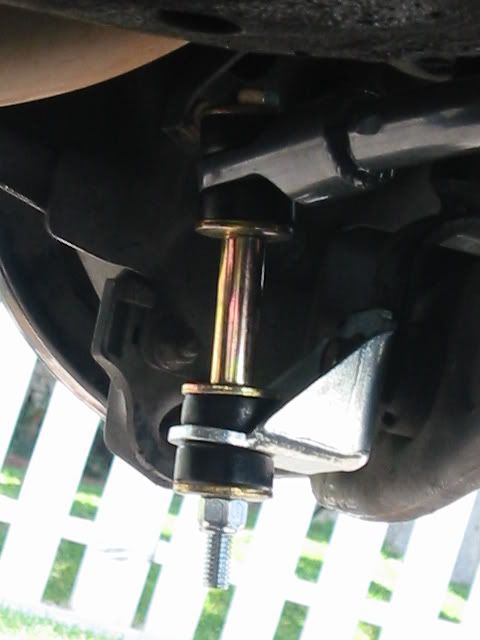
Endlink assembly attached to bar and bracket mounted to lower shock bolt.
As you can tell in this pic, the swaybar rests on the LCA, but from everything I've heard, this is normal and causes no problems. I've noticed no noise from it although my rear tires rub a bit during hard cornering. I'm pretty low though, so I may raise the car up a bit to fix that problem.
So far it feels great. Haven't really tested it it to it's fullest yet, but on the commute and the freeway offramp, everything is nice and tight and understeer is non existent.
Install is really easy. First you need to rotate the rear shocks so that the welded nut faces towards the rear. When you put the bolt back through, you need to attach the endlink bracket first. This is where the endlinks will attach. Next you need to remove LCA pivot bolt and attach the supplied brackets with the bolt provided. Once both brackets are bolted up, you can lube the bushings and mount the bar to the chassis. Next, assemble the endlinks, and attach them to the brackets attached to the shock bolt. Tighten everything just snug, lower the car and roll it back and forth a few times. Now you can tighetn everything down to spec.
LCA Pivot brackets mounted. Note that I had not yet put on the upper bolts
Endlink assembly attached to bar and bracket mounted to lower shock bolt.
As you can tell in this pic, the swaybar rests on the LCA, but from everything I've heard, this is normal and causes no problems. I've noticed no noise from it although my rear tires rub a bit during hard cornering. I'm pretty low though, so I may raise the car up a bit to fix that problem.
So far it feels great. Haven't really tested it it to it's fullest yet, but on the commute and the freeway offramp, everything is nice and tight and understeer is non existent.
 07-06-2004, 10:17 AM
#2
Honda-Tech Member
Join Date: Oct 2002
Location: Tampa
Posts: 5,401
Likes: 0
Received 0 Likes
on
0 Posts
damn. looks like its just a bit low.
i thought my ST bar was low...
let us know how it feels.
edit: just realized it mounts to the lca pivot point.
Modified by nerdsports at 3:33 PM 7/6/2004
i thought my ST bar was low...
let us know how it feels.
edit: just realized it mounts to the lca pivot point.
Modified by nerdsports at 3:33 PM 7/6/2004
07-06-2004, 10:21 AM
#3
Vice President/CEO
Join Date: Sep 2002
Location: TEXAS
Posts: 3,161
Likes: 0
Received 0 Likes
on
0 Posts
damn thats NICE! I'm currently doing research on which rear sway i want to get..
Where did you get yours from?
Where did you get yours from?
07-06-2004, 10:40 AM
#5
Thread Starter
Join Date: Sep 2003
Location: Emo Town, CA, 90804
Posts: 1,826
Likes: 0
Received 0 Likes
on
0 Posts
I bought it for $169 shipped from Tires.com.
It feels great....I'll let you know what I really think after I take it through the twisties this weekend.
It feels great....I'll let you know what I really think after I take it through the twisties this weekend.
07-06-2004, 10:45 AM
#6
Join Date: Jun 2004
Location: arroyo grande, ca, us
Posts: 30
Likes: 0
Received 0 Likes
on
0 Posts
tight, i've been thinking about getting a rear sway...currently i have a skunk2 lower arm bar, so maybe once i get a rear sway bar, it will complete my rear end....another good write up!
Trending Topics
07-06-2004, 11:08 AM
#8
Thread Starter
Join Date: Sep 2003
Location: Emo Town, CA, 90804
Posts: 1,826
Likes: 0
Received 0 Likes
on
0 Posts
Just a note....you can not use a lower tie bar with this swaybar due to it being mounted to the LCA pivot point. I had to remove my Neuspeed bar to put it on (no big loss really  )
)
)
07-06-2004, 11:59 AM
#9
Honda-Tech Member
Join Date: Oct 2003
Location: www.rideekulo.us
Posts: 1,775
Likes: 0
Received 0 Likes
on
0 Posts
that looks bad for subframe stress... even worse than shitty spring rates. let us know how things work out with the sway bar constantly resting on the LCA.
07-06-2004, 12:31 PM
#11
Thread Starter
Join Date: Sep 2003
Location: Emo Town, CA, 90804
Posts: 1,826
Likes: 0
Received 0 Likes
on
0 Posts
Why would there be any subframe stress......the bar does not mount to the subframe other than a place for the bracket to attach. All the stress is placed on the LCA pivot bolt and the rear shock fork bolt. I've never heard of any subframe damage with this bar. Progress has been around forever and is used by some of the top race teams. .. they wouldn't have got there by bad engineering. I called Progress about the bar resting on the LCA, they said its not a problem. I trust them.
07-06-2004, 12:32 PM
#12
Thread Starter
Join Date: Sep 2003
Location: Emo Town, CA, 90804
Posts: 1,826
Likes: 0
Received 0 Likes
on
0 Posts
<TABLE WIDTH="90%" CELLSPACING=0 CELLPADDING=0 ALIGN=CENTER><TR><TD>Quote, originally posted by s1ngle »</TD></TR><TR><TD CLASS="quote">have fun ripping out your subframe and banging up your lca's
</TD></TR></TABLE>
You sir, are an idiot. KTHNXBB
</TD></TR></TABLE>
You sir, are an idiot. KTHNXBB
07-06-2004, 02:49 PM
#15
Honda-Tech Member
Can you do me a favor? Can you put the car on jackstands, take the wheels off, and take some pics for me. A pic of one wheel jacked up into the wheel well and the other at full droop, and a pic of both wheels jacked up into the wheel wells. I especially want to see the positions of the bar against the lca on both sides.
Does anybody know how this bar gets away without subframe tearout?
Does anybody know how this bar gets away without subframe tearout?
07-06-2004, 03:08 PM
#16
Thread Starter
Join Date: Sep 2003
Location: Emo Town, CA, 90804
Posts: 1,826
Likes: 0
Received 0 Likes
on
0 Posts
Dude I spent all day yesterday with that ****** on stands, I'm not going to pull them out again till the weekend when I check all the bolts.
I'll tell you how it resists subframe tearage: On the standard sway bars, the D brackets that hold the bar to the subframe mount via the two holes in the sheet metal. This metal is very thin, so most people use the Beaks kit wich is really just a thick shim that mounts between the two. On the Progress bar, they use special brackets that you place the LCA pivot bolt through, which is where most of the holding power/stress resistance is. The only bolt that touches the subframe is the one at the very top (the one in the pic without a bolt in it) and that is really just to help keep the bracket in place. The kit comes with self tapping bolts, which Progress says needs to be welded once it's in place, or you run the risk of the bracket failing (NOT THE SUBFRAME). I did as others have done and bought some grade 10 bolts and extra large washers and a locking not to replace them. I did the bolt washer/washer/nut combo. The endlinks also attach to the rear shock mount fork bolt, wich is much more sturdy that the hole in the LCA.
I'll tell you how it resists subframe tearage: On the standard sway bars, the D brackets that hold the bar to the subframe mount via the two holes in the sheet metal. This metal is very thin, so most people use the Beaks kit wich is really just a thick shim that mounts between the two. On the Progress bar, they use special brackets that you place the LCA pivot bolt through, which is where most of the holding power/stress resistance is. The only bolt that touches the subframe is the one at the very top (the one in the pic without a bolt in it) and that is really just to help keep the bracket in place. The kit comes with self tapping bolts, which Progress says needs to be welded once it's in place, or you run the risk of the bracket failing (NOT THE SUBFRAME). I did as others have done and bought some grade 10 bolts and extra large washers and a locking not to replace them. I did the bolt washer/washer/nut combo. The endlinks also attach to the rear shock mount fork bolt, wich is much more sturdy that the hole in the LCA.
07-06-2004, 03:43 PM
#17
Member
Join Date: Apr 2004
Location: Mission Viejo, CA, USA
Posts: 1,290
Likes: 0
Received 0 Likes
on
0 Posts
Well my friend has a sway bar on his GSR, 22mm and he ripped his subframe out  Now he re-enforced his subframe by welding it in several places. Hope you don't have that kinda problem. Tell me how it handles..im looking into getting a sway bar as well.
Now he re-enforced his subframe by welding it in several places. Hope you don't have that kinda problem. Tell me how it handles..im looking into getting a sway bar as well.
07-06-2004, 07:08 PM
#19
Honda-Tech Member
Join Date: Mar 2001
Location: AWFUL autocrosser from, RI
Posts: 2,578
Likes: 0
Received 0 Likes
on
0 Posts
<TABLE WIDTH="90%" CELLSPACING=0 CELLPADDING=0 ALIGN=CENTER><TR><TD>Quote, originally posted by jeffk182 »</TD></TR><TR><TD CLASS="quote">Well my friend has a sway bar on his GSR, 22mm and he ripped his subframe out Now he re-enforced his subframe by welding it in several places. Hope you don't have that kinda problem. Tell me how it handles..im looking into getting a sway bar as well. </TD></TR></TABLE>
READ. Your friend proboably had an ITR bar, which wouldn't mount using the LCA pivot bolts. That is a much stronger mount point than the d-bracket holes on the subframe.
Here's my Suspension Techniques sway/tie combo. It also uses the LCA pivot bolts as well as a thick subframe brace. Beefy

Now he re-enforced his subframe by welding it in several places. Hope you don't have that kinda problem. Tell me how it handles..im looking into getting a sway bar as well. </TD></TR></TABLE>READ. Your friend proboably had an ITR bar, which wouldn't mount using the LCA pivot bolts. That is a much stronger mount point than the d-bracket holes on the subframe.
Here's my Suspension Techniques sway/tie combo. It also uses the LCA pivot bolts as well as a thick subframe brace. Beefy
07-06-2004, 09:33 PM
#20
Join Date: Feb 2003
Location: Kailua, HI, USA
Posts: 48
Likes: 0
Received 0 Likes
on
0 Posts
If you can, loosen up the endlinks and C-brackets for the bar. Place a jack under the middle of the bar and use the jack to push the bar up as far as the C-Brackets will allow, those metal plates/brackets that are attatched to the subframe have oval shaped and allow a couple of millimeters up and down. The bar originally rested on my LCAs too, but with the give of a couple of milimeters, I was able to raise it off. (do it with the car NOT on stands unless you have a tall enough jack)
I heard the clunking when I took turns, it was the bar flexing and knocking on the LCAs.
I heard the clunking when I took turns, it was the bar flexing and knocking on the LCAs.
07-06-2004, 09:51 PM
#21
Thread Starter
Join Date: Sep 2003
Location: Emo Town, CA, 90804
Posts: 1,826
Likes: 0
Received 0 Likes
on
0 Posts
Thanks forthe tip man.....I already loosened up the endlinks and that raised it up a bit.
How's kailua these days? I was stationed at Bellows for 4 years back in 96-2000. Man I miss living in Kailua.
How's kailua these days? I was stationed at Bellows for 4 years back in 96-2000. Man I miss living in Kailua.
07-06-2004, 09:51 PM
#22
Honda-Tech Member
Well dont get all mad at me, I'm not jumping your *** like that other guy. Actually I'm just a little skeptical but if this bar is true to your claims, I might be replacing my 22mm adjustable bar with that one. I've seen Progress's work up close on the draggin Waggin from Honda Tuning. Looks like some real good stuff. No rush on the pics but if you feel like shooting some for me, that would be great.
I kind of understand what you're saying but I wish the lca pivot bolt was shown more clearly in the pics. Being that the end link is attached to the lower shock mounting bolt, which is farther away from the LCA pivot bolt, there would be less stress put on the mounting brackets than a conventional design. But you wouldn't want a longer swaybar cuz it would lose its stiffness, so that must be why they cut the clearance to the LCA down to zero, to keep the bar as short as possible.
I kind of understand what you're saying but I wish the lca pivot bolt was shown more clearly in the pics. Being that the end link is attached to the lower shock mounting bolt, which is farther away from the LCA pivot bolt, there would be less stress put on the mounting brackets than a conventional design. But you wouldn't want a longer swaybar cuz it would lose its stiffness, so that must be why they cut the clearance to the LCA down to zero, to keep the bar as short as possible.
07-07-2004, 07:29 AM
#23
Thread Starter
Join Date: Sep 2003
Location: Emo Town, CA, 90804
Posts: 1,826
Likes: 0
Received 0 Likes
on
0 Posts
I'm not mad dude....just too many people on here who talk out their ***.
Here are a few more pics of the shock mount bracket and the endlinks.


Here are a few more pics of the shock mount bracket and the endlinks.