
My 95 Civic CX hatch build

 03-11-2013, 04:45 AM
#252
talks to himself
Thread Starter
It'll create more pressure loss and reduce the water's flow efficiency. It's just crappy construction quality and it's really bothering me. Oh well. There's not much I can do about it.
 03-11-2013, 07:13 AM
#253
talks to himself
Thread Starter
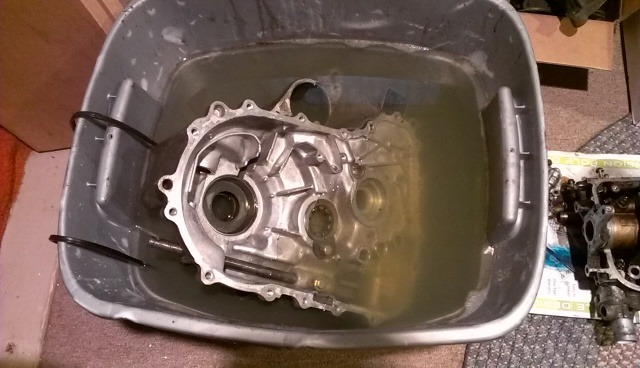
Soaking the trans. case I picked up this weekend in a mix of Simple Green and water to break up the crud that's built up on the outside. Parts washer and media blaster to finish it up and prep it for paint.
03-12-2013, 05:49 PM
#254
talks to himself
Thread Starter

 03-15-2013, 06:41 AM
#257
talks to himself
Thread Starter
A lot of little things. I need to sit down and make a comprehensive list.
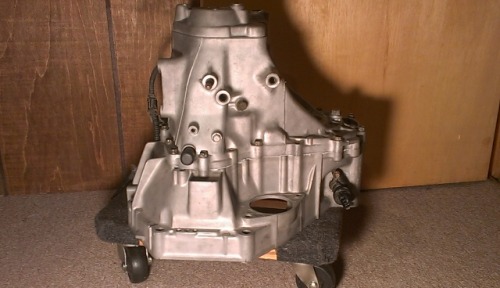
In the meantime, I'll buy the beer if you come over this weekend and help me with the trans. assembly. I had the case I bought last weekend glass bead blasted. It looks amazing. I might have shimmed the diff. incorrectly. I need to look into that more.
In the meantime, I'll buy the beer if you come over this weekend and help me with the trans. assembly. I had the case I bought last weekend glass bead blasted. It looks amazing. I might have shimmed the diff. incorrectly. I need to look into that more.
03-16-2013, 06:37 PM
#258
talks to himself
Thread Starter
FINALLY
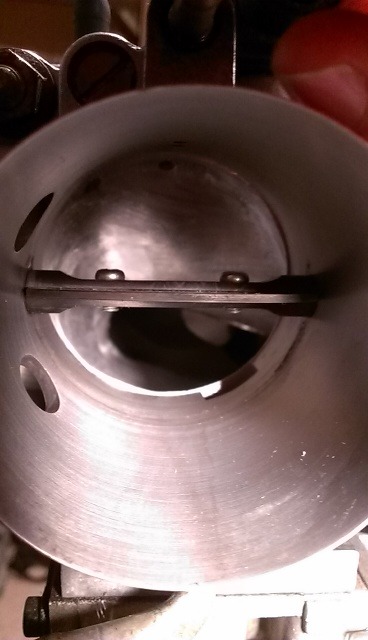
I realized what I needed to do was stick a screw driver in the shift rod and wiggle it around until the case popped down further.
I realized what I needed to do was stick a screw driver in the shift rod and wiggle it around until the case popped down further.
03-17-2013, 11:00 AM
#259
agree on that transmission teardown link. I read that thing 50 times last yr before I did my mfactory lsd, ls 5th and synchro change. Had it memorized by the time I actually started. Nice build. Like how youre adding lots of links. Reading for the past 6 hours at work. Awesome!
03-18-2013, 09:07 AM
#260
talks to himself
Thread Starter
agree on that transmission teardown link. I read that thing 50 times last yr before I did my mfactory lsd, ls 5th and synchro change. Had it memorized by the time I actually started. Nice build. Like how youre adding lots of links. Reading for the past 6 hours at work. Awesome!
Also, to everyone else, I updated my last post regarding the work that I've done to my fuel rail. You can find it here: https://honda-tech.com/forums/showpo...&postcount=247
I'll update this thread again later on today with the other things that I got done this weekend.
03-18-2013, 01:39 PM
#261
talks to himself
Thread Starter
After assembling the transmission and finishing the work on the fuel rail I was looking for little things that need to be done. I didn't like the way my thermostat housing looked so I removed it, along with the water pipe, and spent about 20 minutes sanding it with a nylon bristle wheel.
Before:
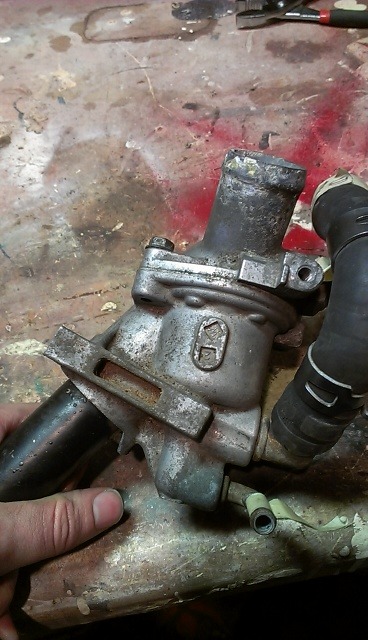
After:
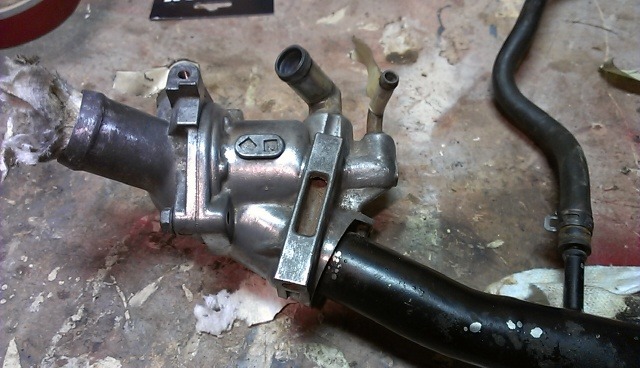
Here's the setup I used:
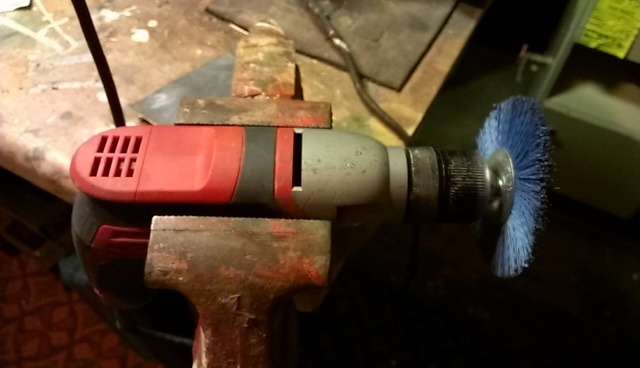
It's not perfect but it's better. Also, I replaced the o-ring on the water pump side of the water pipe with a new, OEM, o-ring.
Before:
After:
Here's the setup I used:
It's not perfect but it's better. Also, I replaced the o-ring on the water pump side of the water pipe with a new, OEM, o-ring.
03-19-2013, 03:14 AM
#262
talks to himself
Thread Starter
I was checking out the port matching on my intake side on Sunday as well.
Thermal Intake Manifold Gasket to Head
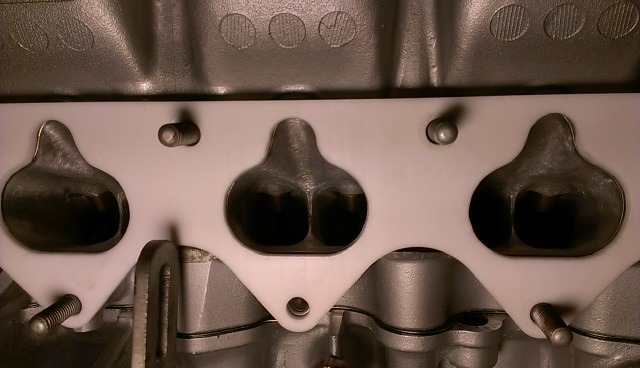
Thermal Intake Manifold Gasket to Intake Manifold (Intake manifold could use some more port work).
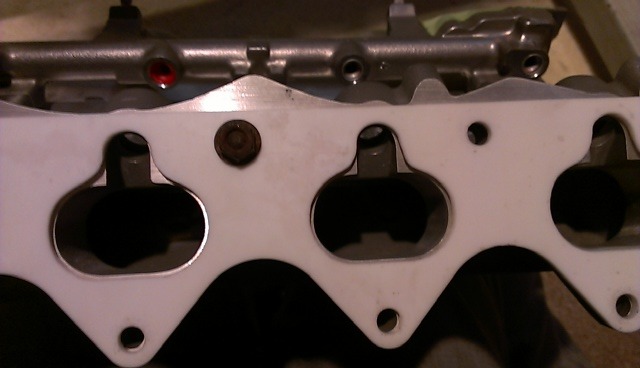
Clamped up:

Clamped up:
The way it's set up now, there'll be a small amount of vacuum along the edges of the manifold to head transition causing minor swirl as the air rapidly expands. However, it's better to transition to a larger cross sectional area than to a smaller one. Maybe I'll round the edges on the manifold to smooth the transition.
Thermal Intake Manifold Gasket to Head
Thermal Intake Manifold Gasket to Intake Manifold (Intake manifold could use some more port work).
Clamped up:
Clamped up:
The way it's set up now, there'll be a small amount of vacuum along the edges of the manifold to head transition causing minor swirl as the air rapidly expands. However, it's better to transition to a larger cross sectional area than to a smaller one. Maybe I'll round the edges on the manifold to smooth the transition.
03-19-2013, 04:27 AM
#263
talks to himself
Thread Starter
"Catch-can Drama"
I'm stuck on what to do and this post is intended to consolidate my understanding of what I've read and gain feedback from the community.
In this post I will discuss one of the recommended ventilation methods that I've read about as well as provide links to the threads I've read. I will also discuss why I a) do not want to vent from the valve cover and b) can't utilize the recommend block ventilation methods. While reading this post, please keep in mind that with this build I have had no prior experience with engine systems such as the Positive Crankcase Ventilation (PCV) system. I may not have all of my facts straight and I will pose questions that I have yet to answer for myself. I welcome any input.
This user's dreams will be smashed...
I'd like to vent blow-by gases using the method referred to as "Open Breather Ventilation" in this thread:
Link:The Official Crankcase Evacuation thread for Turbo Hondas / PCV / Catchcan /
However, I do not want to vent the gases from my valve cover and would prefer to vent them from the back of the block for several reason.
a) I do not want to modify my valve cover,
b) The excess pressure originates in the block,
c) I do not want contaminates forced into my head.
a)I do not want to modify my valve cover.
While I agree that having braided AN hoses hanging from the valve cover looks awesome, I don't want to modify my cover. I don't even want to do cut-outs for my cam gears. When the time comes to tune my engine, I hope to borrow a valve cover.
I don't want to modify my valve cover for several reason. The predominate reason being that I've messed up just about everything I've done with this build during my first try. This process is really starting to nickle and dime me to death and it's depressing. In addition, I don't have access to a TIG welder to weld the fittings onto my valve cover.
b)The excess pressure originates in the block
The head and the block are connected through relatively small ports. The increased surface area that would be created if the gases were to be vented from the valve cover would work to slow the volumetric flow rate of the gases thereby decreasing the total amount of vented gases per compression cycle.
c)I do not want contaminates forced into my head.
I don't like the idea of forcing the gases that we don't want in our engine into the head. That just seems backwards. I know experience tells us that venting from the valve cover is acceptable and I know that many of us utilize this method in our daily drivers and our race cars but it still doesn't seem right. I'd like to avoid this method; however, I have not ruled it out 100%.
The images in the linked thread do not show up for me so I'll post my own image:
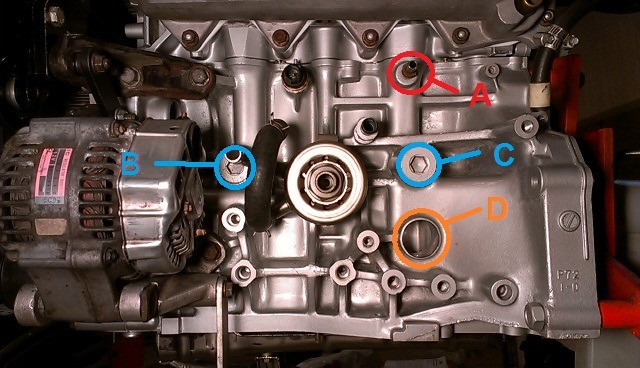
In his post, dasher, indicates that for B-series engines: "it is preferable to ventilate the crankcase gases through 2 ports located on the back of the block." The ports he's referring to are labeled as B and C in the image posted above. The "crankcase ventilation hole" that he refers to is labeled as D. The "port on the top of your block which normally connects a line to your PVC chamber" is labeled as A.
I would like to use this method because I do not want to re-route the blow-by gases and oil into my supercharger's compressor.
However, my setup poses a few problems that I need to remedy before I can use the "recommended" ventilation method. Because my water tube has the ports for the OEM oil cooler and because the JRSC requires me to clock the oil cooler to the 9 o'clock position, the port labeled as B is blocked. This is shown in the above image. It is not likely that I will be able to use it as a location to vent my block. I could, simply, vent only from C but it's not ideal. Using one point of ventilation will be better than using the stock setup but more efficient ventilation could be had.
Where I'm getting hung-up
My question is, instead of using B and C to vent my block, why can't I use C and D? D always seems to be plugged with a freeze plug or reserved for drain-back. Is it because it's too low on the block and will siphon oil? How? My catch-can will be at atmospheric pressure and will not be actively drawing vacuum on the block. I know the blow-by gases will be creating pressure in my block that will force gases out such that the atmospheric pressure will seem like a vacuum (depending on your reference frame) but I can't help but feel that it's a different scenario.
Linked in this post:
The Official Crankcase Evacuation thread for Turbo Hondas / PCV / Catchcan / by dasher
Further reading:
Tests on the PCV system - How Honda intended it - by dasher
I'm stuck on what to do and this post is intended to consolidate my understanding of what I've read and gain feedback from the community.
In this post I will discuss one of the recommended ventilation methods that I've read about as well as provide links to the threads I've read. I will also discuss why I a) do not want to vent from the valve cover and b) can't utilize the recommend block ventilation methods. While reading this post, please keep in mind that with this build I have had no prior experience with engine systems such as the Positive Crankcase Ventilation (PCV) system. I may not have all of my facts straight and I will pose questions that I have yet to answer for myself. I welcome any input.
This user's dreams will be smashed...
Link:The Official Crankcase Evacuation thread for Turbo Hondas / PCV / Catchcan /
However, I do not want to vent the gases from my valve cover and would prefer to vent them from the back of the block for several reason.
a) I do not want to modify my valve cover,
b) The excess pressure originates in the block,
c) I do not want contaminates forced into my head.
a)I do not want to modify my valve cover.
While I agree that having braided AN hoses hanging from the valve cover looks awesome, I don't want to modify my cover. I don't even want to do cut-outs for my cam gears. When the time comes to tune my engine, I hope to borrow a valve cover.
I don't want to modify my valve cover for several reason. The predominate reason being that I've messed up just about everything I've done with this build during my first try. This process is really starting to nickle and dime me to death and it's depressing. In addition, I don't have access to a TIG welder to weld the fittings onto my valve cover.
b)The excess pressure originates in the block
The head and the block are connected through relatively small ports. The increased surface area that would be created if the gases were to be vented from the valve cover would work to slow the volumetric flow rate of the gases thereby decreasing the total amount of vented gases per compression cycle.
c)I do not want contaminates forced into my head.
I don't like the idea of forcing the gases that we don't want in our engine into the head. That just seems backwards. I know experience tells us that venting from the valve cover is acceptable and I know that many of us utilize this method in our daily drivers and our race cars but it still doesn't seem right. I'd like to avoid this method; however, I have not ruled it out 100%.
The images in the linked thread do not show up for me so I'll post my own image:
In his post, dasher, indicates that for B-series engines: "it is preferable to ventilate the crankcase gases through 2 ports located on the back of the block." The ports he's referring to are labeled as B and C in the image posted above. The "crankcase ventilation hole" that he refers to is labeled as D. The "port on the top of your block which normally connects a line to your PVC chamber" is labeled as A.
I would like to use this method because I do not want to re-route the blow-by gases and oil into my supercharger's compressor.
However, my setup poses a few problems that I need to remedy before I can use the "recommended" ventilation method. Because my water tube has the ports for the OEM oil cooler and because the JRSC requires me to clock the oil cooler to the 9 o'clock position, the port labeled as B is blocked. This is shown in the above image. It is not likely that I will be able to use it as a location to vent my block. I could, simply, vent only from C but it's not ideal. Using one point of ventilation will be better than using the stock setup but more efficient ventilation could be had.
Where I'm getting hung-up
My question is, instead of using B and C to vent my block, why can't I use C and D? D always seems to be plugged with a freeze plug or reserved for drain-back. Is it because it's too low on the block and will siphon oil? How? My catch-can will be at atmospheric pressure and will not be actively drawing vacuum on the block. I know the blow-by gases will be creating pressure in my block that will force gases out such that the atmospheric pressure will seem like a vacuum (depending on your reference frame) but I can't help but feel that it's a different scenario.
Linked in this post:
The Official Crankcase Evacuation thread for Turbo Hondas / PCV / Catchcan / by dasher
Further reading:
Tests on the PCV system - How Honda intended it - by dasher
03-25-2013, 07:20 AM
#264
Honda-Tech Member
Join Date: Sep 2004
Location: far EAST SIDE, NY, USA
Posts: 307
Received 0 Likes
on
0 Posts
You really kicked things up a notch with stamped pics, guide,links, table of contents in this thread...great read. I cannot give you any good debate about why you cant vent D and C. I can confirm B was a blocked off with the hoses, and when the charger gets back there everything gets tighter. I was looking at the drain-back/vented valve cover catch can but I abandoned that idea after reinstalling the it all again.
As for your LHT woes, I feel you with some flaws in the manufacture of the units. You really got the short end of the stick with that piece. Good thing you can fix it all and aren't waiting to get the car back on the road . anyways still a great read! I love this thread
And feel free to jack my photos anytime! Thats what they are there for, sharing, learning, building better.
Last edited by GOOCH-JDM-ITR; 03-25-2013 at 07:21 AM. Reason: additional comment
03-25-2013, 05:19 PM
#265
R.I.P. Mark
iTrader: (1)
Join Date: Jan 2008
Location: Melbourne, Australia
Posts: 1,377
Likes: 0
Received 2 Likes
on
2 Posts
you can use B but you need to rotate the cooler round more and use new hoses for it
the benifit would be to use B and C
this is what im doing atm
Im also going to block off A and D
I bought a kit from Ebay
http://www.ebay.com.au/itm/271170665...84.m1497.l2649
the benifit would be to use B and C
this is what im doing atm
Im also going to block off A and D
I bought a kit from Ebay
http://www.ebay.com.au/itm/271170665...84.m1497.l2649
04-07-2013, 09:46 AM
#267
talks to himself
Thread Starter
04-07-2013, 04:00 PM
#269
talks to himself
Thread Starter
Something like silicone heater hose would probably work. https://www.siliconehose.com/commerc...-wa-hh-100.htm I wonder if I can find something like this locally. I'll have to check around. I was worried about how rigid the original hose is and I know it can't be formed but this stuff is coiled on a hose reel so I'm guessing it's more compliant.
04-07-2013, 06:05 PM
#270
R.I.P. Mark
iTrader: (1)
Join Date: Jan 2008
Location: Melbourne, Australia
Posts: 1,377
Likes: 0
Received 2 Likes
on
2 Posts
Something like silicone heater hose would probably work. https://www.siliconehose.com/commerc...-wa-hh-100.htm I wonder if I can find something like this locally. I'll have to check around. I was worried about how rigid the original hose is and I know it can't be formed but this stuff is coiled on a hose reel so I'm guessing it's more compliant.
04-08-2013, 06:56 AM
#271
talks to himself
Thread Starter
This Week's Agenda:
1. Buy some silicone heater hose.
2. Meet B-serious for a possible radiator purchase.
3. Catch/Can assembly arrives.
4. Remove block plugs and install catch can breather fittings.
5. Buy silicone heater hose and re-route oil cooler lines.
6. Test fit oil cooler, breather, and supercharger.
7. Clean-up bumper (actual bumper. not the plastic cover.) with a wire wheel, prime, paint, and cut for front-mount.
8. Test fit front mount and water pump.
9. Purchase water tube O-ring (Already replaced the water pump side but didn't purchase a replacement for the thermostat housing side...)
04-08-2013, 11:21 AM
#272
Honda-Tech Member

Join Date: Mar 2012
Posts: 10
Likes: 0
Received 0 Likes
on
0 Posts
Very impressive! Rust sucks so bad, it really does kill cars. I did some rust repair on my ek when i had it, and it was not even close to as bad as that, but it was still a pain! You guys really overhauled the body, and i think it turned out fantastic!
04-10-2013, 05:37 AM
#274
talks to himself
Thread Starter
No actual progress to report.
I did pick up the radiator and my catch can setup arrived. I went to Sears to buy a 14mm hex key/socket but they didn't have an individual one for sale. All they had was a set of 4 massive hex sockets and it was $39.99. I said "Nope" and walked out. I'll use an bolt 14mm bolt. I have one left over from my rear lower control arms. But, all I have is a vice-grip at home and I wasn't able to get enough leverage to break the plugs loose. (B and C in a previous post). So, off to the hardware store today to see if I can get a couple of nuts to match the threads so that I can weld them to the bolt and get my breaker bar on these things. If that doesn't work, I'll have to go to my parents house, charge the compressor, put it in my car, drive it to my house, and hope there's enough air in the tank to pop both plugs loose without having to make a second trip...
I did pick up the radiator and my catch can setup arrived. I went to Sears to buy a 14mm hex key/socket but they didn't have an individual one for sale. All they had was a set of 4 massive hex sockets and it was $39.99. I said "Nope" and walked out. I'll use an bolt 14mm bolt. I have one left over from my rear lower control arms. But, all I have is a vice-grip at home and I wasn't able to get enough leverage to break the plugs loose. (B and C in a previous post). So, off to the hardware store today to see if I can get a couple of nuts to match the threads so that I can weld them to the bolt and get my breaker bar on these things. If that doesn't work, I'll have to go to my parents house, charge the compressor, put it in my car, drive it to my house, and hope there's enough air in the tank to pop both plugs loose without having to make a second trip...