
HOW TO: DIY Custom Interior Project - **NO56K**"
 02-14-2009, 05:36 PM
#1
***********CLIFF NOTES*********
PAGE 1 -
----------REMOVING PANELS AND DASHBOARD
---1/2---REMOVING ARM RESTS IN DOOR PANELS / WRAPPING A-PILLARS
---3/4---CLEANING AND PREPPING PANELS
---END--PAINTED PANELS / BEFORE & AFTER PICS
PAGE 5 -
----------FABRIC GLUES AND EXPLANATION OF WRAPPING ARM RESTS AND HEADLINER
PAGE 8 -
----------PICS OF MOTOR SWAP
----------PICS OF DASH & HEADLINER IN CAR
PAGE 9 -
----------ALL PIECES INSTALLED (MINUS SEATS & WHEEL)
----------RUN DOWN OF PARTS/MATERIALS USED AND $$
Its Valentines Day so I decided to break her out and remove my interior and change it up. I am going to follow some of the others threads on re-finsihing the interior panels as well as the dashboard. I am going to change it from the stock gray color to a black finish. Also going to switch the headliner to black alcantara and wrap the a-pillars as well. I have the red CTR carpet currently, but i think i am going to get a new one since i already have everything out anyway. Today i got just about all of the panels out. Im planning on taking out the dashboard by the end of next weekend. (not looking forward to it) Im going to have everything painted by my Uncle who has a paint booth. Im trying to decide what i want to do for paint. He has a spray gun but the paint ive seen others use i believe was out of a can. So i dont know which way to go? Im going to clean the panels i have out as best as i can tonight and tomorrow. I think that the other threads said i should use adhesion promoter before i actually paint, and a layer or two of clear once paint has dried? Luckily i have some time to work on this thanks to the "Winter Monster".
heres a couple pics of todays work and the parts that i could fit on the table.
Some things to note:
I started with removing my rear seat first. this gave me access to the rear window panel and worked my way to the front from there.
Almost ALL of the interior pieces and held in by CLIPS.
To remove the door panel you must unscrew and remove the housing around the handle and lock assembly. Then you must unscrew the screw in the pull tray on your door panel (the slot you grab to close your door). Once these two pieces are removed, you must remove the pin from your Window crank. (if you have power windows negate this part) If you try to gently push your door panel away from the crank, and pull the handle out a little (its plastic, it will flex TO A POINT....dont get stupid ) There is a clip holding the window gear on from the back, it is gold and you can see if it you look closely. They make a tool to get this off, but of course i dont have that. I used my key, if you slide it behind the window crank and can press it onto the correct side of the clip, you should be able to easily push off the clip in whichever direction and remove the crank. Finally, there is one last screw, underneath the speaker cover, in a indent in the panel. Once you remove this screw, carefully pry the bottom of your door panel out of its clips starting at the bottom. There is a lip along the top to catch your window trim so you must remove from the bottom first.
All other panels and consoles either come right out of the clips, or the screws are CLEARLY visible.


PAGE 1 -
----------REMOVING PANELS AND DASHBOARD
---1/2---REMOVING ARM RESTS IN DOOR PANELS / WRAPPING A-PILLARS
---3/4---CLEANING AND PREPPING PANELS
---END--PAINTED PANELS / BEFORE & AFTER PICS
PAGE 5 -
----------FABRIC GLUES AND EXPLANATION OF WRAPPING ARM RESTS AND HEADLINER
PAGE 8 -
----------PICS OF MOTOR SWAP
----------PICS OF DASH & HEADLINER IN CAR
PAGE 9 -
----------ALL PIECES INSTALLED (MINUS SEATS & WHEEL)
----------RUN DOWN OF PARTS/MATERIALS USED AND $$
Its Valentines Day so I decided to break her out and remove my interior and change it up. I am going to follow some of the others threads on re-finsihing the interior panels as well as the dashboard. I am going to change it from the stock gray color to a black finish. Also going to switch the headliner to black alcantara and wrap the a-pillars as well. I have the red CTR carpet currently, but i think i am going to get a new one since i already have everything out anyway. Today i got just about all of the panels out. Im planning on taking out the dashboard by the end of next weekend. (not looking forward to it) Im going to have everything painted by my Uncle who has a paint booth. Im trying to decide what i want to do for paint. He has a spray gun but the paint ive seen others use i believe was out of a can. So i dont know which way to go? Im going to clean the panels i have out as best as i can tonight and tomorrow. I think that the other threads said i should use adhesion promoter before i actually paint, and a layer or two of clear once paint has dried? Luckily i have some time to work on this thanks to the "Winter Monster".
heres a couple pics of todays work and the parts that i could fit on the table.
Some things to note:
I started with removing my rear seat first. this gave me access to the rear window panel and worked my way to the front from there.
Almost ALL of the interior pieces and held in by CLIPS.
To remove the door panel you must unscrew and remove the housing around the handle and lock assembly. Then you must unscrew the screw in the pull tray on your door panel (the slot you grab to close your door). Once these two pieces are removed, you must remove the pin from your Window crank. (if you have power windows negate this part) If you try to gently push your door panel away from the crank, and pull the handle out a little (its plastic, it will flex TO A POINT....dont get stupid
) There is a clip holding the window gear on from the back, it is gold and you can see if it you look closely. They make a tool to get this off, but of course i dont have that. I used my key, if you slide it behind the window crank and can press it onto the correct side of the clip, you should be able to easily push off the clip in whichever direction and remove the crank. Finally, there is one last screw, underneath the speaker cover, in a indent in the panel. Once you remove this screw, carefully pry the bottom of your door panel out of its clips starting at the bottom. There is a lip along the top to catch your window trim so you must remove from the bottom first.All other panels and consoles either come right out of the clips, or the screws are CLEARLY visible.
Last edited by DC2-ProdUcTiOnS; 07-11-2009 at 06:17 PM.
 02-14-2009, 06:47 PM
#3
I need to figure out how i wanna do it. Im torn between using the SEM paint that comes in either can or bucket, or PPG paint. The Landau Black for the SEM paint seems to give a real nice OEM look to it.
Has anyone painted there dash without taking it out? Saw it posted in a couple threads but no word on how it ever came out. IDK if im going to this route. I want it to be done right, i just dont want to take out my steering column. If i do that ill feel like why not get a new wheel or paint mine? idk yet. Does the RSX wheel fit?
Has anyone painted there dash without taking it out? Saw it posted in a couple threads but no word on how it ever came out. IDK if im going to this route. I want it to be done right, i just dont want to take out my steering column.
If i do that ill feel like why not get a new wheel or paint mine? idk yet. Does the RSX wheel fit?
02-14-2009, 08:27 PM
#5
Honda-Tech Member
Join Date: Nov 2006
Location: 360 Washington
Posts: 844
Likes: 0
Received 0 Likes
on
0 Posts
Looks like you got a good plan. I used the SEM Landau Black it turned out great the paint is really easy to spray also it doesn't run easily it sprays very dry, make sure you go over everything thoroughly because it can be easy to miss spots. I prepped with SEM plastic cleaner and used some adhesion promoter I forgot what brand it turned out great though, too bad I dont still have the car to show you what it looks like now =/. But good luck to you man I'm looking forward to see how yours turns out.
02-14-2009, 08:56 PM
#6
Does the paint stick just as well to the upper vinyl portion of the door panel as oppose to the lower plastic portion? Is there any other way i should go about prepping the vinyl area as oppose to the plastic?
Thank you guys in advance. I really appreciate it. I want to do it right, and i want it to be the first time.
Thank you guys in advance. I really appreciate it. I want to do it right, and i want it to be the first time.
Trending Topics
02-15-2009, 08:46 AM
#10
Honda-Tech Member
Just disconnect your battery and let it sit for a couple mins. Ive seen guys(crazy IMO) remove airbags while the battery was still hooked up.
02-15-2009, 10:06 AM
#11
Ive done some research and it seems like the method is:
- Remove negative from battery
- Straighten wheels
- remove side panels on steering wheel
- loosen T30 torx screws
- disconnect SRS plug to airbag
- carefully remove airbag
- disconnect additional plugs still connected (cruise control, etc..)
- either 14mm or 19mm bolt on the center of wheel
Can i simply drop the steering column to remove dash instead of taking off the entire wheel?
02-15-2009, 03:48 PM
#12
*************************************
*****REMOVING THE DASHBOARD********
*************************************
I returned today to get some more work done. I figured i would take some pics as i was doing it since the write ups for removing a 96-98 civic dash have all removed the pictures.
Ill continue to post as i go, so im gonna save a couple slots after this post to keep the pictures continuous. Today i pretty much got the dash ready to be removed. All panels, clips, climate control, etc. has been removed. All i have left to do is drop the steering column so i can unbolt and remove the dash. I did everything today with the seats still installed. It would have been alot more comfortable to do it with them out, but i needed something to b!tch about.
I am following the directions step by step straight from the 2300 page EJ6, EJ7, EJ8, (96-00) Service Manual by Honda for technicians.
Todays Work:
First you must remove the gauge bezel. There are 2 screws on the the underside.

Once you have removed your bezel it should look something like this.

Next you must remove the Drivers dashboard lower cover and knee bolster.
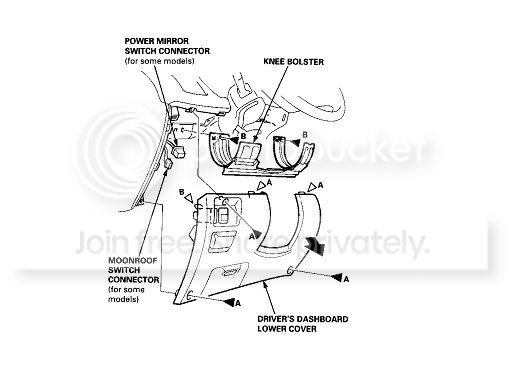
Once you have removed the 3 screws, and removed the panel it should look something like this.

Next you must remove the Glove Box. There are 2 8mm bolts on the bottom of the glove box. Your going to have to be on your back under the dash to get to them. ** MAKE SURE YOU HAVE THE GLOVE BOX CLOSED! ** it will fall on your face if you dont! They are the bolts attached to a hinge like this.

Once you have removed these two bolts, pull you handle to open you glove box and remove it. Here is a pic of the glove box removed. As you can see im pointing to the location of the 2 8mm bolts that hold on the glove box.

Next you must remove your air vents and fogger trims so that you can get at bolts later for dash removal. Take a small flat head screwdriver and pry underneath the fogger trims FROM THE SIDES. Be careful not to pry too hard and break the clips. Once you have the clips loose, you may have to pull towards to to remove. Be easy when removing the side air vents. If you dont you can easily make pessure dents in your dash. (and we dont want that) Heres what each side should look like after progress so far.


Now you must remove the center dashboard lower cover.
this thing....

There are 5 screws to remove this piece. The picture below is showing the screw driver on one of the screws, as my pinky points to the location of the second screw on the bottom. It is the same for the other side. Finally the 5th screw is dead center towards the bottom.

the diagram also shows a (1) 8mm bolt on the right side next to where the glove box was. But that was not present on mine.
Once you have removed all of the screws, pull the panel out of its clips but be careful to not pull too hard if you have the accessory socket because its still connected. Once you release the panel from its clips. it should be hanging like this. Simply pull the plug straight out from the back. it didnt seem like it would unclip, but just seperate the two, no clips or nothing just a plug.

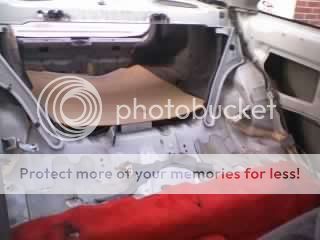
Once you have removed these panels it should now look something like this.

Now for the part that everyone said was going to be the most difficult. Removing the climate control. I dont know if its because of my long arms and fingers but it wasnt too difficult for me!
First remove your radio, pull it out and disconnect and connections. Once you have removed the radio, you may be able to reach the defogger switch and the hazard switch. If you cannot, carefully use a flathead screwdriver or slim tool and pull it straight out of it clips. Once you have removed them and disconnected there plugs, there are 2 screws behind them. it looks like this.


Now you must climb underneath the center part of the dashboard, if you go from the passenger side, it should look like this. Remove the brown plug. It has a release ON THE BOTTOM of the plug.

There are two more pieces to disconnect the climate control. If you go over to the driver side and crawl underneath from that side, there is a small green plug, closest to the driver side door. The release is on the TOP of the plug. While you are underneath, disconnecting this cable, you will notice the air mix control cable. It is hooked up to the center panel and runs back towards your firewall. I found it easier to follow the line all the way back lever where the line hooked up. It was simply a loop on the end of the cable attached to a post. The post i took the other end of the cable off of looked like this.

Here is a pic of my climate control out of the car. You can notice the cable still attached because i wasnt going to bend that end to a point of not being able to get it back in.

Once you have removed your center panel, it should now look something like this! You can see im holding the 2 plugs that went to the back of your climate control unit.

Well that was enough for today. It started to get dark and i dont want to get too far into the dash without a helping hand. Im at a good point. I now need to lower the steering column, remove all plugs and connections, unbolt and unscrew all dashboard connections, remove to point of disconnecting remaining plugs, hopefully remove the dash! Once it is out, i will show full cleaning process of panels, prep, and paint. Its alll soon to come so stay tuned.
Dc2
************************************************** ************
********************** UPDATE 2-21-09 ************************
************************************************** ************
So when i returned today, IM DETERMINED to get the dash off. My boy who was supposed to come and help is now not answering his phone, but im doing it anyway. Dash by myself? Whynot? So since i believe im going to get a EP3 steering wheel, i removed mine and dropped my steering column to get the dash out.
Todays Work:
*********************************************
********* MAKE SURE THAT YOU DISCONNECT YOUR NEGATIVE CABLE ON YOUR BATTERY!!! LET IT SIT FOR 5 MINUTES BEFORE MESSING WITH SRS COMPONENTS!!!**************
*********************************************
First you must make sure that your wheels are straight. then remove the covers on the side and bottom of your steering wheel. Once you have done this you will be bale to see the T30 torx screws on the side, and the Yellow SRS plug underneath.


Unplug the yellow SRS plug first and then remove the two T30 Torx screws. The plug is a little tricky, i fiddled with it for a minute before i got it off. Once you have the two Torx screws out, the airbag will slide ride out. Store the airbag on its back (H emblem facing you) and on a level surface. Once you have the airbag out there are two black plugs still connected. Unplug both of them, they say push right on them. After you have done that, use a 19mm socket to get the bolt off of the center of the wheel.

Once you have the bolt off, put your hands at the 10 and 2 position and pull/shake each side. left right left right. mine was a little tight at first but then it came right out.

The next step was to remove my cluster. Since you already have the bezel or whatever its called off, you can see the screws holding in the cluster. Unscrew them and tilt the cluster towards you. You can reach the plugs on the top of the cluster. There are little tabes in the middle that you need to push down to release the plug. Once you have the top two out, you can maneuver the cluster to get to the other plugs. I think my harness may have been switched from the owner before me? idk...anyways,heres what i had.

The next step is to remove you main relay box. You must unplug all of the main connections. Keep an eye on what goes where. Theres a WHOLE SLEW of plugs that you must undo to get it loose. There are NONE on the back. Only the major plugs must be taken out. Once you have all the main plugs removed, there are two 10mm bolts holding the relay in place.


Once you have the nuts off, tilt the relay box down. you just need it to be disconnected from the dashboard framing. Youll see once your under there.
You are now ready to start taking off the bolts for the dashboard. They are all 12mm except for 1 or 2 spots. Start on the drivers side and make your way across. First, there are two bolt to the left of where the relay box was. This pic shows the ratchet on one and the other one to the left.

Next FROM THE OUTSIDE, there is a bolt on your door frame. Pictured here.

next you must loosen the two 10mm bolts behind where the cup holder would be in the center. You dont need to remove them all the way because they are just there as a guide.

Now i hadnt lowered the steering column yet and realized i prolly sohuld have done so. it is 4 12mm bolts, in the next picture showing the location of the next bolt to be undone you can see the other end of the clamp that holds up the steering column. If you get under the dash and look you can see all 4 bolts clear as day. Mine were marked by the factory with purple paint. This next picture shows the bolt the along the firewall. i left the ratchet on there so you could see it, its kinda tight in there.


Next you must remove the center dashboard cover. Behind it is a 10mm bolt. You must use an a pretty long extension for this one becuase you cant get leverage so close to the windshield and dashboard.


Once you have removed this, go to the passenger side, and there are 2 more bolts. Also the one giant plug left to disconnect. This pic shows all three.

Once you have removed the two bolts and the plug your home free. Start to wiggle the dashboard out. Now remember im doing this by myself, which is not too easy. I had the dash completely out and was getting incredibly frustrated because it was still stuck in somewhere. It was over by the drivers side. I had the dash pretty much out at this pint it was just hanging there by a couple plastic wire clips. I was having major difficulty holding up the dash, moving the other 10,000 wires out of the way to get my ginormous hands back there and be able to cut the little clip. after about 20 minutes of extreme profanity, my friend finally called and said he was on his way. Once he got there, i did it in literally 2 seconds. snip snip, and the dash fell right out. (damn slacker friends... )

I have now successfully removed the dash, and will begin getting everything ready for paint later this week. Im going to paint next saturday and sunday. I will be doing the rest f the prep thursday and friday night. I will post pics of the further prepping process once complete.
*****REMOVING THE DASHBOARD********
*************************************
I returned today to get some more work done. I figured i would take some pics as i was doing it since the write ups for removing a 96-98 civic dash have all removed the pictures.
Ill continue to post as i go, so im gonna save a couple slots after this post to keep the pictures continuous. Today i pretty much got the dash ready to be removed. All panels, clips, climate control, etc. has been removed. All i have left to do is drop the steering column so i can unbolt and remove the dash.
I did everything today with the seats still installed. It would have been alot more comfortable to do it with them out, but i needed something to b!tch about.I am following the directions step by step straight from the 2300 page EJ6, EJ7, EJ8, (96-00) Service Manual by Honda for technicians.
Todays Work:
First you must remove the gauge bezel. There are 2 screws on the the underside.
Once you have removed your bezel it should look something like this.
Next you must remove the Drivers dashboard lower cover and knee bolster.
Once you have removed the 3 screws, and removed the panel it should look something like this.
Next you must remove the Glove Box. There are 2 8mm bolts on the bottom of the glove box. Your going to have to be on your back under the dash to get to them. ** MAKE SURE YOU HAVE THE GLOVE BOX CLOSED! ** it will fall on your face if you dont!
They are the bolts attached to a hinge like this.Once you have removed these two bolts, pull you handle to open you glove box and remove it. Here is a pic of the glove box removed. As you can see im pointing to the location of the 2 8mm bolts that hold on the glove box.
Next you must remove your air vents and fogger trims so that you can get at bolts later for dash removal. Take a small flat head screwdriver and pry underneath the fogger trims FROM THE SIDES. Be careful not to pry too hard and break the clips. Once you have the clips loose, you may have to pull towards to to remove. Be easy when removing the side air vents. If you dont you can easily make pessure dents in your dash. (and we dont want that) Heres what each side should look like after progress so far.
Now you must remove the center dashboard lower cover.
this thing....
There are 5 screws to remove this piece. The picture below is showing the screw driver on one of the screws, as my pinky points to the location of the second screw on the bottom. It is the same for the other side. Finally the 5th screw is dead center towards the bottom.
the diagram also shows a (1) 8mm bolt on the right side next to where the glove box was. But that was not present on mine.
Once you have removed all of the screws, pull the panel out of its clips but be careful to not pull too hard if you have the accessory socket because its still connected. Once you release the panel from its clips. it should be hanging like this. Simply pull the plug straight out from the back. it didnt seem like it would unclip, but just seperate the two, no clips or nothing just a plug.
Once you have removed these panels it should now look something like this.
Now for the part that everyone said was going to be the most difficult. Removing the climate control. I dont know if its because of my long arms and fingers but it wasnt too difficult for me!
First remove your radio, pull it out and disconnect and connections. Once you have removed the radio, you may be able to reach the defogger switch and the hazard switch. If you cannot, carefully use a flathead screwdriver or slim tool and pull it straight out of it clips. Once you have removed them and disconnected there plugs, there are 2 screws behind them. it looks like this.
Now you must climb underneath the center part of the dashboard, if you go from the passenger side, it should look like this. Remove the brown plug. It has a release ON THE BOTTOM of the plug.
There are two more pieces to disconnect the climate control. If you go over to the driver side and crawl underneath from that side, there is a small green plug, closest to the driver side door. The release is on the TOP of the plug. While you are underneath, disconnecting this cable, you will notice the air mix control cable. It is hooked up to the center panel and runs back towards your firewall. I found it easier to follow the line all the way back lever where the line hooked up. It was simply a loop on the end of the cable attached to a post. The post i took the other end of the cable off of looked like this.
Here is a pic of my climate control out of the car. You can notice the cable still attached because i wasnt going to bend that end to a point of not being able to get it back in.
Once you have removed your center panel, it should now look something like this!
You can see im holding the 2 plugs that went to the back of your climate control unit.Well that was enough for today. It started to get dark and i dont want to get too far into the dash without a helping hand. Im at a good point. I now need to lower the steering column, remove all plugs and connections, unbolt and unscrew all dashboard connections, remove to point of disconnecting remaining plugs, hopefully remove the dash! Once it is out, i will show full cleaning process of panels, prep, and paint. Its alll soon to come so stay tuned.
Dc2
************************************************** ************
********************** UPDATE 2-21-09 ************************
************************************************** ************
So when i returned today, IM DETERMINED to get the dash off. My boy who was supposed to come and help is now not answering his phone, but im doing it anyway. Dash by myself? Whynot? So since i believe im going to get a EP3 steering wheel, i removed mine and dropped my steering column to get the dash out.
Todays Work:
*********************************************
********* MAKE SURE THAT YOU DISCONNECT YOUR NEGATIVE CABLE ON YOUR BATTERY!!! LET IT SIT FOR 5 MINUTES BEFORE MESSING WITH SRS COMPONENTS!!!**************
*********************************************
First you must make sure that your wheels are straight. then remove the covers on the side and bottom of your steering wheel. Once you have done this you will be bale to see the T30 torx screws on the side, and the Yellow SRS plug underneath.
Unplug the yellow SRS plug first and then remove the two T30 Torx screws. The plug is a little tricky, i fiddled with it for a minute before i got it off. Once you have the two Torx screws out, the airbag will slide ride out. Store the airbag on its back (H emblem facing you) and on a level surface. Once you have the airbag out there are two black plugs still connected. Unplug both of them, they say push right on them. After you have done that, use a 19mm socket to get the bolt off of the center of the wheel.
Once you have the bolt off, put your hands at the 10 and 2 position and pull/shake each side. left right left right. mine was a little tight at first but then it came right out.
The next step was to remove my cluster. Since you already have the bezel or whatever its called off, you can see the screws holding in the cluster. Unscrew them and tilt the cluster towards you. You can reach the plugs on the top of the cluster. There are little tabes in the middle that you need to push down to release the plug. Once you have the top two out, you can maneuver the cluster to get to the other plugs. I think my harness may have been switched from the owner before me? idk...anyways,heres what i had.
The next step is to remove you main relay box. You must unplug all of the main connections. Keep an eye on what goes where. Theres a WHOLE SLEW of plugs that you must undo to get it loose. There are NONE on the back. Only the major plugs must be taken out. Once you have all the main plugs removed, there are two 10mm bolts holding the relay in place.
Once you have the nuts off, tilt the relay box down. you just need it to be disconnected from the dashboard framing. Youll see once your under there.
You are now ready to start taking off the bolts for the dashboard. They are all 12mm except for 1 or 2 spots. Start on the drivers side and make your way across. First, there are two bolt to the left of where the relay box was. This pic shows the ratchet on one and the other one to the left.
Next FROM THE OUTSIDE, there is a bolt on your door frame. Pictured here.
next you must loosen the two 10mm bolts behind where the cup holder would be in the center. You dont need to remove them all the way because they are just there as a guide.
Now i hadnt lowered the steering column yet and realized i prolly sohuld have done so. it is 4 12mm bolts, in the next picture showing the location of the next bolt to be undone you can see the other end of the clamp that holds up the steering column. If you get under the dash and look you can see all 4 bolts clear as day. Mine were marked by the factory with purple paint. This next picture shows the bolt the along the firewall. i left the ratchet on there so you could see it, its kinda tight in there.
Next you must remove the center dashboard cover. Behind it is a 10mm bolt. You must use an a pretty long extension for this one becuase you cant get leverage so close to the windshield and dashboard.
Once you have removed this, go to the passenger side, and there are 2 more bolts. Also the one giant plug left to disconnect. This pic shows all three.
Once you have removed the two bolts and the plug your home free. Start to wiggle the dashboard out. Now remember im doing this by myself, which is not too easy. I had the dash completely out and was getting incredibly frustrated because it was still stuck in somewhere. It was over by the drivers side. I had the dash pretty much out at this pint it was just hanging there by a couple plastic wire clips. I was having major difficulty holding up the dash, moving the other 10,000 wires out of the way to get my ginormous hands back there and be able to cut the little clip. after about 20 minutes of extreme profanity, my friend finally called and said he was on his way. Once he got there, i did it in literally 2 seconds. snip snip, and the dash fell right out. (damn slacker friends...
)I have now successfully removed the dash, and will begin getting everything ready for paint later this week. Im going to paint next saturday and sunday. I will be doing the rest f the prep thursday and friday night. I will post pics of the further prepping process once complete.
Last edited by DC2-ProdUcTiOnS; 02-21-2009 at 03:13 PM.
02-15-2009, 03:53 PM
#13
************************************************** *********************************************
*********WORK WITH INTERIOR PANELS (PREP, PAINT, WRAPPING, TRIMMING , CLUSTER SWAP)*************
************************************************** *********************************************
Whew...so it has been a long night. I planned on washing and prepping all of the panels tonight with the new Dupont cleaner and getting ready for paint. Wheeeeeel...it didnt quite work out that way. I ended up getting involved with taking the arm rests out of the door panels. Sooooo heres the beginning of the DIY armrest portion of this Interior project.
Ok, so when you flip over your door panel, hopefully it should look simething like this.

So the first thing you will obviously notice is that you have to take off what i believe is a brace? or sound deadener? idk, but the big black piece has to come off. Also you will notice that the styrofoam needs to go too. I simply cut tight along arm rest in will glue it on later. Now heres where i got completely ****!ing looney. I started looking at the back of the arm rest and noticed that it wasnt screws, but heat pressed points. They looked like this.

So i was thinking of the best way to get this off without butchering everything. So i decided to break out the dremel tool and grind them off. ***** WARNING ***** You need to be extra careful when you do this, it is very easy to grind too much off. You need to leave yourself something to screw into when you put it back together. Be careful and take your time. Slowly go around the edges, as you go you will see where you need to drill out the molded plastic. check it out. a pic of the dremel and the bit i used for reference as well.


My best advice is to drill to get as much of the excess pieces off. Then repeatedly stop and rub off what you can and keep going, also lift gently to see where it needs to be drilled further. Once you have all of the plastic gone, lift the arm rest out from the door frame. The fabric may still be stick around the edges, so get it out of there. your going to end up replacing it anyway so dont worry about ripping it.

and you door panel should now look like this...notice all of the little nubs of plastic remaining for you to screw you the arm rest back in...

You can now peel the fabric right off of the arm rest.


The last thing you need to remove from your door panel is the weather strip for the window. The strip is held in by metal tabs underneath the panel. Simply pry them in there correction direction to make them vertical. Once they are all positioned correctly, you may need to use a lil force to break the seal on both ends. It seemed like it may have just been sticky, or maybe a lil bit of glue, but its not too hard.


So after doing all of this i started to wash all of my panels....ill give the full write up for that since its going to be a 3 step process. Enough for one night
Dc2
********************************
******** UPDATE 2-23-09 *********
********************************
I went to the local fabric store and got my Alcantara Ultra Suede in black for my headliner and A-pillars, and my tight ply red tweed for my armrests. I spent a total of $19, but i have not yet gotten the fabric for the headliner. That should be another $18. I started tonight with wrapping a main section of both A-pillars. They have some twists and bends and some tough angles, so i figured ill tackle the hard stuff first. I purchased one square yard of the Alcantara, and cut it into two equal sections and will be using a spray can of fabric adhesive. Once I had the two sections, i trimmed an outline around the A-pillar. It is easier to work with less fabric. But be careful not to cut too much. Remember to take into account the shape of what you are wrapping. You must clean the A-pillars so they can take the adhesive and create a solid bond. I used Fantastic heavy duty de-greaser, and it worked..... fantastic?
Pic of Alcantara Ultra Suede

Cutting a small template since less fabric is easier to work with...


I decided to it in sections. Because of the bends and shape of the piece, i am going to spray just the long center piece first, let that dry overnight, and work my way from there. To help make sure things didnt get out of place, i used clamps to hold the fabric in its place on one end on the pieces i wasnt spraying. you could use clothes pins as well. Once i was ready, you must shake the adhesive for a minute solid, and it must be atleast 60 degrees or so. (room temp) Spray evenly ON THE PLASTIC A-PILLAR applying a coat to a point where you can see the moisture evenly on the plastic. Make sure to get all edges, under seams, and be sure not to leave any spots dry. BUT DONT OVER DO IT OR YOUR FABRIC WILL FEEL WET....let the adhesive sit on the plastic for a minute or so so it can adhere and build moisture. After a minute, lay your fabric on the piece sprayed making sure to not leave any bubbles or bumps. Smooth it out as tight as you can as fast as you can. IT GETS STICKY RRREEEEEAAALLLLLYYYYY QUICK. it helps to have someone else spread it out. If you get a seam or bubble, lift up quickly and set back down. Smooth from the center OUT towards the sides. Better to push the glue AWAY from the center, that way it doesnt pool.
Heres a pic just moments after getting it nice and tight and rubbing them together....

A shot of them drying on the rack for the moment.....

And a close up shot after about 15 minutes of drying....its coming out GREAT!!!

I will put up pics of the rest of the pillars and the headliner soon once completed.
Dc2
***********************************
********* UPDATE 2-25-09 ***********
***********************************
I finished wrapping the A-pillars and took out my headliner and removed the old fabric. Im EXTREMELY EXCITED about how good these A-pillars came out. I used the simple fabric spray adhesive as described above, and another finishing glue on the back of the panels. Read directions above for instructions on laying front pieces. FOR THE BACK LAYER, be careful because the outside layer is visible when you open the door!!!! Once you have the outsides fully wrapped in fabric, trim as much excess fabric off as possible. You must also trim around the connection points. There are the clips, and there are little tabs as well that slide into holes to hold it in place. Check it out...


Once you have completed wrapping the back and glueing it, let it dry for at least 24 hours. Heres a couple pics of the end result. This fabric is so cool YOU CAN WRITE ON IT !!!!! check out where i wrote HONDA down one of the pillars....i tried to write "tech" sideways but it didnt come out to well.... more pics to come....i cant wait to get this back in the car.


ENJOY! more to come...tomorrow is final stages of cleaning panels to prep for paint....
Dc2
*********WORK WITH INTERIOR PANELS (PREP, PAINT, WRAPPING, TRIMMING , CLUSTER SWAP)*************
************************************************** *********************************************
Whew...so it has been a long night. I planned on washing and prepping all of the panels tonight with the new Dupont cleaner and getting ready for paint. Wheeeeeel...it didnt quite work out that way. I ended up getting involved with taking the arm rests out of the door panels. Sooooo heres the beginning of the DIY armrest portion of this Interior project.
Ok, so when you flip over your door panel, hopefully it should look simething like this.
So the first thing you will obviously notice is that you have to take off what i believe is a brace? or sound deadener? idk, but the big black piece has to come off. Also you will notice that the styrofoam needs to go too. I simply cut tight along arm rest in will glue it on later. Now heres where i got completely ****!ing looney. I started looking at the back of the arm rest and noticed that it wasnt screws, but heat pressed points. They looked like this.
So i was thinking of the best way to get this off without butchering everything. So i decided to break out the dremel tool and grind them off. ***** WARNING ***** You need to be extra careful when you do this, it is very easy to grind too much off. You need to leave yourself something to screw into when you put it back together. Be careful and take your time. Slowly go around the edges, as you go you will see where you need to drill out the molded plastic. check it out. a pic of the dremel and the bit i used for reference as well.
My best advice is to drill to get as much of the excess pieces off. Then repeatedly stop and rub off what you can and keep going, also lift gently to see where it needs to be drilled further. Once you have all of the plastic gone, lift the arm rest out from the door frame. The fabric may still be stick around the edges, so get it out of there. your going to end up replacing it anyway so dont worry about ripping it.
and you door panel should now look like this...notice all of the little nubs of plastic remaining for you to screw you the arm rest back in...
You can now peel the fabric right off of the arm rest.
The last thing you need to remove from your door panel is the weather strip for the window. The strip is held in by metal tabs underneath the panel. Simply pry them in there correction direction to make them vertical. Once they are all positioned correctly, you may need to use a lil force to break the seal on both ends. It seemed like it may have just been sticky, or maybe a lil bit of glue, but its not too hard.
So after doing all of this i started to wash all of my panels....ill give the full write up for that since its going to be a 3 step process. Enough for one night
Dc2
********************************
******** UPDATE 2-23-09 *********
********************************
I went to the local fabric store and got my Alcantara Ultra Suede in black for my headliner and A-pillars, and my tight ply red tweed for my armrests. I spent a total of $19, but i have not yet gotten the fabric for the headliner. That should be another $18. I started tonight with wrapping a main section of both A-pillars. They have some twists and bends and some tough angles, so i figured ill tackle the hard stuff first. I purchased one square yard of the Alcantara, and cut it into two equal sections and will be using a spray can of fabric adhesive. Once I had the two sections, i trimmed an outline around the A-pillar. It is easier to work with less fabric. But be careful not to cut too much. Remember to take into account the shape of what you are wrapping. You must clean the A-pillars so they can take the adhesive and create a solid bond. I used Fantastic heavy duty de-greaser, and it worked..... fantastic?
Pic of Alcantara Ultra Suede
Cutting a small template since less fabric is easier to work with...
I decided to it in sections. Because of the bends and shape of the piece, i am going to spray just the long center piece first, let that dry overnight, and work my way from there. To help make sure things didnt get out of place, i used clamps to hold the fabric in its place on one end on the pieces i wasnt spraying. you could use clothes pins as well. Once i was ready, you must shake the adhesive for a minute solid, and it must be atleast 60 degrees or so. (room temp) Spray evenly ON THE PLASTIC A-PILLAR applying a coat to a point where you can see the moisture evenly on the plastic. Make sure to get all edges, under seams, and be sure not to leave any spots dry. BUT DONT OVER DO IT OR YOUR FABRIC WILL FEEL WET....let the adhesive sit on the plastic for a minute or so so it can adhere and build moisture. After a minute, lay your fabric on the piece sprayed making sure to not leave any bubbles or bumps. Smooth it out as tight as you can as fast as you can. IT GETS STICKY RRREEEEEAAALLLLLYYYYY QUICK. it helps to have someone else spread it out. If you get a seam or bubble, lift up quickly and set back down. Smooth from the center OUT towards the sides. Better to push the glue AWAY from the center, that way it doesnt pool.
Heres a pic just moments after getting it nice and tight and rubbing them together....
A shot of them drying on the rack for the moment.....
And a close up shot after about 15 minutes of drying....its coming out GREAT!!!
I will put up pics of the rest of the pillars and the headliner soon once completed.
Dc2
***********************************
********* UPDATE 2-25-09 ***********
***********************************
I finished wrapping the A-pillars and took out my headliner and removed the old fabric. Im EXTREMELY EXCITED about how good these A-pillars came out. I used the simple fabric spray adhesive as described above, and another finishing glue on the back of the panels. Read directions above for instructions on laying front pieces. FOR THE BACK LAYER, be careful because the outside layer is visible when you open the door!!!! Once you have the outsides fully wrapped in fabric, trim as much excess fabric off as possible. You must also trim around the connection points. There are the clips, and there are little tabs as well that slide into holes to hold it in place. Check it out...
Once you have completed wrapping the back and glueing it, let it dry for at least 24 hours. Heres a couple pics of the end result. This fabric is so cool YOU CAN WRITE ON IT !!!!! check out where i wrote HONDA down one of the pillars....i tried to write "tech" sideways but it didnt come out to well....
more pics to come....i cant wait to get this back in the car.ENJOY! more to come...tomorrow is final stages of cleaning panels to prep for paint....
Dc2
Last edited by DC2-ProdUcTiOnS; 02-25-2009 at 07:08 PM.
02-15-2009, 03:53 PM
#14
**********************************
********UPDATE 2-27-09************
**********************************
I was able to get some of my panels painted today and they came out great. My door panels looks awesome. The panels look BLACK, and have a OEM finish to them. I was a little skeptical at first because they mixed it as a medium gloss finish for me. However, as i should have trusted them, it came out perfect. It looks like it was always that color. I have just a few pieces left like the dashboard, door sills, rear upper panels, and all the little clips and tabs that there are a million of.
Im posting the pics that i have of the cleaning process here as well. As shown on the second page, the Dupont Plastic Cleaner that i used. My cleaning method was this:
- WASH all panels with hot/warm water and soap. Wipe soap away with warm water until no soap remains. Towel Dry. (ALL PIECES, vinyl, plastic, everything)
- SPRAY all panels with Heavy Duty De-greaser (Fantastic or comparable substitute) and let sit for about 30 seconds. Then wipe with dry towel. (ALL PIECES, vinyl, plastic, etc.)
- Scrub PLASTIC PANELS ONLY with Dupont Plastic Cleaner applying it with a scotch brite pad. BE CAREFUL TO NOT LET THE CLEANER DRY. Rinse thoroughly with warm water. Be sure to remove all remaining cleaner. Wipe dry with towel.
Here are some pics of the tools (lol...rags and buckets) the process, what it should look like before wiping clean the Dupont cleaner with water, before they were transported in trash bags..
Tools.....


The process.....


Packed up and ready for paint.....

Hanging right before paint......

The finished product........


The rest of the pics will be up soon of the dashboard and the door sills.....Stay tuned...Recaro SRD's in RED on the way, CTR Steering wheel pending, DC2 ITR Gauge cluster getting fitted, Alcantara headliner.....
Dc2
********UPDATE 2-27-09************
**********************************
I was able to get some of my panels painted today and they came out great. My door panels looks awesome. The panels look BLACK, and have a OEM finish to them. I was a little skeptical at first because they mixed it as a medium gloss finish for me. However, as i should have trusted them, it came out perfect. It looks like it was always that color. I have just a few pieces left like the dashboard, door sills, rear upper panels, and all the little clips and tabs that there are a million of.
Im posting the pics that i have of the cleaning process here as well. As shown on the second page, the Dupont Plastic Cleaner that i used. My cleaning method was this:
- WASH all panels with hot/warm water and soap. Wipe soap away with warm water until no soap remains. Towel Dry. (ALL PIECES, vinyl, plastic, everything)
- SPRAY all panels with Heavy Duty De-greaser (Fantastic or comparable substitute) and let sit for about 30 seconds. Then wipe with dry towel. (ALL PIECES, vinyl, plastic, etc.)
- Scrub PLASTIC PANELS ONLY with Dupont Plastic Cleaner applying it with a scotch brite pad. BE CAREFUL TO NOT LET THE CLEANER DRY. Rinse thoroughly with warm water. Be sure to remove all remaining cleaner. Wipe dry with towel.
Here are some pics of the tools (lol...rags and buckets) the process, what it should look like before wiping clean the Dupont cleaner with water, before they were transported in trash bags..
Tools.....
The process.....
Packed up and ready for paint.....
Hanging right before paint......
The finished product........
The rest of the pics will be up soon of the dashboard and the door sills.....Stay tuned...Recaro SRD's in RED on the way, CTR Steering wheel pending, DC2 ITR Gauge cluster getting fitted, Alcantara headliner.....
Dc2
Last edited by DC2-ProdUcTiOnS; 02-27-2009 at 06:24 PM.
02-15-2009, 03:54 PM
#15
I got all my pieces back from being painted today. Also got my arm rests wrapped. THEY LOOK AWESOME....my panels look really good too. I have just a couple of pieces that i tried to do with a brush since they were small and it cam out WAYYYY different from pieces that have been sprayed. So once all of those are done, im going to start to piece everything back together. Last thing I need to figure out is how im going to mount my ITR cluster. Ive got a pretty good idea going and ill post the complete process if it goes as planned.
Heres some pics of my painted panels all layed out on the table as they were before. If you look at how gray the pieces were in previous pictures you can get a great comparison. Heres a couple pictures of the panels all done... just one more round of cleaning before they get put back into the car...


Heres the arm rests.....I was having trouble getting them to adhere to the arm rests without the adhesive i was using leaking through the fabric. ( IN DEPTH DIRECTIONS OF HOW TO ON PAGE 3) I used spray glue that came out in a mist, and glue that came out like silly string. Both when sprayed on the fabric leaked right through discoloring the fabric instantly and permanently. What i did was spray the silly string glue ON TO THE PLASTIC uncovered arm rest and spread it evenly with a brush. I let it sit for about 2-3 minutes. You can see once it starts to transform from a bubbly liquid to a gluey kind of paste. Then i sprayed a LIGHT COAT of the mist type glue onto the back of the fabric. I dont know if the amount i sprayed was enough or if it did anything, but that fabric sure is on there now.... check em out...


More to come......Thanks for checkin in....
Dc2
***** ( FULL IN DEPTH DIRECTIONS OF HOW TO WRAP ARM RESTS ON PAGE 3 ) *****
Heres some pics of my painted panels all layed out on the table as they were before. If you look at how gray the pieces were in previous pictures you can get a great comparison. Heres a couple pictures of the panels all done... just one more round of cleaning before they get put back into the car...
Heres the arm rests.....I was having trouble getting them to adhere to the arm rests without the adhesive i was using leaking through the fabric. ( IN DEPTH DIRECTIONS OF HOW TO ON PAGE 3) I used spray glue that came out in a mist, and glue that came out like silly string. Both when sprayed on the fabric leaked right through discoloring the fabric instantly and permanently. What i did was spray the silly string glue ON TO THE PLASTIC uncovered arm rest and spread it evenly with a brush. I let it sit for about 2-3 minutes. You can see once it starts to transform from a bubbly liquid to a gluey kind of paste. Then i sprayed a LIGHT COAT of the mist type glue onto the back of the fabric. I dont know if the amount i sprayed was enough or if it did anything, but that fabric sure is on there now.... check em out...
More to come......Thanks for checkin in....
Dc2
***** ( FULL IN DEPTH DIRECTIONS OF HOW TO WRAP ARM RESTS ON PAGE 3 ) *****
Last edited by DC2-ProdUcTiOnS; 03-10-2009 at 06:08 AM.
02-16-2009, 09:20 AM
#16
So luckily i work right next to the major automotive paint distributor for our area and was able to sneak over for a couple minutes for some questions on my lunch break.
They carry SEM paints, and have PLENTY of Landau Black as well as adhesion promoter.
They offer the SEM paint in either spray can or in a bucket so you can put in a spray gun. They said its truly preference,of which you would rather use, however it is likely that while using the spray gun you will give a more continuous, even, and constant spray as oppose to the can.
They told me the best way to prep my panels for paint is going to be to use a special plastic cleaner by Dupont that he showed me with a scuff pad after it has been cleaned with warm water and soap. He specifically said, PREP IS THE MOST IMPORTANT PART. All of the oils from your skin, all of the countless coats of armor all wipes are all stuck in the plastic. You must get it out, and this is the best way. For the vinyl sections, the said to not use the same cleaner. Once cleaned with hot water and soap, use a household cleaning solution like Fantastic, or something comparable. Once finished, wipe all components completely dry.
Now for the kicker....they HIGHLY recommended that i use a specific Dupont Vinyl and Plastic dye. They said they have used it before with fantastic results on interior panels. They said lined up with SEM, its a little better. This Dupont paint only comes in a bucket, and can be used only by Spray Gun. (which is no problem for me, have all equip.) They can also mix it to match the Landau Black exactly for me. They said when using the Dupont paint you dont HAVE TO use adhesion promoter, but i think i may anyway.
They seemed pretty solid on their stance of the Dupont paint. Gonna get the Dupont plastic cleaner tonight or tomorrow. Hoping to have some pics up of the cleaning process soon.
Dc2
They carry SEM paints, and have PLENTY of Landau Black as well as adhesion promoter.
They offer the SEM paint in either spray can or in a bucket so you can put in a spray gun. They said its truly preference,of which you would rather use, however it is likely that while using the spray gun you will give a more continuous, even, and constant spray as oppose to the can.
They told me the best way to prep my panels for paint is going to be to use a special plastic cleaner by Dupont that he showed me with a scuff pad after it has been cleaned with warm water and soap. He specifically said, PREP IS THE MOST IMPORTANT PART. All of the oils from your skin, all of the countless coats of armor all wipes are all stuck in the plastic. You must get it out, and this is the best way. For the vinyl sections, the said to not use the same cleaner. Once cleaned with hot water and soap, use a household cleaning solution like Fantastic, or something comparable. Once finished, wipe all components completely dry.
Now for the kicker....they HIGHLY recommended that i use a specific Dupont Vinyl and Plastic dye. They said they have used it before with fantastic results on interior panels. They said lined up with SEM, its a little better. This Dupont paint only comes in a bucket, and can be used only by Spray Gun. (which is no problem for me, have all equip.) They can also mix it to match the Landau Black exactly for me.
They said when using the Dupont paint you dont HAVE TO use adhesion promoter, but i think i may anyway. They seemed pretty solid on their stance of the Dupont paint. Gonna get the Dupont plastic cleaner tonight or tomorrow. Hoping to have some pics up of the cleaning process soon.
Dc2
02-16-2009, 12:41 PM
#19
thank you
annnd.... a'thank you
ive been talking to some other HT members who have done this project themselves via PM and they have used the SEM paint in the spray can with GREAT results.No chipping, fading, cracking, etc. Havent heard of anyone to use the Dupont dye yet though. But like i said, my guys in the paint store seemed pretty firm on there stance with the Dupont.
Oh and just for note: he said the Dupli-color paints "bl0w goat ball$"
^^^ his words...
02-17-2009, 12:05 AM
#20
Honda-Tech Member
iTrader: (1)
Join Date: Feb 2007
Location: new orleans
Posts: 213
Likes: 0
Received 0 Likes
on
0 Posts
thank you
annnd.... a'thank you
ive been talking to some other HT members who have done this project themselves via PM and they have used the SEM paint in the spray can with GREAT results.No chipping, fading, cracking, etc. Havent heard of anyone to use the Dupont dye yet though. But like i said, my guys in the paint store seemed pretty firm on there stance with the Dupont.
Oh and just for note: he said the Dupli-color paints "bl0w goat ball$"
^^^ his words...
annnd.... a'thank you
ive been talking to some other HT members who have done this project themselves via PM and they have used the SEM paint in the spray can with GREAT results.No chipping, fading, cracking, etc. Havent heard of anyone to use the Dupont dye yet though. But like i said, my guys in the paint store seemed pretty firm on there stance with the Dupont.
Oh and just for note: he said the Dupli-color paints "bl0w goat ball$"
^^^ his words...
im about to be in the process of converting my interior but im gettin spare interior parts of everything just in case it doesnt turn out the way i want.
02-17-2009, 08:05 AM
#22
Junior Member
Join Date: Feb 2009
Location: new york
Posts: 17
Likes: 0
Received 0 Likes
on
0 Posts
best of luck on your diy
def a project i would wana do in the near future and so far this thread has def been a great refrence...keep the updates coming
def a project i would wana do in the near future and so far this thread has def been a great refrence...keep the updates coming
02-17-2009, 08:23 AM
#23
New User
Join Date: Feb 2006
Location: Ames, I
Posts: 2
Likes: 0
Received 0 Likes
on
0 Posts
Looking good so far. If you're interested, the subaru guys on Nasioc seem to like PlastiDip for re-doing interiors. Check it out.
http://forums.nasioc.com/forums/show...ight=plastidip
http://forums.nasioc.com/forums/show...ight=plastidip