
Full headlight retrofit with relay harness for aftermarket headlight
 03-29-2007, 08:18 PM
#1
Thread Starter

Join Date: Aug 2006
Location: 718, New York
Posts: 885
Likes: 0
Received 0 Likes
on
0 Posts
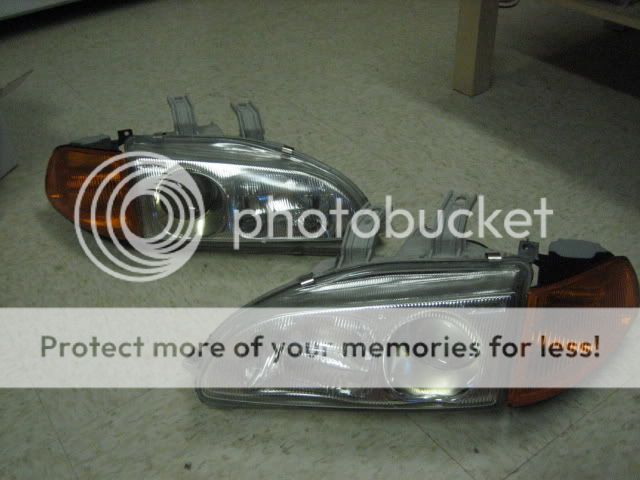
Here we have a 93 headlight assembly euro type with clear lense.
These come with H3 projectors for lows and H1 reflectors for hi beams.
You will learn how to:
- Retrofit TSX projectors into the headlight.
- Colormod your tsx projectors.
- Make your own H1 harness for your lows so you can keep the reflectors for your high beams.
- How to hook everything up step-by-step so it will be easy for you.
- Cost effective in case you are on a budget but want the luxury look and performance from those bmw, acura, lexus, audi headlight.
I will start my project this saturday but i've had the parts for a long time. I promised sometime i would do this for you guys. I will also be doing an FG2 retrofit but that's for my forum.
Enjoy!
Here are some pics of the parts i gathered:
bulbs philips 85122+

Denso Ballast =]

The rest


ColdHeat Solder FTW!!
it's 12:19am on the northeast coast so i can't start now and tomorrow will be my last day before spring break so i'll start on my goodies this weekend!
Modified by Striker_1818 at 10:49 AM 3/30/2007
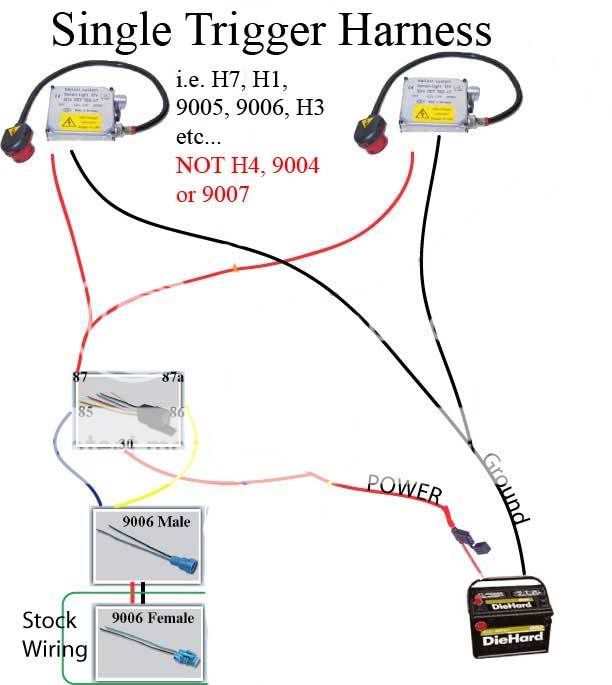
Relay Harness:
I made this for a 9006 but this also works with the h3 bc they have one positive and one negative only. Enjoy!
There isn't really a thread here for making your own relay harness...
so here's a clean how-to:
- 20ft 14 Gauge wire: Autozone/strauss has them for $ 5.00

- 10 sets of Disconnect Pairs(male and female) 14gauge: autozone has them for $ 5.00

- 12 Volt 30amp Relay: autozone or strauss has them for $ 5.00

- Black electrical tape: $ 0.99

- fuse holder 14 gauge: $1.50

- 9006 male connector (only one is needed)
................
Let's start by simply gathering the parts together...
And following this simple drawing you'll be set =]
- Start by cutting two wires that can be 4ft long. This will be the positive and negative for the ballast that will be located further away from
- Cut two wires that are 1 ft long. This will be for the negative and positive for the ballast that's the closest to the relay harness.
- Cut two wires that are 6 inches long. This will go to the 9006 female for a plug and play.
- Use the cut wires above as you wish on the description below. Remember, one headlight is almost touching the battery so use the short ones for the ballast that will be connected to such headlight and 9006 female connector.
Now let's go to the drawings:
Note: The drawings have numbers where it says relay that's because the relay has 4 teeth. Each teeth is already numbered on the relay itself. Look for them.
1.Ground or negative: Prepare both with one disconnect female at one end only...not both(the ballast + and - wire will have disconnect males)...At the very end of the wires you have to attach a single wire and wrap them up in black electrical tape and attach a terminal to the end. This will be bolted onto the chassis =]


2. Grab 2 wires and prepare 2 ends with female disconnects. Unite/crimple the other ends and attach another short wire with one end having a female disconnect.


3. Grab one wire and attach it to the fuse holder and wrap electrical tape around it. The to the other end of the fuse holder, attach a terminal...


4. Grab the 9006 male connector and add extensions to the wires if u need them longer...then attach two female disconnects. You're done with the wiring!

Now attach everything and your relay harness is f*ckin done! =]
You just saved yourself 50 bucks. (taken from hidplanet.com)
Here is where everything should be attached to on the relay.
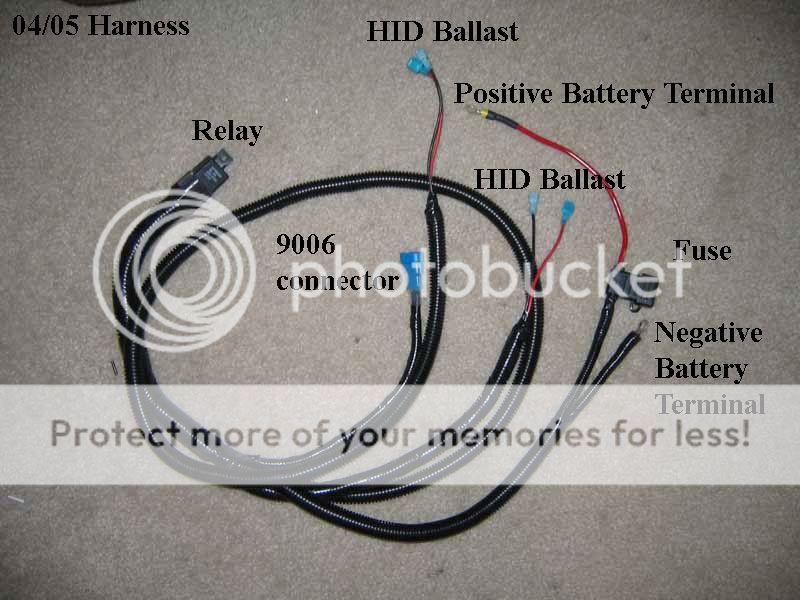
Final Product: it should look similar to this...
Modified by Striker_1818 at 10:32 PM 4/7/2007
These come with H3 projectors for lows and H1 reflectors for hi beams.
You will learn how to:
- Retrofit TSX projectors into the headlight.
- Colormod your tsx projectors.
- Make your own H1 harness for your lows so you can keep the reflectors for your high beams.
- How to hook everything up step-by-step so it will be easy for you.
- Cost effective in case you are on a budget but want the luxury look and performance from those bmw, acura, lexus, audi headlight.
I will start my project this saturday but i've had the parts for a long time. I promised sometime i would do this for you guys. I will also be doing an FG2 retrofit but that's for my forum.
Enjoy!
Here are some pics of the parts i gathered:
bulbs philips 85122+
Denso Ballast =]
The rest
ColdHeat Solder FTW!!
it's 12:19am on the northeast coast so i can't start now and tomorrow will be my last day before spring break so i'll start on my goodies this weekend!
Modified by Striker_1818 at 10:49 AM 3/30/2007
Relay Harness:
I made this for a 9006 but this also works with the h3 bc they have one positive and one negative only. Enjoy!
There isn't really a thread here for making your own relay harness...
so here's a clean how-to:
- 20ft 14 Gauge wire: Autozone/strauss has them for $ 5.00
- 10 sets of Disconnect Pairs(male and female) 14gauge: autozone has them for $ 5.00
- 12 Volt 30amp Relay: autozone or strauss has them for $ 5.00
- Black electrical tape: $ 0.99
- fuse holder 14 gauge: $1.50
- 9006 male connector (only one is needed)
................
Let's start by simply gathering the parts together...
And following this simple drawing you'll be set =]
- Start by cutting two wires that can be 4ft long. This will be the positive and negative for the ballast that will be located further away from
- Cut two wires that are 1 ft long. This will be for the negative and positive for the ballast that's the closest to the relay harness.
- Cut two wires that are 6 inches long. This will go to the 9006 female for a plug and play.
- Use the cut wires above as you wish on the description below. Remember, one headlight is almost touching the battery so use the short ones for the ballast that will be connected to such headlight and 9006 female connector.
Now let's go to the drawings:
Note: The drawings have numbers where it says relay that's because the relay has 4 teeth. Each teeth is already numbered on the relay itself. Look for them.
1.Ground or negative: Prepare both with one disconnect female at one end only...not both(the ballast + and - wire will have disconnect males)...At the very end of the wires you have to attach a single wire and wrap them up in black electrical tape and attach a terminal to the end. This will be bolted onto the chassis =]
2. Grab 2 wires and prepare 2 ends with female disconnects. Unite/crimple the other ends and attach another short wire with one end having a female disconnect.
3. Grab one wire and attach it to the fuse holder and wrap electrical tape around it. The to the other end of the fuse holder, attach a terminal...
4. Grab the 9006 male connector and add extensions to the wires if u need them longer...then attach two female disconnects. You're done with the wiring!
Now attach everything and your relay harness is f*ckin done! =]
You just saved yourself 50 bucks. (taken from hidplanet.com)
Here is where everything should be attached to on the relay.
Final Product: it should look similar to this...
Modified by Striker_1818 at 10:32 PM 4/7/2007
 03-30-2007, 09:43 AM
#2
Thread Starter
Join Date: Aug 2006
Location: 718, New York
Posts: 885
Likes: 0
Received 0 Likes
on
0 Posts
Day #1
So today I had some extra time and why not explain you guys how to take apart your headlight and everything else?
since my heating gun is dead(damn 99cent store heating guns) I went and used a hair dryer lol
Anyways here is the deal:
First unclip theclips that join the glass apart with the plastic housing. Use a flat-headed screw driver and pop it out.

Use your heating gun or hair blow dryer and set it to high to soften up the seal and with a butter knife, gently cut the seal in two and slide it from corner to corner. If it's hard still apply more heating from the hair blow dryer. It took me 2 mins to open up the headlight this method.


Viola! It's done!

Test-fitting the tsx projector half where the lens go...

To get the projector out of the housing, You have to use the adjustment screws on the back of the headlight and rotate it clockwise. The projector will come off.

Projector out:
Unscrew the ground on the existing bracket and viola!

Cut the H3 wire for the bulb and pull out such wire to the OUTSIDE of the headlight that way you have wires for the ballast to plug in and such... then solder them together and heatshrink them or you can just put some black electrical tape around and get it over with =]


Using the left existing bracket and testing for the tsx projector:

Won't fit so i have to make a bracket
And this is all for now. Thanks for watching.
Day #2
So I ended up using the existing brackets but i had to dril holes to them =]
Imust say it turned out pretty okay. Anyways here's the how-to:
Materials:
- 6 #8 washers (homedepot has them for 99 cents a pack of 10)

- #6-32 x 2" flat-head screws with nuts.

- Electric Dril
- Knife or anything to cut plastic.
First Let me teach you guys to do the color mod or "washer mod" as many people know them. This mod allows the thin colorband to become thicker. In other words, there will be a thicker blue colorband above the cutoff =]
-Put 3 #6 washers on each nipple. (See picture below)

And here are the two halves together with the washers in between both halves. The two halves are bolted in together.

And You're Done!
So we got out of the way how to do the washer/color mod. Let's go to the next step: Modifying the back of the plastic housing.
Mounting the projector with the stock housing WILL NOt let you change bulbs in an event they will burn out thus leaving you to open up the headlight again and go through all that trouble.

Lastly: Mounting the projectors! This was tricky but U'll see how i managed to get around it.
Drill a hole to extend the existing hole that way you will create a little wider, rectangular-shaped opening. that's for the right existing bracket =]
The little circles indicate the existing holes that were on the bracket.

So, to the left bracket we go. You just have to drill two holes on the bottom sides where indicated in the picture

Mount the brackets like they were at the beginning and You're done!


Use your hair dryer to seal them back up using the existing seal and You're done!
Final Product


Now i'll be making the harness tomorrow and plug everything in probably on monday or tuesday =]
Off to radioshack to buy the components!
[img][/img]
Modified by Striker_1818 at 12:57 PM 3/31/2007
So today I had some extra time and why not explain you guys how to take apart your headlight and everything else?
since my heating gun is dead(damn 99cent store heating guns) I went and used a hair dryer lol
Anyways here is the deal:
First unclip theclips that join the glass apart with the plastic housing. Use a flat-headed screw driver and pop it out.
Use your heating gun or hair blow dryer and set it to high to soften up the seal and with a butter knife, gently cut the seal in two and slide it from corner to corner. If it's hard still apply more heating from the hair blow dryer. It took me 2 mins to open up the headlight this method.
Viola! It's done!
Test-fitting the tsx projector half where the lens go...
To get the projector out of the housing, You have to use the adjustment screws on the back of the headlight and rotate it clockwise. The projector will come off.
Projector out:
Unscrew the ground on the existing bracket and viola!
Cut the H3 wire for the bulb and pull out such wire to the OUTSIDE of the headlight that way you have wires for the ballast to plug in and such... then solder them together and heatshrink them or you can just put some black electrical tape around and get it over with =]
Using the left existing bracket and testing for the tsx projector:
Won't fit so i have to make a bracket
And this is all for now. Thanks for watching.
Day #2
So I ended up using the existing brackets but i had to dril holes to them =]
Imust say it turned out pretty okay. Anyways here's the how-to:
Materials:
- 6 #8 washers (homedepot has them for 99 cents a pack of 10)
- #6-32 x 2" flat-head screws with nuts.
- Electric Dril
- Knife or anything to cut plastic.
First Let me teach you guys to do the color mod or "washer mod" as many people know them. This mod allows the thin colorband to become thicker. In other words, there will be a thicker blue colorband above the cutoff =]
-Put 3 #6 washers on each nipple. (See picture below)
And here are the two halves together with the washers in between both halves. The two halves are bolted in together.
And You're Done!
So we got out of the way how to do the washer/color mod. Let's go to the next step: Modifying the back of the plastic housing.
Mounting the projector with the stock housing WILL NOt let you change bulbs in an event they will burn out thus leaving you to open up the headlight again and go through all that trouble.
Lastly: Mounting the projectors! This was tricky but U'll see how i managed to get around it.
Drill a hole to extend the existing hole that way you will create a little wider, rectangular-shaped opening. that's for the right existing bracket =]
The little circles indicate the existing holes that were on the bracket.
So, to the left bracket we go. You just have to drill two holes on the bottom sides where indicated in the picture
Mount the brackets like they were at the beginning and You're done!
Use your hair dryer to seal them back up using the existing seal and You're done!
Final Product
Now i'll be making the harness tomorrow and plug everything in probably on monday or tuesday =]
Off to radioshack to buy the components!
[img][/img]
Modified by Striker_1818 at 12:57 PM 3/31/2007
 03-30-2007, 10:40 AM
#5
Thread Starter
Join Date: Aug 2006
Location: 718, New York
Posts: 885
Likes: 0
Received 0 Likes
on
0 Posts
That's because they are...
and when i opened it up and saw the projector w/the shield...it was crap
and when i opened it up and saw the projector w/the shield...it was crap
03-30-2007, 10:43 AM
#6
Junior Member
Join Date: Jan 2006
Location: np, mn, usa
Posts: 154
Likes: 0
Received 0 Likes
on
0 Posts
cool,i have some rare blacked out ones that im waiting to this to,so im very interested!! thanks for your info!!
Trending Topics
03-31-2007, 01:11 PM
#8
Honda-Tech Member
Join Date: Aug 2006
Location: Windsor Mill, MD, US
Posts: 192
Likes: 0
Received 0 Likes
on
0 Posts
Put the headlamps in the oven at 200 for 20 min and they come apart alot easier.
03-31-2007, 01:20 PM
#9
Thread Starter
Join Date: Aug 2006
Location: 718, New York
Posts: 885
Likes: 0
Received 0 Likes
on
0 Posts
<TABLE WIDTH="90%" CELLSPACING=0 CELLPADDING=0 ALIGN=CENTER><TR><TD>Quote, originally posted by fanaticalK »</TD></TR><TR><TD CLASS="quote">
Put the headlamps in the oven at 200 for 20 min and they come apart alot easier.</TD></TR></TABLE>
took me two mins with a hair dryer
Put the headlamps in the oven at 200 for 20 min and they come apart alot easier.</TD></TR></TABLE>
took me two mins with a hair dryer
04-04-2007, 07:19 PM
#11
Junior Member
looks like you're doing a good job... if i would do mine over again, i'd use s2k projectors... and rig a way to adjust rotation (not just up/down/left/right)
04-04-2007, 08:33 PM
#14
Thread Starter
Join Date: Aug 2006
Location: 718, New York
Posts: 885
Likes: 0
Received 0 Likes
on
0 Posts
I will be doing another set of OEM headligihts following t his.
As soon as I'm done with the relay harness then I will teach you how to make a relay harness for bixenon projectors on H4 connectors
As soon as I'm done with the relay harness then I will teach you how to make a relay harness for bixenon projectors on H4 connectors
01-18-2008, 11:19 PM
#18
Honda-Tech Member
Bump this up!! this is great I already got my denji's apart and everything out...just gotta get the tsx projectors....btw my projectors must be waay older cause the bracket it different and my high beam doesn't have the bends in it...its just smooth.
 01-21-2008, 10:42 PM
#22
Honda-Tech Member
Join Date: Oct 2007
Location: Sacramento, CA, USA
Posts: 1,513
Likes: 0
Received 0 Likes
on
0 Posts
well DAM look so easy now i what to do this to my old school denjis
04-24-2009, 08:44 PM
#24
Junior Member
Join Date: Dec 2007
Posts: 370
Likes: 0
Received 0 Likes
on
0 Posts
sorry for not further explaining.
The 9006 male/female are just connectors that will hook up to the low beam(which in this case would be a 2-prong wiring coming out of the denji wiring.
Unlike the stock unit which uses one bulb for both hi and low beam modes, What Denji did is separate both low beams and hi-beams. So, Denji comes pre-wired already. You don't have to use the 9006 male/female connectors. Just connect positive -> positive and negative -> negative

Thread
Thread Starter
Forum
Replies
Last Post