
FAQ: How to Install JDM EG Rear Interior - Pic Intensive
 12-01-2008, 05:47 AM
#1
Honda-Tech Member
Thread Starter
iTrader: (1)
Join Date: May 2003
Location: Street Light Garage, So Cal
Posts: 2,846
Likes: 0
Received 0 Likes
on
0 Posts
There have been plenty of threads about people asking about how to install JDM EG rear interior in a US spec car and the usual answer is "its easy". Well, it kind of is, but there are some snags you run into if your just a normal DIY'er.
So... heres a little How To I did on a friends car, and explaining the hurdles your going to run into.
1st things first. Make sure you've got a complete set of interior.
-Both side panels & all the other plastics/pockets that come with.
-Gathers 4 speaker kit w/ bracket. They use the same exact plug as what is already in your USDM car. Plug & play.
-Trunk box & trunk plastic (piece that goes in the back of the spare tire well).
-Metal cross bar that is supposed to bolt on the rear fender wells.
-Plastic piece that screws on top of it.
-4 trunk box lock assemblys - 4 Screws, 4 metal base pieces w/ screen, and 4 plastic locks.
-Of course the rear seats (3 pieces).
-Seat back pivot piece.

-*IMPORTANT* The rear seat back pivot bolts to the cross bar, which is supposed to bolt on to a piece that is spot welded to the bottom of the car. Most of the JDM interiors you buy do not have this piece, so you'll have to fabricate one. Make sure your get it if your buying interior from someone that has a rear clip.
Pic of the seat back pivot:
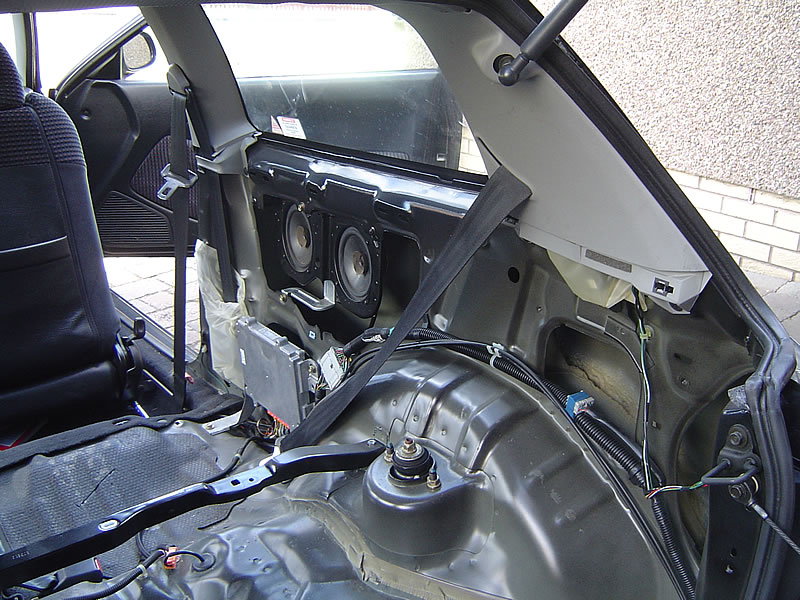
1. 1st, your going to have to drill out some spot welds and take some of your US factory seat material. 1. The center seat bracket, 2. Both factory seat back locks (on each fenderwell), & 3. both back seat pivots (on each fenderwell)

-I had the crew at MOBWorks drill them all out, and then paint & refinish it so it looks clean.
This is what you should have:

2. Put your JDM gather speaker setup in the car. The JDM bracket bolts right up to the factory location. And all US EH hatchs come factory prewired for rear speakers. Use the factory plug & you've got sound.


3. Put your rear crossbar in, with the seat pivot attached. WITHOUT the plastic attached on top. Spot weld the center piece to the body if you've got it.
-Here is where you need to fabricate a center piece if you dont have the factory one. And you need to fabricate something to bolt the sides up to.
Factory Piece: Pic Courtesy of CunninLynguist

Or a fabricated piece: Courtesy of TouringAccord (I dont know what he does for a crossbar)

Factory Bolt Down for the sides: Pic Courtesy of Jdm Oz:
I am searching for a factory center piece still, so for now its just kind of floating around. If nothing is found in the next month or so then im going to fab something up for the middle and sides. Heres where im at now:

UPDATE: I have found a factory piece, so I will update this when we install it!
4. Now put your side panels in. Both sides use US factory clip, nut, and bolt locations, so no sweat:

Just make sure the cross bar lines up with the holes:

5. Now put the plastic piece over the crossbar:

6. And put your spare tire well plastic in:

And straighten out your weather stripping:

So... heres a little How To I did on a friends car, and explaining the hurdles your going to run into.
1st things first. Make sure you've got a complete set of interior.
-Both side panels & all the other plastics/pockets that come with.
-Gathers 4 speaker kit w/ bracket. They use the same exact plug as what is already in your USDM car. Plug & play.
-Trunk box & trunk plastic (piece that goes in the back of the spare tire well).
-Metal cross bar that is supposed to bolt on the rear fender wells.
-Plastic piece that screws on top of it.
-4 trunk box lock assemblys - 4 Screws, 4 metal base pieces w/ screen, and 4 plastic locks.
-Of course the rear seats (3 pieces).
-Seat back pivot piece.
-*IMPORTANT* The rear seat back pivot bolts to the cross bar, which is supposed to bolt on to a piece that is spot welded to the bottom of the car. Most of the JDM interiors you buy do not have this piece, so you'll have to fabricate one. Make sure your get it if your buying interior from someone that has a rear clip.
Pic of the seat back pivot:
1. 1st, your going to have to drill out some spot welds and take some of your US factory seat material. 1. The center seat bracket, 2. Both factory seat back locks (on each fenderwell), & 3. both back seat pivots (on each fenderwell)
-I had the crew at MOBWorks drill them all out, and then paint & refinish it so it looks clean.
This is what you should have:
2. Put your JDM gather speaker setup in the car. The JDM bracket bolts right up to the factory location. And all US EH hatchs come factory prewired for rear speakers. Use the factory plug & you've got sound.
3. Put your rear crossbar in, with the seat pivot attached. WITHOUT the plastic attached on top. Spot weld the center piece to the body if you've got it.
-Here is where you need to fabricate a center piece if you dont have the factory one. And you need to fabricate something to bolt the sides up to.
Factory Piece: Pic Courtesy of CunninLynguist
Or a fabricated piece: Courtesy of TouringAccord (I dont know what he does for a crossbar)
Factory Bolt Down for the sides: Pic Courtesy of Jdm Oz:
I am searching for a factory center piece still, so for now its just kind of floating around. If nothing is found in the next month or so then im going to fab something up for the middle and sides. Heres where im at now:
UPDATE: I have found a factory piece, so I will update this when we install it!
4. Now put your side panels in. Both sides use US factory clip, nut, and bolt locations, so no sweat:
Just make sure the cross bar lines up with the holes:
5. Now put the plastic piece over the crossbar:
6. And put your spare tire well plastic in:
And straighten out your weather stripping:
 12-01-2008, 05:48 AM
#2
Honda-Tech Member
Thread Starter
iTrader: (1)
Join Date: May 2003
Location: Street Light Garage, So Cal
Posts: 2,846
Likes: 0
Received 0 Likes
on
0 Posts
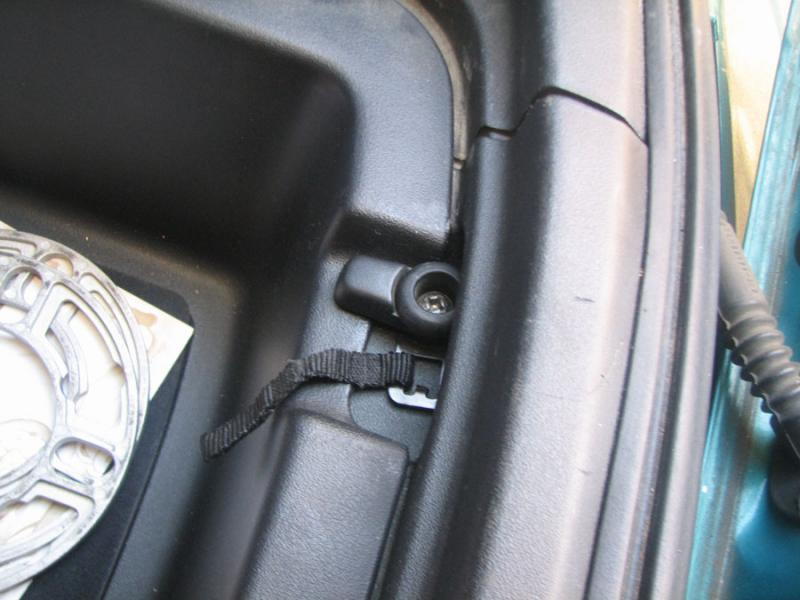
7. Get out your trunk box locks. One of the ones I have were broken:

And they go at all 4 corners of where the trunk box will go. 2 on the back, 2 on the cross bar.


8. Now once you have your cross bar and seat back pivot all bolted down, you need to put your seat backs in the car as a mock up so you can mark where you need to drill & tap 4 holes for the bolts (2 on each side). Once mocked up, you'll see that there are depressions in the US body of where the JDM bolts will go. Its just waiting to be drilled and tapped. I recomend a 10mmx1.25 tap so you can use factory honda bolts.


9. Once thats all done. Put the seat backs in and bolt them down, then put the seat bottom in. Just about the same as your US seat. The back 10mm bolt bolts to the top of the pivot and crossbar to secure it in place:
(Pic taken without the backs in place)

Note: Here is the bummer if you dont have the piece that the cross bar & pivot bolt to. Right now, no one can sit in these seats until this is taken car of.

10. Put your new full size spare in the car: MR5 Spare FTW!

11. Now set your trunk box in place and lock it down with your locks:
And wallah'! Your done.


Simple as that.
Every good job should be followed up with a few of these:

As a side note... my friend scored one of these..
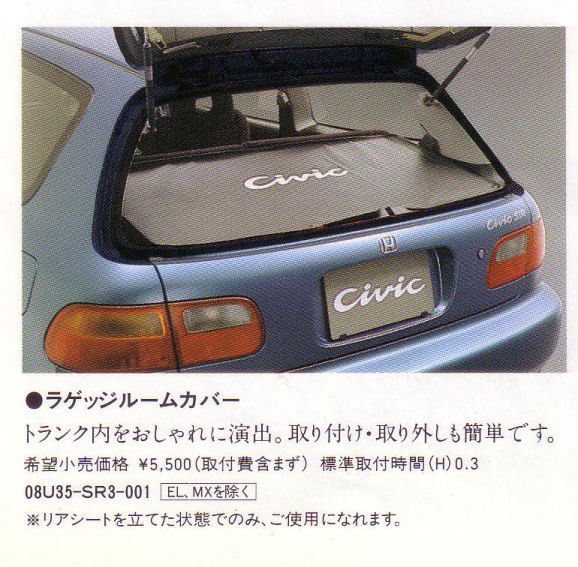
Its easy to install across the seat backs...

But you will need to buy a few "male" side of a snap button (dont know what else to call it) from any crafts store like Michaels or JoAnns and install them on the tailgate plastic. We havent done it.. so for now that piece sits in the garage.
Hit me up with questions if you've got them.. always glad to help.

And they go at all 4 corners of where the trunk box will go. 2 on the back, 2 on the cross bar.
8. Now once you have your cross bar and seat back pivot all bolted down, you need to put your seat backs in the car as a mock up so you can mark where you need to drill & tap 4 holes for the bolts (2 on each side). Once mocked up, you'll see that there are depressions in the US body of where the JDM bolts will go. Its just waiting to be drilled and tapped. I recomend a 10mmx1.25 tap so you can use factory honda bolts.
9. Once thats all done. Put the seat backs in and bolt them down, then put the seat bottom in. Just about the same as your US seat. The back 10mm bolt bolts to the top of the pivot and crossbar to secure it in place:
(Pic taken without the backs in place)
Note: Here is the bummer if you dont have the piece that the cross bar & pivot bolt to. Right now, no one can sit in these seats until this is taken car of.
10. Put your new full size spare in the car: MR5 Spare FTW!
11. Now set your trunk box in place and lock it down with your locks:
And wallah'! Your done.
Simple as that.
Every good job should be followed up with a few of these:
As a side note... my friend scored one of these..
Its easy to install across the seat backs...
But you will need to buy a few "male" side of a snap button (dont know what else to call it) from any crafts store like Michaels or JoAnns and install them on the tailgate plastic. We havent done it.. so for now that piece sits in the garage.
Hit me up with questions if you've got them.. always glad to help.
Trending Topics
02-13-2009, 09:54 AM
#13
Honda-Tech Member
Join Date: Feb 2006
Location: Long Beach, California, United States
Posts: 406
Likes: 0
Received 0 Likes
on
0 Posts
are the rear seats still strong or hold up well, even though there is no factory center piece for the seats??
02-17-2009, 11:39 AM
#15
Honda-Tech Member
Thread Starter
iTrader: (1)
Join Date: May 2003
Location: Street Light Garage, So Cal
Posts: 2,846
Likes: 0
Received 0 Likes
on
0 Posts
The seats themselves sit just fine without the center piece/bracket. BUT... you cant have anyone sit in the backseats. At all.
Ive been lagging for along time since Ive had my kid last June, but ive sourced a factory center bracket and some other pieces that came in the JDM EG rear (like the spare tire & tool kit mount) for my friends car. He's been bugging me to make time to put it all together, so soon I think.
Pics up shortly after..
02-17-2009, 11:48 AM
#16
Honda-Tech Member
Join Date: Jul 2008
Location: Lodi, Ca
Posts: 1,108
Likes: 0
Received 0 Likes
on
0 Posts
i found a cross bar but no luck with a pivot in the middle..ive spoke with touring accord on specs for it to get one custom made since finding one seems to be impossible
02-17-2009, 12:06 PM
#17
Honda-Tech Member
Thread Starter
iTrader: (1)
Join Date: May 2003
Location: Street Light Garage, So Cal
Posts: 2,846
Likes: 0
Received 0 Likes
on
0 Posts
Seems to be impossible is why a lot of people give up. It took 18 months of searching to find the one ive got. Look into direct importers in So & Nor Cal. Just beware of price gouging.
Ive said it before, and ill say it again. If you are looking to buy this interior, then make sure it has that center assembly. Otherwise, if your buying JDM interior, then you should be able to haggle the price down 30-40% without this essential piece.
Ive said it before, and ill say it again. If you are looking to buy this interior, then make sure it has that center assembly. Otherwise, if your buying JDM interior, then you should be able to haggle the price down 30-40% without this essential piece.
02-17-2009, 01:59 PM
#18
Honda-Tech Member
Join Date: Jul 2008
Location: Lodi, Ca
Posts: 1,108
Likes: 0
Received 0 Likes
on
0 Posts
the cross bar is the most important IMO..the pivot bracket can be made easily as per touring accord...and the pic above u have of his custom one has the crossbar in it..just removed the part that angles down
02-18-2009, 09:24 AM
#19
Honda-Tech Member
Thread Starter
iTrader: (1)
Join Date: May 2003
Location: Street Light Garage, So Cal
Posts: 2,846
Likes: 0
Received 0 Likes
on
0 Posts
IMO, touringaccords piece just offers a solid piece for the seat backs themselves to pivot.
However, it does not offer a solid foundation for weight to be put on the back rests (which anchor against the cross bar). So I would still not feel comfortable with someone sitting in the back seat 1. For safety and 2. Because I wouldnt want anything to break.
If touringaccord is watching this thread, it would be a great place for him to chime in with his experiences, since I dont have first person experience with his situation.

 02-18-2009, 11:15 PM
#22
Honda-Tech Member
Join Date: Mar 2004
Location: westminster, ca
Posts: 2,271
Likes: 0
Received 0 Likes
on
0 Posts