
DIY: Shifter Plate Template Walkthrough (Pics)
 01-01-2011, 03:16 PM
#1
B*a*n*n*e*d
Thread Starter

Okay, so after seeing the original shifter plate DIY, (https://honda-tech.com/forums/honda-civic-del-sol-1992-2000-1/diy-shifter-plate-1303448/) I wanted to try it myself, to see if I could put forks in it. Also, my shifter looked like crap due to the previous owner. As a background, I'm running a B&M Dual Bend Short Throw with ES bushings. INTERIOR WAS PAINTED BY PREVIOUS OWNER! I will not spend the time or money to change it back, I'll just live with the flaking. Ugh...
This boot is not for a Civic. It looks like a truck boot. It's long, nasty pleather. You'll see later how I had to install it. The previous owner just had it draped over the shifter, I took it and had to wire tie it to the metal bracket. It was so long, it puddles dirt. Nasty! So, I wanted something cleaner.

So, first thing's first. Remove the ****, center console pieces, etc.

I found a wheat penny from 1958 by my E-brake. I was excited.

Now, we take the console inside, flip it over and we see the handywork.

After a few snips, and removing of two screws, we have our metal bracket.

Now, here's where we go on my DIY tangent, followed by a lot of simple measurements that you may or may not need depending on the tangent you take, but it's important to follow nonetheless.
Take the shifter portion of the console, and sit it over your shifter, no need to screw it back in, just make sure it's sitting how it would when screwed in. Now, take your measurements from the sides of your shifter hole to where your shifter is in each gear and write them down. DO NOT JUST SIT IT IN EACH GEAR, HOLD YOUR SHIFTER TO THE MAXIMUM OF EACH DIRECTION. IT DOES MOVE FROM IT'S IN-GEAR PLACEMENT. Here's how my pink sticky note looked like. I rounded to at least 8th's and when I put them on a template, I obviously gave it extra room. About an 8th to a 4th of space. I won't give my measurements because every shifter is different from mine for the most part. Not going to give you guys an easy route and blaming me for effing up your OEM shifter.


Now, I cut out a piece of cheap cardboard from a gingerbread man box. I took measurements of the whole... hole. A rough estimate was 6 1/2 long to 4 5/8 wide and cut the piece of cardboard to shape, roughly.


Now, I put my measurements of my whole shifting area on the cardboard.

I didn't realize how small of an area my shifter actually uses, this is where I started to get worried about my forks. I cut out the square and placed it over my shifter to make sure it didn't hit. LABEL THE FRONT vs. THE TRUNK! It does matter, I almost wasted time doing measurements again until I realized I needed to flip it.

I then traced it onto another piece of cardboard to work on the forks, since of course, I just cut out the whole area. If I'm making a fork template, I need the cardboard there.

Now, here's where I found out I can't have forks. After measuring the diameter of my shifter at the point of the console's height, (diameter was 3/4), I realized that B&M uses all the space they can. That square can be cut into three perfect sets of 3/4" sized columns. That means there's no absolute way I can have forks. =[ But, I did not let that stop me.

So, going back to my original template, I was planning on making a metal plate, and was going to add rubber under the plate (since there would be a gaping square). It would still look much nicer and still be functional since the shifter could easily move through the rubber. I was hoping my friend (who has large supplies of scrap metal) was going to be available to help me. Alas, he wasn't. So, I decided I would just make my plate out of rubber for now and wait till I could get a metal plate from him. It came out much better than I would have ever thought.
I took my template over a piece of roofing rubber, and cut it close to the template but left a good amount of it on each side, since I would be using the metal bracket to hold it in place (I should've cut more excess but it works). Using the cut out square, I cut a large plus into the rubber so the shifter can move into each gear with ease.

I then took it, sandwiched it between the bracket and console and screwed it down. This is why some excess is important.

Due to the rubbers nature, it already sits nice and flush, with no worries of creases, like my crappy old boot.

Since it's roofing rubber, we just let it sit outside until needed. So after a few Armour All wipes (I'll be looking for rubber paint soon, to just give it a nice gloss coat) and some tidying up, I had a shifter plate made from rubber! I honestly do not know if I even want to put the metal there, the rubber works so well! You can see in the pictures that I need to Armour All with a Q - tip haha, I couldn't get to the edges. Also, I was worried about how the four slits would look around my shifter. After pushing the shifter into each gear for clearance (if it doesn't look right just cut the plus a bit larger), I noticed that the four lips sit perfectly around the shifter and dip into the console, rather than push up around the shifter. =D
I'm very proud of myself and love how it looks (sans the OEM ****, it's obviously made for a boot, oh well. Still looks good.) Here are some final shots of it, with a nasty flash that makes the rubber look worse than it should. I love that naked shifter look.
**This is why the measurements either matter a lot, or not at all. If going right with the rubber, you can really just eye it. If going for the metal plate (if you can do forks or not) you need the measurements. So I hope this DIY works to your individual situation. If definitely cleaned up my nasty situation.
***If I add the metal plate, I will update.


This boot is not for a Civic. It looks like a truck boot. It's long, nasty pleather. You'll see later how I had to install it. The previous owner just had it draped over the shifter, I took it and had to wire tie it to the metal bracket. It was so long, it puddles dirt. Nasty! So, I wanted something cleaner.
So, first thing's first. Remove the ****, center console pieces, etc.
I found a wheat penny from 1958 by my E-brake. I was excited.
Now, we take the console inside, flip it over and we see the handywork.
After a few snips, and removing of two screws, we have our metal bracket.
Now, here's where we go on my DIY tangent, followed by a lot of simple measurements that you may or may not need depending on the tangent you take, but it's important to follow nonetheless.
Take the shifter portion of the console, and sit it over your shifter, no need to screw it back in, just make sure it's sitting how it would when screwed in. Now, take your measurements from the sides of your shifter hole to where your shifter is in each gear and write them down. DO NOT JUST SIT IT IN EACH GEAR, HOLD YOUR SHIFTER TO THE MAXIMUM OF EACH DIRECTION. IT DOES MOVE FROM IT'S IN-GEAR PLACEMENT. Here's how my pink sticky note looked like. I rounded to at least 8th's and when I put them on a template, I obviously gave it extra room. About an 8th to a 4th of space. I won't give my measurements because every shifter is different from mine for the most part. Not going to give you guys an easy route and blaming me for effing up your OEM shifter.
Now, I cut out a piece of cheap cardboard from a gingerbread man box. I took measurements of the whole... hole. A rough estimate was 6 1/2 long to 4 5/8 wide and cut the piece of cardboard to shape, roughly.
Now, I put my measurements of my whole shifting area on the cardboard.
I didn't realize how small of an area my shifter actually uses, this is where I started to get worried about my forks. I cut out the square and placed it over my shifter to make sure it didn't hit. LABEL THE FRONT vs. THE TRUNK! It does matter, I almost wasted time doing measurements again until I realized I needed to flip it.
I then traced it onto another piece of cardboard to work on the forks, since of course, I just cut out the whole area. If I'm making a fork template, I need the cardboard there.
Now, here's where I found out I can't have forks. After measuring the diameter of my shifter at the point of the console's height, (diameter was 3/4), I realized that B&M uses all the space they can. That square can be cut into three perfect sets of 3/4" sized columns. That means there's no absolute way I can have forks. =[ But, I did not let that stop me.
So, going back to my original template, I was planning on making a metal plate, and was going to add rubber under the plate (since there would be a gaping square). It would still look much nicer and still be functional since the shifter could easily move through the rubber. I was hoping my friend (who has large supplies of scrap metal) was going to be available to help me. Alas, he wasn't. So, I decided I would just make my plate out of rubber for now and wait till I could get a metal plate from him. It came out much better than I would have ever thought.
I took my template over a piece of roofing rubber, and cut it close to the template but left a good amount of it on each side, since I would be using the metal bracket to hold it in place (I should've cut more excess but it works). Using the cut out square, I cut a large plus into the rubber so the shifter can move into each gear with ease.
I then took it, sandwiched it between the bracket and console and screwed it down. This is why some excess is important.
Due to the rubbers nature, it already sits nice and flush, with no worries of creases, like my crappy old boot.
Since it's roofing rubber, we just let it sit outside until needed. So after a few Armour All wipes (I'll be looking for rubber paint soon, to just give it a nice gloss coat) and some tidying up, I had a shifter plate made from rubber! I honestly do not know if I even want to put the metal there, the rubber works so well! You can see in the pictures that I need to Armour All with a Q - tip haha, I couldn't get to the edges. Also, I was worried about how the four slits would look around my shifter. After pushing the shifter into each gear for clearance (if it doesn't look right just cut the plus a bit larger), I noticed that the four lips sit perfectly around the shifter and dip into the console, rather than push up around the shifter. =D
I'm very proud of myself and love how it looks (sans the OEM ****, it's obviously made for a boot, oh well. Still looks good.) Here are some final shots of it, with a nasty flash that makes the rubber look worse than it should. I love that naked shifter look.
**This is why the measurements either matter a lot, or not at all. If going right with the rubber, you can really just eye it. If going for the metal plate (if you can do forks or not) you need the measurements. So I hope this DIY works to your individual situation. If definitely cleaned up my nasty situation.
***If I add the metal plate, I will update.
 01-01-2011, 07:09 PM
#3
B*a*n*n*e*d
Thread Starter
The thing is, is that the rubber is only a stand still till I can talk to my friend with the metal sheets. The shitty boot looked like crap and was just pooling dust. I mean, I don't think the rubber piece is all that bad, honestly. I need to clean it up sure, but it's a good base for an actual metal shifter plate. The stock **** makes it look worse than it should anyways. I like that bare shifter look. I mean, the other boot was decent but I just straight hated it. You really think it's that **** poor of a job, eh?
EDIT: And to add, the project was supposed to be a lot more till I figured out I couldn't put forks into a plate due to my shifter. So, I had to take another route. And to bring it up again, I didn't have the metal available to be at the time. Regardless of how my end result was, it's also a good walk - through for anyone who wants to create there own plate, no? I mean, if this really is a crappy walk - through, and I'm just looking at it through biased eyes, delete it.
EDIT: And to add, the project was supposed to be a lot more till I figured out I couldn't put forks into a plate due to my shifter. So, I had to take another route. And to bring it up again, I didn't have the metal available to be at the time. Regardless of how my end result was, it's also a good walk - through for anyone who wants to create there own plate, no? I mean, if this really is a crappy walk - through, and I'm just looking at it through biased eyes, delete it.
01-01-2011, 07:18 PM
#4
I dunno man. If you did it because the boot was "pooling dust" I would have taken a vacuum to it and the rest of the car along with some 303 Aerospace cleaner/protectant.
If you wanted to do the DIY, I would have waited until you did the "Ferrari" style shift gate made out of sheet metal. That's must $.02 and we all know $.02 isnt worth ****.
If you wanted to do the DIY, I would have waited until you did the "Ferrari" style shift gate made out of sheet metal. That's must $.02 and we all know $.02 isnt worth ****.
01-01-2011, 07:25 PM
#5
B*a*n*n*e*d
Thread Starter
I dunno man. If you did it because the boot was "pooling dust" I would have taken a vacuum to it and the rest of the car along with some 303 Aerospace cleaner/protectant.
If you wanted to do the DIY, I would have waited until you did the "Ferrari" style shift gate made out of sheet metal. That's must $.02 and we all know $.02 isnt worth ****.
01-01-2011, 07:58 PM
#6
B*a*n*n*e*d
Thread Starter
What I plan to do, is re create that metal bracket with sheet metal. Basically, just cut it long enough that I can cut out the bottom for the tabs and drill holes in it to screw it in at the top. I'm just concerned about how good that square would look. Or maybe, I could sand a circular shape in there. Regardless, I just didn't like what it was and I thought even with the rubber as a stop gate, it looks pretty clean and different. I didn't really assume it to be a POS hack job. I mean, not a lot of people are in my situation with an F-ed up shift boot and such. Also, if someone's interested in attempting their own plate in general, I thought I gave a good template or start. I'll try to make this look better with the metal, and like I said, if this is just a below average attempt at a DIY, I won't have a problem with a MOD deleting it, thinking so as well.
01-01-2011, 08:12 PM
#7
Honda-Tech Member
Why don't you put a piece of metal slightly bigger than what hole you make in your "base"...and attach it to the shifter itself...and put it slightly under your base if that makes sense. That way it's seemless...the piece attached to the shifter will move around under your base...and constantly keep the hole closed looking. I know that sounds retarded but i'll try to draw something up in paint in a little bit.
Trending Topics
01-01-2011, 08:33 PM
#8
B*a*n*n*e*d
Thread Starter
Why don't you put a piece of metal slightly bigger than what hole you make in your "base"...and attach it to the shifter itself...and put it slightly under your base if that makes sense. That way it's seemless...the piece attached to the shifter will move around under your base...and constantly keep the hole closed looking. I know that sounds retarded but i'll try to draw something up in paint in a little bit.
01-01-2011, 10:20 PM
#9
Honda-Tech Member
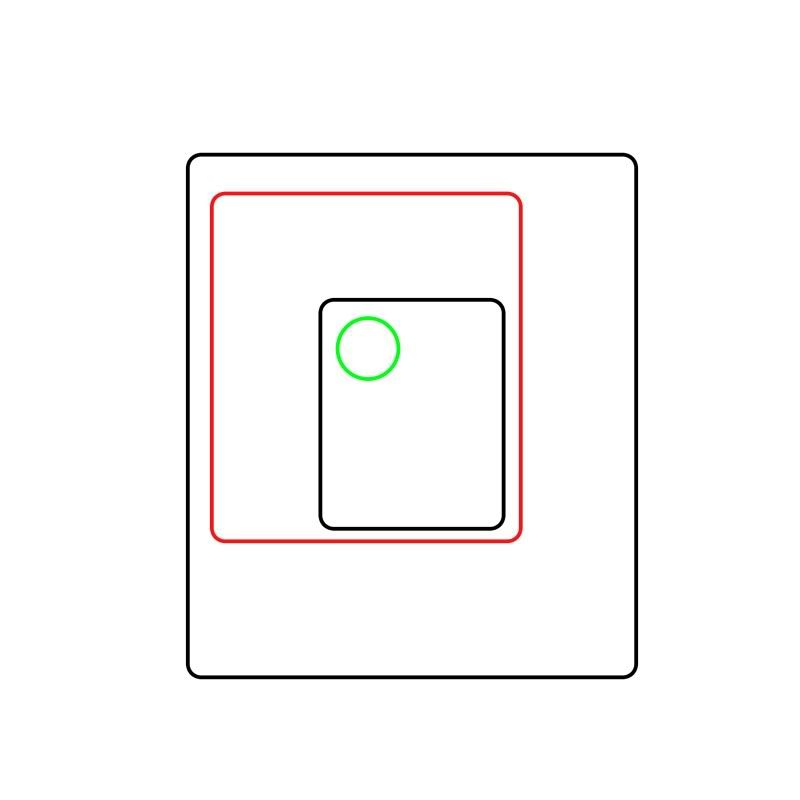
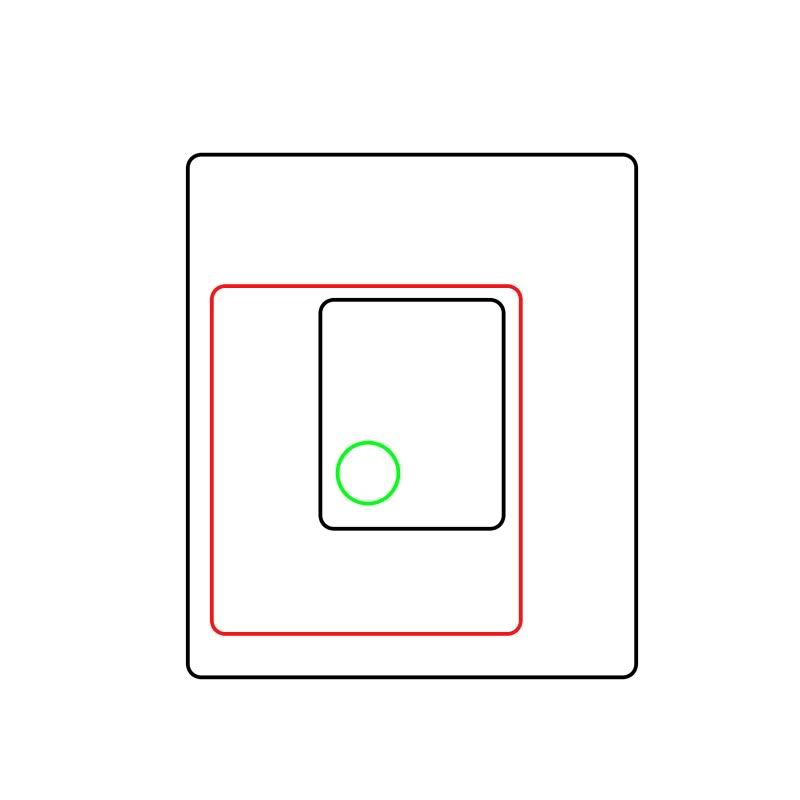
The black represents the base plates cuts...the red would be the shifter plate that moves around with the shifter...and the green being the shifter itself.
Nuetral
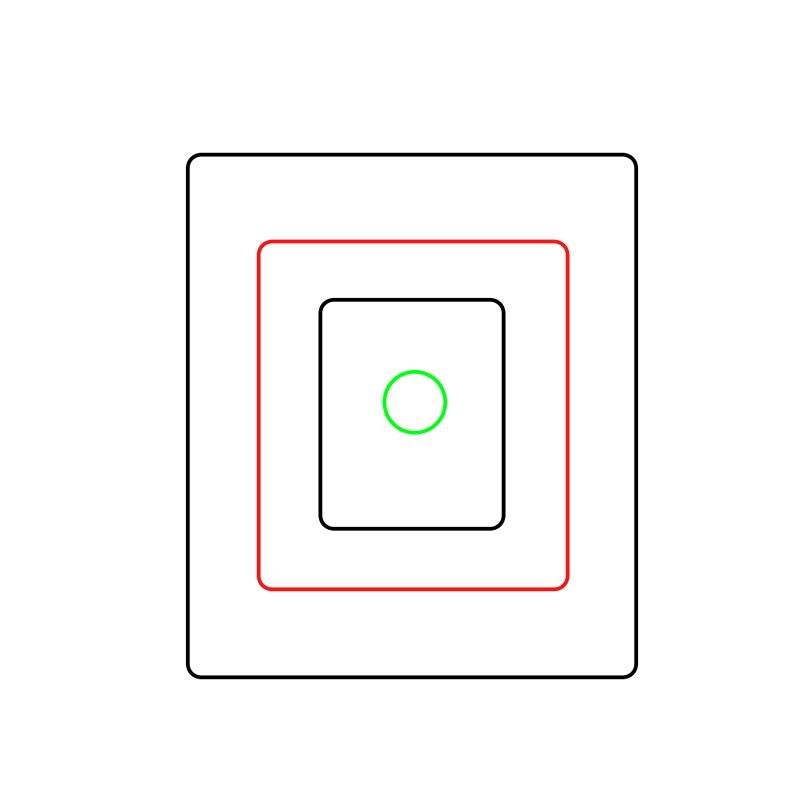
1st Gear
2nd Gear
Get the concept?
I imagine you could anchor the plate on the shifter itself by putting a ziptie or something about the same level as your base plate...and then put the shifting plate on top of that so it "floats" under the base plate...but no matter what it will be just big enough to where there will never be any gaps. If you made this out of black ABS plastic I imagine it would look pretty sharp. You could probably experiment with a thick black plastic binder or something. That's what I use to test shaping on projects so I don't mess up my actual material.
Nuetral
1st Gear
2nd Gear
Get the concept?
I imagine you could anchor the plate on the shifter itself by putting a ziptie or something about the same level as your base plate...and then put the shifting plate on top of that so it "floats" under the base plate...but no matter what it will be just big enough to where there will never be any gaps. If you made this out of black ABS plastic I imagine it would look pretty sharp. You could probably experiment with a thick black plastic binder or something. That's what I use to test shaping on projects so I don't mess up my actual material.
01-01-2011, 10:25 PM
#10
Honda-Tech Member
Or....if you feel like being really crafty...you could make two "base" plates and sandwich the shifter plate between them...and then all you would need is the drill a hole in the shifter plate for it to fit around the shifter and the two base plates would keep it level...and since you wont see the bottom plate it wouldn't need to be as precise as far as the cuts and whatnot...
BTW...post a pic of the corvette concept you are talking about if you can...
Hope this gives you some ideas or inspiration.
BTW...post a pic of the corvette concept you are talking about if you can...
Hope this gives you some ideas or inspiration.

 01-02-2011, 05:40 AM
#13
Honda-Tech Member
Join Date: Aug 2009
Location: Charlotte, NC
Posts: 1,431
Likes: 0
Received 0 Likes
on
0 Posts
Interesting. I'll stick with my boot, but props for trying something different. I'd love to see something like what two faced is talking about actually executed.
01-02-2011, 06:33 AM
#14
B*a*n*n*e*d
Thread Starter
BTW...post a pic of the corvette concept you are talking about if you can...

I'm going to try to emulate this plate. It seems easy enough. I cut down some metal, much like I did the rubber, and cut the square out. Then, I take a dremel or circular file and cut about a 1/4" arch over each shifting lane, then deck the thing in Honda awesomeness.
Awesome writeup! BTW it's 50� to vacuum your car out at the car wash.
01-02-2011, 06:34 AM
#15
B*a*n*n*e*d
Thread Starter
wtf? i believe the boot looked better then that...i guess if u like it thats all that matters...
01-02-2011, 07:45 AM
#16
Honda-Tech Member

Join Date: Sep 2008
Location: nowhere ville.
Posts: 2,039
Likes: 0
Received 0 Likes
on
0 Posts
i think it'll look decent. put a big H where the corvette flags are and get a different **** then it'll be pretty. still i like the idea. in for when you get the plate.
might toy with the idea later on my dels.
might toy with the idea later on my dels.
01-02-2011, 07:49 AM
#17
B*a*n*n*e*d
Thread Starter
i think it'll look decent. put a big H where the corvette flags are and get a different **** then it'll be pretty.
01-02-2011, 09:11 AM
#18
Honda-Tech Member
If you're making it out of metal....and you want it to look really Sharp....go to a trophy shop and get a sheet of metal from them....and they could engrave Honda or civic emblems and gear numbers in it. It could be black with only the engravings being raw metal...just an idea.
01-02-2011, 10:00 AM
#19
Honda-Tech Member
Oh...and depending on how much time you have on your hands...and how much it means to you...that paint on the vinyl parts will come off really good with easy off oven cleaner or w.e. it's called...just spray it on and let it sit for a few minutes and it should just scrape off with some light plastic card or even hose off. From the looks of the picture and the way the texture is...it seems as though the previous owner just sprayed it on without prepping it...which is good for you...it means so sand or scuff marks just a beautiful classy grey ready to shine!
01-02-2011, 10:09 AM
#20
The Grumpiest
iTrader: (4)
Join Date: May 2008
Location: Oak Ridge, TN, USA
Posts: 28,333
Likes: 0
Received 16 Likes
on
15 Posts
I wonder if there would be some type of metal on metal noise resulting from this type of design. If you know a chick that sews you could design a boot out of stiffer vinyl that would prevent that sagging that gathers dust. There used to be a boot/shifter set back inteh days that connected that accomplished the same things. Razo maybe?
 01-02-2011, 11:49 AM
#22
Honda-Tech Member
@ grumblemarc...if only the top layer was metal...and the rest abs plastic I think noise shouldn't be bad.
I have a spare oem shifter I was going to cut down so the shift **** sits barely above the plate...maybe use the nrg down low ball or w.e. its called. I doubt I would keep it but just for projects sake
I have a spare oem shifter I was going to cut down so the shift **** sits barely above the plate...maybe use the nrg down low ball or w.e. its called. I doubt I would keep it but just for projects sake
01-04-2011, 05:15 PM
#23
B*a*n*n*e*d
Thread Starter
So, me and my friend hit a little, almost life threatening snafu today. We started and almost finished the plate today, almost. So after going back to his warehouse to pick out a beautiful piece of gloss white finished 24 gauge steel, we got to work. In no less than 5 minutes, me and my friend (CadillacDelSlow) had the piece cut, had the square marked and had 6 punches on the sheet to start the arches. Here came the problem. After being basically 60% done with it, we set it down on the drill press. We piloted each 6 holes with a 1/2 drive. (burnt it up, of course. Cheap bits.) We then moved up to the big momma-jamma 3/4 drive. We hit about halfway trough the first hole and all hell broke loose. Next thing I see, is the piece getting grabbed by the bit, spinning halfway up onto the bit and becoming a shifter plate of death. My friend pulls the plug and the first thing he says to me is "Well, I need stitches..." Turns out, the plate caught him over a knuckle, hit him at the bone and missed his finger's tendon by about a millimeter. Only needed about a stitch though. Plate was ruined but it's a good metal template now. Already has the shape and punches in place, so it'll be easy to start back up. We're going to go with a dremel next time though. Safer, but with a higher chance of human error. If we mess up, we'll file out the hiccup though, no problem. We're gonna wait a few days for his skin to push back together and his stitches to take. Haha, boy was today fun... that plate was looking awesome too. Kinda sucked.

Thread
Thread Starter
Forum
Replies
Last Post
fleabag
Honda Civic (2001 - 2005)
9
08-17-2012 05:24 PM