
Another DIY for Painting Wheels
 01-09-2007, 12:11 PM
#1
Honda-Tech Member
Thread Starter
Join Date: May 2006
Location: CNJ
Posts: 1,035
Likes: 0
Received 0 Likes
on
0 Posts
Here is a pretty simple DiY for painting your wheels. I'm pretty much a moron when it comes to this stuff so if I can do this so can you! I pretty much based my methods off of TRE_ and the DIY from honda tech's Wheel and Tire forum. Type-X, Scott and I did it this weekend and this is the way we did it.
TRE_'s --- https://honda-tech.com/zerothread/1829894
H-T sticky--- https://honda-tech.com/zerothread/1356908
Materials:
---I purchased a set of 16" RSX wheels off of clubrsx for $200. shipped. They are the original Type-S wheels.

--- 3M 80 grit sandpaper. Can be bought anywhere Wal Mart or auto part/hardware store. I got the 5 pack of large sheets so I can tear them off to make smaller sheets or whatever.
--- 2 cans of Aircraft Stripper. These in my area were a little tough to find. I bought them at Autozone for about $7. a can. I checked Lowes and Home Depot but they didn't carry it. It also comes in a gallon sized pourable can but I recomend the aerosol spray cans.

--- Simple Green for cleaning after sanding

--- Towels and Garbage bags
--- Rubber Gloves, these are really important when handeling the Aircraft Stripper.
--- 3 Cans of Krylon Primer- Black $2-3. a can
--- 3 Cans of Krylon Gloss Black interior/exterior spray paint $2-3. a can
--- 2 Cans of Krylon Crystal Clear acrylic spray $2-3. a can

--- Hose
--- Warm sunny day
Step 1:
---Using Simple Green or any other wheel/rim cleaner, thouroughly clean each wheel.
Step 2:
--- Next take out the sanpaper and tear it off into rectangle about the lenth and width of your hand. Dunk the sanpaper in some water and rub the face of the wheel applying medium pressure. You dont have to kill yourself with this. Just make sure than you that you do an even job. Make sure that you get the outside edge of the rim as well and try to rub in the same direction. Once the outside is done flip the wheel over and give the inside a quick rub with some wet sandpaper.
We yielded better results when we sanded first, rather than just relying on the Aircraft Stripper alone.
Step 3:
---Hose off freshly sanded wheel thouroughly dry. If your just doing the wheels with no tire mounted now would be a good time to pop out the valve stems. Put on your rubber gloves and spray Aircraft Stripper on the outside of the wheel in an even fashion covering everything that you just sanded. We found that it if the wheel is in the sun the Stripper seems to bubble the paint off easier. After you got a nice thick coat of the stripper on wait about 10-15 mins. After about 5 minutes you should see the paint lifting from the wheel. It will bubble up and you could proably just scrap it off. Next I hosed off the Stripper with a sharp stream of water making sure all of the srtipper was removed.
Applying Aircraft Remover

After 5 mins of setteling:

Hosing off, You can see where the Remover didnt quite eat at all the paint:

After Stripper and before sanding:

Step 3:
--- After drying the wheel it was time to hit with sandpaper one last time to make make sure everything is smooth and even. The Stripper should have taken everything off but its always good to hit it one last time in all the grooves and corners and especially around the lip. Making sure everything is even and smooth this will allow the primer to coat the rims evenly. After sanding clean and dry the wheel and make sure its free of any dust or dirt.
Last sanding before primer:

Step 4:
Now its time to hit the wheels with some Primer. I went with a black primer because I am going to paint them black. Set the wheel down with the rim face up facing you. Shake primer for a minute or so to mix it all up. Apply primer in short quick bursts while constantley moving the can. You don't want to spray too much in one area because it will drip and it will be obvious. You just need to get a light even coat across the whole wheel. Now, if you have tires already mounted on your wheel you can stick index cards at the edge of the rims to cover the tires. After your first coat of primer dries(about 10-15mins depending on temp) spray the wheels again with a light even coat. Try to get the edge of the rims also.
First Coat of Primer:


After second coat of Primer:


Step 5:
---After your second coat of primer dries its time to paint. Shake can until paint is mixed well. We painted the inside of the wheel well so the alloy wouldn't offset the black. Then I layed down rim and painted the front using the same technique as the primer. Short, quick, even bursts of paint trying not stay in one spot too long to avoid drips. Again, make sure your away from the other wheels to avoid overspray and other debris. After the first coat throughly dries we added another coat using the same techniques as before.
First layer of paint over primer:

Step 6:
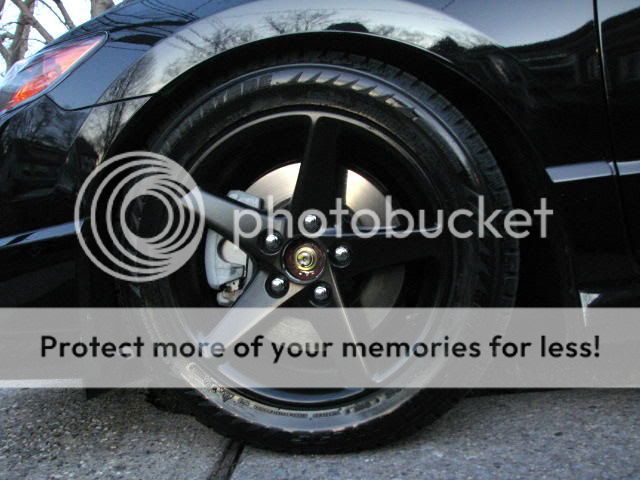
---After the paint dries and you can do as many coats as you think neccessary, I hit the wheels again with clear coat to give the wheels a little exrta gloss shine to them. Again using the same techniques as before for applying and ample time to dry between each coat. For the clear I hit it 3 times. Viola! Freshly painted rims!


Step 7:
--- This step I havent done yet, but at this point if you really want them to look perfect you can wet sand them again using a really really high grit sandpaper, like a 2000 grit or higher if you can. Make sure you wet sand them using a lot of water. After they dry, you can hit again with a couple of coats of clear. I guess you can bake them as well to really let the paint cure but I don't know anything about that.
---As for the Centercaps: Same Process-Sand, Prime, Paint, and clear. Mine are not finished yet.
Thanks for looking and if you have any questions feel free to PM me.
Thanks to Type-X and Scott for the help and sweet pics!!!!
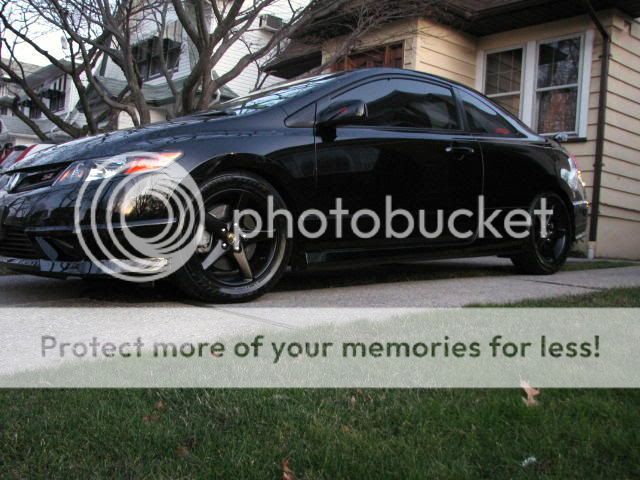
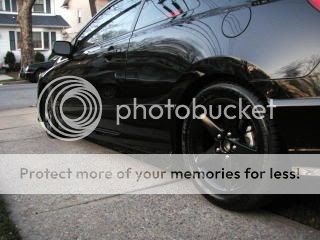
Sorry for the delay but I just mounted these last week. I have to say I couldn't be happier. First off they look sick. Second they're a 16 wheel with a 55 series tire and I couldnt imagine how it would look with my drop. I thought I would either be too low and have rubbing issues or a 4x4 stance. I think its perfect. The 55 series tire compensates for the smaller rim. I have zero rubbing issues and the car feels ALOT smoother. I mounted Blizzaks on the rims and they are as quiet as the regular stock Michelin's. Car rides better than stock in my opinon. Even the guy who mounted them couldn't believe that I, Type X, painted them. He said they looked really good. I am impressed and and very happy I may not want to go back to 17's! We'll see. Onto the pics. Sorry these aren't the best pics but I wanted to post something up plus the weather has been really crappy here the passed couple of weeks.

Modified by Michael Bolton at 11:11 PM 1/31/2007
Modified by Michael Bolton at 10:25 AM 2/1/2007
TRE_'s --- https://honda-tech.com/zerothread/1829894
H-T sticky--- https://honda-tech.com/zerothread/1356908
Materials:
---I purchased a set of 16" RSX wheels off of clubrsx for $200. shipped. They are the original Type-S wheels.
--- 3M 80 grit sandpaper. Can be bought anywhere Wal Mart or auto part/hardware store. I got the 5 pack of large sheets so I can tear them off to make smaller sheets or whatever.
--- 2 cans of Aircraft Stripper. These in my area were a little tough to find. I bought them at Autozone for about $7. a can. I checked Lowes and Home Depot but they didn't carry it. It also comes in a gallon sized pourable can but I recomend the aerosol spray cans.
--- Simple Green for cleaning after sanding
--- Towels and Garbage bags
--- Rubber Gloves, these are really important when handeling the Aircraft Stripper.
--- 3 Cans of Krylon Primer- Black $2-3. a can
--- 3 Cans of Krylon Gloss Black interior/exterior spray paint $2-3. a can
--- 2 Cans of Krylon Crystal Clear acrylic spray $2-3. a can
--- Hose
--- Warm sunny day
Step 1:
---Using Simple Green or any other wheel/rim cleaner, thouroughly clean each wheel.
Step 2:
--- Next take out the sanpaper and tear it off into rectangle about the lenth and width of your hand. Dunk the sanpaper in some water and rub the face of the wheel applying medium pressure. You dont have to kill yourself with this. Just make sure than you that you do an even job. Make sure that you get the outside edge of the rim as well and try to rub in the same direction. Once the outside is done flip the wheel over and give the inside a quick rub with some wet sandpaper.
We yielded better results when we sanded first, rather than just relying on the Aircraft Stripper alone.
Step 3:
---Hose off freshly sanded wheel thouroughly dry. If your just doing the wheels with no tire mounted now would be a good time to pop out the valve stems. Put on your rubber gloves and spray Aircraft Stripper on the outside of the wheel in an even fashion covering everything that you just sanded. We found that it if the wheel is in the sun the Stripper seems to bubble the paint off easier. After you got a nice thick coat of the stripper on wait about 10-15 mins. After about 5 minutes you should see the paint lifting from the wheel. It will bubble up and you could proably just scrap it off. Next I hosed off the Stripper with a sharp stream of water making sure all of the srtipper was removed.
Applying Aircraft Remover
After 5 mins of setteling:
Hosing off, You can see where the Remover didnt quite eat at all the paint:
After Stripper and before sanding:
Step 3:
--- After drying the wheel it was time to hit with sandpaper one last time to make make sure everything is smooth and even. The Stripper should have taken everything off but its always good to hit it one last time in all the grooves and corners and especially around the lip. Making sure everything is even and smooth this will allow the primer to coat the rims evenly. After sanding clean and dry the wheel and make sure its free of any dust or dirt.
Last sanding before primer:
Step 4:
Now its time to hit the wheels with some Primer. I went with a black primer because I am going to paint them black. Set the wheel down with the rim face up facing you. Shake primer for a minute or so to mix it all up. Apply primer in short quick bursts while constantley moving the can. You don't want to spray too much in one area because it will drip and it will be obvious. You just need to get a light even coat across the whole wheel. Now, if you have tires already mounted on your wheel you can stick index cards at the edge of the rims to cover the tires. After your first coat of primer dries(about 10-15mins depending on temp) spray the wheels again with a light even coat. Try to get the edge of the rims also.
First Coat of Primer:
After second coat of Primer:
Step 5:
---After your second coat of primer dries its time to paint. Shake can until paint is mixed well. We painted the inside of the wheel well so the alloy wouldn't offset the black. Then I layed down rim and painted the front using the same technique as the primer. Short, quick, even bursts of paint trying not stay in one spot too long to avoid drips. Again, make sure your away from the other wheels to avoid overspray and other debris. After the first coat throughly dries we added another coat using the same techniques as before.
First layer of paint over primer:
Step 6:
---After the paint dries and you can do as many coats as you think neccessary, I hit the wheels again with clear coat to give the wheels a little exrta gloss shine to them. Again using the same techniques as before for applying and ample time to dry between each coat. For the clear I hit it 3 times. Viola! Freshly painted rims!
Step 7:
--- This step I havent done yet, but at this point if you really want them to look perfect you can wet sand them again using a really really high grit sandpaper, like a 2000 grit or higher if you can. Make sure you wet sand them using a lot of water. After they dry, you can hit again with a couple of coats of clear. I guess you can bake them as well to really let the paint cure but I don't know anything about that.
---As for the Centercaps: Same Process-Sand, Prime, Paint, and clear. Mine are not finished yet.
Thanks for looking and if you have any questions feel free to PM me.
Thanks to Type-X and Scott for the help and sweet pics!!!!
Sorry for the delay but I just mounted these last week. I have to say I couldn't be happier. First off they look sick. Second they're a 16 wheel with a 55 series tire and I couldnt imagine how it would look with my drop. I thought I would either be too low and have rubbing issues or a 4x4 stance. I think its perfect. The 55 series tire compensates for the smaller rim. I have zero rubbing issues and the car feels ALOT smoother. I mounted Blizzaks on the rims and they are as quiet as the regular stock Michelin's. Car rides better than stock in my opinon. Even the guy who mounted them couldn't believe that I, Type X, painted them. He said they looked really good. I am impressed and and very happy I may not want to go back to 17's! We'll see. Onto the pics. Sorry these aren't the best pics but I wanted to post something up plus the weather has been really crappy here the passed couple of weeks.
Modified by Michael Bolton at 11:11 PM 1/31/2007
Modified by Michael Bolton at 10:25 AM 2/1/2007
 01-09-2007, 12:25 PM
#3
Honda-Tech Member
Join Date: Jul 2006
Location: Westchester, NY
Posts: 1,811
Likes: 0
Received 0 Likes
on
0 Posts
I am thinking about doing the same thing to my stock SI wheels painting them a flat black to go with nhbp nice diy !
01-09-2007, 12:35 PM
#6
Honda-Tech Member
Thread Starter
Join Date: May 2006
Location: CNJ
Posts: 1,035
Likes: 0
Received 0 Likes
on
0 Posts
<TABLE WIDTH="90%" CELLSPACING=0 CELLPADDING=0 ALIGN=CENTER><TR><TD>Quote, originally posted by Type X »</TD></TR><TR><TD CLASS="quote">Good time had by all......
Great write up...
 </TD></TR></TABLE>
Thanks again couldn't have done it withoutcha! Thanks for pics too
Great write up...
</TD></TR></TABLE>Thanks again couldn't have done it withoutcha! Thanks for pics too
Trending Topics
 01-09-2007, 03:06 PM
#9
Honda-Tech Member
Thread Starter
Join Date: May 2006
Location: CNJ
Posts: 1,035
Likes: 0
Received 0 Likes
on
0 Posts
<TABLE WIDTH="90%" CELLSPACING=0 CELLPADDING=0 ALIGN=CENTER><TR><TD>Quote, originally posted by projekt EJ8 »</TD></TR><TR><TD CLASS="quote">subscribed! will this job last?</TD></TR></TABLE>
thats what im wondering. i should be mounting them sometime next week. i have to finish the center caps first.
i dont think they will stay looking that good. the paint seems real delicate. but touching up would be easy. salt is pretty harsh on paint. i proably could have done a few more coats of paint to make it really thick but then i think it would look sloppy. maybe ill wet sand them again and do a few more coats of clear. i dunno though laziness > me...
powder coating or baking them is the obvious choice for durability but for less then $ 250. not including Blizzaks, im not that worried about it.
ill keep you guys updated
 01-09-2007, 05:12 PM
#14
Join Date: Sep 2006
Location: Monterrey, N.L., Mex
Posts: 151
Likes: 0
Received 0 Likes
on
0 Posts
that was an awesome job and the wheels im sure flow with the car very well design wise...
but why didnt you wet sand them after the paint and before the clear?
it seems to have orange skin...can you take closeups?
but why didnt you wet sand them after the paint and before the clear?
it seems to have orange skin...can you take closeups?
01-09-2007, 07:00 PM
#15
Honda-Tech Member
Thread Starter
Join Date: May 2006
Location: CNJ
Posts: 1,035
Likes: 0
Received 0 Likes
on
0 Posts
<TABLE WIDTH="90%" CELLSPACING=0 CELLPADDING=0 ALIGN=CENTER><TR><TD>Quote, originally posted by Zesti1 »</TD></TR><TR><TD CLASS="quote">Great DIY and awesome writeup and pics
Im tempted to just buy some cheap wheels to try this out </TD></TR></TABLE>
You should, its really not that hard its just time consuming. I tried to be as complete as possible when writing this up to help you guys avoid any mistakes and make sure all the details are there. Take from this and learn and improve.
<TABLE WIDTH="90%" CELLSPACING=0 CELLPADDING=0 ALIGN=CENTER><TR><TD>Quote, originally posted by TRE_ »</TD></TR><TR><TD CLASS="quote">lol this **** puts my little DIY to shame </TD></TR></TABLE>
c'mon dog you were the inspiration for this. Without you I would have never painted these rims! Have fun in Vegas...Remember always double down on 11.
<TABLE WIDTH="90%" CELLSPACING=0 CELLPADDING=0 ALIGN=CENTER><TR><TD>Quote, originally posted by typeReg »</TD></TR><TR><TD CLASS="quote">Nice DIY!!! And thanks!!!</TD></TR></TABLE>
<TABLE WIDTH="90%" CELLSPACING=0 CELLPADDING=0 ALIGN=CENTER><TR><TD>Quote, originally posted by Toxis »</TD></TR><TR><TD CLASS="quote">very nice write up with great detail and pictures. Good stuff.</TD></TR></TABLE>
Thanks guys! Im glad to help.
<TABLE WIDTH="90%" CELLSPACING=0 CELLPADDING=0 ALIGN=CENTER><TR><TD>Quote, originally posted by misterghost »</TD></TR><TR><TD CLASS="quote">that was an awesome job and the wheels im sure flow with the car very well design wise...
but why didnt you wet sand them after the paint and before the clear?
it seems to have orange skin...can you take closeups?</TD></TR></TABLE>
Honestly I didnt think of that or even know to do that but I see what your saying now. Once winter is over I will have all summer to work on these again and I have some new ideas to play with. I will try to get closer shots though.
01-09-2007, 07:07 PM
#16
Member
Join Date: Mar 2002
Location: San Antonio, Texas, USA
Posts: 1,215
Likes: 0
Received 0 Likes
on
0 Posts
I like the combat look. I did that a few years ago with the 91 sedan dubbed "The Golden Shower." I miss those days. Nice lookin' wheels.
