
DIY Aftermarket steering wheel and hub install
 12-01-2009, 03:43 PM
#1
Honda-Tech Member
Thread Starter
Join Date: Nov 2008
Posts: 83
Likes: 0
Received 0 Likes
on
0 Posts
So a few weeks back i bought a steering wheel and hub combo from ebay and i tried to find help to install with no luck so i tampered with it and came up with this solution...
First things first disconect your battery for at least 15 minutes prior to the steering wheel peel (you do not wanna get an air bag in the face)
Now the first three pictures belong to LatinEM2 on the board here...i didn't take pictures when i took mine off so thanks in advance...
First things first take the torque screw on each side with a T30 bit
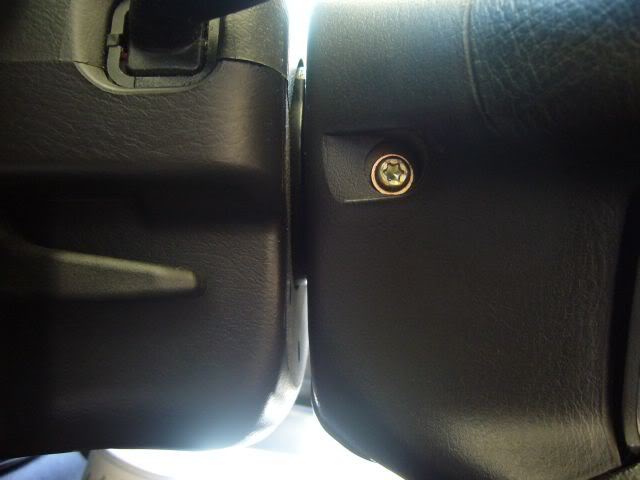
Then wiggle the horn/airbag a little and pull it towards you. It should come out without using force so no need to tug too hard... then disconnect the wire on your left with the black connector (horn live wire)

now unplug both connectors... The Yellow is your airbag and the green your cruise control... and also take out the two philipps screws on the side of the cruise control button...
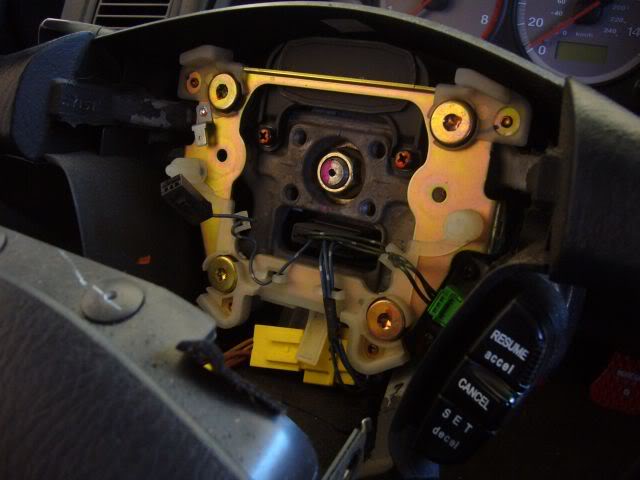
Now that this is all unplugged the only thing left is to take the 19mm center bolt and take the wheel off... The way i did this to avoid hitting myself with the wheel loosen the bolt quite a bit but not all the way and give the steering wheel a few good tugs till she gets loose and remove...
Now that the OEM wheel is off here comes the fun part...
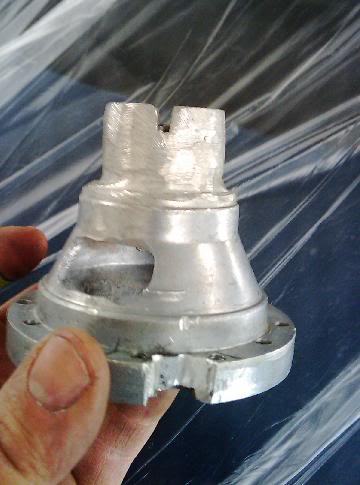
This is what the ebay hub looks like before you modify it...
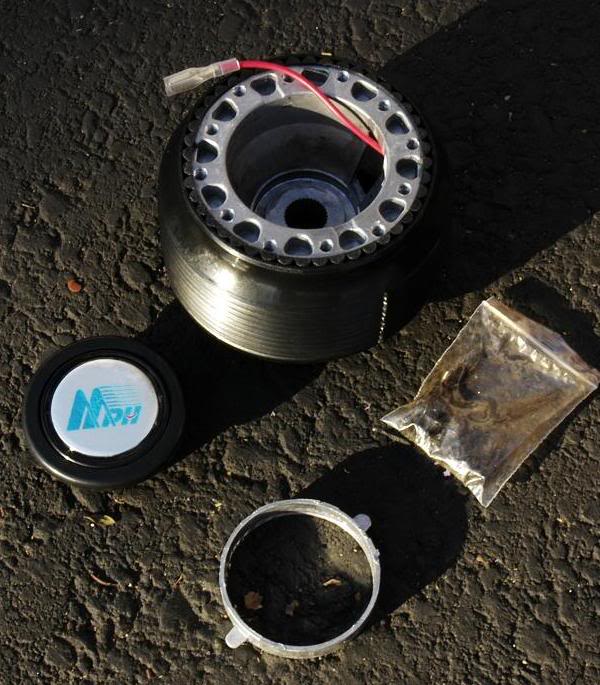
Now slide that black plastic sleeve and O rings off and break off the bottom piece that the wire is connected to... It is a useless piece and you will ground the horn in a better spot later... Just make sure to keep the wire for later use...
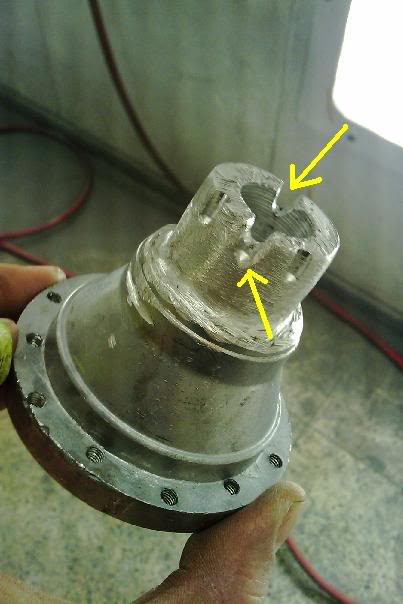
Now that your hub is naked it should look like this (minus the notching)
Now its time to modify the hub to make it so that you can keep your cruise and your signal light turn off and horn...
what you wanna do is shave of two notches on the bottom part...
marked with yellow arrows... There is two pre drilled holes from the factory but they won't be aligning that's why you wanna notch them more..
This is the part you wanna take off... (don't have to notch that piece)
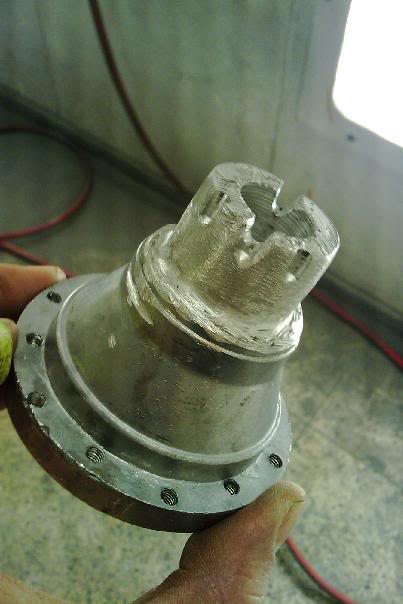
And also you will need to thin out the bottom of the hub in order for it to fit in the clock spring... If you have access to a machinist i'd get them to do it nice and even but if you wanna attempt this it's not too hard...
Make sure you do not trim too far down leave at least a quarter inch of untouched hub... stop no further than the red line
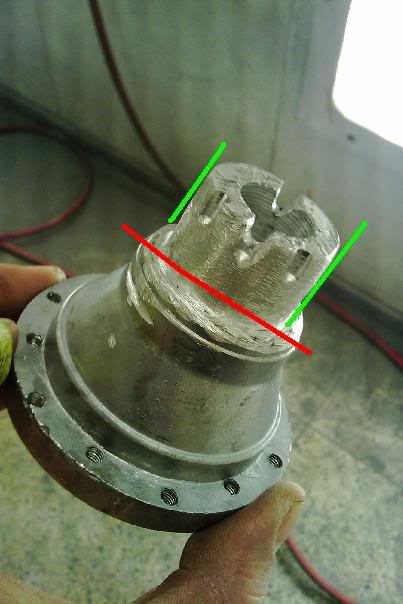
now your hub should fit in your clock spring no trouble... Remeber, all you wanna do is shave off the minimum so that it can slide in the clock spring hole so DON'T over do the trimming of the hub...
I needed the hub to be notch a little bit more on the side in order for my cruise control button to fit were i wanted it but this could be avoided in other style wheels...
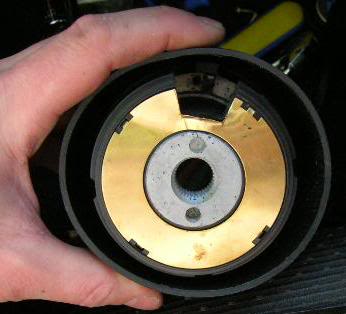
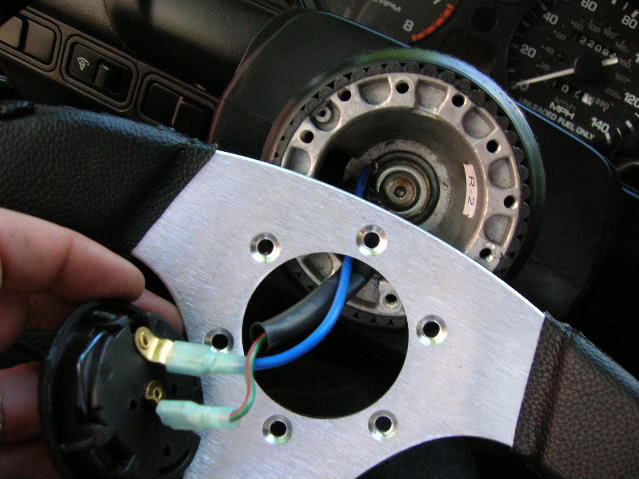
This is what you will have to do to the clock spring and the wiring.
RED: You'll wanna cut the two plastic pins flush to the clock spring
BLUE: This is the airbag wires cut them flush
YELLOW: This is the mechanism that makes your signal light turn off when you turn your wheel
GREEN: This is your horn Live wire (do not cut)
PURPLE: These are your cruise control wires (do not cut)
Now time for the cruise control bracket build...
First take a piece of cardboard and a pen/marker and trace your steering wheel and mark down your holes now you'll need to play with the design a bit acording to your preference and steering wheel style...
Once you have your bracket to a T, trace it down on sheet metal. ( I used a scrapped fender from work.)
Now that i have my pattern i cut out the holes for the horn and 6 steering wheel holes...
Now you'll wanna bend the bracket 90 degrees where the cruise buttons bolt up. after this part was done i scuffed it up and sprayed it flat black because you could see a little bit of it and it looked cleanner
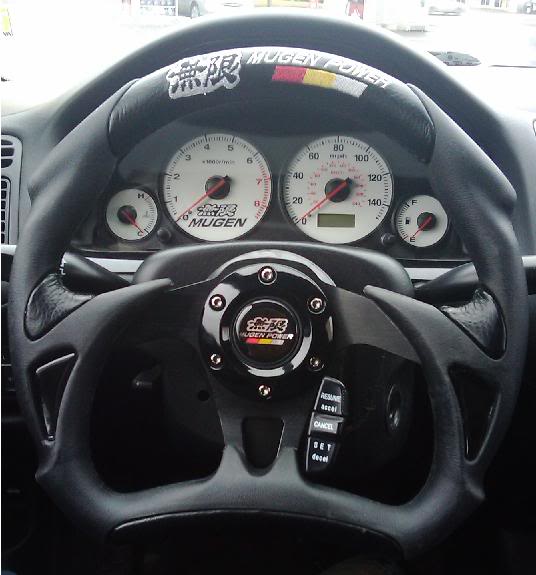
Now it's all done just need to reinstall everything...
Put the hub back on the car and make sure you align the top bolt on top and make sure that the signal light plastic piece aligns with the notches you made on your hub...
Now that the hub is on pull out the wire that you saved earlier and ground it under the 19mm bolt and pass the blue live horn wire in the hole on the side of your hub
now place your newly made cruise bracket on along with the steering wheel and horn. and plug your wires and make sure horn works before your done... (Picture borrowed again just for refference)
Now align the steering wheel and cruise bracket put lock tight on all 6 bolts and start all 6 bolts before tightning...
now that the 6 bolts are in you can tighten them with the same pattern you use on rims crossing from side to side...
all that's left now is bolt your cruise button on the bracket and plug in the green plugin'
"VOILA"
Your done
Hope this helped alot and if you have questions don't hesitate
First things first disconect your battery for at least 15 minutes prior to the steering wheel peel (you do not wanna get an air bag in the face)
Now the first three pictures belong to LatinEM2 on the board here...i didn't take pictures when i took mine off so thanks in advance...
First things first take the torque screw on each side with a T30 bit
Then wiggle the horn/airbag a little and pull it towards you. It should come out without using force so no need to tug too hard... then disconnect the wire on your left with the black connector (horn live wire)
now unplug both connectors... The Yellow is your airbag and the green your cruise control... and also take out the two philipps screws on the side of the cruise control button...
Now that this is all unplugged the only thing left is to take the 19mm center bolt and take the wheel off... The way i did this to avoid hitting myself with the wheel loosen the bolt quite a bit but not all the way and give the steering wheel a few good tugs till she gets loose and remove...
Now that the OEM wheel is off here comes the fun part...
This is what the ebay hub looks like before you modify it...
Now slide that black plastic sleeve and O rings off and break off the bottom piece that the wire is connected to... It is a useless piece and you will ground the horn in a better spot later... Just make sure to keep the wire for later use...
Now that your hub is naked it should look like this (minus the notching)
Now its time to modify the hub to make it so that you can keep your cruise and your signal light turn off and horn...
what you wanna do is shave of two notches on the bottom part...
marked with yellow arrows... There is two pre drilled holes from the factory but they won't be aligning that's why you wanna notch them more..
This is the part you wanna take off... (don't have to notch that piece)
And also you will need to thin out the bottom of the hub in order for it to fit in the clock spring... If you have access to a machinist i'd get them to do it nice and even but if you wanna attempt this it's not too hard...
Make sure you do not trim too far down leave at least a quarter inch of untouched hub... stop no further than the red line
now your hub should fit in your clock spring no trouble... Remeber, all you wanna do is shave off the minimum so that it can slide in the clock spring hole so DON'T over do the trimming of the hub...
I needed the hub to be notch a little bit more on the side in order for my cruise control button to fit were i wanted it but this could be avoided in other style wheels...
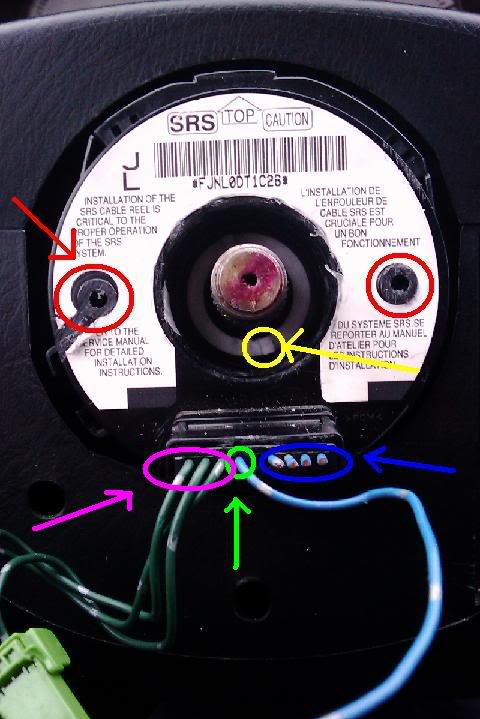
This is what you will have to do to the clock spring and the wiring.
RED: You'll wanna cut the two plastic pins flush to the clock spring
BLUE: This is the airbag wires cut them flush
YELLOW: This is the mechanism that makes your signal light turn off when you turn your wheel
GREEN: This is your horn Live wire (do not cut)
PURPLE: These are your cruise control wires (do not cut)
Now time for the cruise control bracket build...
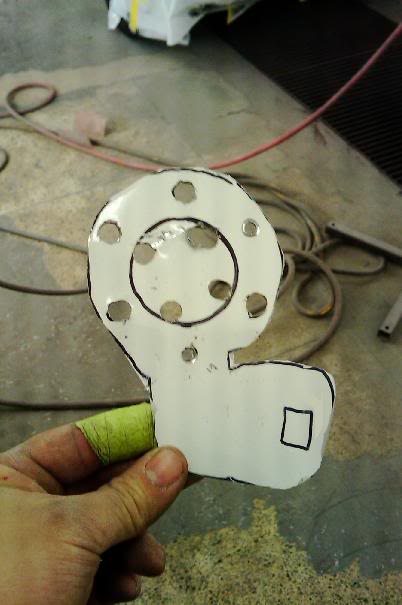
First take a piece of cardboard and a pen/marker and trace your steering wheel and mark down your holes now you'll need to play with the design a bit acording to your preference and steering wheel style...
Once you have your bracket to a T, trace it down on sheet metal. ( I used a scrapped fender from work.)
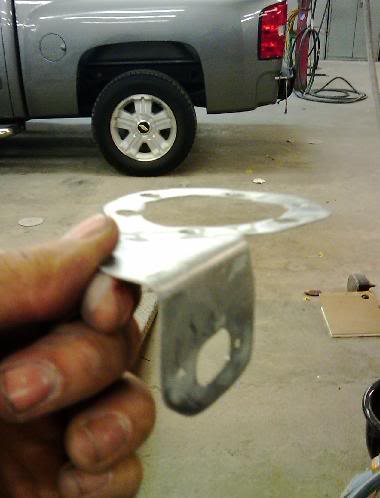
Now that i have my pattern i cut out the holes for the horn and 6 steering wheel holes...
Now you'll wanna bend the bracket 90 degrees where the cruise buttons bolt up. after this part was done i scuffed it up and sprayed it flat black because you could see a little bit of it and it looked cleanner
Now it's all done just need to reinstall everything...
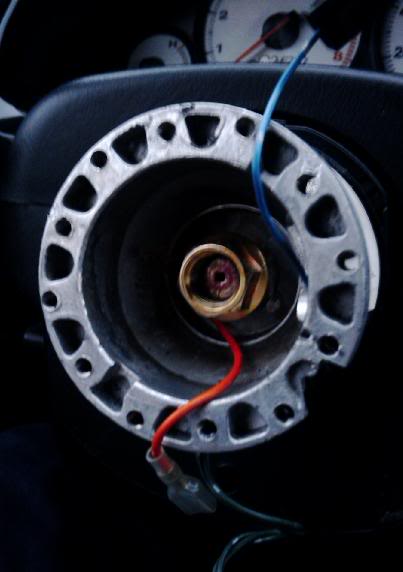
Put the hub back on the car and make sure you align the top bolt on top and make sure that the signal light plastic piece aligns with the notches you made on your hub...
Now that the hub is on pull out the wire that you saved earlier and ground it under the 19mm bolt and pass the blue live horn wire in the hole on the side of your hub
now place your newly made cruise bracket on along with the steering wheel and horn. and plug your wires and make sure horn works before your done... (Picture borrowed again just for refference)
Now align the steering wheel and cruise bracket put lock tight on all 6 bolts and start all 6 bolts before tightning...
now that the 6 bolts are in you can tighten them with the same pattern you use on rims crossing from side to side...
all that's left now is bolt your cruise button on the bracket and plug in the green plugin'
"VOILA"
Your done
Hope this helped alot and if you have questions don't hesitate
 12-01-2009, 05:07 PM
#2
Function>Fashion
I would never trust any steering wheel or hub from eBay...
Nice writeup regardless. I did not have to do any notching or modifying for my NRG hub but I removed the entire clockspring unit.
Nice writeup regardless. I did not have to do any notching or modifying for my NRG hub but I removed the entire clockspring unit.
12-01-2009, 07:27 PM
#3
Honda-Tech Member
Join Date: Apr 2007
Location: cincinnati, ohio, united states
Posts: 214
Likes: 0
Received 0 Likes
on
0 Posts
Nice right up for sure.. but damn that is one of those parts that you cant go ebay on.
12-02-2009, 02:31 AM
#4
Honda-Tech Member
Thread Starter
Join Date: Nov 2008
Posts: 83
Likes: 0
Received 0 Likes
on
0 Posts
no worries  ... I meen this is a steel steering wheel bolted on at 6 spots on the hub... I should remind that i changed the bolts to higher quality ones but regardless your not gonna do much damage to the steering wheel weather you bought it on ebay or not... to me aftermarket is aftermarket...
... I meen this is a steel steering wheel bolted on at 6 spots on the hub... I should remind that i changed the bolts to higher quality ones but regardless your not gonna do much damage to the steering wheel weather you bought it on ebay or not... to me aftermarket is aftermarket...
12-02-2009, 01:59 PM
#5
Honda-Tech Member
What i dont get is, u bought a ebay hub and u have a legit *** steering wheel u couldnt find a better hub juss like ^^ they sed i wouldnt trust it.. i always use the sayin u get what u pay for.. but non the less juss my opinion!
12-02-2009, 02:09 PM
#6
Function>Fashion
It's not an authentic Mugen steering wheel. Just an eBay design.
Trending Topics
12-02-2009, 03:30 PM
#8
Honda-Tech Member
Thread Starter
Join Date: Nov 2008
Posts: 83
Likes: 0
Received 0 Likes
on
0 Posts
Well if you can find me a hub that i'll be able to keep my clock spring mechanism , PLEASE post link... Like harlowe mentioned she had to lose the clock spring with her ligit NRG hub...
Oh and jdm em2 you fell for the wheel so therfore YOU FAIL
Oh and jdm em2 you fell for the wheel so therfore YOU FAIL
12-02-2009, 04:22 PM
#9
Honda-Tech Member
First off harlowe isnt't a she!! LMAO and i fail how do i fail i dont have a knock off steering wheel my car is all legit shyt! so try n flame a little better next time
P.s Nothin on my car is fake/knock-off
P.s Nothin on my car is fake/knock-off
12-02-2009, 05:58 PM
#10
Honda-Tech Member
Thread Starter
Join Date: Nov 2008
Posts: 83
Likes: 0
Received 0 Likes
on
0 Posts
Well harlowe has a girl display pic and i don't know him personaly so sorry for the comfusion Harlowe... And you fell for the wheel so you obviously don't know much about unfake stuff... FAIL Pfff ...
AFTERMARKET PARTS ARE ALL KNOCK OFFS
I'm not the only guy buying stuff on ebay so this thread was for theses guys/girls
And you fell for the wheel so you obviously don't know much about unfake stuff... FAIL Pfff ... AFTERMARKET PARTS ARE ALL KNOCK OFFS
I'm not the only guy buying stuff on ebay so this thread was for theses guys/girls
12-02-2009, 10:30 PM
#11
Junior Member
Join Date: Mar 2007
Location: UAE
Posts: 305
Likes: 0
Received 0 Likes
on
0 Posts
Thanks for sharing your DIY mate but your stock wheel is much better than you have now, i have a feeling that ebay hub will come off one day so be careful.
12-03-2009, 04:59 PM
#12
Honda-Tech Member
Join Date: Aug 2008
Location: Stillwater, OK, United States
Posts: 334
Likes: 0
Received 0 Likes
on
0 Posts
What does the clock spring do any ways? Seems like alot of extra work when you could just trow on a hub thats correct for the car.
12-04-2009, 12:11 PM
#13
Honda-Tech Member
Thread Starter
Join Date: Nov 2008
Posts: 83
Likes: 0
Received 0 Likes
on
0 Posts
the clock spring is a mechanism that alows your steering wheel to turn without the wires getting all tangled up... Like the horn, cruise and airbag wires.
And i needed the horn and cruise wires so therefore i needed the clock spring
And i needed the horn and cruise wires so therefore i needed the clock spring
12-04-2009, 01:19 PM
#14
Function>Fashion
If you don't use cruise control you can take the clock spring out. The horn can easily be wired without it.
12-04-2009, 01:54 PM
#16
Honda-Tech Member
Join Date: Aug 2008
Location: Stillwater, OK, United States
Posts: 334
Likes: 0
Received 0 Likes
on
0 Posts
O I don't even have cruse vp civc ftmfw I was thinking about getting a quick disconnect hub but I haven't decided what I want to do with the horn yet.
12-04-2009, 03:17 PM
#17
Honda-Tech Member
Thread Starter
Join Date: Nov 2008
Posts: 83
Likes: 0
Received 0 Likes
on
0 Posts
Well for me the issue at first with the horn without the clock spring was that the live wire was always disconnecting due to tangeling when steering... I tried leaving it longer but still would come off after awhile... With the clock spring it moves with the wheel... Plus i wanted to have my cruise too...And Harlowe if you would have been that girl in your pic i would have drove down from Canada to see you lol... Sorry if i insulted you and JDM em2 i call troose...
Did anybody find a good hub that i can use and keep my clock spring??? If so post me the link...
i really do wanna upgrade to a better hub for peace of mind.
wanna keep the wheel though, really like the look of it even if she's a knock off mugen
Did anybody find a good hub that i can use and keep my clock spring??? If so post me the link...
i really do wanna upgrade to a better hub for peace of mind.
wanna keep the wheel though, really like the look of it even if she's a knock off mugen
12-04-2009, 03:22 PM
#18
Function>Fashion
batmobile steering wheel lol
Behind the steering wheel there is a white plastic piece and on the other side its metal. You secure an exposed wire back there to make sure it rubs against the metal, and it keeps the circuit complete.
Behind the steering wheel there is a white plastic piece and on the other side its metal. You secure an exposed wire back there to make sure it rubs against the metal, and it keeps the circuit complete.
12-04-2009, 03:25 PM
#19
Honda-Tech Member
Thread Starter
Join Date: Nov 2008
Posts: 83
Likes: 0
Received 0 Likes
on
0 Posts
hehe quick Robin, Into the Bat mobile lol
But yeah i got everything working fine even with the cruise wich for me is a must...
Airbag Pshhh option in the 90s lol...
But yeah i got everything working fine even with the cruise wich for me is a must...
Airbag Pshhh option in the 90s lol...
12-04-2009, 03:32 PM
#20
Function>Fashion

NRG short hub, NRG 2.0 quick release, and Personal Neo Grinta 330mm wheel... I love it...
12-04-2009, 03:36 PM
#21
Honda-Tech Member
Thread Starter
Join Date: Nov 2008
Posts: 83
Likes: 0
Received 0 Likes
on
0 Posts
how much was the NRG combo with quick release??? And do you have a side view to see how far out it projects with the 2 pieces.
12-04-2009, 06:56 PM
#22
Function>Fashion
Weaksauce has the combo for about $400. I got it a year ago and it was a little cheaper.

Sticks out about as much as the stock wheel, from what I can remember.. 330mm is a little smaller than the ep3/rsx wheel.
Sticks out about as much as the stock wheel, from what I can remember.. 330mm is a little smaller than the ep3/rsx wheel.
 i want oneeeeeeeee
12-05-2009, 06:36 PM
i want oneeeeeeeee
12-05-2009, 06:36 PM
#25
Junior Member
Join Date: Mar 2007
Location: UAE
Posts: 305
Likes: 0
Received 0 Likes
on
0 Posts