
photoshop your car like a pro!
 01-12-2009, 08:52 PM
#1
Junior Member
Thread Starter
Join Date: Jan 2009
Location: East Coast
Posts: 50
Likes: 0
Received 0 Likes
on
0 Posts
Sup, I wanted to make this reference thread to those who want to make adjustments to their car without the consequences. The best way to do that of course is through photoshop. You can pretty much adjust the height of your car, add carbon fiber parts and change color of rims or even switch up the rims if you wanted to. Anything you might think of can be done yes.. sky is the limit.
This 1st part I am writing up is to show you guys how to make your car lower in a picture which would give you a good idea of what it would look like.
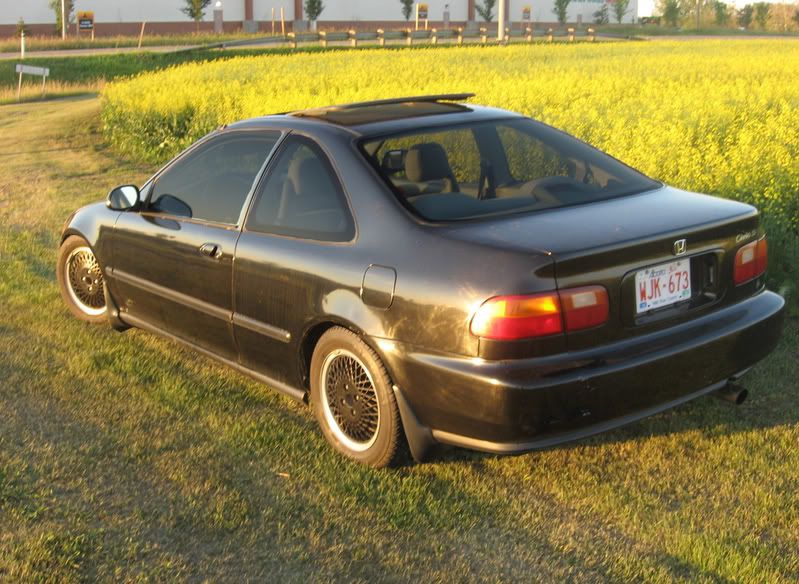
1st - Copy the picture or select the picture of the car you want to lower.
2nd- Open it with Photoshop
3rd- Select the Lasso Tool
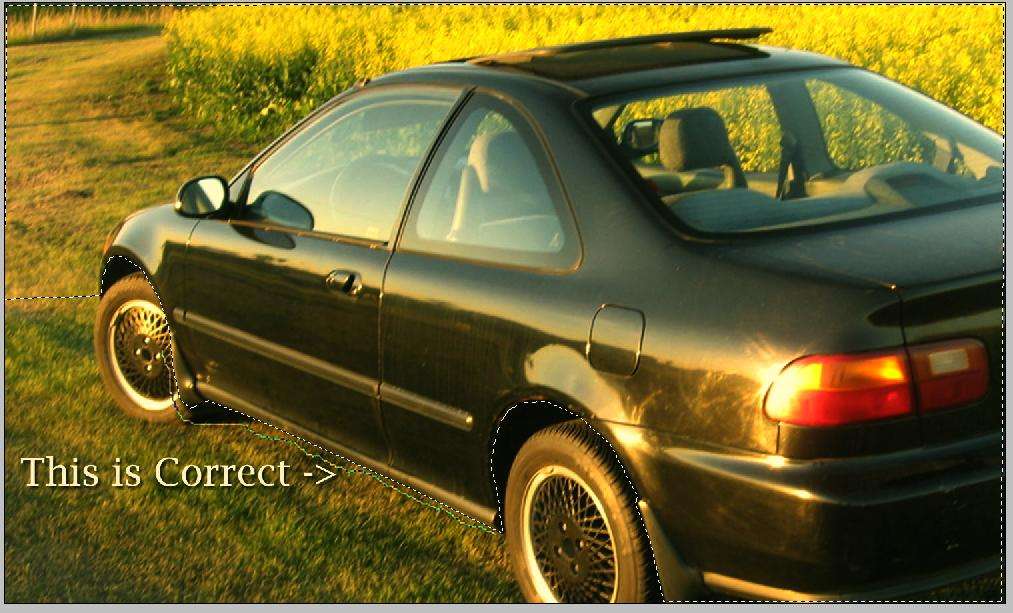
4rth- cut the car all around... important to know that while you cut, it does not need to be THAT perfect and also remember that it's better to cut outside of the car rather then pass the edges into the car itself.
correct way notice the cut being done from the outside of the body.

wrong way , notice how the cut goes within the car.

Okay next after you cut the car all around Select copy
Then Select paste
this creates a layer of the copied car within your layers window.

Now it's important to understand how layers work.
That copy/paste you made of the car when you used the lasso tool created the layer of the car but you might not see it.
If you select the layer of the cut car , you can move it around and see what I mean. So while your doing this, go ahead and lower the layer to drop the car.
Should look something like this:

Next select the earser tool
Then erase some of the wheel well from the tire to give it a clean drop look.

Remember that you can also choose the the type of brush you erase with as well as the size of the brush.
Next - we need to remove the ugly outer part of the car that was left when we lowered it.
This is done with the Clone tool.
Select the clone tool.
Next make sure you have the MAIN layer of the picture selected (not the cut/copy layer of the car.
The way clone works is really easy (and cool) if you press the ALT key you will notice that your clone pointer turns into atarget like pointer.
Depending on where you let go of that ALT pointer is where the cloning with begin from.
So for example I want to start from the back of the car, I want to press ALT close to that part , let it go, then move the mouse away from that area and then you can click on the picture to begin the clone.

I hope this little tutorial helps answer alot of questions some of you guys were having. Have fun. Maybe others can add more tips and tricks. I will add more stuff later on this week like changing rim colors and paint colors and stuff like that.
Enjoy
This 1st part I am writing up is to show you guys how to make your car lower in a picture which would give you a good idea of what it would look like.
1st - Copy the picture or select the picture of the car you want to lower.
2nd- Open it with Photoshop
3rd- Select the Lasso Tool
4rth- cut the car all around... important to know that while you cut, it does not need to be THAT perfect and also remember that it's better to cut outside of the car rather then pass the edges into the car itself.
correct way notice the cut being done from the outside of the body.
wrong way , notice how the cut goes within the car.
Okay next after you cut the car all around Select copy
Then Select paste
this creates a layer of the copied car within your layers window.
Now it's important to understand how layers work.
That copy/paste you made of the car when you used the lasso tool created the layer of the car but you might not see it.
If you select the layer of the cut car , you can move it around and see what I mean. So while your doing this, go ahead and lower the layer to drop the car.
Should look something like this:
Next select the earser tool
Then erase some of the wheel well from the tire to give it a clean drop look.
Remember that you can also choose the the type of brush you erase with as well as the size of the brush.
Next - we need to remove the ugly outer part of the car that was left when we lowered it.
This is done with the Clone tool.
Select the clone tool.
Next make sure you have the MAIN layer of the picture selected (not the cut/copy layer of the car.
The way clone works is really easy (and cool) if you press the ALT key you will notice that your clone pointer turns into atarget like pointer.
Depending on where you let go of that ALT pointer is where the cloning with begin from.
So for example I want to start from the back of the car, I want to press ALT close to that part , let it go, then move the mouse away from that area and then you can click on the picture to begin the clone.
I hope this little tutorial helps answer alot of questions some of you guys were having. Have fun. Maybe others can add more tips and tricks. I will add more stuff later on this week like changing rim colors and paint colors and stuff like that.
Enjoy
 01-12-2009, 08:57 PM
#2
B*a*n*n*e*d
Join Date: Oct 2007
Location: IN A BLACK ROOM
Posts: 938
Likes: 0
Received 0 Likes
on
0 Posts
O man this link is a copy and paced saver . One thang i need now is PHOTOSHOP ! i have tried the cache code and stuff but never works . Do you no how i can get it ?
01-12-2009, 09:09 PM
#5
Junior Member
Thread Starter
Join Date: Jan 2009
Location: East Coast
Posts: 50
Likes: 0
Received 0 Likes
on
0 Posts
Best Buy - Compuse - Tigerdirect - newegg - some colleges provide them for free. Uhmmm someone told me you can use photoshop online for free too but not sure if it's as advance as their main program.. might be missing some tools not sure. But yeah hope that helps.
01-12-2009, 09:40 PM
#6
Junior Member
Join Date: Aug 2005
Location: antioch, ca, usa
Posts: 26
Likes: 0
Received 0 Likes
on
0 Posts
well for the correct way well the easier way to select what you want i edited your pic and did it the way i do it with the polygonal lasso
once done all you have to do is copy and paste it then just crop the top and go over your lines around the wheel well and if it bugs you the grass and such
i did this pic the other day someone has said it was a bad pic to lower a car but its one of the best
as you can tell on the sides of the grass i used a bleed tool to blend the grass in
now for the window tint all you have to do is make a new layer cover the whole window in black then use the opacity on the new layer to make it transparent then go over the border with the eraser to make it clean i did that one a lil fast so its kinda off theres alot more you can do to that pic but i did it in like 10 mins lol maybe less
edit oh and for some reason that i have yet to figure out my photoshop comes out darker on my screen so the first pic is a screen shoot of !ntegr@'s original screen shoot lol they save the right color but i dont see them the right color gota figure that one out one day lol
Last edited by ghettogeddy; 01-12-2009 at 10:02 PM.
Trending Topics
01-12-2009, 10:02 PM
#8
Honda-Tech Member
Join Date: Mar 2005
Location: Dallas, TX, United States
Posts: 1,663
Likes: 0
Received 0 Likes
on
0 Posts
helpful info.. i also found this step-by-step tutorial. not tryin to thread jack or anything. just thought it would help.
http://www.digimods.co.uk/tutorials/tutorials.htm
http://www.digimods.co.uk/tutorials/tutorials.htm

Thread
Thread Starter
Forum
Replies
Last Post