
F22B2 ITB setup


 04-05-2008, 09:01 PM
#55
Honda-Tech Member
Thread Starter
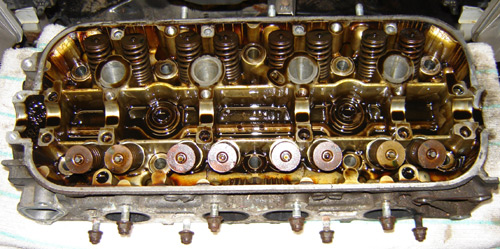
I got a start on a little bit of head work today. Took everything apart and all looked to good to be true.
I thought that it looked pretty clean for a 12 year old engine with 200k. Probably due to having regular oil changes!
by GhostAccord, on Flickr
That dark oil on the sides wiped right off with a dry rag, first swipe 8)
Took the springs and valves out
by GhostAccord, on Flickr
to give it a good Hot bath.....
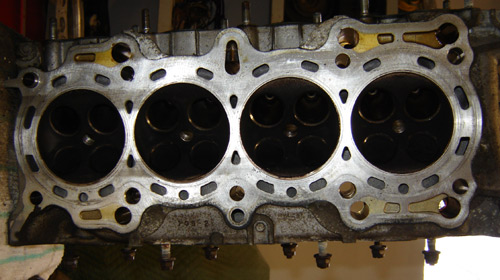
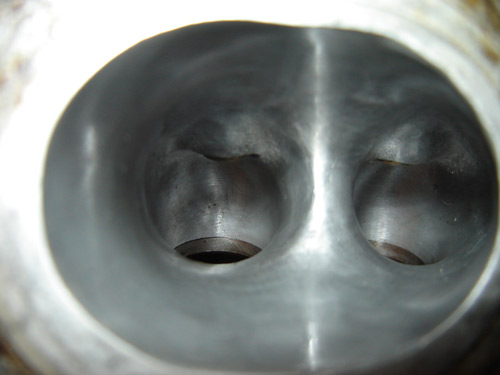
After drying and oiling the head I took my first shot at port shaping.
by GhostAccord, on Flickr
I removed the casting cracks, widened the injector run, deepened the bowl (adding a bit of length to the long wall), shortened & narrowed the separation wall and blended the step from the bowl into the throat. mindful not to remove too much material out of the throat.
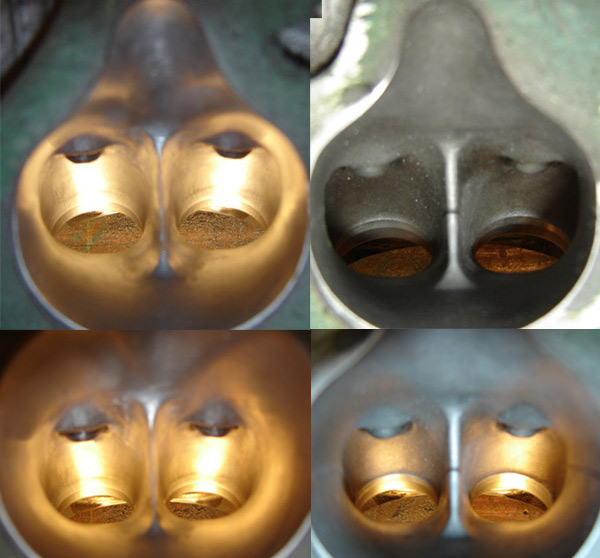
Stock combustion chamber.

by GhostAccord, on Flickr
It has taken me approx. 40hrs to get to this point.
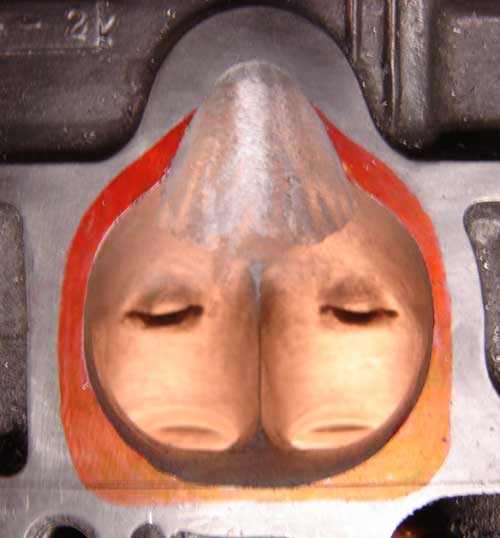
Valves De-Shrouded (is that even a word... )
)
by GhostAccord, on Flickr
The most this added to my combustion chamber was 1.6cc's for a grand total of 51.6cc's. I think the fact that I'm going with a larger cylinder bore vs the stock 85mm, that extra 1.6cc's shouldn't relay do much to effect my overall compression...lol
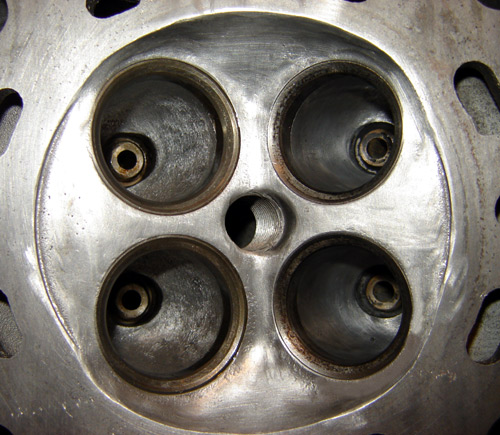
Here are the measurements for all 4 cylinders.
#1 = 51.4cc #2 = 51.6cc #3 = 51.5cc #4 = 51.5cc
Should I even them all out or is a tolerance of +/- 0.1cc close enough?
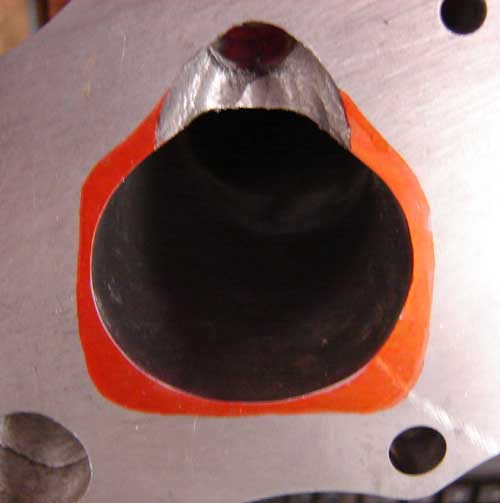
Intake Port

by GhostAccord, on Flickr
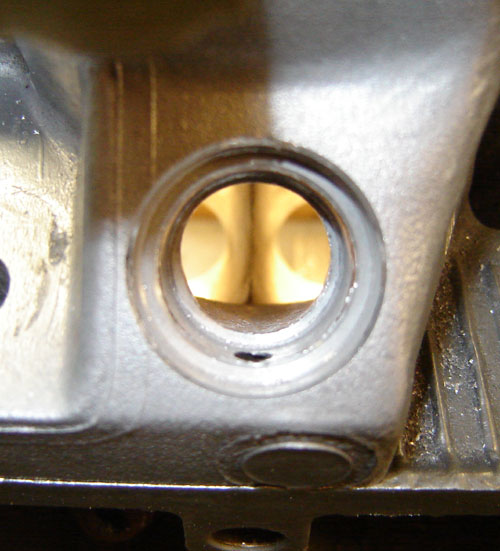
Exhaust Port
by GhostAccord, on Flickr
Feb 09 Update
Head porting stage 2

by GhostAccord, on Flickr
I thought that it looked pretty clean for a 12 year old engine with 200k. Probably due to having regular oil changes!
by GhostAccord, on Flickr
That dark oil on the sides wiped right off with a dry rag, first swipe 8)
Took the springs and valves out
by GhostAccord, on Flickr
to give it a good Hot bath.....
After drying and oiling the head I took my first shot at port shaping.
by GhostAccord, on Flickr
I removed the casting cracks, widened the injector run, deepened the bowl (adding a bit of length to the long wall), shortened & narrowed the separation wall and blended the step from the bowl into the throat. mindful not to remove too much material out of the throat.
Stock combustion chamber.
by GhostAccord, on Flickr
It has taken me approx. 40hrs to get to this point.
Valves De-Shrouded (is that even a word...
)by GhostAccord, on Flickr
The most this added to my combustion chamber was 1.6cc's for a grand total of 51.6cc's. I think the fact that I'm going with a larger cylinder bore vs the stock 85mm, that extra 1.6cc's shouldn't relay do much to effect my overall compression...lol
Here are the measurements for all 4 cylinders.
#1 = 51.4cc #2 = 51.6cc #3 = 51.5cc #4 = 51.5cc
Should I even them all out or is a tolerance of +/- 0.1cc close enough?
Intake Port
by GhostAccord, on Flickr
Exhaust Port
by GhostAccord, on Flickr
Feb 09 Update
Head porting stage 2
by GhostAccord, on Flickr
Last edited by GhostAccord; 03-11-2018 at 11:14 AM. Reason: Update Stage 2 Head Porting
04-06-2008, 05:47 AM
#58
Honda-Tech Member
Thread Starter
Thanks, I have long way to go on this girl. One baby step at a time. I didn't figure showing my bay progress was as cool as my engine progress 
I did give it a little go just too see what cleaners work best at getting rid of the sheep wool wax. When they say lifetime there not joking. This stuff is hard to get rid of but I did manage to find something that works fairly well.

by GhostAccord, on Flickr
I tried to sand it but it gums up the sanding disks in a matter of seconds. Then it just smears around everywhere....
Well it's out and my engine stand awaits.
by GhostAccord, on Flickr
Now that I have the complete front end striped it's cleaning time.
Wheel well looking for a good cleaning and coat of paint.
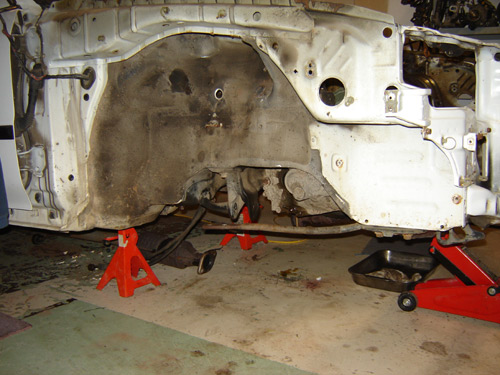
by GhostAccord, on Flickr
And the bay. All full of dirty wax. Easy off oven cleaner is the only thing I found that actually takes this stuff off with very little effort on my part. 8)

by GhostAccord, on Flickr
......More updates after the weekend
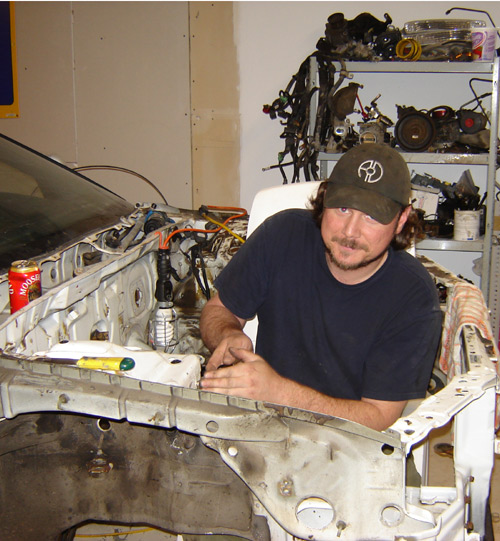
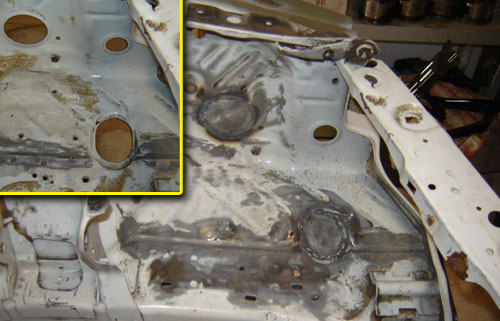
Weekend Update, I think this might be a step closer to Sat.
Getting down and dirty in the engine bay.
by GhostAccord, on Flickr
Here's how I left it at the end of the day today.

by
GhostAccord, on Flickr
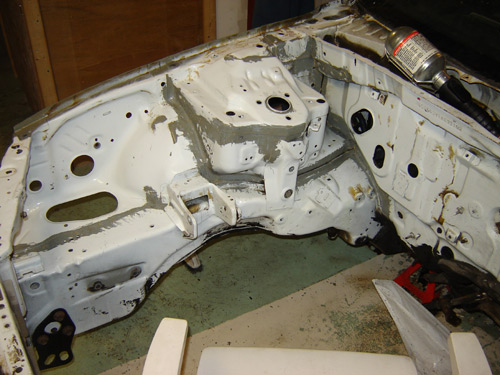
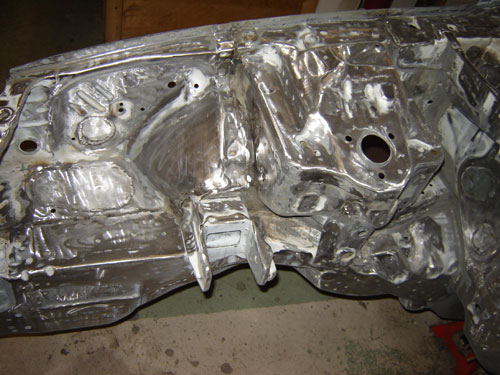
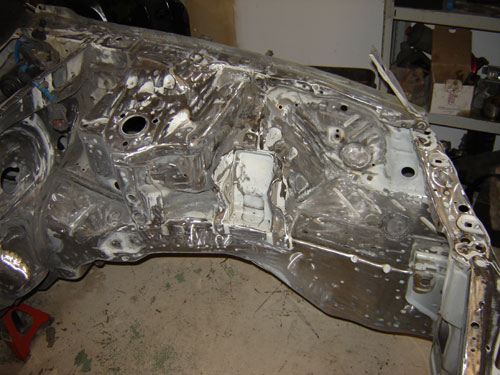
Next thing to do in there is to mig in all the small holes and patch the bigger ones in the fire wall/bulkhead. Including the AC & Heater Hose holes and even the Main wire harness hole. My wires are going to be sneaking there way back into this bay some other way.
Update Oct 08
Here is were I get to spend some quality time with my welding machine pluging a few gaping holes in my engine bay.
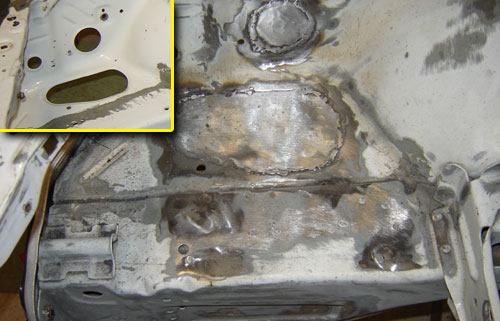
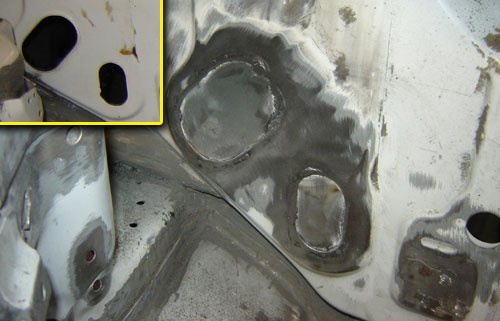

by GhostAccord, on Flickr
Update Nov 08
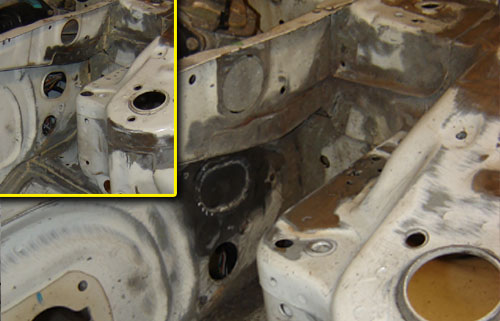
Weekend Update!
All this.............................

by GhostAccord, on Flickr
..........................and still not an oz of bondo has touched the car ....Man will the welding and grinding ever end..... When I stop to think about it. The worst thing is after all this prep work and grinding it just gets covered up...
Few more hours of sheet metal prep and hopefully it will be time for bondo and a lot of hand sanding
Cheers
I did give it a little go just too see what cleaners work best at getting rid of the sheep wool wax. When they say lifetime there not joking. This stuff is hard to get rid of but I did manage to find something that works fairly well.
by GhostAccord, on Flickr
I tried to sand it but it gums up the sanding disks in a matter of seconds. Then it just smears around everywhere....
Well it's out and my engine stand awaits.
by GhostAccord, on Flickr
Now that I have the complete front end striped it's cleaning time.
Wheel well looking for a good cleaning and coat of paint.
by GhostAccord, on Flickr
And the bay. All full of dirty wax. Easy off oven cleaner is the only thing I found that actually takes this stuff off with very little effort on my part. 8)
by GhostAccord, on Flickr
......More updates after the weekend
Originally Posted by RedneckDave
You should clean that engine bay as well. That is un sat.
Getting down and dirty in the engine bay.
by GhostAccord, on Flickr
Here's how I left it at the end of the day today.
by
GhostAccord, on Flickr
Next thing to do in there is to mig in all the small holes and patch the bigger ones in the fire wall/bulkhead. Including the AC & Heater Hose holes and even the Main wire harness hole. My wires are going to be sneaking there way back into this bay some other way.
Update Oct 08
Here is were I get to spend some quality time with my welding machine pluging a few gaping holes in my engine bay.
by GhostAccord, on Flickr
Update Nov 08
Weekend Update!
All this.............................
by GhostAccord, on Flickr
..........................and still not an oz of bondo has touched the car ....Man will the welding and grinding ever end..... When I stop to think about it. The worst thing is after all this prep work and grinding it just gets covered up...
Few more hours of sheet metal prep and hopefully it will be time for bondo and a lot of hand sanding
Cheers
Last edited by GhostAccord; 03-11-2018 at 11:54 AM.
04-13-2008, 03:02 PM
#60
Working
<TABLE WIDTH="90%" CELLSPACING=0 CELLPADDING=0 ALIGN=CENTER><TR><TD>Quote, originally posted by GhostAccord »</TD></TR><TR><TD CLASS="quote">
Weekend Update, I think this might be a step closer to Sat.
Getting down and dirty in the engine bay.
Another weekend of cleaning and it should be ready for sanding and body fill.</TD></TR></TABLE>
Looks much better. Are you doing a full shave and tuck on the bay as well?
Weekend Update, I think this might be a step closer to Sat.
Getting down and dirty in the engine bay.
Another weekend of cleaning and it should be ready for sanding and body fill.</TD></TR></TABLE>
Looks much better. Are you doing a full shave and tuck on the bay as well?
04-13-2008, 04:21 PM
#61
Honda-Tech Member
Thread Starter
<TABLE WIDTH="90%" CELLSPACING=0 CELLPADDING=0 ALIGN=CENTER><TR><TD>Quote, originally posted by oem_certified_accord »</TD></TR><TR><TD CLASS="quote">ghost is gettin it done, i thought you were runnin an f22b1 though?</TD></TR></TABLE>
Nope, sticking with the B2
<TABLE WIDTH="90%" CELLSPACING=0 CELLPADDING=0 ALIGN=CENTER><TR><TD>Quote, originally posted by -RedneckDave- »</TD></TR><TR><TD CLASS="quote">
Looks much better. Are you doing a full shave and tuck on the bay as well?</TD></TR></TABLE>
Going to try, this is my first attempt at it so It may be a lengthy process.
04-15-2008, 02:16 PM
#63
Honda-Tech Member
Thread Starter
Thanks TA, Took me a bit longer than I anticipated to get her into the garage. It's still not 100% but it's got three walls a door and a ceiling. Things are coming along quickly now though.
Here is the start of the Wire tuck Project

Now I get to sit in my office and figure out what wires and electrical devices I can delete. No more AC or Cruise so no need for either of those modules.
Ah what a lovely mess......
The wires along the top of the pic are those of the engine bay

And the dash harness in it's entirety.

And the start of my OBD2 vehicle to OBD1 ECU full harness. No turning back now...

I wasted so much time making a conversion harness last spring. Only to have it sitting on the cutting room floor now....lol
Update Dec 08
Update,
Just in time for the holidays. I finally got my obd2 to OBD1 wiring finished. Next step for this part of the project is mounting the ECU and sneaking the wires into the engine bay.


Cheers
Here is the start of the Wire tuck Project
Now I get to sit in my office and figure out what wires and electrical devices I can delete. No more AC or Cruise so no need for either of those modules.
Ah what a lovely mess......
The wires along the top of the pic are those of the engine bay
And the dash harness in it's entirety.
And the start of my OBD2 vehicle to OBD1 ECU full harness. No turning back now...
I wasted so much time making a conversion harness last spring. Only to have it sitting on the cutting room floor now....lol
Update Dec 08
Update,
Just in time for the holidays. I finally got my obd2 to OBD1 wiring finished. Next step for this part of the project is mounting the ECU and sneaking the wires into the engine bay.
Cheers
Last edited by GhostAccord; 05-25-2010 at 05:39 AM.
04-15-2008, 09:26 PM
#64
moderator emeritus

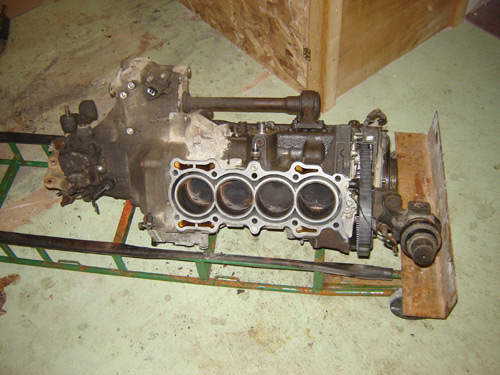
just wondering mark, why did you decide to weld the throttles to the runners?
I had that done with my set and other than the runner angle being completely screwed, the welding warped #3 and #4 throttles and completely killed my ability to synch the plates.
sorry i havent read this whole thread and i dont know if that has been questioned.
good luck. Hopefully you have better luck than i did.
04-16-2008, 02:00 AM
#65
Honda-Tech Member
Thread Starter
I decided to weld them because I didn't want to bother with having to deal with the ugly 1/4 inch down and up steps that you would have inside the runner when using a piece of rubber/silicon tube. That and I despise hose clamps.  I knew that I had a very talented aluminum tig welder here in town that likes a technical challenge. I figured out the length that I needed the runners for my engine setup, fabricated them, and had them welded that way. I had them measured before and after they went into the weld shop. They are well within spec's. No problem with warping or the throttle plate bore going out of round. The plates snap closed & seal just as good as the day they came off the assembly line. Hopefully once I have them on the engine and all hooked up they will stay the same
I knew that I had a very talented aluminum tig welder here in town that likes a technical challenge. I figured out the length that I needed the runners for my engine setup, fabricated them, and had them welded that way. I had them measured before and after they went into the weld shop. They are well within spec's. No problem with warping or the throttle plate bore going out of round. The plates snap closed & seal just as good as the day they came off the assembly line. Hopefully once I have them on the engine and all hooked up they will stay the same
04-24-2008, 09:07 AM
#66
Honda-Tech Member
Thread Starter
Well I figured while I wait for some much needed tools and parts that I would get a start on my interior mods.
I picked up a set of USDM ITR front seats for a steel and figured that I would give them a shot in the old girl.
Front seat frame only test fitting.

After a quick tack of the ITR brackets onto the Accord rails and putting the foam back on.

This part was actually easier than I figured it would be. A cut here, weld there, Accord bracket moved here and a few ITR brackets welded there. I took pictures along the way so a Step by Step DIY ITR seat swap could be possible. After I get the passenger side seats swapped I'll post it up.
I'm not going to bother with Racing seats and harness just yet. For now the car is just going to be a fair weather Daily Driver......Until we get a track or two around these parts......then all it will be is to unbolt these and drop in some JDM ITR Recaros
Update Nov 08
Here are a few fab pics.....
Started off with completely clean Accord rails, cut everything off them except for the seatbelt bracket on the inside rails. I made sure not to ruin the Accord front inside mount when I cut it off. I knew that I would need it to mount the ITR seat.

I also drilled the spot welds off the mounting brackets from the ITR rails. This allowed me to weld them to the Accord rails.

The ITR seats have the inside rail mounting bolts coming from the bottom of the seat. This presented a problem in conjunction with the Accord rails. Therefore I had to move the mounts from the bottoms of the seats to the sides.


After moving the mounting brackets on the sides of the seat. I was able to bolt the rail brackets to the seat and tack them into place on the rail.
Here is where the original front mount from the Accord rail comes into play.


I then removed the seat bolts in order to finish the welds. Viola one ITR seat pan in a CD5.

and the finished product....

Update Jan 09
Both seats installed


Cheers
I picked up a set of USDM ITR front seats for a steel and figured that I would give them a shot in the old girl.
Front seat frame only test fitting.
After a quick tack of the ITR brackets onto the Accord rails and putting the foam back on.
This part was actually easier than I figured it would be. A cut here, weld there, Accord bracket moved here and a few ITR brackets welded there. I took pictures along the way so a Step by Step DIY ITR seat swap could be possible. After I get the passenger side seats swapped I'll post it up.
I'm not going to bother with Racing seats and harness just yet. For now the car is just going to be a fair weather Daily Driver......Until we get a track or two around these parts......then all it will be is to unbolt these and drop in some JDM ITR Recaros
Update Nov 08
Here are a few fab pics.....
Started off with completely clean Accord rails, cut everything off them except for the seatbelt bracket on the inside rails. I made sure not to ruin the Accord front inside mount when I cut it off. I knew that I would need it to mount the ITR seat.
I also drilled the spot welds off the mounting brackets from the ITR rails. This allowed me to weld them to the Accord rails.
The ITR seats have the inside rail mounting bolts coming from the bottom of the seat. This presented a problem in conjunction with the Accord rails. Therefore I had to move the mounts from the bottoms of the seats to the sides.
After moving the mounting brackets on the sides of the seat. I was able to bolt the rail brackets to the seat and tack them into place on the rail.
Here is where the original front mount from the Accord rail comes into play.
I then removed the seat bolts in order to finish the welds. Viola one ITR seat pan in a CD5.
and the finished product....
Update Jan 09
Both seats installed
Cheers
Last edited by GhostAccord; 05-25-2010 at 05:40 AM.
04-24-2008, 10:46 AM
#67
Member
Join Date: Apr 2007
Location: Driving Slow, Through Your City
Posts: 1,260
Likes: 0
Received 0 Likes
on
0 Posts
thank you, i have been talking about picking up a ITR red recaro for my drivers side, so please do post it up when you're done. and a for progress.
for progress.
05-04-2008, 07:35 AM
#69
Honda-Tech Member
Thread Starter
Here are the 4 burs that I used.

From left to right,
1. SD-1L6
2. SF-3L6
3. SC-3L6
4. SC-5L6
All of them are double cut.
From left to right,
1. SD-1L6
2. SF-3L6
3. SC-3L6
4. SC-5L6
All of them are double cut.
05-11-2008, 09:37 AM
#71
Honda-Tech Member
Thread Starter
Yeah that's what I thought...maybe I'll go scratch it with my fingernail...lol
Last edited by GhostAccord; 02-05-2009 at 01:19 PM.
05-26-2008, 07:38 PM
#72
Honda-Tech Member
Join Date: Aug 2005
Location: Pompano Beach, FL, USA
Posts: 3,495
Likes: 0
Received 5 Likes
on
4 Posts
it had been a few weeks since last time i checked to see how this thread was going.Danm, look at you putting a lot of work into your car. About that engine bay man... woooooooooow.... it took me a lot of hours to take the "sealer" from those little corners and all.
It's really nice to see people doing this kind of work on their cars, you're taking this car from "ordinary cd5" to unique and customized ACCORD. Like i said before, i'm proud of you! Keep up the good work!
05-26-2008, 08:14 PM
#73
Honda-Tech Member
Thread Starter
Thanks gain, I appreciate that. I can only hope that my car ends up looking as nice as yours. I love cars and everything about them fascinates me. The more of me that I can put into this the more it's worth to me. I'd rather build it than buy it.
When I used to turn wrenches for a living I had a 78 Camaro that I was working on....well I rebuilt the engine twice and never did actually finish the body. I've been away from wenching for a few years now. I decided to put 100% of my hobby time into a wrenching project...and this is it. A Canadian 1996 Accord EX, 4 door, Non VTEC, 2.2L I4. I could have chosen something with 2 doors and a wee bit sportier. But there was something about the way it looked that I liked right from the start.

Look at that smile!...lol
Thanks again and Cheers
Updates on my suspension to come soon!
I think the parts should be baking right about now.
When I used to turn wrenches for a living I had a 78 Camaro that I was working on....well I rebuilt the engine twice and never did actually finish the body. I've been away from wenching for a few years now. I decided to put 100% of my hobby time into a wrenching project...and this is it. A Canadian 1996 Accord EX, 4 door, Non VTEC, 2.2L I4. I could have chosen something with 2 doors and a wee bit sportier. But there was something about the way it looked that I liked right from the start.
Look at that smile!...lol
Thanks again and Cheers
Updates on my suspension to come soon!
I think the parts should be baking right about now.
