
del Sol thread v 2.0!
 05-30-2009, 03:24 PM

If you saw them in person, you might change your mind.
 05-30-2009, 03:25 PM
http://inlinefour.com/mugmtentreat.html
05-30-2009, 03:44 PM
Honda-Tech Member
Join Date: Jul 2004
Location: Carlisle, PA, united states
Posts: 1,557
Likes: 0
Received 0 Likes
on
0 Posts
05-30-2009, 08:26 PM
HT White Ops
iTrader: (1)

Join Date: Mar 2006
Location: I see what you did there.
Posts: 16,222
Likes: 0
Received 3 Likes
on
3 Posts
Surprisingly, these are great floor mats. They're just as good as OEM, minus the rarity. The rubber on the bottom of the mat is great quality. The stitching and trim around the edges is very clean. They fit great, and they look just like OEM (besides the designs of the print on the mats). In fact, before Honda got onto the company about it, they used to put the "del Sol" logo embroidered on the floor mats and they looked GREAT.
If you saw them in person, you might change your mind.
If you saw them in person, you might change your mind.
05-30-2009, 08:43 PM
Honda-Tech Member
 I am starting to have the change or mindset as well, I never really cared about where the parts came from but honestly you get what you pay for and you cant really beat OEM unless you fab something yourself.
05-30-2009, 08:53 PM
I am starting to have the change or mindset as well, I never really cared about where the parts came from but honestly you get what you pay for and you cant really beat OEM unless you fab something yourself.
05-30-2009, 08:53 PM
Let's see...
$48 for really nice replicas... $100+ for mint real del Sol floormats

I'd understand if you were talking about generic eBay stuff... but there's good knockoffs and then there are bad knockoffs. These are good knockoffs. Same thing as buying aftermarket parts. Spend the dough and buy from a nice company, and you can expect good quality. Buy from a cheap company, expect sub-par quality parts.
05-30-2009, 08:54 PM
HT White Ops
iTrader: (1)
Join Date: Mar 2006
Location: I see what you did there.
Posts: 16,222
Likes: 0
Received 3 Likes
on
3 Posts
It really hit me all of the sudden one day with my hatch. I looked at it and was SEVERELY not happy. I was tired of having fake **** that looked just a little off and functioned just a little off.
05-30-2009, 08:55 PM
HT White Ops
iTrader: (1)
Join Date: Mar 2006
Location: I see what you did there.
Posts: 16,222
Likes: 0
Received 3 Likes
on
3 Posts
If you don't get it, that's fine. Nobody is forcing you to pay for real deal parts if you're happy with how the knockoffs / replicas function or look.
Some of us just care, and that's our prerogative.
05-30-2009, 08:57 PM
It's not that you like what you like, it's that you put down anything that's not OEM. I will agree to disagree, but it really feels like an insult as an owner of the part because of how inferior you are acting like the part is.
There are good aftermarket parts and there are bad aftermarket parts. You fail to realize that.
I almost always spend the extra dough and buy nice parts. I took a gamble on these floormats and they turned out to be just as good as OEM... if they weren't, then I would have bought OEM floormats shortly afterwards.
I am considering buying the OEM ones though, just because I like the logo being on the floormats.
Do you know where I can find blue zig zags or other del Sol floormats? What are all the styles available?
05-30-2009, 09:13 PM
HT White Ops
iTrader: (1)
Join Date: Mar 2006
Location: I see what you did there.
Posts: 16,222
Likes: 0
Received 3 Likes
on
3 Posts

You're confusing aftermarket and replica.
I have no problem with AFTERMARKET parts. I have qualms with REPLICA parts.
My Mugen lip, grille, and wing on my hatch were AFTERMARKET. They were fantastic quality.
My Nardi woodgrain setup was AFTERMARKET.
My suspension setup on my del Sol is, by and large, AFTERMARKET. They are also high quality.
My wheels are AFTERMARKET.
My speakers are AFTERMARKET.
My headlight bulbs and quartz diffusers are AFTERMARKET.
These floormats you keep going on about are REPLICAS.
Aftermarket parts are products that didn't exist from the factory. Replica parts are copies of OEM or Aftermarket parts that do not have the RnD and time put into them to make them up to par with the original item.
05-30-2009, 09:26 PM
Honda-Tech Member
Are these the DS tuning floormats? if so then yes I would rock them on the daily but save my zig zags for show and stuff so the dont get messed up. 
05-30-2009, 09:32 PM
Honda-Tech Member
Join Date: Feb 2008
Location: San Diego, CA, USA
Posts: 592
Likes: 0
Received 0 Likes
on
0 Posts
It's a $66 oil additive. IMO it's just too expensive to even try it.
http://inlinefour.com/mugmtentreat.html

http://inlinefour.com/mugmtentreat.html
05-30-2009, 09:45 PM
Oh do I now?
You're confusing aftermarket and replica.
I have no problem with AFTERMARKET parts. I have qualms with REPLICA parts.
My Mugen lip, grille, and wing on my hatch were AFTERMARKET. They were fantastic quality.
My Nardi woodgrain setup was AFTERMARKET.
My suspension setup on my del Sol is, by and large, AFTERMARKET. They are also high quality.
My wheels are AFTERMARKET.
My speakers are AFTERMARKET.
My headlight bulbs and quartz diffusers are AFTERMARKET.
These floormats you keep going on about are REPLICAS.
Aftermarket parts are products that didn't exist from the factory. Replica parts are copies of OEM or Aftermarket parts that do not have the RnD and time put into them to make them up to par with the original item.
But like I said, i'm considering getting zig zags or something else because I like the del Sol logo... what OEM mats are there to choose from? Zig-zags and rainbow-logo, but what else is there, or is that all? Anyone know where I can find them?
05-30-2009, 09:54 PM
05-30-2009, 09:56 PM
There aren't USDM zig-zags?
JDM mats are out of the question due to them being for RHD.
EDM are LHD, right?
I saw a del sol at my local junkyard with blue zig zags (I think) but they were trashed.
JDM mats are out of the question due to them being for RHD.
EDM are LHD, right?
I saw a del sol at my local junkyard with blue zig zags (I think) but they were trashed.
05-30-2009, 10:27 PM
HT White Ops
iTrader: (1)
Join Date: Mar 2006
Location: I see what you did there.
Posts: 16,222
Likes: 0
Received 3 Likes
on
3 Posts
ATTENTION: WINK MIRROR USERS
I have solved the vibration issue utilizing the factory mounting points! I did this with JDM/EDM/GDM visors, but I'm sure with a longer length of plumber's tape, you could do this with the USDM visors.
Materials:
Wink Rally 5-Panel Mirror
One Wink window mounting kit
Plumber's Tape (Approx 3-4" to be safe)
Rubber Mallet / Plastic Mallet
Philip's Head Screwdriver
THIN philip's head OR flat head screwdriver
Drill + Bits
Thread Tap
T25 Torx Screwdriver
15mm box or adjustable box wrench
Tin Snips / Lever-Action Dikes
10mm Socket Wrench
Process:
1. Making the L-Brackets.
Using your tin snips / dikes, cut about an inch of plumber's tape -- about 4 perforations, and then cut halfway through the fifth and sixth perforations.
It'd look like this:
_________
) O O O O (
-------------
Using your snips, round the edges close to the outside perforations. The part that will be bolting to the roof should get MUCH closer to the perforation that the bolt will go through to give as much clearance as possible.
It'd look like this:
_______
( O O O O)
----------
Bend the new bracket into an L-shape and slip it over the outside hole on the visor mounting plate. Bolt them back into the roof. Then using the hardware for the original Wink L-brackets, bolt the adjuster arms to the new L-brackets using the lock washer and a 10mm socket wrench. Position them so they are resting at about a 45-degree angle towards the front of the car, resting against the A-Pillar garnish.
Should look like this:


2. Removing the stock mirror.
Follow the instructions in the service manual for removing the mirror. As far as I know, this fix we're doing only works for the "USA-Produced" mirrors.
Stick your little philips or flathead into the slot, and gently tap it up into the mount until you can slide the mirror off the metal shoe.
Thanks dSoc for the image!

3. Attaching the Wink Mount.
On the back of your wink mirror, there should be two metal threaded holes for where the two windshield mounts are supposed to attach. Measure the distance between the two, and make a mark in the middle. It should be right in the middle of the "Rally" logo, below the "AL". Find a drill bit (cobalt works the best/fastest) a tiny bit smaller than the threadstock on the Wink windshield mount.
Drill very slowly and gently through the back of the mirror. DO NOT DRILL INTO THE MIRROR. DUH. LOL! Find a thread tap approx. the same size as the threadstock on the mount. Spray it with WD-40 or Liquid Wrench or some sort of oil and tap the drilled plastic hole. The pitch of the tap doesn't matter, since it's plastic, and the threadstock is just going to rip it's own path. You just want some sort of threaded pattern for it to grab on to and start threading it.
Tighten the windshield mount to the mirror with a 15mm box wrench.
Wink mirror neck attached to Wink mirror:

4. Making it all come together.
With your L-brackets and adjuster arm in place in the car, and the windshield mount threaded into the Wink mirror, it's time to make it all work together!
Position the mirror in your car, and slide the windshield attachment onto the factory mounting shoe.
Wink mirror neck attached to stock mirror shoe:

Bend the passenger side mirror bracket out a little bit to get the adjuster bolt on the side of the Wink mirror through the bracket. Bend it back into place. Screw on the adjuster ****, but just finger tight.
Put the other adjuster bolt through the driver side of the Wink mirror and through the adjuster bracket. Screw on the adjuster ****, but just finger tight.
Pull the windshield attachment down as far as you can on the factory shoe (don't force it), and hold it in place while using a philip's head driver to tighten the screw. This will lock the mount into place.
Sit in your driver's seat how you would if you were driving comfortably. Adjust your mirror to the preferred angle. Tighten down the adjuster *****.
GO DRIVE AND ENJOY NOT FEELING LIKE YOU'RE GONNA PUKE WHEN YOU'RE ON THE FREEWAY!.
I have solved the vibration issue utilizing the factory mounting points! I did this with JDM/EDM/GDM visors, but I'm sure with a longer length of plumber's tape, you could do this with the USDM visors.
Materials:
Wink Rally 5-Panel Mirror
One Wink window mounting kit
Plumber's Tape (Approx 3-4" to be safe)
Rubber Mallet / Plastic Mallet
Philip's Head Screwdriver
THIN philip's head OR flat head screwdriver
Drill + Bits
Thread Tap
T25 Torx Screwdriver
15mm box or adjustable box wrench
Tin Snips / Lever-Action Dikes
10mm Socket Wrench
Process:
1. Making the L-Brackets.
Using your tin snips / dikes, cut about an inch of plumber's tape -- about 4 perforations, and then cut halfway through the fifth and sixth perforations.
It'd look like this:
_________
) O O O O (
-------------
Using your snips, round the edges close to the outside perforations. The part that will be bolting to the roof should get MUCH closer to the perforation that the bolt will go through to give as much clearance as possible.
It'd look like this:
_______
( O O O O)
----------
Bend the new bracket into an L-shape and slip it over the outside hole on the visor mounting plate. Bolt them back into the roof. Then using the hardware for the original Wink L-brackets, bolt the adjuster arms to the new L-brackets using the lock washer and a 10mm socket wrench. Position them so they are resting at about a 45-degree angle towards the front of the car, resting against the A-Pillar garnish.
Should look like this:
2. Removing the stock mirror.
Follow the instructions in the service manual for removing the mirror. As far as I know, this fix we're doing only works for the "USA-Produced" mirrors.
Stick your little philips or flathead into the slot, and gently tap it up into the mount until you can slide the mirror off the metal shoe.
Thanks dSoc for the image!
3. Attaching the Wink Mount.
On the back of your wink mirror, there should be two metal threaded holes for where the two windshield mounts are supposed to attach. Measure the distance between the two, and make a mark in the middle. It should be right in the middle of the "Rally" logo, below the "AL". Find a drill bit (cobalt works the best/fastest) a tiny bit smaller than the threadstock on the Wink windshield mount.
Drill very slowly and gently through the back of the mirror. DO NOT DRILL INTO THE MIRROR. DUH. LOL! Find a thread tap approx. the same size as the threadstock on the mount. Spray it with WD-40 or Liquid Wrench or some sort of oil and tap the drilled plastic hole. The pitch of the tap doesn't matter, since it's plastic, and the threadstock is just going to rip it's own path. You just want some sort of threaded pattern for it to grab on to and start threading it.
Tighten the windshield mount to the mirror with a 15mm box wrench.
Wink mirror neck attached to Wink mirror:
4. Making it all come together.
With your L-brackets and adjuster arm in place in the car, and the windshield mount threaded into the Wink mirror, it's time to make it all work together!
Position the mirror in your car, and slide the windshield attachment onto the factory mounting shoe.
Wink mirror neck attached to stock mirror shoe:
Bend the passenger side mirror bracket out a little bit to get the adjuster bolt on the side of the Wink mirror through the bracket. Bend it back into place. Screw on the adjuster ****, but just finger tight.
Put the other adjuster bolt through the driver side of the Wink mirror and through the adjuster bracket. Screw on the adjuster ****, but just finger tight.
Pull the windshield attachment down as far as you can on the factory shoe (don't force it), and hold it in place while using a philip's head driver to tighten the screw. This will lock the mount into place.
Sit in your driver's seat how you would if you were driving comfortably. Adjust your mirror to the preferred angle. Tighten down the adjuster *****.
GO DRIVE AND ENJOY NOT FEELING LIKE YOU'RE GONNA PUKE WHEN YOU'RE ON THE FREEWAY!.
Last edited by Eran; 05-31-2009 at 03:10 PM.
05-30-2009, 10:37 PM
HT White Ops
iTrader: (1)
Join Date: Mar 2006
Location: I see what you did there.
Posts: 16,222
Likes: 0
Received 3 Likes
on
3 Posts
Oh yah, I forgot about that. 93-94 only I believe, and they were an accessory. And they only had red, green, and blue in the USA. Silver was EDM only (sucks to be meeeee!)
Last edited by Eran; 05-30-2009 at 10:45 PM.
05-31-2009, 12:25 AM
Honda-Tech Member
Join Date: Jan 2009
Posts: 828
Likes: 0
Received 0 Likes
on
0 Posts


seen yu at that meet today by uw..
i dident no yu lived in washington bro
nice sol
05-31-2009, 12:34 AM
Honda-Tech Member
Join Date: Sep 2002
Location: Salt lake City, Utah, USA
Posts: 430
Likes: 0
Received 0 Likes
on
0 Posts
ATTENTION: WINK MIRROR USERS
I have solved the vibration issue utilizing the factory mounting points! I did this with JDM/EDM/GDM visors, but I'm sure with a longer length of plumber's tape, you could do this with the USDM visors.
Materials:
Wink Rally 5-Panel Mirror
One Wink window mounting kit
Plumber's Tape (Approx 3-4" to be safe)
Rubber Mallet / Plastic Mallet
Philip's Head Screwdriver
THIN philip's head OR flat head screwdriver
Drill + Bits
Thread Tap
T25 Torx Screwdriver
15mm box or adjustable box wrench
Tin Snips / Lever-Action Dikes
10mm Socket Wrench
Process:
1. Making the L-Brackets.
Using your tin snips / dikes, cut about an inch of plumber's tape -- about 4 perforations, and then cut halfway through the fifth and sixth perforations.
It'd look like this:
_________
) O O O O (
-------------
Using your snips, round the edges close to the outside perforations. The part that will be bolting to the roof should get MUCH closer to the perforation that the bolt will go through to give as much clearance as possible.
It'd look like this:
_______
( O O O O)
----------
Bend the new bracket into an L-shape and slip it over the outside hole on the visor mounting plate. Bolt them back into the roof. Then using the hardware for the original Wink L-brackets, bolt the adjuster arms to the new L-brackets using the lock washer and a 10mm socket wrench. Position them so they are resting at about a 45-degree angle towards the front of the car, resting against the A-Pillar garnish.
Should look like this:
2. Removing the stock mirror.
Follow the instructions in the service manual for removing the mirror. As far as I know, this fix we're doing only works for the "USA-Produced" mirrors.
Stick your little philips or flathead into the slot, and gently tap it up into the mount until you can slide the mirror off the metal shoe.
Thanks dSoc for the image!
3. Attaching the Wink Mount.
On the back of your wink mirror, there should be two metal threaded holes for where the two windshield mounts are supposed to attach. Measure the distance between the two, and make a mark in the middle. It should be right in the middle of the "Rally" logo, below the "AL". Find a drill bit (cobalt works the best/fastest) a tiny bit smaller than the threadstock on the Wink windshield mount.
Drill very slowly and gently through the back of the mirror. DO NOT DRILL INTO THE MIRROR. DUH. LOL! Find a thread tap approx. the same size as the threadstock on the mount. Spray it with WD-40 or Liquid Wrench or some sort of oil and tap the drilled plastic hole. The pitch of the tap doesn't matter, since it's plastic, and the threadstock is just going to rip it's own path. You just want some sort of threaded pattern for it to grab on to and start threading it.
Tighten the windshield mount to the mirror with a 15mm box wrench.
Wink mirror neck attached to Wink mirror:
4. Making it all come together.
With your L-brackets and adjuster arm in place in the car, and the windshield mount threaded into the Wink mirror, it's time to make it all work together!
Position the mirror in your, and slide the windshield attachment onto the factory mounting shoe.
Wink mirror neck attached to stock mirror shoe:
Bend the passenger side mirror bracket out a little bit to get the adjuster bolt on the side of the Wink mirror through the bracket. Bend it back into place. Screw on the adjuster ****, but just finger tight.
Put the other adjuster bolt through the driver side of the Wink mirror and through the adjuster bracket. Screw on the adjuster ****, but just finger tight.
Pull the windshield attachment down as far as you can on the factory shoe (don't force it), and hold it in place while using a philip's head driver to tighten the screw. This will lock the mount into place.
Sit in your driver's seat how you would if you were driving comfortably. Adjust your mirror to the preferred angle. Tighten down the adjuster *****.
GO DRIVE AND ENJOY NOT FEELING LIKE YOU'RE GONNA PUKE WHEN YOU'RE ON THE FREEWAY!.

glad you got it fixed though.
Last edited by B00M3R; 05-31-2009 at 12:44 AM.
05-31-2009, 05:59 AM
Honda-Tech Member
Join Date: Jul 2004
Location: Carlisle, PA, united states
Posts: 1,557
Likes: 0
Received 0 Likes
on
0 Posts
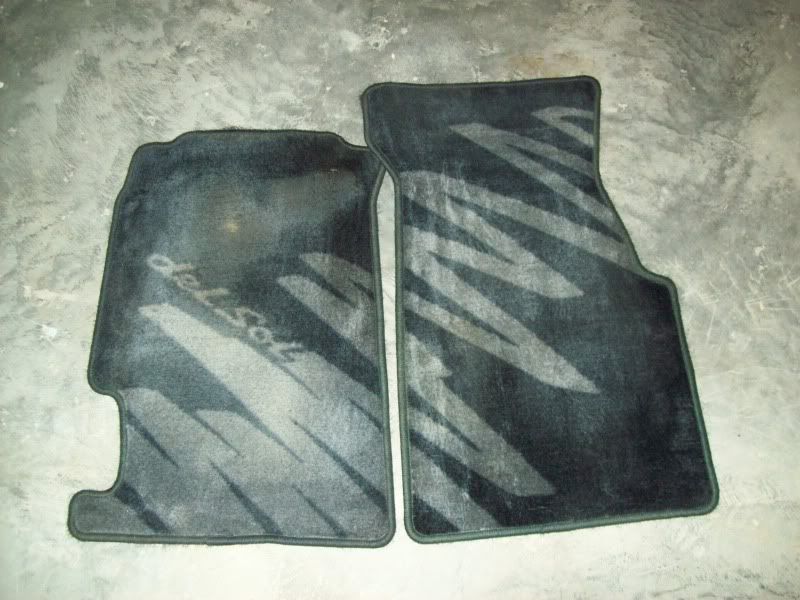
Here are my floor mats (not for sale by the way), but I wanted to know how rare these are. So you guys are saying they weren't an option in this color in the US? I got these off of ebay BNIB back when I first got my car like 8 years ago. I've had other mats over these after about the first year and they're near mint other than theres a small wear mark from where your foot rests for the gas pedal. Oh well back then I didn't know they were anything special.
05-31-2009, 06:29 AM
Honda-Tech Member
iTrader: (2)
Join Date: Aug 2007
Location: dSoc 69
Posts: 2,494
Likes: 0
Received 0 Likes
on
0 Posts
Yeah man, I hate my konis.
I'm on my 3rd set in 2 years ><
05-31-2009, 08:22 AM
Honda-Tech Member
the gray zig zags came in s models i believe.. def not edm only though.. i got a set from the junkyard for $2
05-31-2009, 09:00 AM
HT White Ops
iTrader: (1)
Join Date: Mar 2006
Location: I see what you did there.
Posts: 16,222
Likes: 0
Received 3 Likes
on
3 Posts
All the zigzags are with 08P15-SR2-1X0.
D = Green
3 = Blue
4 = Red
6 = Silver
But I swear I've seen the zigzags on ebay.co.uk before, and for sale on a dutch civic site.
05-31-2009, 09:01 AM
HT White Ops
iTrader: (1)
Join Date: Mar 2006
Location: I see what you did there.
Posts: 16,222
Likes: 0
Received 3 Likes
on
3 Posts
I hope you and I aren't the only people who have/want Wink mirrors. They're like the best $20 part ever.
Last edited by Eran; 05-31-2009 at 09:27 AM.