
Five years and counting: my low budget Integra build
 02-27-2014, 05:47 PM
#376
Honda-Tech Member
Thread Starter
There are no big updates with the car but it's hardly on pause.
The time had finally come where storing my car at Suja 1 wasn't possible so I've had to since find and rent out a storage facility where I can house the car, all my extra parts that were taking up space at Suja 1 and Tif's EF. I had no idea I'd accumulated so much extra **** working on Hondas through the decades. Since I live in Chicago and prices for storing a car are more than some mortgages I found a place in the suburbs with some like-minded friends. Then we had to get a lift. And extra tools. And all the things I was used to having at my disposal when dealing with a performance shop. I'm still not done stockpiling all the tools I'd like to have in a dream garage but it's a start. . . starting to get expensive!
All the while trying to move into a place before Chicago turned in the great frozen tundra I have had an order outstanding from overseas worth a little over three grand for some stuff that will certainly kick the re-build into high gear when it lands on our shores. I'm very excited to see that come in and I hope I made the right choice with my idiotic decision.
But the car is in its new permanent home, ready to go on jack stands again. New stuff should be coming in soon. Joel from Race-Spec has made some design changes to the harness and that's nearing completion. It's great to talk to him because he understands the concept behind the build and was willing to make some changes based upon what HE wants to see in the harness. I couldn't ask for a better collaborator.
With any luck my ship will come in (literally ha!) the middle of March. From there I promise swift and exciting updates. I didn't think anyone would be satisfied with cluttering pictures of new trinkets as they roll in so I will save the space and post meaningful work when it happens. I sure hope it happens soon!
 02-28-2014, 06:05 AM
#379
Honda-Tech Member
iTrader: (1)
Join Date: Aug 2001
Location: Funfax, VA, United States
Posts: 4,180
Likes: 0
Received 1 Like
on
1 Post
Can you expand on what Joel @RaceSpec is doing harness wise for you? I've been lusting after his harness' that he posts.
02-28-2014, 01:02 PM
#380
Honda-Tech Member
Join Date: Dec 2003
Location: Mill Creek, Washington, USA
Posts: 655
Likes: 0
Received 0 Likes
on
0 Posts
Hay Brandon will the brake lines I got from you years ago work with a JDM ITR brake conversion? Thanks a lot.
03-01-2014, 09:16 AM
#381
Honda-Tech Member
Thread Starter

Casey, good to see you're still around! The brake lines should work considering there isn't much difference with caliper spacing between standard disc brakes and ITR brakes. The lines usually have enough slack to make it a non-issue. What is this going on?
03-01-2014, 04:33 PM
#382
Honda-Tech Member
Join Date: Dec 2003
Location: Mill Creek, Washington, USA
Posts: 655
Likes: 0
Received 0 Likes
on
0 Posts
Thanks man you too. They will be going on my '99 hatch that I've had since 2002. I'm selling my Audi and using some of that money to do a K Swap and throw on the JDM Integra brakes I got a while back.
03-01-2014, 08:26 PM
#383
Honda-Tech Member
Join Date: Sep 2007
Location: Kansas City, Kansas
Posts: 1,488
Likes: 0
Received 0 Likes
on
0 Posts
My mind is blown from the details of your build.
Wish more guys like us were around that desire that attention to detail unlike some. Makes my friends crazy when I dislike something on my car even though they think its fine but to me its not haha.
Hope to see the build pick back up I'll be keeping an eye on this for sure!
Good luck on the future of the build
-Rob
03-19-2014, 08:12 AM
#384
I'm not Rick!
Join Date: Feb 2009
Location: under a prayer shawl
Posts: 6,940
Likes: 0
Received 4 Likes
on
4 Posts
wow amazing build man. mucho props
wish we could have seen what the alt/belt setup would have looked like finished(your first idea)
wish we could have seen what the alt/belt setup would have looked like finished(your first idea)
03-30-2014, 08:29 AM
#386
Honda-Tech Member
Thread Starter
Lol, Duckman. In for some updates on your car!
My ship has come in . . . figuratively speaking. This build has opened my eyes more than ever that there are some people you can count on and some you can’t. There are some great companies out there supporting the import community and some that don’t. I won’t use this as a pulpit to bash anyone but I’d like to throw out some gratitude and kind words to companies like Ktuned, PowerRevRacing and Race-Spec for making quality parts and giving quality service day in and day out.
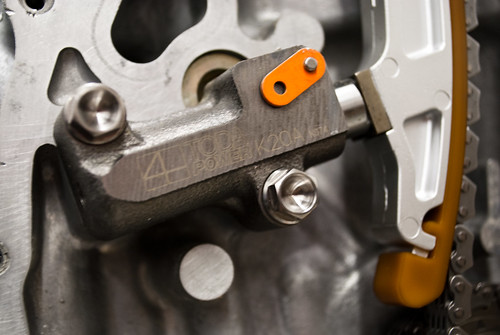
One of those pieces fresh in my mind is something so seemingly small and insignificant that it should have been approached with a “why even make this?” The small stuff is where differences are made. Ktuned had finally released a reuseable timing chain tensioner cover that didn’t require the use of Hondabond or some other liquid gasket to seal against the cover. Hallelujah! The downside? Even though it’s billet aluminum I found it unnecessarily heavy. So I gave it to TallKyle with some requests. Once I got it back I polished it up and threw it on the engine. It’s gorgeous and only half the weight of when it came out of the box. It’s been a while since I weighed it but I think it went from 4.5oz down to 2.3oz.
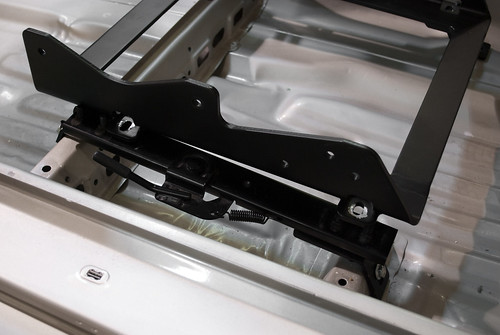
To prove to you guys that all builds – no matter how much pre-planning goes into them – never go without hiccups. The newest one for me was mating my Veilside seat brackets (bottom mount) to the Vision one-touch rails (side mount). I had the Veilside seats in my EK mounted on Feel’s rails so I didn’t think anything of it. Vision rails work with stock DC2/EK9 Recaros so and so do the Feel’s so it only makes sense that they’ll fit, right? Well, not if I buy the wrong style. So, the remedy is to cut off and grind the Veilside bottom mount tabs and have Kyle weld in larger plates that will go over the posts on the Vision sliders. Could I just get different sliders? Sure, but then what a I going to do with these? It’s actually easier (in my warped mind) to put in the work and modify the seat brackets than to deal with the hassle of selling and sourcing new sliders. Here’s a crappy picture to illustrate:
Since it’s been a while between updates I moved the Integra to a new home. Like moving into a new house you have to pack up all your accumulated stuff and really examine how much you have. I couldn’t believe it. I probably have enough spare parts and harnesses to build another car – and that’s after having enough spare parts to justify Tif’s build! Once this car is completed I’m going to throw out a decade’s worth of “just in case” parts.
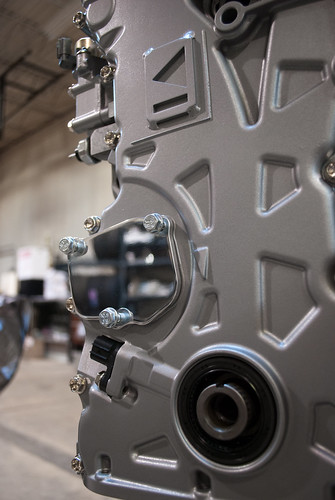
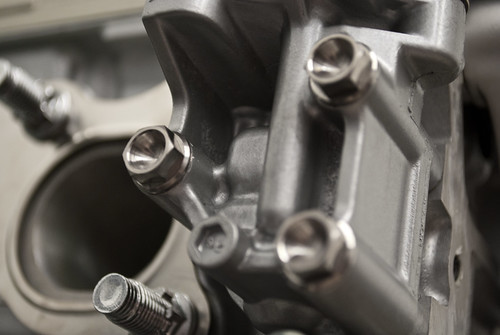
On to more exciting (not really) news: the powdercoater who was supposed to get the hardware tin-nickel plated for me flaked. Not only did he flake but he kept the hardware for weeks on end and dodged my phone calls. It took me going over to his place (an hour away from me) with the hopes he would actually be there. Thankfully he was. I got the entire stockpile back untouched. Needless to say I wasn’t very happy – not because he couldn’t (wouldn’t) do it but because he dodged me for so long and put me behind. So, my frustration got the best of me. I was sick of dealing with flakers. I was sick of relying on other people outside of those who I can trust. I was sick of certain aspects being out of my control. What did I do? I placed an order – an order for every single nut and bolt on the car – made out of titanium. I could never get to the weight savings titanium offers without switching materials. The drilling and obsessing netted me 20%-25% weight savings but titanium is already 60% lighter than steel. Couple that with the corrosion resistance and the fact I don’t have to have anything plated and it’s much easier on me. The cost difference wasn’t that bad considering how much it is to plate and how long the wait is if they actually get done. I can now work at my own pace with all the hardware I need.
Yesterday I changed out all the bolts on the engine and transmission and finally (I hope) won’t have to touch it again. It was fun going over everything one last time but damn, can I work on other areas of the car yet?
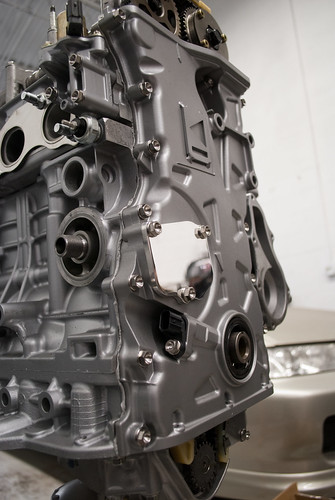
I also tackled some other areas while Tif was refinishing the half shaft and starter. I changed out the hardware on the door hinges, door checks and hood hinges and headlights. Everything else will be done as the car goes together. I figure once I have it on the lift to do the swap I’ll drop the front suspension anyway and change those out. The fuel tank, lines, and rest of the rear suspension and brakes will go in at that time. PB still has my harness so the interior cannot go together but that’s fine. I still have to order interior brake lines anyway. It’s been a bunch of slow methodical steps. Five years? Hopefully it’ll only take six.
My ship has come in . . . figuratively speaking. This build has opened my eyes more than ever that there are some people you can count on and some you can’t. There are some great companies out there supporting the import community and some that don’t. I won’t use this as a pulpit to bash anyone but I’d like to throw out some gratitude and kind words to companies like Ktuned, PowerRevRacing and Race-Spec for making quality parts and giving quality service day in and day out.
One of those pieces fresh in my mind is something so seemingly small and insignificant that it should have been approached with a “why even make this?” The small stuff is where differences are made. Ktuned had finally released a reuseable timing chain tensioner cover that didn’t require the use of Hondabond or some other liquid gasket to seal against the cover. Hallelujah! The downside? Even though it’s billet aluminum I found it unnecessarily heavy. So I gave it to TallKyle with some requests. Once I got it back I polished it up and threw it on the engine. It’s gorgeous and only half the weight of when it came out of the box. It’s been a while since I weighed it but I think it went from 4.5oz down to 2.3oz.
To prove to you guys that all builds – no matter how much pre-planning goes into them – never go without hiccups. The newest one for me was mating my Veilside seat brackets (bottom mount) to the Vision one-touch rails (side mount). I had the Veilside seats in my EK mounted on Feel’s rails so I didn’t think anything of it. Vision rails work with stock DC2/EK9 Recaros so and so do the Feel’s so it only makes sense that they’ll fit, right? Well, not if I buy the wrong style. So, the remedy is to cut off and grind the Veilside bottom mount tabs and have Kyle weld in larger plates that will go over the posts on the Vision sliders. Could I just get different sliders? Sure, but then what a I going to do with these? It’s actually easier (in my warped mind) to put in the work and modify the seat brackets than to deal with the hassle of selling and sourcing new sliders. Here’s a crappy picture to illustrate:
Since it’s been a while between updates I moved the Integra to a new home. Like moving into a new house you have to pack up all your accumulated stuff and really examine how much you have. I couldn’t believe it. I probably have enough spare parts and harnesses to build another car – and that’s after having enough spare parts to justify Tif’s build! Once this car is completed I’m going to throw out a decade’s worth of “just in case” parts.
On to more exciting (not really) news: the powdercoater who was supposed to get the hardware tin-nickel plated for me flaked. Not only did he flake but he kept the hardware for weeks on end and dodged my phone calls. It took me going over to his place (an hour away from me) with the hopes he would actually be there. Thankfully he was. I got the entire stockpile back untouched. Needless to say I wasn’t very happy – not because he couldn’t (wouldn’t) do it but because he dodged me for so long and put me behind. So, my frustration got the best of me. I was sick of dealing with flakers. I was sick of relying on other people outside of those who I can trust. I was sick of certain aspects being out of my control. What did I do? I placed an order – an order for every single nut and bolt on the car – made out of titanium. I could never get to the weight savings titanium offers without switching materials. The drilling and obsessing netted me 20%-25% weight savings but titanium is already 60% lighter than steel. Couple that with the corrosion resistance and the fact I don’t have to have anything plated and it’s much easier on me. The cost difference wasn’t that bad considering how much it is to plate and how long the wait is if they actually get done. I can now work at my own pace with all the hardware I need.
Yesterday I changed out all the bolts on the engine and transmission and finally (I hope) won’t have to touch it again. It was fun going over everything one last time but damn, can I work on other areas of the car yet?
I also tackled some other areas while Tif was refinishing the half shaft and starter. I changed out the hardware on the door hinges, door checks and hood hinges and headlights. Everything else will be done as the car goes together. I figure once I have it on the lift to do the swap I’ll drop the front suspension anyway and change those out. The fuel tank, lines, and rest of the rear suspension and brakes will go in at that time. PB still has my harness so the interior cannot go together but that’s fine. I still have to order interior brake lines anyway. It’s been a bunch of slow methodical steps. Five years? Hopefully it’ll only take six.
Last edited by phunhaus; 03-30-2014 at 10:15 AM.
03-30-2014, 10:06 AM
#387
Honda-Tech Member
iTrader: (11)

Join Date: Oct 2011
Location: NC
Posts: 1,494
Likes: 0
Received 0 Likes
on
0 Posts
Wow every single bolt... that's impressive. How did you go about compiling a list of everything needed and where did you order them from?
Also, I have ordered some supplies from Joel at Race-Spec before and his service is great. I can't wait to see the harness he is building for you.
Also, I have ordered some supplies from Joel at Race-Spec before and his service is great. I can't wait to see the harness he is building for you.
03-30-2014, 12:40 PM
#388
Sexy Cheese Cake
Join Date: Feb 2004
Location: Ill INoise, U.S. of A
Posts: 2,444
Likes: 0
Received 0 Likes
on
0 Posts
03-30-2014, 03:48 PM
#389
WOW Brandon what a build! OMG I so love this! Such attention to detail!!! I so wish I could do something like this with my RSX, but losing EjWone back in September, has kinda put me on a mission to enjoy this car and drive it as much as I can! I hope to meet you someday and shake your hand! Thank you for your help with EjWone and Thank you for taking the time to log your build on this car!
03-31-2014, 04:00 AM
#390
Honda-Tech Member
Join Date: May 2008
Location: Portrush, Antrim, Northern Ireland
Posts: 20
Likes: 0
Received 0 Likes
on
0 Posts
That's the one thing I hate about my builds, dealing with the as****es, whether it be services or the people you buy parts from. I do everything I can myself as then you don't have to rely on others.
I've looked into titanium bolts, they were very expensive, you must have spent a fortune.
I've looked into titanium bolts, they were very expensive, you must have spent a fortune.
04-01-2014, 10:06 PM
#392
Honda-Tech Member
Thread Starter
Wow every single bolt... that's impressive. How did you go about compiling a list of everything needed and where did you order them from?
Also, I have ordered some supplies from Joel at Race-Spec before and his service is great. I can't wait to see the harness he is building for you.
Also, I have ordered some supplies from Joel at Race-Spec before and his service is great. I can't wait to see the harness he is building for you.
For the bolts I went through the Honda catalogs for each donor car (engine, chassis, suspension, etc) and ordered what I needed. The list was pretty ridiculous by the time I was done.
WOW Brandon what a build! OMG I so love this! Such attention to detail!!! I so wish I could do something like this with my RSX, but losing EjWone back in September, has kinda put me on a mission to enjoy this car and drive it as much as I can! I hope to meet you someday and shake your hand! Thank you for your help with EjWone and Thank you for taking the time to log your build on this car!
That's the one thing I hate about my builds, dealing with the as****es, whether it be services or the people you buy parts from. I do everything I can myself as then you don't have to rely on others.
I've looked into titanium bolts, they were very expensive, you must have spent a fortune.
I've looked into titanium bolts, they were very expensive, you must have spent a fortune.
As for all those characters trying to do "business" I have a long and growing list of people to steer others away from. But for those actually doing business i'm happy to refer as much as I can their way.
Thanks, John. It's a little bit of research, a little bit of time, and a little saving. Anything can he done with patience and a plan!
Sorry the updates are coming as swiftly as I'd like. I'm in the process of moving yet again so free time is 100% non-existent.
04-02-2014, 02:38 PM
#393
something different
Join Date: Sep 2002
Location: grand rapids/chicago, usa
Posts: 6,995
Likes: 0
Received 1 Like
on
1 Post
I'd like to buy some TI bolts , just for fun, if you have any left.... I don't know why indont have your number..... But I don't . Lol
next time I see ya let me know if you have extras!
next time I see ya let me know if you have extras!
04-03-2014, 01:25 PM
#395
Honda-Tech Member
Join Date: Nov 2008
Posts: 744
Likes: 0
Received 0 Likes
on
0 Posts
looking good brandon. i know how you feel about counting on people and they dick around. im working on my current eg hatch build... ive waited 4 months to get my new welder ive been waiting on. couldnt get any body work done. So pissed. i get what i thought was everything finally, hook the gas tank up to the welder and find out he didnt give me a power wire that is needed from the trigger to the box. talk about pissed off.
those bolts not only ad function but really cleans that motor up.
glad to see you still updating this thread.
those bolts not only ad function but really cleans that motor up.
glad to see you still updating this thread.
 05-03-2014, 08:08 PM
#397
Honda-Tech Member
Thread Starter
looking good brandon. i know how you feel about counting on people and they dick around. im working on my current eg hatch build... ive waited 4 months to get my new welder ive been waiting on. couldnt get any body work done. So pissed. i get what i thought was everything finally, hook the gas tank up to the welder and find out he didnt give me a power wire that is needed from the trigger to the box. talk about pissed off.
those bolts not only ad function but really cleans that motor up.
glad to see you still updating this thread.
those bolts not only ad function but really cleans that motor up.
glad to see you still updating this thread.
Sucks to hear about the welder. Not only did you not get a tool but the job waiting on the tool has to be pushed back. That blows.
Thanks! Hopefully this next update will keep that going.
05-03-2014, 08:08 PM
#398
Honda-Tech Member
Thread Starter
I was able to spend a day and a half with the car and I feel accomplished. The half-day started last night as I met TallKyle at his work to “help” him. He works in a factory with all kinds of cool machinery – everything you could want aside from a CNC machine . . . which I don’t know how to program anyway. After sand blasting his wheels he jumped in to re-make the sway bar spacing brackets I’ve had in cobalt steel for some years. They were fine for their sure but unnecessarily heavy. Luckily a place like this has aluminum stock just “lying around.”
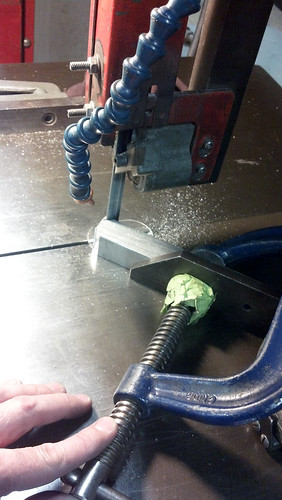
After the rough shape was cut we went over to the upright band saw.
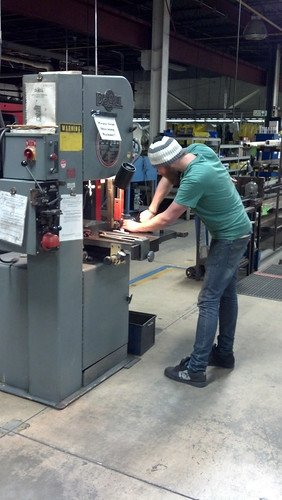
A slight notch needs to be cut out of each frontwards facing side to clear the DC2 subframe.
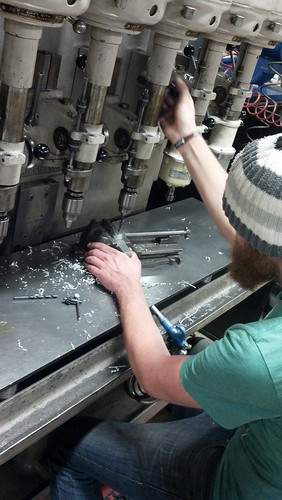
Then the holes were drilled on the coolest drill press I’d ever seen. You can tandem all five heads together or even use one to tap and reverse out of the threaded hole it created. It’s a cool old machine and overkill for what we were doing – drilling and chamfering two holes in each block.
The finished product is exactly what I’d already had but in aluminum. These blocks space the EK9 front sway bar lower on the DC2 subframe to a position more native to the EK. The subframes are shaped differently and thusly the sway bars are shaped differently. This “takes up” the space normally found on an EK front subframe.

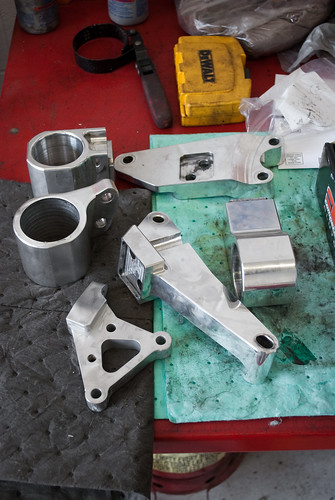
Earlier in the night I went across the shop floor to where the polishing stand was and lined up some items I wanted to freshen up. Those are the HASport mounts and the PowerRevRacing aluminum engine side bracket. I had Kyle mill the extra nub off it and then I sanded down the hard anodizing. Ugh. I know P2R made the bracket to OEM specs but why that useless nub? It’s nothing more than weight. No one has ever given me a good useful explanation for its existence. So that went away.
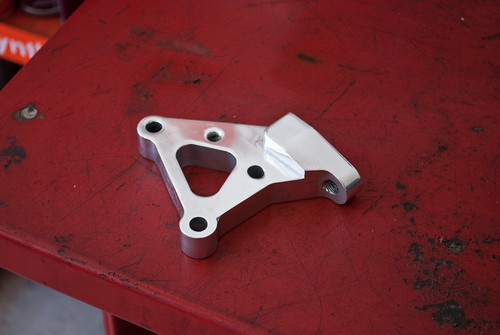
After a couple passes on the polisher I was left with a much more visually appealing piece. I won’t take any credit for the outcome. My prep work was rushed so I relied solely on the compound. It. Was. Amazing.
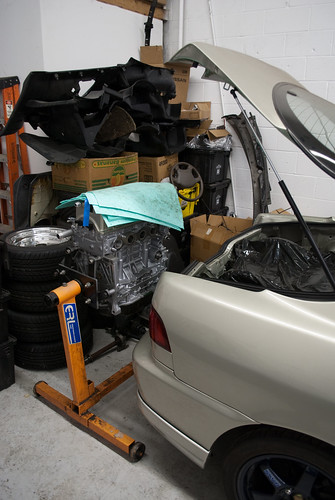
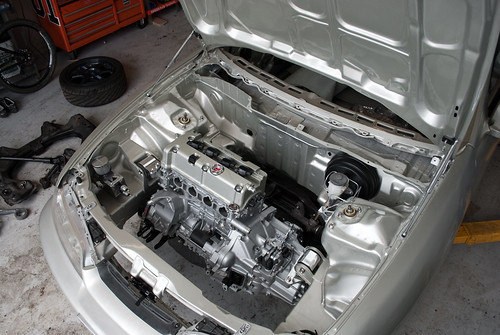
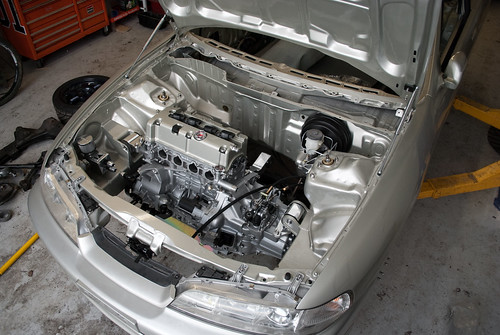
Come Saturday I had plans to work on the car all day and made it out to the garage around 11am. In the past couple weeks I installed a Competition Clutch Super Single and new throw out bearing. The transmission finally went back on the engine after being apart for some years. Yes, years.
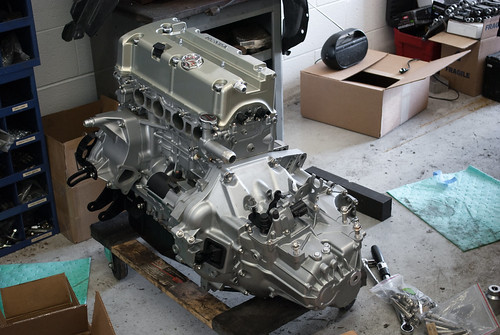
I rolled the car onto the lift and set the billet mounts into their homes. Kyle went to a car show representing Gridlife so I was running solo and expected a fight with the car. It seems like everything with the car has been fighting me recently.
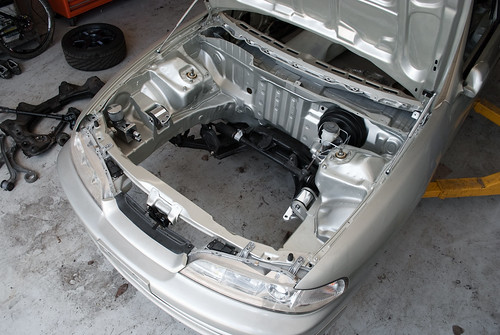
Lifting the car up gave me the room to roll the engine under the car.

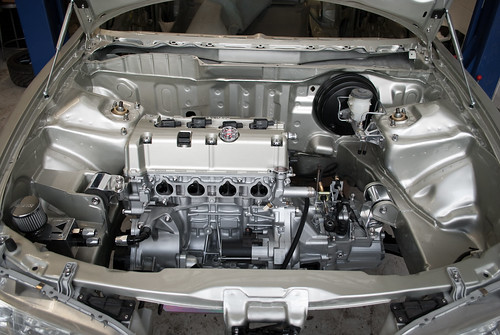
About twelve minutes later and the engine was bolted back in! I wasn’t certain that the engine would go in that easily given all the work done to the mounts but it really couldn’t have gone more smoothly. I was grateful for that because it was just me today.
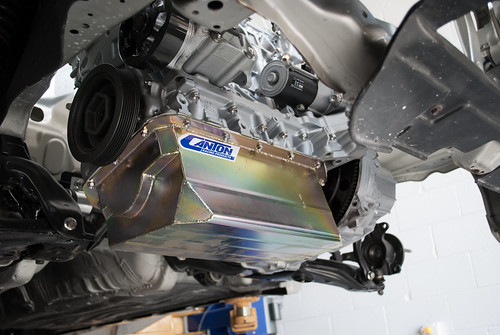
While the engine was out of the car I left the stamped steel pan on it. I knew it would be sitting on the dollie and getting a little roughed up while getting the clutch installed and I didn’t want that abuse to go to the Canton Racing pan.
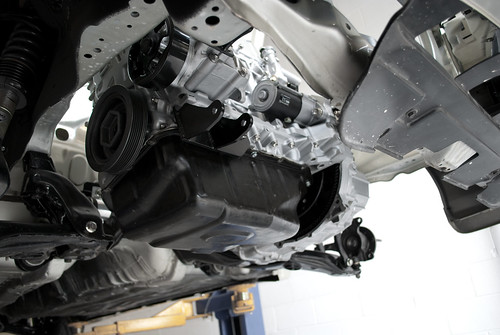
The beauty of the pan isn’t only that it fits around the S2000 oil pump but the four trap door baffles that keep the oil pooled around the sump. This is similar to the Moroso pan on my EK without the kick-out for capacity increase.
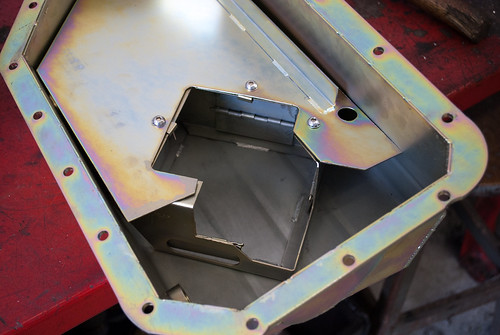
Sixteen titanium bolts and some Hondabond later and the Canton Racing pan was installed. The steel on the Canton Racing pan is considerably thicker than the factory stamped steel unit. This makes it much much heavier but I hope more durable as well.
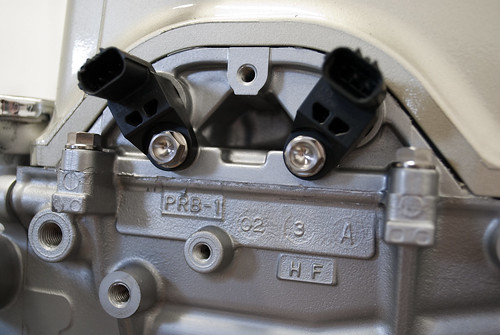
I moved on to the KTuned thermostat housing and removed the thermo element from it. I am not using the recirculation port from the factory housing so a thermo element would prove to be a block in the cooling system and, as we’ve seen in the past, create hot spots and lead to premature engine failure. Cutting the element out instead of removing the thermostat altogether means I will have some resistance hopefully allowing for engine warm-up but won’t be such a blockage.

I threw the KTuned thermostat housing and Hybrid Racing cables on the engine. I could only find one retaining clip and none of the cotter pins so they’re just kind of . . . on there.
One thing that didn’t go my way today was the catch-can. Jesse mounted the catch can as far forward as possible per my request but I completely forgot about the bulbs sticking out from the back. I made plans for the catch can sitting about an inch further forward from where it actually could fit. Thankfully Jesse doesn’t listen to me and figures this stuff out on his owm. I’m probably going to cut the PCV outlet down to bring the AN fitting closer to the engine and get it to line up with the catch can. It won’t take much and will definitely be possible.

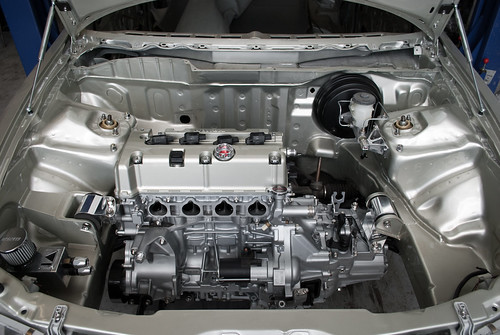
A parting shot for the day. Jesse is going to have the intake manifold back on the way to me shortly. Joel said the harness is almost wrapped up. It’s time to get the radiator in and start on some brackets and fan mounting. I’d be really happy to have that in and the lines made. It’s about damn time.
After the rough shape was cut we went over to the upright band saw.
A slight notch needs to be cut out of each frontwards facing side to clear the DC2 subframe.
Then the holes were drilled on the coolest drill press I’d ever seen. You can tandem all five heads together or even use one to tap and reverse out of the threaded hole it created. It’s a cool old machine and overkill for what we were doing – drilling and chamfering two holes in each block.
The finished product is exactly what I’d already had but in aluminum. These blocks space the EK9 front sway bar lower on the DC2 subframe to a position more native to the EK. The subframes are shaped differently and thusly the sway bars are shaped differently. This “takes up” the space normally found on an EK front subframe.
Earlier in the night I went across the shop floor to where the polishing stand was and lined up some items I wanted to freshen up. Those are the HASport mounts and the PowerRevRacing aluminum engine side bracket. I had Kyle mill the extra nub off it and then I sanded down the hard anodizing. Ugh. I know P2R made the bracket to OEM specs but why that useless nub? It’s nothing more than weight. No one has ever given me a good useful explanation for its existence. So that went away.
After a couple passes on the polisher I was left with a much more visually appealing piece. I won’t take any credit for the outcome. My prep work was rushed so I relied solely on the compound. It. Was. Amazing.
Come Saturday I had plans to work on the car all day and made it out to the garage around 11am. In the past couple weeks I installed a Competition Clutch Super Single and new throw out bearing. The transmission finally went back on the engine after being apart for some years. Yes, years.
I rolled the car onto the lift and set the billet mounts into their homes. Kyle went to a car show representing Gridlife so I was running solo and expected a fight with the car. It seems like everything with the car has been fighting me recently.
Lifting the car up gave me the room to roll the engine under the car.
About twelve minutes later and the engine was bolted back in! I wasn’t certain that the engine would go in that easily given all the work done to the mounts but it really couldn’t have gone more smoothly. I was grateful for that because it was just me today.
While the engine was out of the car I left the stamped steel pan on it. I knew it would be sitting on the dollie and getting a little roughed up while getting the clutch installed and I didn’t want that abuse to go to the Canton Racing pan.
The beauty of the pan isn’t only that it fits around the S2000 oil pump but the four trap door baffles that keep the oil pooled around the sump. This is similar to the Moroso pan on my EK without the kick-out for capacity increase.
Sixteen titanium bolts and some Hondabond later and the Canton Racing pan was installed. The steel on the Canton Racing pan is considerably thicker than the factory stamped steel unit. This makes it much much heavier but I hope more durable as well.
I moved on to the KTuned thermostat housing and removed the thermo element from it. I am not using the recirculation port from the factory housing so a thermo element would prove to be a block in the cooling system and, as we’ve seen in the past, create hot spots and lead to premature engine failure. Cutting the element out instead of removing the thermostat altogether means I will have some resistance hopefully allowing for engine warm-up but won’t be such a blockage.
I threw the KTuned thermostat housing and Hybrid Racing cables on the engine. I could only find one retaining clip and none of the cotter pins so they’re just kind of . . . on there.
One thing that didn’t go my way today was the catch-can. Jesse mounted the catch can as far forward as possible per my request but I completely forgot about the bulbs sticking out from the back. I made plans for the catch can sitting about an inch further forward from where it actually could fit. Thankfully Jesse doesn’t listen to me and figures this stuff out on his owm. I’m probably going to cut the PCV outlet down to bring the AN fitting closer to the engine and get it to line up with the catch can. It won’t take much and will definitely be possible.
A parting shot for the day. Jesse is going to have the intake manifold back on the way to me shortly. Joel said the harness is almost wrapped up. It’s time to get the radiator in and start on some brackets and fan mounting. I’d be really happy to have that in and the lines made. It’s about damn time.
Last edited by phunhaus; 05-03-2014 at 08:32 PM.
