
aMac's 94 GSR build thread: Project "Aeris" Lots of DIY's and pics!
 02-26-2007, 10:54 AM
#26
76.169.175.137

Join Date: Jun 2006
Location: So Cal....yes, i know, ca, USA
Posts: 2,659
Likes: 0
Received 0 Likes
on
0 Posts
looks tons better....nice work man
just paint the damn thing
are you going to paint it taffeta white again?
id go with black....never seen a black DB8
just paint the damn thing
are you going to paint it taffeta white again?
id go with black....never seen a black DB8
 02-26-2007, 01:22 PM
#28
Honda-Tech Member
Join Date: Apr 2004
Location: Northern, CA
Posts: 2,096
Likes: 0
Received 0 Likes
on
0 Posts
<TABLE WIDTH="90%" CELLSPACING=0 CELLPADDING=0 ALIGN=CENTER><TR><TD>Quote, originally posted by CW_98gsr »</TD></TR><TR><TD CLASS="quote">looks tons better....nice work man
just paint the damn thing
are you going to paint it taffeta white again?
id go with black....never seen a black DB8 </TD></TR></TABLE>
Wasn't Frost White the color offered in 1994, paint code NH-538 as oposed to Taffeta White's NH-578?
just paint the damn thing
are you going to paint it taffeta white again?
id go with black....never seen a black DB8
</TD></TR></TABLE>Wasn't Frost White the color offered in 1994, paint code NH-538 as oposed to Taffeta White's NH-578?
02-27-2007, 11:38 AM
#30
These pics will be back up on the 16th of April
Alright. This was the first time I've ever done ANY suspension work of any kind..
and I have to say it's much easier than most people would think (easier than I thought anyway).
So, this little guide should give a n00b a good idea of what they are getting into and
what to expect. This is by no means perfect. I�m sure I�m gonna leave some stuff out
and their may be a better way to go about doing something. I�ll do my best to
describe what I did and any problems I encountered. If something is wrong, please,
let me know and I�ll update so as to not mislead anybody.
With that said, here we go!
--------------------------------------------------------------------------------
The patient is a 1994 GSR Sedan names Aeris. I�ll be installing Ground Control coil overs (dampers) w/KYB struts.
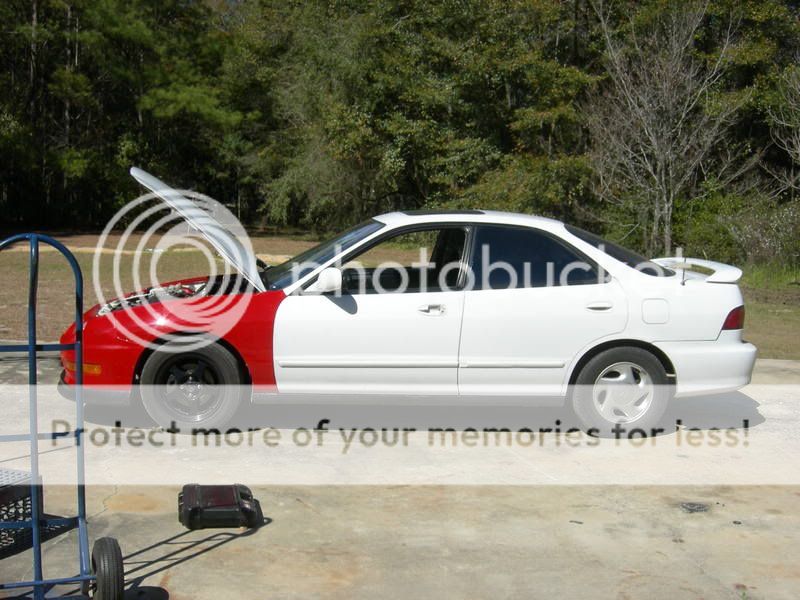
Now, the first thing you want to do is get it off the ground w/jack stands, or
jacks. Whatever is safe. Absolutely, NEVER EVER EVER EVER get under
or work around a car that's not secure. Jacks can fail and stuff breaks.. You
don't need to be under a car when it happens. Safety is more important than
your car being low
I chose to do my like this..
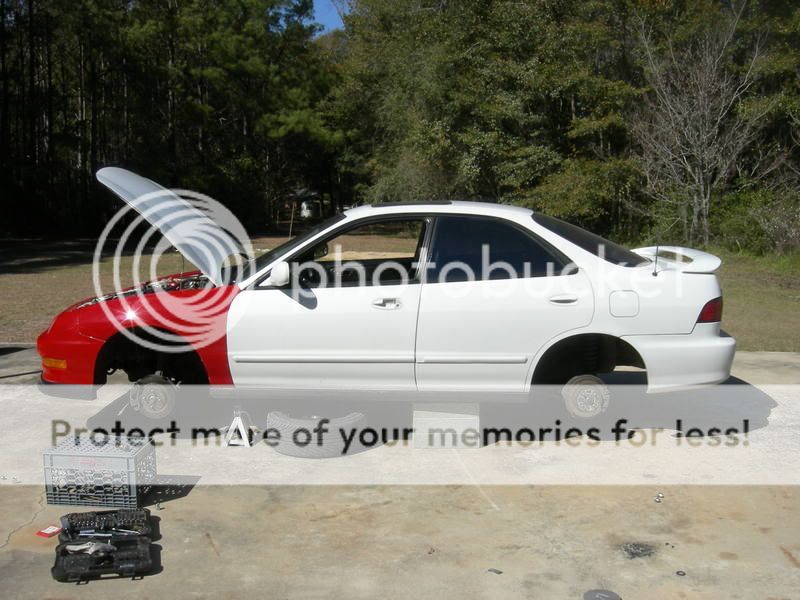
So, if the jack failed, the blocks would catch it, and if the blocks failed, the car would
still be resting on the tires(had tires on the other side, underneath as well. So, I felt safe.)
Tools needed:
Jack/jack stands
12-17 MM sockets/wrenches
A buddy (always helpful if you have one around)
Some Nirvana (preferably Nevermind, but whatever works for you )
First up: The front suspension.
#0: Obviously, remove the tires
#1: Remove the two 12mm bolts holding the brake lines to the strut.
The brake lines have a little bracket they are bolted to on the damper,
(2) 12 mm bolts I believe. I used a 1/4 drive ratchet to get em� off. Be sure to move
the brake lines out of the way so they don't get caught in between a spring.
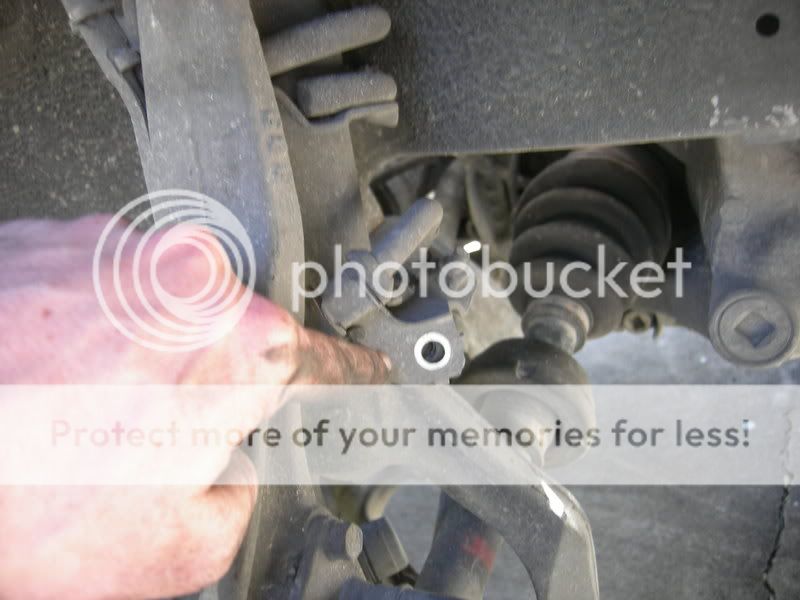
#2: Remove 14 MM bolt on the damper fork.
Now, the damper sits in a little socket in the damper fork. It has a 14 mm bolt going
through a flange that screws into a self locking nut, to clamp the assembly down and
hold it in place.
It looks like so:
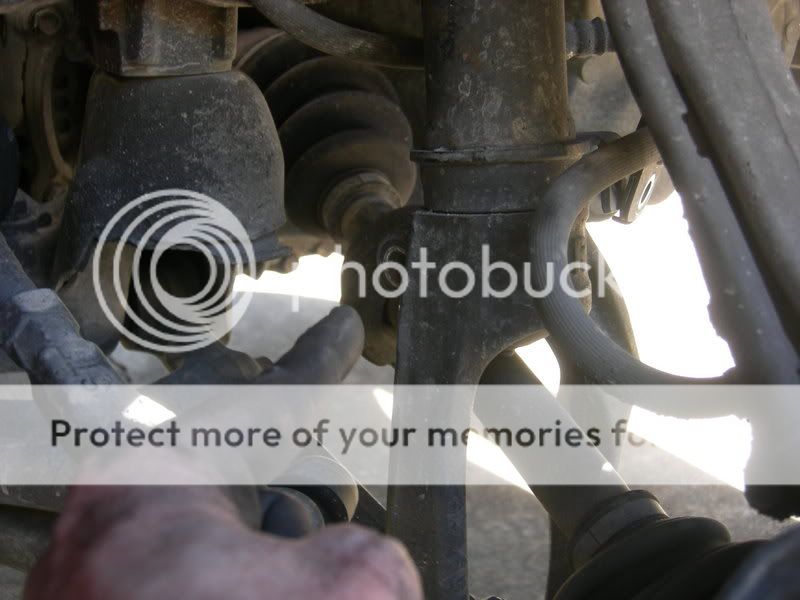
#3: Remove the 17 mm bolt holding the damper fork into place.
Next up, you need to loosen the damper fork so the whole assembly will drop
down.. I forget the size of the nut, but I think its like a 17 or 18 mm.
It looks like this..
#4: Remove the two 12 MM nuts holding the damper in place in the engine
compartment.
Once that bolt is removed, you can then go up top and remove the 2 nuts holding the
whole assembly on
You can do it w/out unbolting the strut bar (if you have a GSR or aftermarket) but I
decided it would be easier and went ahead and took it out.
With those last 2 nuts, the complete damper assembly will pull right out. You have to
wiggle it and maneuver it through the suspension components, but it'll come out.
The finished product! Asbestos FTW!
Now for the rear.. which is slightly more aggrivating than the front.
#1: Remove the backets holding down the wheel sensor line. 12MM bolts.
#2: Remove flange bolt holding the damper in place.
Next up, is the very annoying bolt thats hard to remove and even harder to get back
in. It's a 17 mm.
Use a punch or a screw driver, once it's loose, and tap it out of its home. Or pull it
w/some pliers, whichever way you so choose.
It's on the far left of the picture, at the bottom. I've already removed the bolt in the
pic.
#3: OPTIONAL
I didn't take a picture of it, but your gonna want to remove the bolt holding the sway bar (if you have one) so you have some more room to play with.
#4: Remove nuts holding the damper in place, in the trunk. 12MM bolts
With those done, you can go up top and remove the two 12 mm nuts holding the
assembly in. If you have a 2 door, you have to remove a lil cover to get to them. in a 4 door, you have to remove the panels in the trunk, as I did.
With evrything loose, you can now remove the assembly. Your gonna have to push down on the rotor (or drum) so give yourself the room to remove the damper. Kind of tricky, but not too bad.
Now for the goods
Sexy huh?
The assembly is just the reverse of the removal for the front and back. It�s helpful to
have 2 sets of hands to do this, but one person can manage.
A tip for the rear...Remember that big bolt I said was hard to get out?
Using a jack, pick up the suspension and line up the hole so the bolt will go through. Use a hammer to lightly tap on the bolt while raising/lowering (whatever you need to go) to get it to go back home. Not the easiest thing to do, but you kind of have to, so don't whine
As for the front, the dampers are opposite hand (a left and a right.) The bracket for
the brakes won't line up with the brake hoses.
Also, three is a little indention in the strut where the bolt you removed here..
The bolt and that indention MUST line up.
And then, the finished product. I bought these from a guy who had em on his Integra,
so they were already set up, so I haven�t adjusted them YET. But it�s suppose to be
really easy
Overall, it's a pretty straightforward process. Anybody w/half a brain should be able
to do it. It's a simple as knowing what you have to take out, and removing any
bolts/nuts that are hindering you from doing so.
IF I need to add/change anything that may be correct, don�t flame, just let me
know and I�ll be more than happy to change it. I want this to, maybe just
maybe, help somebody out one day. J

Modified by mac_24_seven at 1:21 PM 2/27/2007
Modified by mac_24_seven at 1:17 PM 3/26/2007
Modified by mac_24_seven at 1:02 PM 5/1/2007
Alright. This was the first time I've ever done ANY suspension work of any kind..
and I have to say it's much easier than most people would think (easier than I thought anyway).
So, this little guide should give a n00b a good idea of what they are getting into and
what to expect. This is by no means perfect. I�m sure I�m gonna leave some stuff out
and their may be a better way to go about doing something. I�ll do my best to
describe what I did and any problems I encountered. If something is wrong, please,
let me know and I�ll update so as to not mislead anybody.
With that said, here we go!
--------------------------------------------------------------------------------
The patient is a 1994 GSR Sedan names Aeris. I�ll be installing Ground Control coil overs (dampers) w/KYB struts.
Now, the first thing you want to do is get it off the ground w/jack stands, or
jacks. Whatever is safe. Absolutely, NEVER EVER EVER EVER get under
or work around a car that's not secure. Jacks can fail and stuff breaks.. You
don't need to be under a car when it happens. Safety is more important than
your car being low
I chose to do my like this..
So, if the jack failed, the blocks would catch it, and if the blocks failed, the car would
still be resting on the tires(had tires on the other side, underneath as well. So, I felt safe.)
Tools needed:
Jack/jack stands
12-17 MM sockets/wrenches
A buddy (always helpful if you have one around)
Some Nirvana (preferably Nevermind, but whatever works for you )
First up: The front suspension.
#0: Obviously, remove the tires
#1: Remove the two 12mm bolts holding the brake lines to the strut.
The brake lines have a little bracket they are bolted to on the damper,
(2) 12 mm bolts I believe. I used a 1/4 drive ratchet to get em� off. Be sure to move
the brake lines out of the way so they don't get caught in between a spring.
#2: Remove 14 MM bolt on the damper fork.
Now, the damper sits in a little socket in the damper fork. It has a 14 mm bolt going
through a flange that screws into a self locking nut, to clamp the assembly down and
hold it in place.
It looks like so:
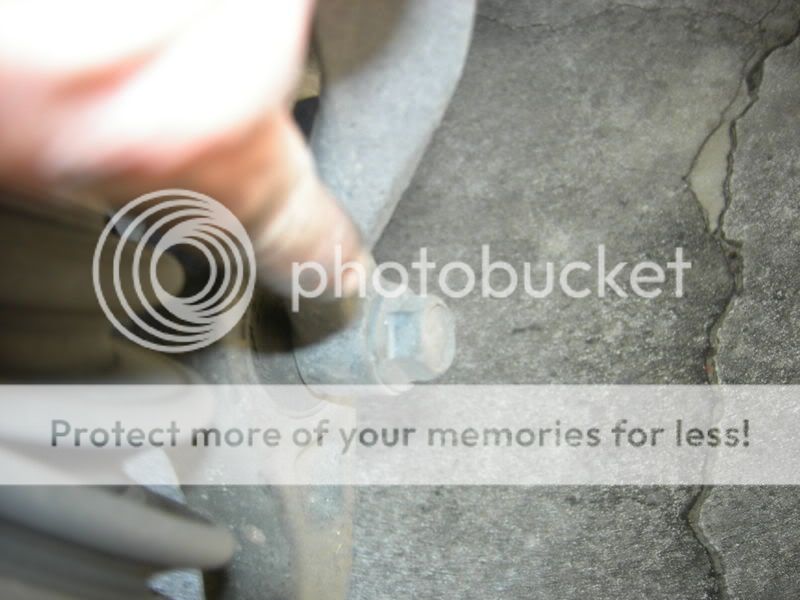
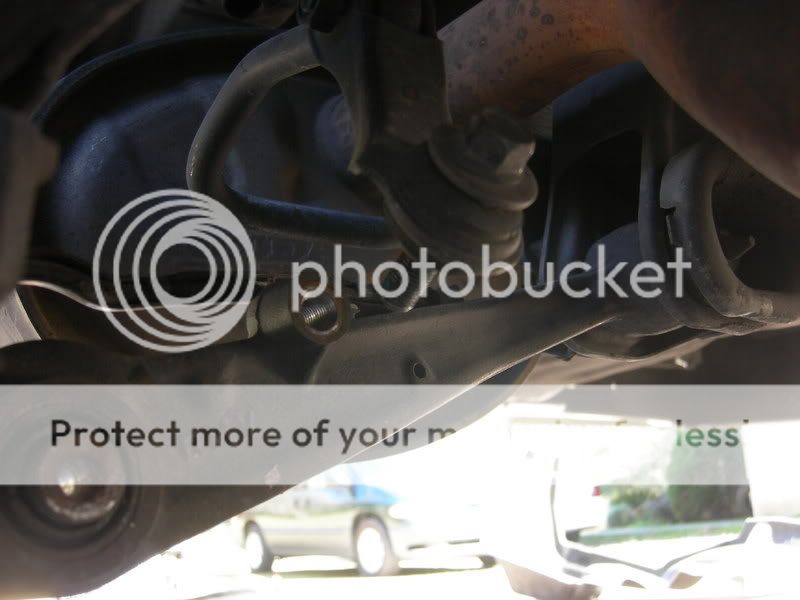
#3: Remove the 17 mm bolt holding the damper fork into place.
Next up, you need to loosen the damper fork so the whole assembly will drop
down.. I forget the size of the nut, but I think its like a 17 or 18 mm.
It looks like this..
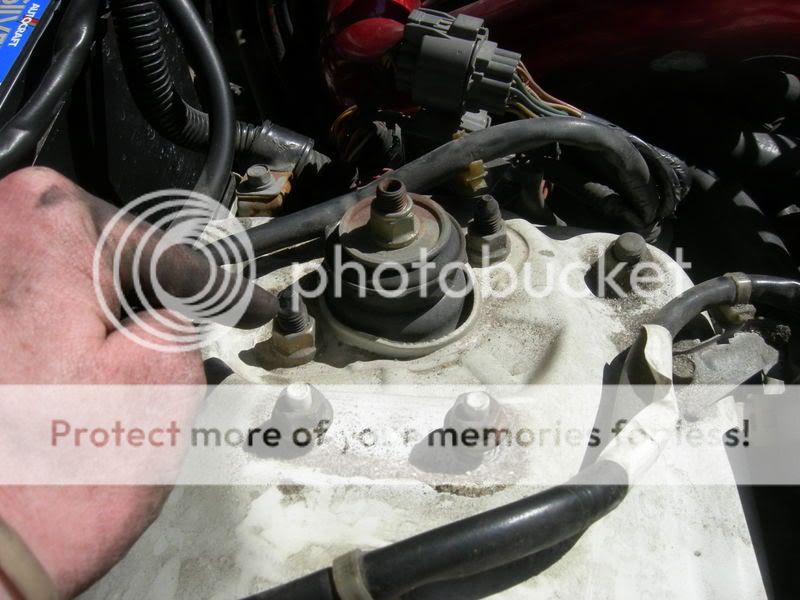
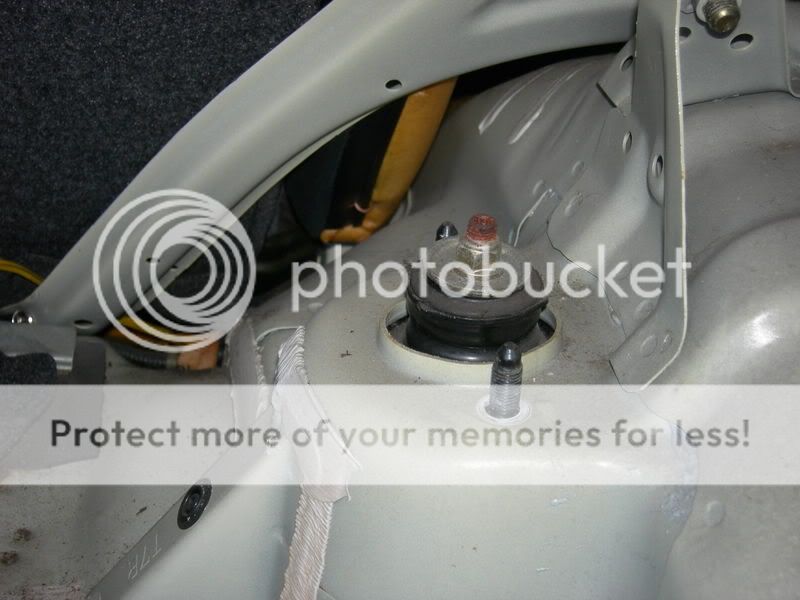
#4: Remove the two 12 MM nuts holding the damper in place in the engine
compartment.
Once that bolt is removed, you can then go up top and remove the 2 nuts holding the
whole assembly on
You can do it w/out unbolting the strut bar (if you have a GSR or aftermarket) but I
decided it would be easier and went ahead and took it out.
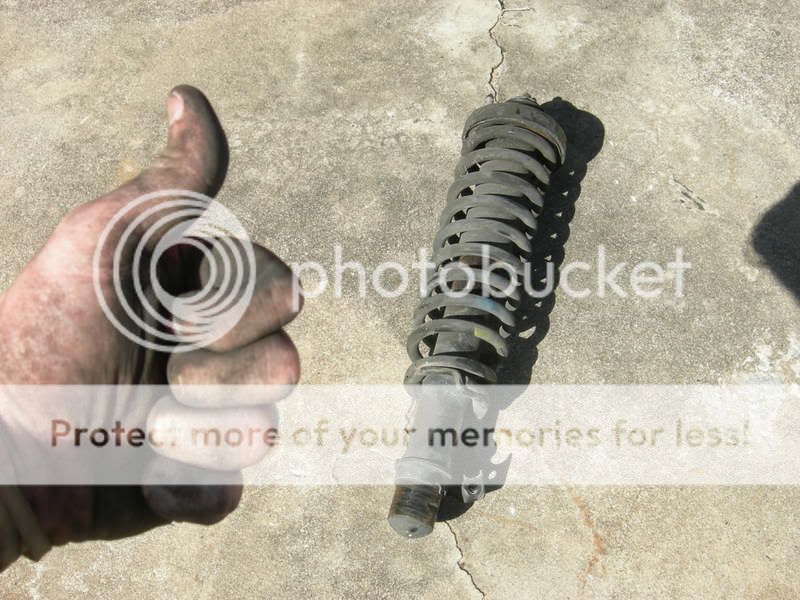
With those last 2 nuts, the complete damper assembly will pull right out. You have to
wiggle it and maneuver it through the suspension components, but it'll come out.
The finished product! Asbestos FTW!
Now for the rear.. which is slightly more aggrivating than the front.
#1: Remove the backets holding down the wheel sensor line. 12MM bolts.
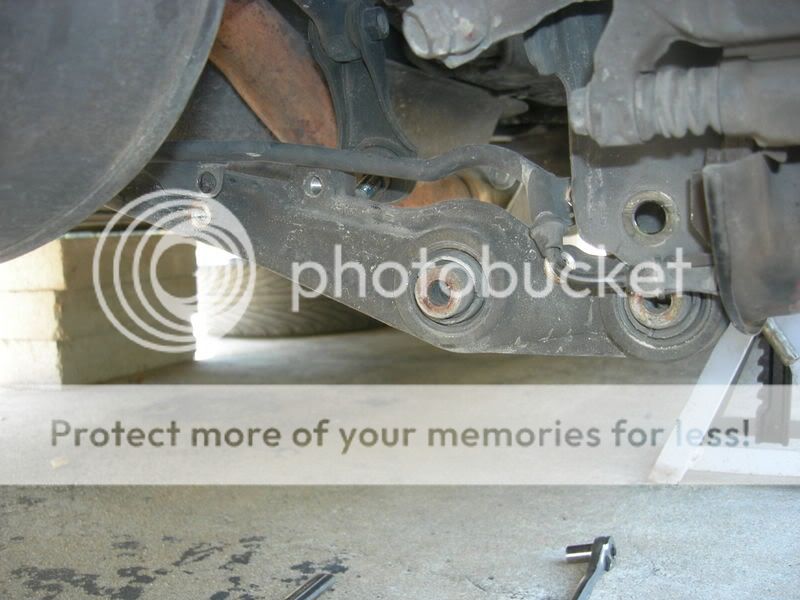
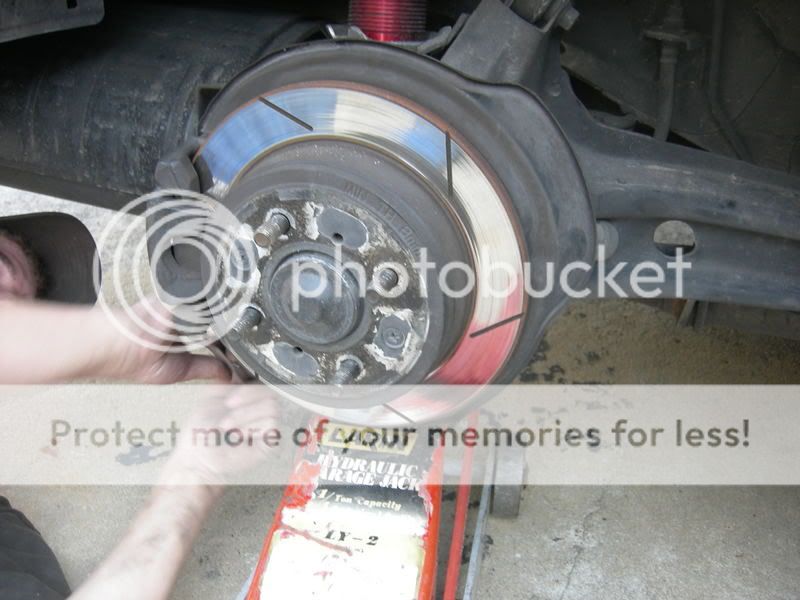
#2: Remove flange bolt holding the damper in place.
Next up, is the very annoying bolt thats hard to remove and even harder to get back
in. It's a 17 mm.
Use a punch or a screw driver, once it's loose, and tap it out of its home. Or pull it
w/some pliers, whichever way you so choose.
It's on the far left of the picture, at the bottom. I've already removed the bolt in the
pic.
#3: OPTIONAL
I didn't take a picture of it, but your gonna want to remove the bolt holding the sway bar (if you have one) so you have some more room to play with.
#4: Remove nuts holding the damper in place, in the trunk. 12MM bolts
With those done, you can go up top and remove the two 12 mm nuts holding the
assembly in. If you have a 2 door, you have to remove a lil cover to get to them. in a 4 door, you have to remove the panels in the trunk, as I did.
With evrything loose, you can now remove the assembly. Your gonna have to push down on the rotor (or drum) so give yourself the room to remove the damper. Kind of tricky, but not too bad.
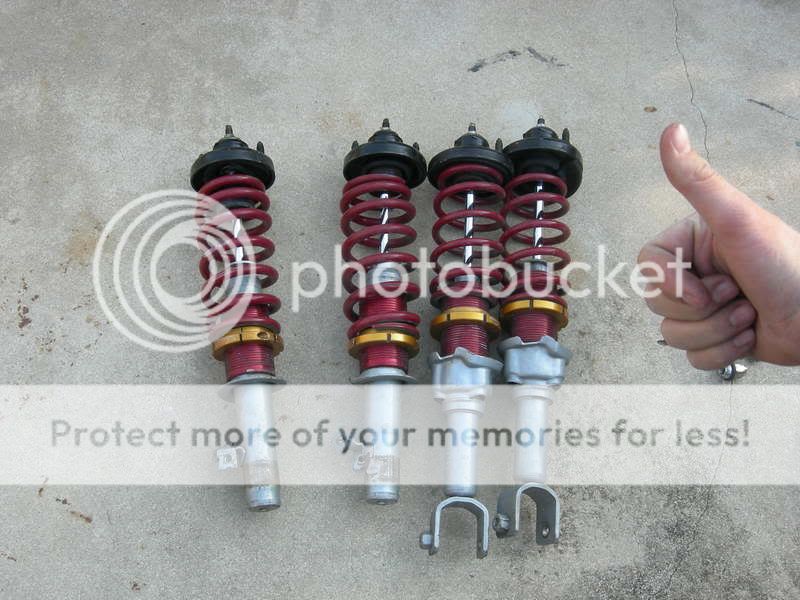
Now for the goods
Sexy huh?
The assembly is just the reverse of the removal for the front and back. It�s helpful to
have 2 sets of hands to do this, but one person can manage.
A tip for the rear...Remember that big bolt I said was hard to get out?
Using a jack, pick up the suspension and line up the hole so the bolt will go through. Use a hammer to lightly tap on the bolt while raising/lowering (whatever you need to go) to get it to go back home. Not the easiest thing to do, but you kind of have to, so don't whine
As for the front, the dampers are opposite hand (a left and a right.) The bracket for
the brakes won't line up with the brake hoses.
Also, three is a little indention in the strut where the bolt you removed here..
The bolt and that indention MUST line up.
And then, the finished product. I bought these from a guy who had em on his Integra,
so they were already set up, so I haven�t adjusted them YET. But it�s suppose to be
really easy
Overall, it's a pretty straightforward process. Anybody w/half a brain should be able
to do it. It's a simple as knowing what you have to take out, and removing any
bolts/nuts that are hindering you from doing so.
IF I need to add/change anything that may be correct, don�t flame, just let me
know and I�ll be more than happy to change it. I want this to, maybe just
maybe, help somebody out one day. J
Modified by mac_24_seven at 1:21 PM 2/27/2007
Modified by mac_24_seven at 1:17 PM 3/26/2007
Modified by mac_24_seven at 1:02 PM 5/1/2007
02-27-2007, 12:16 PM
#32
Honda-Tech Member
iTrader: (1)
Join Date: Jan 2002
Location: Nowhere and Everywhere
Posts: 29,530
Likes: 0
Received 52 Likes
on
46 Posts
The lower bolts are 17's. Nothing on a Honda is 18mm 
well except those new upper control arms I just installed came with new nuts that were 18mm so I just left them off and used my original 17mm nuts.
well except those new upper control arms I just installed came with new nuts that were 18mm
so I just left them off and used my original 17mm nuts.
 02-27-2007, 12:36 PM
#35
<TABLE WIDTH="90%" CELLSPACING=0 CELLPADDING=0 ALIGN=CENTER><TR><TD>Quote, originally posted by Type R 00 »</TD></TR><TR><TD CLASS="quote">nice job man.. sorry if youve said this before in the thread.. but are you gunn sa paint match the red front or are you gunna choose a new color? looks good tho!</TD></TR></TABLE>
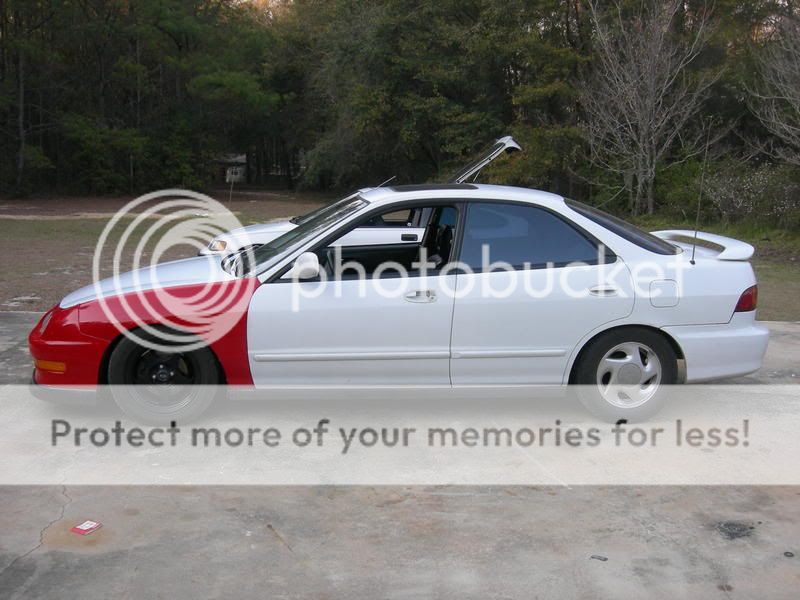
White...
This is what my WILL look like. I'm not trying to copy the guy, but I already had my scheme set before I found this pic..It just so happens he has INCREDIBLE taste and happens to have already done what I want to do.. Even the color of the wheels/style are what I want.
I MAY go w/a black or arbon fiber hood, I havn't decided yet.
That has to be one of the sexiest, cleanest DB's EVER..no, sexiest cleanest CARS ever (IMO anyway)...which means Aeris is gonna be just as sexy
And even if pple don't like 4 doors or colored rims, nobody can argue that it's not one helluva clean ride
Modified by mac_24_seven at 1:20 PM 3/26/2007
White...
This is what my WILL look like. I'm not trying to copy the guy, but I already had my scheme set before I found this pic..It just so happens he has INCREDIBLE taste and happens to have already done what I want to do.. Even the color of the wheels/style are what I want.
I MAY go w/a black or arbon fiber hood, I havn't decided yet.
That has to be one of the sexiest, cleanest DB's EVER..no, sexiest cleanest CARS ever (IMO anyway
)...which means Aeris is gonna be just as sexy And even if pple don't like 4 doors or colored rims, nobody can argue that it's not one helluva clean ride
Modified by mac_24_seven at 1:20 PM 3/26/2007
02-27-2007, 12:53 PM
#36
Yay! Christmas in Feb!
Look what ole Saint Fed Ex man brought me!

Skunk 2 IM
ITR Throttle cable and bracket
Stock GSR IM gasket
"Frog Eye" gauge pod
Sweet! I needed this cause I really e'ffed up some stuff at work today and I was feelin pretty freakin lousy
ANd tomorrow, my wife is gonna be out of town.. so since I won't have to tend to her tomorrow evening I'll be able to hook up my gauges!!
Modified by mac_24_seven at 1:20 PM 3/26/2007
Look what ole Saint Fed Ex man brought me!
Skunk 2 IM
ITR Throttle cable and bracket
Stock GSR IM gasket
"Frog Eye" gauge pod
Sweet! I needed this cause I really e'ffed up some stuff at work today and I was feelin pretty freakin lousy
ANd tomorrow, my wife is gonna be out of town.. so since I won't have to tend to her tomorrow evening I'll be able to hook up my gauges!!
Modified by mac_24_seven at 1:20 PM 3/26/2007
02-28-2007, 07:20 AM
#39
Well, plans have changed slightly...
For the good, I'll have a complete set of wheels on my car by this evening (all rota slips) and evrything is set to get my GSR blades this saturday.
The not so good is my "Frog Eye" gauge cluster. It fits... but... blahhh. It's not OEM, so it's not anywhere as good of quality (which I already knew that).
But I"m tryin to make my car be clean, inside and out, so.. as I was driving home last night looking at my cluster.. I was thinking that I could probably make something that looked that good myself...which, I've decided to do.
With Dremel in hand I cut apart my new gauge cluster and started working on molding the actual piece the gauge fit in, into the stock gauge cluster bezel.
I'll work on it gradually and take my time, since it's something I'll be looking at everey single time I get into my car.
I'll post some pics tonight so you can see what I've done..And I'll post a DIY when it's complete and painted.
03-05-2007, 03:52 AM
#40
Sorry for no pics on the cluster... I didn't have a chance to work on it any this weekend.. WAYYYYYYYYY too busy. Geez. I bet I drove nearly 800 miles Since Friday
I did, however, finally manage to get my GSR blades! Car looks a million times better IMO. Unfortunately, one of the wheel has some curbing and the finish on all of them is coming off, SO..A DIY on polishing is on it's way. Should look really good when I'm done.
Also, after cracking my lip in 2 more places I raised the front, yesterday, 3/4 to 1", so it's sitting pretty flush right now.. The front MAY be 1/4 lower than the back, still looks killer though.
I'll update w/pics at lunchtime today when I can go take some
I did, however, finally manage to get my GSR blades! Car looks a million times better IMO. Unfortunately, one of the wheel has some curbing and the finish on all of them is coming off, SO..A DIY on polishing is on it's way. Should look really good when I'm done.
Also, after cracking my lip in 2 more places
I raised the front, yesterday, 3/4 to 1", so it's sitting pretty flush right now.. The front MAY be 1/4 lower than the back, still looks killer though.I'll update w/pics at lunchtime today when I can go take some
03-05-2007, 05:00 AM
#42
<TABLE WIDTH="90%" CELLSPACING=0 CELLPADDING=0 ALIGN=CENTER><TR><TD>Quote, originally posted by sidesi »</TD></TR><TR><TD CLASS="quote">Now i'm not going to say this to flame you but.....
you should probably finish one project before you start another one.</TD></TR></TABLE>
I know man.. I know. I have a problem w/having too many things to do and not enough time to do em all But, I'm sure I'm not the only person this has happened to.
And really, I only have 2 projects going on: My gauge bezel and shaving the bumper. Now, I have several projects lined up that I'll be doing soon.. But only 2 currently After I finish them, cleaning up the wheels will become a priority, since they aren't the cleanest blades you'll ever find. Even then, they still makes my car look 100 times better The rota's broke me of black wheels.
<TABLE WIDTH="90%" CELLSPACING=0 CELLPADDING=0 ALIGN=CENTER><TR><TD>Quote, originally posted by PatrickGSR94 »</TD></TR><TR><TD CLASS="quote">Does the stock GS-R IM gasket work w/ the Skunk2 manifold? I thought you were going to be using a Hondata or similar-style plastic one?</TD></TR></TABLE>
Yes it does and I'm using a Password JDM gasket (same as Hondata). The stock gasket just came in the little lot of stuff I bought.
Modified by mac_24_seven at 6:21 AM 3/5/2007
you should probably finish one project before you start another one.</TD></TR></TABLE>
I know man.. I know. I have a problem w/having too many things to do and not enough time to do em all
But, I'm sure I'm not the only person this has happened to.And really, I only have 2 projects going on: My gauge bezel and shaving the bumper. Now, I have several projects lined up that I'll be doing soon.. But only 2 currently
After I finish them, cleaning up the wheels will become a priority, since they aren't the cleanest blades you'll ever find. Even then, they still makes my car look 100 times better The rota's broke me of black wheels.<TABLE WIDTH="90%" CELLSPACING=0 CELLPADDING=0 ALIGN=CENTER><TR><TD>Quote, originally posted by PatrickGSR94 »</TD></TR><TR><TD CLASS="quote">Does the stock GS-R IM gasket work w/ the Skunk2 manifold? I thought you were going to be using a Hondata or similar-style plastic one?</TD></TR></TABLE>
Yes it does and I'm using a Password JDM gasket (same as Hondata). The stock gasket just came in the little lot of stuff I bought.
Modified by mac_24_seven at 6:21 AM 3/5/2007
03-05-2007, 06:10 AM
#44
<TABLE WIDTH="90%" CELLSPACING=0 CELLPADDING=0 ALIGN=CENTER><TR><TD>Quote, originally posted by 94allmotor »</TD></TR><TR><TD CLASS="quote">why didnt u keep the stock fenders? you would only have a red bumper </TD></TR></TABLE>
Because my driver side fender was dented and there was a gap between the passenger side fender and the bumper.
I wanted a complete front end so as to find out if there was any damage to the frame or anything, since the car had been into a couple of parking lot incidents.
Thankfully, it all lined up perfectly
03-05-2007, 07:11 AM
#45
Honda-Tech Member
iTrader: (1)
Join Date: Jan 2007
Location: NY
Posts: 1,441
Likes: 0
Received 0 Likes
on
0 Posts
<TABLE WIDTH="90%" CELLSPACING=0 CELLPADDING=0 ALIGN=CENTER><TR><TD>Quote, originally posted by mac_24_seven »</TD></TR><TR><TD CLASS="quote">
Because my driver side fender was dented and there was a gap between the passenger side fender and the bumper.
I wanted a complete front end so as to find out if there was any damage to the frame or anything, since the car had been into a couple of parking lot incidents.
Thankfully, it all lined up perfectly </TD></TR></TABLE>
ok cool i thought that the fenders were diff. im pretty sure their not though. cuz i got a 98 bumper on my 94 and their were a couple of small gapas because the clips were damaged
Because my driver side fender was dented and there was a gap between the passenger side fender and the bumper.
I wanted a complete front end so as to find out if there was any damage to the frame or anything, since the car had been into a couple of parking lot incidents.
Thankfully, it all lined up perfectly
</TD></TR></TABLE>ok cool i thought that the fenders were diff. im pretty sure their not though. cuz i got a 98 bumper on my 94 and their were a couple of small gapas because the clips were damaged
03-05-2007, 09:04 AM
#46
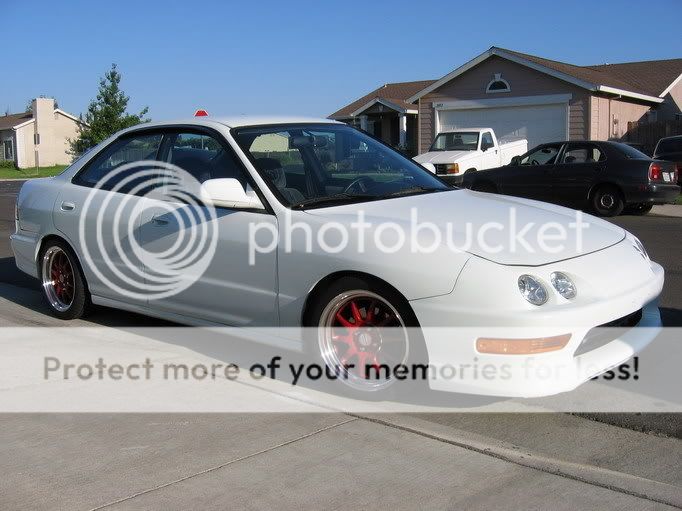
Pics as promised!

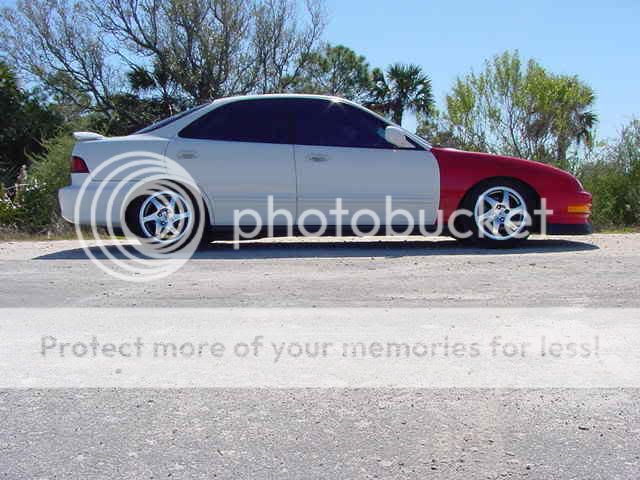
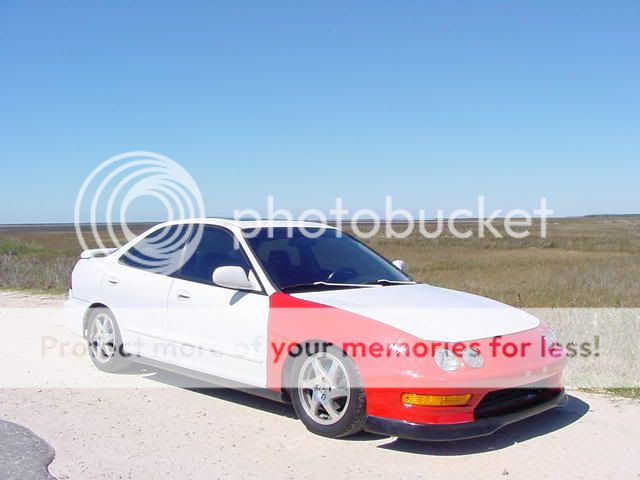
And here's a quick comparo from the slips to the blades:
Before (wrong setting on the camera):

After:

You can see where I am in shaving the holes in the bumper in a couple of the pics.
I think my car looks 100% better and I'm VERY pleased.
Modified by mac_24_seven at 1:24 PM 3/26/2007
Modified by mac_24_seven at 1:26 PM 3/26/2007
And here's a quick comparo from the slips to the blades:
Before (wrong setting on the camera):
After:
You can see where I am in shaving the holes in the bumper in a couple of the pics.
I think my car looks 100% better and I'm VERY pleased.
Modified by mac_24_seven at 1:24 PM 3/26/2007
Modified by mac_24_seven at 1:26 PM 3/26/2007
03-06-2007, 05:04 PM
#49
Whenever I get it done, I'll post a lil DIY on it. I used a different type of Bondo (came in a tube) and it's absolutely craptastic..Stuff took forever to dry and is uber brittle So I've got to dig it out and I'm gonna use real Bondo (the kind you mix and that is Pink).
I did start on on gauge cluster, actually putting the putty and molding the pods in.. and it would be great except the freaking stuff hasn't hardened!! I left it in the sun all day today and it's still soft It's suppose to harden enough to sand and paint!
So, I dunno what I'm gonna do I'll leave it in the sun all day tomorrow as well.
So I've got to dig it out and I'm gonna use real Bondo (the kind you mix and that is Pink).I did start on on gauge cluster, actually putting the putty and molding the pods in.. and it would be great except the freaking stuff hasn't hardened!! I left it in the sun all day today and it's still soft
It's suppose to harden enough to sand and paint!So, I dunno what I'm gonna do
I'll leave it in the sun all day tomorrow as well.
03-06-2007, 06:26 PM
#50
Honda-Tech Member
Join Date: Feb 2007
Location: New Milford, Ct, usa
Posts: 1,494
Likes: 0
Received 0 Likes
on
0 Posts
you also managed to squeeze some window tints in there between projects. also, are you gonna do a diy for the gauge installation? ive been wanting to get a volt and oil gauge and i have no idea how to install it.
very clean db8 by the way, love the blades
very clean db8 by the way, love the blades