
How To: Convert to Distributor-less Ignition (requires standalone)
 05-13-2008, 03:13 PM
#1
Honda-Tech Member
Thread Starter
Here is my How-To Convert to Coil On Plug aka COP, DIS, DLI, Distributor-less, Direct Fire, Waste Spark ignition. As always, the beautified HTML version can be found on the site in my sig. (found here for the time being http://www.civic-eg.com/causeforalarm)
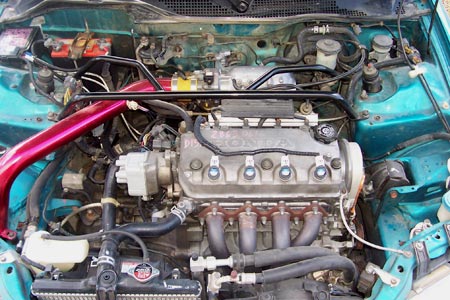
I apologize for the ugly eBay CAI
You cannot do this on a stock ECU no matter what program you're running on it because it only has one coil output. With two coil outputs you can do waste spark, with four you can do a true direct fire setup like that found on virtually every car from 2001 on. I don't cover that here but it's very similar.
I've heard rumors that there's a JDM module that can do it with the stock ECU but I have yet to see it in action and I cannot imagine any way to accomplish it on one coil output and yet fire the coils at the proper time throughout the entire RPM band.
The application shown here is a OBD2 D-series in an OBD1 Chassis, yet the other Honda/Acura engines from this time period are so similar that there would be virtually no difference in this write-up if it were a B, an H, or even an F series engine from 2000 or older.
These are the parts I'm using but obviously there are other options available.
AEM EMS 30-1000
AEM Twin Fire
Honda CBR motorcycle Coils (600F4i)
Autolite 3923 (recommend Denso IK__, IQ__ (choose your heat range) or NGK Iridiums)
Honda CBR coils require screw cap spark plugs. I'm using the crappy Autolite brand plugs because they were readily available. So far they are working great and I see no reason to replace them until they are worn. AEM's Pencil Coils accept standard type spark plug caps (weren't out when I bought my coils).
Benefits
I don't feel much like talking about the benefits because it will touch off too much heated discussion. I just want to focus on how-to for the people that already know that they want to do this.
Flamers
And because this is Honda-Tech (some people just come here to tear each other down) I have to give a disclaimer. Please don't presume to know my priorities, the value of my time, and whether I have resources to pay for this stuff. It just so happens that this has been a very rewarding learning experience; all the parts were purchased used and have been used on my previous projects, and that I'm very happy with the outcome not to mention that I now have a solid base on which to expand. So far I'm making 119wheel hp, 99 ft/lbs of torque (relatively stock engine), and getting 47.5mpg freeway cruising @ 75mph. When your car can do that with less time/effort/money spent, then you can come talk smack.
AEM EM$
I also don't want to hear any flak about the AEM EMS. The AEM is the best option we have, hands down. You can get a used AEM for not much more than what people are charging for much less capable products. Bottom line is that you make more power and more consistent power with less time tuning, have more capability, and better driveability with the EMS. And it's really not that hard to learn how to tune it if you have any experience with tuning. Do it right or not at all. This applies to engine management as much as it applies to assembling a motor.
----------------------------------------------------------------------------------------
HOW-TO
These instructions are meant to supplement the instructions provided with the Twin Fire, not supplant them.
Disconnect the car battery.
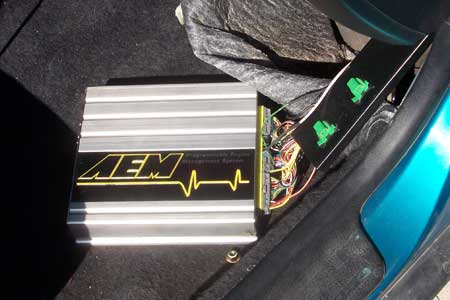
Mount The Twin Fire / Set the Dip Switches
Set the jumpers on the box before you mount the CDI but mount it so the switches are accessible. From left to right it should be UP, DOWN, UP. Or Switch 1 OFF, Multi-Strike Disable (except when you're checking timing with a timing light), Switch 2 ON, Trigger Edge, Falling Edge (wired directly to ECU), Switch 3 OFF, Wasted Spark, 360 Firing.
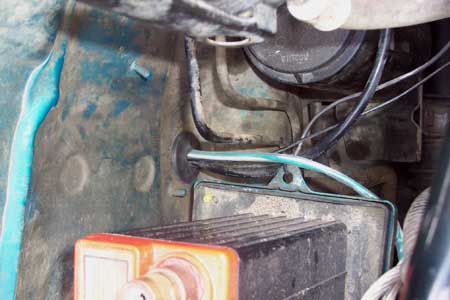
Ground
Here is where I grounded the Twin Fire's main battery ground. I already had a make-shift JDM Yo grounding setup. I made this with some 8 gauge amp wire and ring terminals and a longer 10mm bolt on the passenger side strut tower where the main battery ground is. I used a wire brush drill attachment on the area below the grounds and then I put some rust inhibitor over all of it. These grounds run to the thermostat, starter housing, and distributor housing. I also replaced/upgraded/added grounds at other points on the chassis.
Constant 12V

The Twin Fire doesn't come with the required inline fuse holder so you will have to go get your own. Get one that uses 10 gauge wire and can accept at least a 15A fuse. With some minor cutting you can connect it as shown. Leave the fuse out until you are finished with everything. Wrap this wire with split loom.
Ignition Inputs 1&2
Separate these two wires from the bundle since they will be going to the EMS inside the cabin. Cover them with heat shrink tubing or split loom and pass them through the firewall using a grommet.
Connect them to your available coil outputs. On the 30-1000, this is coil 1 and 3 (B4 and B3).
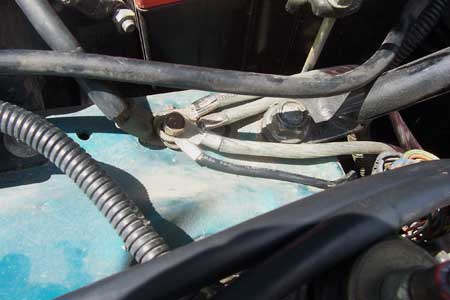
Unused Ignition Inputs
Ignition Inputs 3&4 (violet and yellow) aren't used for waste spark. They must be grounded. I left them in the bundle and connected them to a distributor bolt (where I have my aftermarket 8 gauge ground) using a large ring terminal.
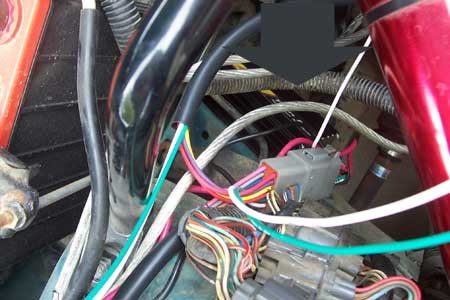
Ignition 12V and Tach
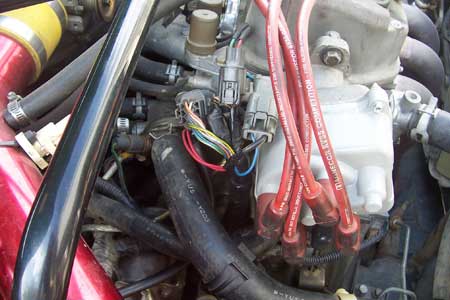
Tuck the white tach wire output into the bundle and run it up to the distributor. The two smaller gauge red wires connect to Ignition power. This can be found on the two pin harness with an 18 gauge blue and a 10 gauge black/yellow at the distributor (OBD1 only, OBD2 has one big harness). The black/yellow is your ignition 12v and the blue is your tach. Leave this harness unplugged on the distributor side and leave the wires intact so that you can switch back to stock ignition easily should the need arise.
Wire the Coils
The blue and gray coil 3 and 4 outputs are not used for waste spark and should be grounded. I grounded them with a ring terminal to the top of the valve cover. You never know; someday I may end up with a newer EMS and want to convert to true direct fire.
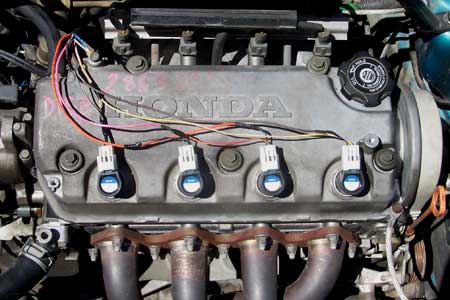
There is a lot of bad info out there concerning the CBR coils and how they're wired for waste spark. All of the following information has been verified. The CBR coils have a black/white common POWER. The color/stripe wires are grounds. Wire the coils in parallel. Basically we're wiring them so that you have two coils (in fact my previous setup utilized two rotary coils with custom Magnecor wires). Coil1/4, and coil 2/3. That is because when coil 1 is on the compression stroke, coil 4 is on the exhaust stroke. We fire the coils together so that coil 1 ignites and coil 4 gets the waste spark, then the engine spins half way and the opposite happens. And of course the same is happening on coils 2 and 3. Make sense? No? Here's a diagram:
http://www.civic-eg.com/causeforalar...aste_spark.gif
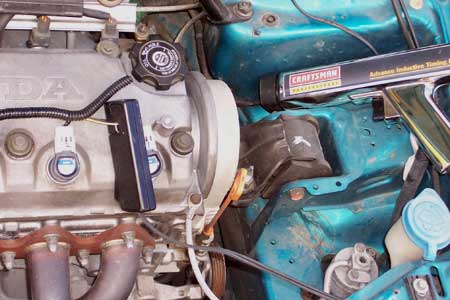
Make sure you pair the right powers with the right grounds. There's two capacitors in the Twin Fire and the power and ground have to be matched up. Refer to the instructions for the wire colors. Just remember that the instructions are for direct fire, but we're doing waste spark. So when it says "+ 540V - Connects to the positive (+) terminal on coils 1 & 3." for us that means "+ 540V - Connects to the positive (+) terminal on coils 1 & 4.".
Making Wiring Connections
It's pretty late to bring this up but you should not be doing this if you don't feel comfortable doing wiring. I recommend soldering all connections and using heat shrink where you can, electric tape where you can't. Some people insist that crimp connections are better because flexing solder joints will destroy them and that's a very valid point (that's why I secure my wiring down with zip ties) so you may want to use non-insulated butt connectors of the appropriate gauge along with heat shrink. But you better be using a good crimp tool. The Channel Lock 909 is the best crimping tool because of the shape it crimps, the leverage it gives you, and because the sliding pin doesn't flex. My problem with crimping in this particular situation is that it makes for very bulky wiring and will not come out looking as clean. It's harder to wrap in split loom.
Set Up the EMS (V1.19)
Internal Jumpers
http://www.civic-eg.com/causeforalar...0-1000_pcb.jpg
Two jumpers need to be set inside the AEM EMS 30-1000. They are JPC1 and JPC3, and they correspond to B4 and B3. The left two pins are for direct fire and the right two pins are for stock ignition. I recommend that you send the EMS to AEM and have them do it. That way you don't void the warranty. Even if it's not under warranty, once that warranty sticker has been torn, they will automatically charge you $50 just to look at it if you ever send it in. They charge you because they have to go through and check everything. The reason I know this is because my EMS had two burnt coil drivers and had to be repaired.
First thing you need to do is run the Coil Dwell Wizard (Ignition, Advanced Ign, Coil Dwell Setup, Coil Dwell Wizard) in the EMS and choose "All CDI Systems 3ms charge time (except Ford TFI)". Don't choose "Honda CBR F4I Coils" because this may be intended for their race box with the different coil output internals. This is the advice I was given by an AEM factory trained tuner @ Motiva in Albuquerque. He's not sure if it's okay to use the Honda CBR selection, but he IS sure that the selection I gave you works perfectly because this is what everybody has been using for the past 5 years since the Honda CBR wizard was only released a few weeks ago. Feel free to call AEM and confirm and then PM me and let me know what they say.
Options, Coil. Make Coils 1, 3, 6, 8 Active.
Setup, Sensors, Cam/Crank Sensor, Cam/Crank Setup. Spark Teeth 24. Check Crank Alt Fire (optional).
Ignition, Advanced Ign, Ignition Phasing, Options Ign Phasing:
Ign Tooth #01 0
Ign Tooth #03 6
Ign Tooth #06 12
Ign Tooth #08 18
Ignition Sync
Checking your base ignition timing advance is a little different now that you've converted to waste spark. Now that your coils are firing twice as many times per cylinder as your one coil used to, your timing light is going to read double. You wont be using a static timing light to line up the red line with the pointer on the timing belt cover anymore. You'll need an adjustable timing gun so that you can turn the **** to line up the white tdc mark instead. Cut the number on the **** in half and that's your timing.
Configure, ECU Setup, Set Ignition... and then correct the EMS to match the timing indicated by a timing light. This is the procedure that you did when you first installed the EMS and it's the reason why your Ignition Sync will vary from mine. You need to adjust this any time you move the distributor. You hook up your timing light the same as usual except you clamp onto the positive black/white wire only.
Wait until the engine is idling at a steady ignition timing. You may have to temporarily zero out your Ign vs Idle table. Then hit Advance or Retard and watch how it effects the Ignition Sync parameter. When the tdc mark gets close, switch to Fine and get it dead on. You may find it easier if you turn switch 1 on the Twin Fire ON to disable multi-strike.
There it is, I hope you find this useful. And if you haven't done so already, read my Cause For Alarm site and get some security. Otherwise you'll get jacked I guarantee it. Even Bisimoto got jacked... I mention Bisi because he's running the EMS, EPM, and Pencil Coils.
Modified by suspendedHatch at 5:19 PM 5/13/2008
Modified by suspendedHatch at 5:22 PM 5/13/2008
Modified by suspendedHatch at 5:51 PM 5/13/2008
Modified by suspendedHatch at 8:16 PM 5/13/2008
I apologize for the ugly eBay CAI
You cannot do this on a stock ECU no matter what program you're running on it because it only has one coil output. With two coil outputs you can do waste spark, with four you can do a true direct fire setup like that found on virtually every car from 2001 on. I don't cover that here but it's very similar.
I've heard rumors that there's a JDM module that can do it with the stock ECU but I have yet to see it in action and I cannot imagine any way to accomplish it on one coil output and yet fire the coils at the proper time throughout the entire RPM band.
The application shown here is a OBD2 D-series in an OBD1 Chassis, yet the other Honda/Acura engines from this time period are so similar that there would be virtually no difference in this write-up if it were a B, an H, or even an F series engine from 2000 or older.
These are the parts I'm using but obviously there are other options available.
AEM EMS 30-1000
AEM Twin Fire
Honda CBR motorcycle Coils (600F4i)
Autolite 3923 (recommend Denso IK__, IQ__ (choose your heat range) or NGK Iridiums)
Honda CBR coils require screw cap spark plugs. I'm using the crappy Autolite brand plugs because they were readily available. So far they are working great and I see no reason to replace them until they are worn. AEM's Pencil Coils accept standard type spark plug caps (weren't out when I bought my coils).
Benefits
I don't feel much like talking about the benefits because it will touch off too much heated discussion. I just want to focus on how-to for the people that already know that they want to do this.
Flamers
And because this is Honda-Tech (some people just come here to tear each other down) I have to give a disclaimer. Please don't presume to know my priorities, the value of my time, and whether I have resources to pay for this stuff. It just so happens that this has been a very rewarding learning experience; all the parts were purchased used and have been used on my previous projects, and that I'm very happy with the outcome not to mention that I now have a solid base on which to expand. So far I'm making 119wheel hp, 99 ft/lbs of torque (relatively stock engine), and getting 47.5mpg freeway cruising @ 75mph. When your car can do that with less time/effort/money spent, then you can come talk smack.
AEM EM$
I also don't want to hear any flak about the AEM EMS. The AEM is the best option we have, hands down. You can get a used AEM for not much more than what people are charging for much less capable products. Bottom line is that you make more power and more consistent power with less time tuning, have more capability, and better driveability with the EMS. And it's really not that hard to learn how to tune it if you have any experience with tuning. Do it right or not at all. This applies to engine management as much as it applies to assembling a motor.
----------------------------------------------------------------------------------------
HOW-TO
These instructions are meant to supplement the instructions provided with the Twin Fire, not supplant them.
Disconnect the car battery.
Mount The Twin Fire / Set the Dip Switches
Set the jumpers on the box before you mount the CDI but mount it so the switches are accessible. From left to right it should be UP, DOWN, UP. Or Switch 1 OFF, Multi-Strike Disable (except when you're checking timing with a timing light), Switch 2 ON, Trigger Edge, Falling Edge (wired directly to ECU), Switch 3 OFF, Wasted Spark, 360 Firing.
Ground
Here is where I grounded the Twin Fire's main battery ground. I already had a make-shift JDM Yo grounding setup. I made this with some 8 gauge amp wire and ring terminals and a longer 10mm bolt on the passenger side strut tower where the main battery ground is. I used a wire brush drill attachment on the area below the grounds and then I put some rust inhibitor over all of it. These grounds run to the thermostat, starter housing, and distributor housing. I also replaced/upgraded/added grounds at other points on the chassis.
Constant 12V
The Twin Fire doesn't come with the required inline fuse holder so you will have to go get your own. Get one that uses 10 gauge wire and can accept at least a 15A fuse. With some minor cutting you can connect it as shown. Leave the fuse out until you are finished with everything. Wrap this wire with split loom.
Ignition Inputs 1&2
Separate these two wires from the bundle since they will be going to the EMS inside the cabin. Cover them with heat shrink tubing or split loom and pass them through the firewall using a grommet.
Connect them to your available coil outputs. On the 30-1000, this is coil 1 and 3 (B4 and B3).
Unused Ignition Inputs
Ignition Inputs 3&4 (violet and yellow) aren't used for waste spark. They must be grounded. I left them in the bundle and connected them to a distributor bolt (where I have my aftermarket 8 gauge ground) using a large ring terminal.
Ignition 12V and Tach
Tuck the white tach wire output into the bundle and run it up to the distributor. The two smaller gauge red wires connect to Ignition power. This can be found on the two pin harness with an 18 gauge blue and a 10 gauge black/yellow at the distributor (OBD1 only, OBD2 has one big harness). The black/yellow is your ignition 12v and the blue is your tach. Leave this harness unplugged on the distributor side and leave the wires intact so that you can switch back to stock ignition easily should the need arise.
Wire the Coils
The blue and gray coil 3 and 4 outputs are not used for waste spark and should be grounded. I grounded them with a ring terminal to the top of the valve cover. You never know; someday I may end up with a newer EMS and want to convert to true direct fire.
There is a lot of bad info out there concerning the CBR coils and how they're wired for waste spark. All of the following information has been verified. The CBR coils have a black/white common POWER. The color/stripe wires are grounds. Wire the coils in parallel. Basically we're wiring them so that you have two coils (in fact my previous setup utilized two rotary coils with custom Magnecor wires). Coil1/4, and coil 2/3. That is because when coil 1 is on the compression stroke, coil 4 is on the exhaust stroke. We fire the coils together so that coil 1 ignites and coil 4 gets the waste spark, then the engine spins half way and the opposite happens. And of course the same is happening on coils 2 and 3. Make sense? No? Here's a diagram:
http://www.civic-eg.com/causeforalar...aste_spark.gif
Make sure you pair the right powers with the right grounds. There's two capacitors in the Twin Fire and the power and ground have to be matched up. Refer to the instructions for the wire colors. Just remember that the instructions are for direct fire, but we're doing waste spark. So when it says "+ 540V - Connects to the positive (+) terminal on coils 1 & 3." for us that means "+ 540V - Connects to the positive (+) terminal on coils 1 & 4.".
Making Wiring Connections
It's pretty late to bring this up but you should not be doing this if you don't feel comfortable doing wiring. I recommend soldering all connections and using heat shrink where you can, electric tape where you can't. Some people insist that crimp connections are better because flexing solder joints will destroy them and that's a very valid point (that's why I secure my wiring down with zip ties) so you may want to use non-insulated butt connectors of the appropriate gauge along with heat shrink. But you better be using a good crimp tool. The Channel Lock 909 is the best crimping tool because of the shape it crimps, the leverage it gives you, and because the sliding pin doesn't flex. My problem with crimping in this particular situation is that it makes for very bulky wiring and will not come out looking as clean. It's harder to wrap in split loom.
Set Up the EMS (V1.19)
Internal Jumpers
http://www.civic-eg.com/causeforalar...0-1000_pcb.jpg
Two jumpers need to be set inside the AEM EMS 30-1000. They are JPC1 and JPC3, and they correspond to B4 and B3. The left two pins are for direct fire and the right two pins are for stock ignition. I recommend that you send the EMS to AEM and have them do it. That way you don't void the warranty. Even if it's not under warranty, once that warranty sticker has been torn, they will automatically charge you $50 just to look at it if you ever send it in. They charge you because they have to go through and check everything. The reason I know this is because my EMS had two burnt coil drivers and had to be repaired.
First thing you need to do is run the Coil Dwell Wizard (Ignition, Advanced Ign, Coil Dwell Setup, Coil Dwell Wizard) in the EMS and choose "All CDI Systems 3ms charge time (except Ford TFI)". Don't choose "Honda CBR F4I Coils" because this may be intended for their race box with the different coil output internals. This is the advice I was given by an AEM factory trained tuner @ Motiva in Albuquerque. He's not sure if it's okay to use the Honda CBR selection, but he IS sure that the selection I gave you works perfectly because this is what everybody has been using for the past 5 years since the Honda CBR wizard was only released a few weeks ago. Feel free to call AEM and confirm and then PM me and let me know what they say.
Options, Coil. Make Coils 1, 3, 6, 8 Active.
Setup, Sensors, Cam/Crank Sensor, Cam/Crank Setup. Spark Teeth 24. Check Crank Alt Fire (optional).
Ignition, Advanced Ign, Ignition Phasing, Options Ign Phasing:
Ign Tooth #01 0
Ign Tooth #03 6
Ign Tooth #06 12
Ign Tooth #08 18
Ignition Sync
Checking your base ignition timing advance is a little different now that you've converted to waste spark. Now that your coils are firing twice as many times per cylinder as your one coil used to, your timing light is going to read double. You wont be using a static timing light to line up the red line with the pointer on the timing belt cover anymore. You'll need an adjustable timing gun so that you can turn the **** to line up the white tdc mark instead. Cut the number on the **** in half and that's your timing.
Configure, ECU Setup, Set Ignition... and then correct the EMS to match the timing indicated by a timing light. This is the procedure that you did when you first installed the EMS and it's the reason why your Ignition Sync will vary from mine. You need to adjust this any time you move the distributor. You hook up your timing light the same as usual except you clamp onto the positive black/white wire only.
Wait until the engine is idling at a steady ignition timing. You may have to temporarily zero out your Ign vs Idle table. Then hit Advance or Retard and watch how it effects the Ignition Sync parameter. When the tdc mark gets close, switch to Fine and get it dead on. You may find it easier if you turn switch 1 on the Twin Fire ON to disable multi-strike.
There it is, I hope you find this useful. And if you haven't done so already, read my Cause For Alarm site and get some security. Otherwise you'll get jacked I guarantee it. Even Bisimoto got jacked... I mention Bisi because he's running the EMS, EPM, and Pencil Coils.
Modified by suspendedHatch at 5:19 PM 5/13/2008
Modified by suspendedHatch at 5:22 PM 5/13/2008
Modified by suspendedHatch at 5:51 PM 5/13/2008
Modified by suspendedHatch at 8:16 PM 5/13/2008
Last edited by suspendedHatch; 10-01-2014 at 10:08 AM.
 05-13-2008, 04:07 PM
#2
Honda-Tech Member
Thread Starter
To completely eliminate the distributor you need something to replace the cam/crank sensor and you need something to fill the hole. AEM just came out with an Engine Position Module.
http://www.aempower.com/ViewCa...D=122
Here's an F22 with the EPM and CBR coils from Bisimoto's myspace

http://www.aempower.com/ViewCa...D=122
Here's an F22 with the EPM and CBR coils from Bisimoto's myspace
05-14-2008, 10:08 AM
#3
Honda-Tech Member
Thread Starter
Converting Back to Stock
Pull the fuse from the power wire.
Unplug the coil harness and zip tie it to your strut bar.
Remove the coils.
Remove the spark plugs, put the caps on them or switch back to your old plugs, reinstall them.
Put the plug wires in.
Plug the 2 pin harness back in in the correct firing order.
Put the jumpers JPC1 and JPC3 back to the right two pins.
Reload your old calibration.
Takes about 10 minutes and you can carry the required tools and parts in a small box.
Neither the C2DI, Twin Fire, or the MSD DIS4 are known for their reliability. But there are other ignitions on the market.

 05-14-2008, 09:51 PM
#6
Honda-Tech Member
Thread Starter
<TABLE WIDTH="90%" CELLSPACING=0 CELLPADDING=0 ALIGN=CENTER><TR><TD>Quote, originally posted by CTR LOVER LU »</TD></TR><TR><TD CLASS="quote">could this be done to an ef with a b20 and running obd1?</TD></TR></TABLE>
It could be done on any car/engine combo if you have a standalone, CDI, and some coils that fit.
It could be done on any car/engine combo if you have a standalone, CDI, and some coils that fit.
Trending Topics
10-01-2014, 08:46 AM
#8
Honda-Tech Member

Join Date: Oct 2014
Location: east coast
Posts: 45
Likes: 0
Received 0 Likes
on
0 Posts
wish the pictures would show up. this coil on plug is giving me a head ache already. any help I would appreciate it. shoot me a pm.. I need to know where I pin all these wires in .. and if I should pin them in the step down harness or the obd2a harnesss
10-01-2014, 10:13 AM
#9
Honda-Tech Member
Thread Starter
Someone pointed this out for me so I fixed it for you. I didn't edit or revise anything, so enjoy the smack talk and note that quite a few products have become available since 2008 to make this simpler and cleaner.
10-06-2014, 05:39 PM
#10
Honda-Tech Member
Join Date: Oct 2014
Location: east coast
Posts: 45
Likes: 0
Received 0 Likes
on
0 Posts
aem epm wires
crank signal yellow wire =b15
cam signal white wire=b11
ground black wire=a25
thanks to this write up it saved me a **** ton of time. also aem and kat-man helped also. appreciate it
crank signal yellow wire =b15
cam signal white wire=b11
ground black wire=a25
thanks to this write up it saved me a **** ton of time. also aem and kat-man helped also. appreciate it
11-15-2014, 06:55 PM
#11
Honda-Tech Member
Join Date: Jun 2004
Location: culpeper, va, usa
Posts: 22
Likes: 0
Received 0 Likes
on
0 Posts
The jumpers jpc1 and 3 should be closer to the wiring harness plug side of the ems for cop on a 30-1000?
 10-13-2017, 07:48 PM
#14
You cannot keep your stock ECU and hope to get rid of the distributor.

Thread
Thread Starter
Forum
Replies
Last Post
92HB_HB
Forced Induction
22
04-15-2004 12:50 PM