
EF9_TryMe's journey for high 11's! race build.
 04-21-2012, 03:27 PM
#1
Honda-Tech Member
Thread Starter
For some of you that haven't seen my old thread regarding specifically to my ek build, and my old b16 that I blew up...
https://honda-tech.com/forums/appearance-build-threads-122/ek-hatch-project-my-first-teardown-ever-advice-comments-more-than-welcomed-2866637/
There's a link for you new guys, and for the ones that have seen it just for refreshment.
I've arranged a lot of data and research to attempt and set my goal for a 11 second car when it comes to collecting useful info on the web specifically addressed for Power. But since the power that I am going to be throwing down to the ground on this new gsr build has priority than my old b16, I come to think of it on how am I going to hook to those 15 inch street tires? Slicks in this case are definitely going for replacement in order to hit that 11 second target since a rough estimated 400-500whp boosted FWD ek will most LIKELY not get even close to such desired values if traction becomes an enemy. Most likely, it will!
but .. Speaking of traction .. What about wheel hop ? Oh yeah, I Forgot .. then theres that problem .. -sighs- Well anyways, I've got about 2-3 months before the "silver omen" reveals it's new guts down the 1320 to get it running properly(had some problems with my greddy boost controller solenoid that I need to check out when I get the gsr running), and wrecks havoc, or get's wrecked upon. Mind you, but I am a newbie when it comes to flying down that quarter mile. When I mean newbie, I addressed it in words where practice is going to be needed in order for me to advance to the next and further level so I can hit my desired targets. I don't even know how to do a proper burnout, jesus christ .. but drag racing has probably been one of my favorite things in life for over 3-4 years now. I haven't had that many chances to shine for high numbers in which I always wanted to, but the opportunity was always golden to me and not have I once wanted to see that kind of glory fade. So here is my GSR rebuild to my former most known street weekend warrior ***** ek that I will be posting updates about.
Desired time: 11 seconds down the 1320
Help I am seeking from experienced honda tech drag racers, engine builders, and guys that know what they're talking about in General .. please share your inputs with me
Things I really want to know:
- Hooking, what suspension, rubber, traction bars, add on suspension accessories am I most likely going to need for my desired time.
- How to launch, how to do a proper burnout ? inputs needed on this one.
- Now I do also have a choice between a b16 tranny, and a gsr tranny ? I'm thinking b16 for that shorter time.
Anything else that you guys would like to share, or throw comments about on how to rebuild a motor or think there's a better way of how to do things in this thread, please feel free to chime in and don't be shy. I'm just another noob racer out there in the streets. But if I exhibit a better feeling on how to accomplish something throughout my teardown/gsr rebuild versus your opinion, don't take that as a sign of offense. Sometimes I will go by a certain instinct, lol... but anyhuuu!!! Here it is...
Cheers.
vehicle: 97 civic dx, completely gutted in the back
block: 95 gsr b18c1, 81.5mm bore
head: stock b16a2 head
transmission: deciding on either the b16 or gsr that I have
ems: eCtune
stock standard micropolished gsr crank
acl main bearings
acl rod bearing
honda oem thrust washers
eagle h beam rods
81.5mm 10.0:1 JE Pistons
OEM Honda Head Gasket
GSR Cams
Stock B16a2 intake manifold, stock TB
transmission/clutch:
gsr or b16, still trying to get the input from you guys?
stock driveshaft components
act comp stage 4 clutch
Suspension/Ground game:
Tein S Tech springs
Stock struts
rear blox lower control arms
Beaks rear tie bar
205/50/15 Falken Ziex's on 15x7 rota slipstreams all around
Innovative Mounts: 75A Black Inserts
Boosted Setup:
Spooling performance Log Style Manifold T3/T4 Flange
Precision SC34 3" Inlet, 57 Trim wheel, .63 A/R Hot side, 5 bolt
2.5 inch stainless steel downpipe, open, no exhaust(x_x neighbors hate me)
Tial 38mm Wastegate w/ DT
AEM UEGO Wideband
AEM Oil pressure Gauge
HKS SSQV3 Blow off valve
Greddy Profec B II Boost Controller
Greddy Turbo Timer
ID's 1000
Stock Fuel pressure regulator, and fuel rail.
255lph Walbro Fuel Pump
2.5" Inch Charge Pipes
XS Power Ebay Intercooler
Motorolla 2.5 Bar Map Sensor(Anybody experience problems with these when going over 20lbs ? I'm probably going to swap out to a hondata one, or a gm 3 bar just for future purposes since I plan on keeping the car.)
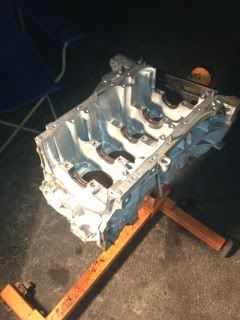
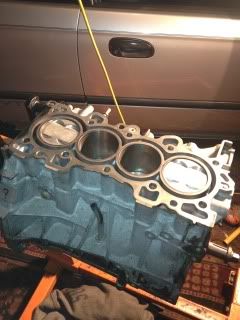
Day 1: The Gsr Rebuild
Block on stand
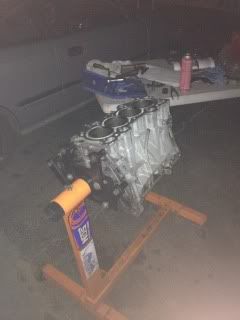
The blueprinting stage:
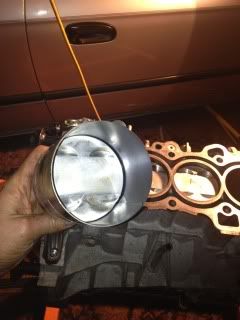
The measuring of the pistons and cylinder bore.
The process I used to indicate the exact measurement of cylinder bore was to first get an accurate reading of what size the pistons were. Since I knew that this wasn't a standard 81mm block by the size of the pistons, I was going to take measurements of the bore with a Dial bore gauge in order to find out what the exact size was. The readings seemed okay, and I am confident enough that there shouldn't be a conflict in the end of this rebuild for a high horsepower build, besides a little bit of clearance for a weekend track ***** I heard is better for a bit of extra more power output.
Best tool ever:
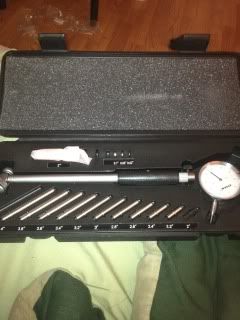
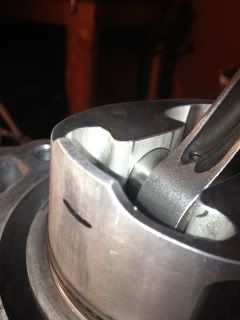
The way I measured the pistons is half inch down from the skirt, address the half inch mark with a marker. Stick it in while the piston ring(i used the compression ring to hold the piston in place)
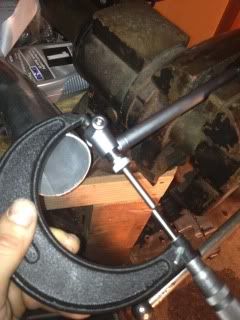
Now I switched over to a micrometer, and mic'd out the readings for each piston. They were pretty much all the same.
Pistons: 3.208" in = 81.48mm
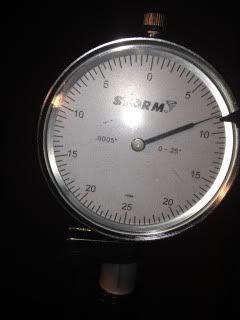
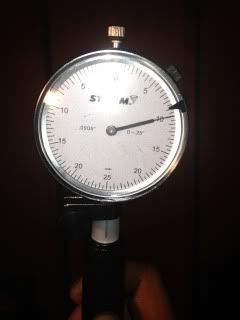
I mic'd out the dial bore gauge with a 3.2 ref adapter guide from the DB kit as my pinpoint to see where my numbers were and how much I am going to need to subtract to get the specific cylinder bore.
Dial bore gauge had to be mic'd accurately, it's important to zero this out and watch the needle not move during this process, because if it does your reading will be very inaccurate.
When mic'd with 3.2 adapter: 3.223"
Now I placed the dial bore gauge in each specific cylinder and these are the reading I've got:
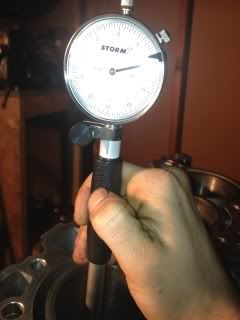
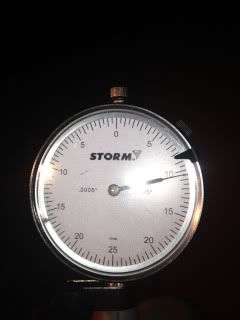
Here are the cylinder bore measurements:
Cyl 1: 3.213 ( subtracted .010 from 3.223 )
Cyl 2: 3.215 ( subtracted .008 from 3.223 )
Cyl 3: 3.212 ( subtracted .011 from 3.223 )
Cyl 4: 3.212 ( subtracted .011 from 3.223 )
Now my biggest fear here is cylinder 2 is off by 2-3 thou of where I kinda wanted it to be at. The clearance between piston to wall on cyl 2 has got me thinking that there is going to be major thrust issues during high load. I did some research on a couple of neon forums, and other evo guys were saying that they are running a .008 piston to wall clearance.
Anybody had any luck with this before ?
Stay tuned.
https://honda-tech.com/forums/appearance-build-threads-122/ek-hatch-project-my-first-teardown-ever-advice-comments-more-than-welcomed-2866637/
There's a link for you new guys, and for the ones that have seen it just for refreshment.
I've arranged a lot of data and research to attempt and set my goal for a 11 second car when it comes to collecting useful info on the web specifically addressed for Power. But since the power that I am going to be throwing down to the ground on this new gsr build has priority than my old b16, I come to think of it on how am I going to hook to those 15 inch street tires? Slicks in this case are definitely going for replacement in order to hit that 11 second target since a rough estimated 400-500whp boosted FWD ek will most LIKELY not get even close to such desired values if traction becomes an enemy. Most likely, it will!
but .. Speaking of traction .. What about wheel hop ? Oh yeah, I Forgot .. then theres that problem .. -sighs- Well anyways, I've got about 2-3 months before the "silver omen" reveals it's new guts down the 1320 to get it running properly(had some problems with my greddy boost controller solenoid that I need to check out when I get the gsr running), and wrecks havoc, or get's wrecked upon. Mind you, but I am a newbie when it comes to flying down that quarter mile. When I mean newbie, I addressed it in words where practice is going to be needed in order for me to advance to the next and further level so I can hit my desired targets. I don't even know how to do a proper burnout, jesus christ .. but drag racing has probably been one of my favorite things in life for over 3-4 years now. I haven't had that many chances to shine for high numbers in which I always wanted to, but the opportunity was always golden to me and not have I once wanted to see that kind of glory fade. So here is my GSR rebuild to my former most known street weekend warrior ***** ek that I will be posting updates about.
Desired time: 11 seconds down the 1320
Help I am seeking from experienced honda tech drag racers, engine builders, and guys that know what they're talking about in General .. please share your inputs with me
Things I really want to know:
- Hooking, what suspension, rubber, traction bars, add on suspension accessories am I most likely going to need for my desired time.
- How to launch, how to do a proper burnout ? inputs needed on this one.
- Now I do also have a choice between a b16 tranny, and a gsr tranny ? I'm thinking b16 for that shorter time.
Anything else that you guys would like to share, or throw comments about on how to rebuild a motor or think there's a better way of how to do things in this thread, please feel free to chime in and don't be shy. I'm just another noob racer out there in the streets. But if I exhibit a better feeling on how to accomplish something throughout my teardown/gsr rebuild versus your opinion, don't take that as a sign of offense. Sometimes I will go by a certain instinct, lol... but anyhuuu!!! Here it is...
Cheers.
vehicle: 97 civic dx, completely gutted in the back
block: 95 gsr b18c1, 81.5mm bore
head: stock b16a2 head
transmission: deciding on either the b16 or gsr that I have
ems: eCtune
stock standard micropolished gsr crank
acl main bearings
acl rod bearing
honda oem thrust washers
eagle h beam rods
81.5mm 10.0:1 JE Pistons
OEM Honda Head Gasket
GSR Cams
Stock B16a2 intake manifold, stock TB
transmission/clutch:
gsr or b16, still trying to get the input from you guys?
stock driveshaft components
act comp stage 4 clutch
Suspension/Ground game:
Tein S Tech springs
Stock struts
rear blox lower control arms
Beaks rear tie bar
205/50/15 Falken Ziex's on 15x7 rota slipstreams all around
Innovative Mounts: 75A Black Inserts
Boosted Setup:
Spooling performance Log Style Manifold T3/T4 Flange
Precision SC34 3" Inlet, 57 Trim wheel, .63 A/R Hot side, 5 bolt
2.5 inch stainless steel downpipe, open, no exhaust(x_x neighbors hate me)
Tial 38mm Wastegate w/ DT
AEM UEGO Wideband
AEM Oil pressure Gauge
HKS SSQV3 Blow off valve
Greddy Profec B II Boost Controller
Greddy Turbo Timer
ID's 1000
Stock Fuel pressure regulator, and fuel rail.
255lph Walbro Fuel Pump
2.5" Inch Charge Pipes
XS Power Ebay Intercooler
Motorolla 2.5 Bar Map Sensor(Anybody experience problems with these when going over 20lbs ? I'm probably going to swap out to a hondata one, or a gm 3 bar just for future purposes since I plan on keeping the car.)
Day 1: The Gsr Rebuild
Block on stand
The blueprinting stage:
The measuring of the pistons and cylinder bore.
The process I used to indicate the exact measurement of cylinder bore was to first get an accurate reading of what size the pistons were. Since I knew that this wasn't a standard 81mm block by the size of the pistons, I was going to take measurements of the bore with a Dial bore gauge in order to find out what the exact size was. The readings seemed okay, and I am confident enough that there shouldn't be a conflict in the end of this rebuild for a high horsepower build, besides a little bit of clearance for a weekend track ***** I heard is better for a bit of extra more power output.
Best tool ever:
The way I measured the pistons is half inch down from the skirt, address the half inch mark with a marker. Stick it in while the piston ring(i used the compression ring to hold the piston in place)
Now I switched over to a micrometer, and mic'd out the readings for each piston. They were pretty much all the same.
Pistons: 3.208" in = 81.48mm
I mic'd out the dial bore gauge with a 3.2 ref adapter guide from the DB kit as my pinpoint to see where my numbers were and how much I am going to need to subtract to get the specific cylinder bore.
Dial bore gauge had to be mic'd accurately, it's important to zero this out and watch the needle not move during this process, because if it does your reading will be very inaccurate.
When mic'd with 3.2 adapter: 3.223"
Now I placed the dial bore gauge in each specific cylinder and these are the reading I've got:
Here are the cylinder bore measurements:
Cyl 1: 3.213 ( subtracted .010 from 3.223 )
Cyl 2: 3.215 ( subtracted .008 from 3.223 )
Cyl 3: 3.212 ( subtracted .011 from 3.223 )
Cyl 4: 3.212 ( subtracted .011 from 3.223 )
Now my biggest fear here is cylinder 2 is off by 2-3 thou of where I kinda wanted it to be at. The clearance between piston to wall on cyl 2 has got me thinking that there is going to be major thrust issues during high load. I did some research on a couple of neon forums, and other evo guys were saying that they are running a .008 piston to wall clearance.
Anybody had any luck with this before ?
Stay tuned.
 04-21-2012, 11:07 PM
#2
Honda-Tech Member
Join Date: Feb 2009
Posts: 201
Likes: 0
Received 0 Likes
on
0 Posts
tune,slicks and seat time.
there's tonnes of threads on burnouts, and launching. 3rd gear burn, preload,launch at 6800 for me anyways.
there's tonnes of threads on burnouts, and launching. 3rd gear burn, preload,launch at 6800 for me anyways.
 04-22-2012, 06:03 AM
#4
Honda-Tech Member
Thread Starter
Unfortunately I have a feeling when I took the motor apart yes the block has been honed before for the 81.5mm JE pistons to fit in, but the thing was it hasn't been honed recently or taken physically by me to the machine shop. I think I might get away with the clearances that I have for the amount of power that I wish to put out for the motor.
Lurking on a bunch of random DSM, and NEON forums, I noticed at some comments people where leaving towards each other that they had some success stories by running a clearance with .006-.007 thou on all 4 cylinders. Not to mention ontop of that, the thermal expansion on the JE pistons requires you to run a larger clearance for them and they are known for piston slap on cold start ? Correct me if I'm wrong.
Lurking on a bunch of random DSM, and NEON forums, I noticed at some comments people where leaving towards each other that they had some success stories by running a clearance with .006-.007 thou on all 4 cylinders. Not to mention ontop of that, the thermal expansion on the JE pistons requires you to run a larger clearance for them and they are known for piston slap on cold start ? Correct me if I'm wrong.
04-22-2012, 07:21 AM
#5
how much P to W are you trying to run? .003 to .0035 is what I run.... If you start to run larger amounts of P to W you will start looking at the potential for piston slap. .008 P to W seems like a whole lot to me but I know there are some guys that build that way or at least have experimented with it, unfortunately I am not one of them so I don't have the answer as to how it worked out.
04-22-2012, 08:52 AM
#6
Honda-Tech Member
Thread Starter
My goal is to run about .004-.005, it's just that second cylinder i am a little concerned about. I guess I will just have to experiment with it and go on, and see what happens. In the long run though, I do plan on keeping this car for the weekend only so it's not going to be my daily driver.
Trending Topics
04-25-2012, 08:27 PM
#8
Honda-Tech Member
Thread Starter
Deck Plate ? Could you please go further more in depth ?
Luck, the piston to wall clearance that I am at currently at is acceptable for 3 of the cylinders for the budget that I am stuck with. I am fine on that, and I don't have much time to get this motor out. The only cylinder I'm concerned is with the one that has slightly a bigger gap than the others. I'll just have to experiment with it, and hope for the best that piston slap doesn't become worse than what some people say, and some people don't say.
As far as my bearing being measured, here are the updates on that:
I first took the measurement of the outer diameter of each crankshaft main journal.
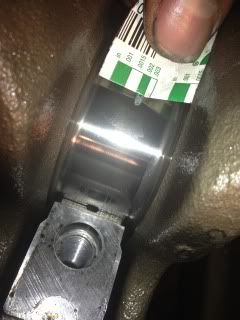
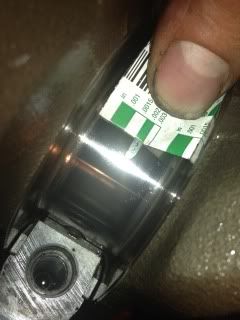
Measuring Main bearing Journal Oil Clearance
crank journal measurements
#1 Main: 2.167"
#2 Main: 2.167"
#3 Main: 2.167"
#4 Main: 2.167"
#5 Main: 2.167"
Got the following readings.
1. Took the following measurement.( 2.167" )
2. Equipped the Dial Bore Gauge.
3. Zero'd out my Dial Bore gauge for 2.167", so 0 on the gauge is equivalent to that measurement.
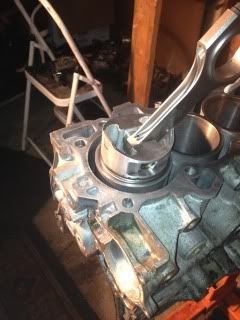
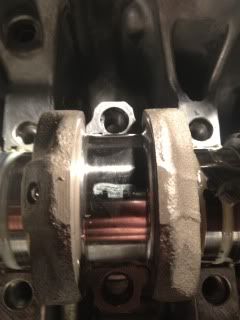
4. Went to work with the Dial Bore Gauge as you can see ...
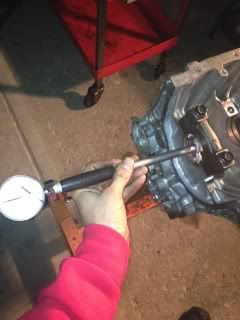
Now some of you blueprinting engine building specialists might think "Why in the picture is he taking measurement of the X axis instead of the Y. Yes, Y axis is the main priority, but I also wanted to keep a note to myself to not forget about the X axis just because I wanted to make sure it wasn't too far off. Yeah the X axis is always going to be a little wider on the mains due to an increase in Oil Capacity on the main bearing journals, but it's not as important as the Y axis since I only took the action to write down and worry about the Y axis which came in the desired spec that I wanted it to be in.
My clearance readings...
#1 Main: 0.003"
#2 Main: 0.002"
#3 Main: 0.002"
#4 Main: 0.0025"
#5 Main: 0.002"
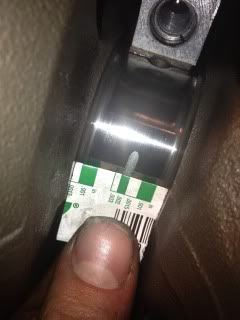
Then I rechecked it with the plasti gauge...
Please share your inputs with me, I always like to get comments even though I am comftorable with the
skill I have at the moment towards building a motor, and working on cars in general. I always like to hear
what others have to say, because sometimes I like to add other peoples opinions and ideas towards the career I love.
Luck, the piston to wall clearance that I am at currently at is acceptable for 3 of the cylinders for the budget that I am stuck with. I am fine on that, and I don't have much time to get this motor out. The only cylinder I'm concerned is with the one that has slightly a bigger gap than the others. I'll just have to experiment with it, and hope for the best that piston slap doesn't become worse than what some people say, and some people don't say.
As far as my bearing being measured, here are the updates on that:
I first took the measurement of the outer diameter of each crankshaft main journal.
Measuring Main bearing Journal Oil Clearance
crank journal measurements
#1 Main: 2.167"
#2 Main: 2.167"
#3 Main: 2.167"
#4 Main: 2.167"
#5 Main: 2.167"
Got the following readings.
1. Took the following measurement.( 2.167" )
2. Equipped the Dial Bore Gauge.
3. Zero'd out my Dial Bore gauge for 2.167", so 0 on the gauge is equivalent to that measurement.
4. Went to work with the Dial Bore Gauge as you can see ...
Now some of you blueprinting engine building specialists might think "Why in the picture is he taking measurement of the X axis instead of the Y. Yes, Y axis is the main priority, but I also wanted to keep a note to myself to not forget about the X axis just because I wanted to make sure it wasn't too far off. Yeah the X axis is always going to be a little wider on the mains due to an increase in Oil Capacity on the main bearing journals, but it's not as important as the Y axis since I only took the action to write down and worry about the Y axis which came in the desired spec that I wanted it to be in.
My clearance readings...
#1 Main: 0.003"
#2 Main: 0.002"
#3 Main: 0.002"
#4 Main: 0.0025"
#5 Main: 0.002"
Then I rechecked it with the plasti gauge...
Please share your inputs with me, I always like to get comments even though I am comftorable with the
skill I have at the moment towards building a motor, and working on cars in general. I always like to hear
what others have to say, because sometimes I like to add other peoples opinions and ideas towards the career I love.
04-26-2012, 06:30 AM
#9
Honda-Tech Member

Join Date: May 2009
Posts: 318
Likes: 0
Received 0 Likes
on
0 Posts
Slicks, preloading, seat time!
My Integra with 265whp runs 12.5 with 22inch slicks, preloading 7000rpm launch, 10psi of air in the tires, full weight, crappy Kyb gr2s. 11s is DEFINTEILY doable in your case. I'll be shooting for 11s also once I make over 300whp.
I do my burnouts in 2nd gear, set my launch during the pre-stage and use my ebrake to "drag" the car into stage. From there I'm pretty much waiting for the third yellow to drop the clutch and brake At the same time cutting 1.7 60ft.
04-26-2012, 06:53 AM
#10
Honda-Tech Member
Thread Starter
Slicks, preloading, seat time!
My Integra with 265whp runs 12.5 with 22inch slicks, preloading 7000rpm launch, 10psi of air in the tires, full weight, crappy Kyb gr2s. 11s is DEFINTEILY doable in your case. I'll be shooting for 11s also once I make over 300whp.
I do my burnouts in 2nd gear, set my launch during the pre-stage and use my ebrake to "drag" the car into stage. From there I'm pretty much waiting for the third yellow to drop the clutch and brake At the same time cutting 1.7 60ft.
My Integra with 265whp runs 12.5 with 22inch slicks, preloading 7000rpm launch, 10psi of air in the tires, full weight, crappy Kyb gr2s. 11s is DEFINTEILY doable in your case. I'll be shooting for 11s also once I make over 300whp.
I do my burnouts in 2nd gear, set my launch during the pre-stage and use my ebrake to "drag" the car into stage. From there I'm pretty much waiting for the third yellow to drop the clutch and brake At the same time cutting 1.7 60ft.
05-12-2012, 05:31 PM
#11
Honda-Tech Member
Thread Starter
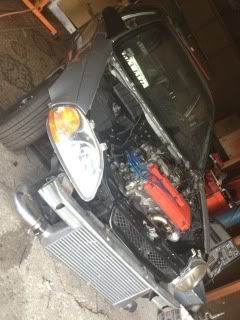
Phew! it's been a while, and how I absolutely miss posting in my thread especially when I am ways up ahead of my build, and almost prepared to fire this thing in the hole(in a good way.)
Anyways! I have gone long ways in the last couple of days, and I am finally getting ready to approach a conclusion towards my build. I haven't had the time to update because work put a burden on internet activity, but not hands on time with the car propped on jack-stands, and the b series attached to my engine stand inside my Honda gravel pit.
With that being said... read on honda-tech, and I hope you guys enjoy my thread. Cheers!
Previously continued blueprinting...
Piston Ring Filing:
Did some research on Piston Ring filing, and when I heard somebody mention a "smooth mill file" on one of the domestic threads, I just wanted to register on that forum and chew him out with a N00b one post reply!
Seriously, I cringed when such words escaped from his mouth. Surprised to see that the V8 guys on there were actually being positive about his remark. Anyways...
Usually I would have a machine shop file the piston rings to their proper spec proportional to the cylinder bore for a moderate street/turbo application. I took matters in my own hands.
The tool that I purchased for the job...
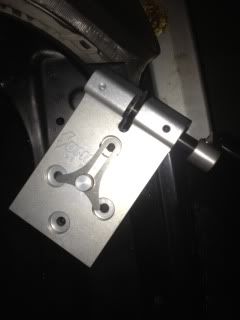
Summit Racing nailed it right on the spot! They had the best tool on the planet available for the average backyard mechanic/DYI engine builder when gaping piston rings.
My piston ring gap formula for the following setup: Cylinder bore x .0050(Moderate Street Turbo setup)
The conclusion to the b18c1 bottom end!
I always take extra caution in all of my bottom end builds that high quality tools are the absolute main priority to when it comes down to nailing the exact torque spec given! I don't know much about you, but I sure don't wanna' do a job twice. Git' ir' done right the first time.
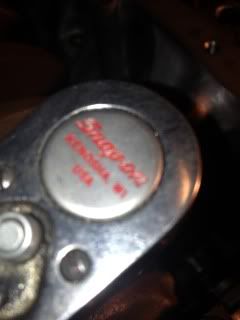
Snap on! That's right!
Bottom end finished!
Planning out small updates for the current setup to secure safety and avoid any leading failures in the near future is prior to establishing power. Like I said, someone as busy as myself would hate to do the whole thing all over again.
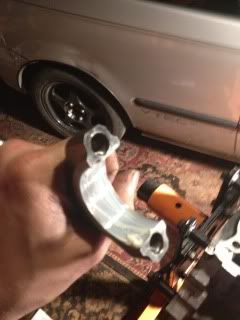
B16 head, and turbo goodies back on engine itself. I had to re-tig the 5 Bolt down pipe and make a new bung for the GSR Oil Pan.
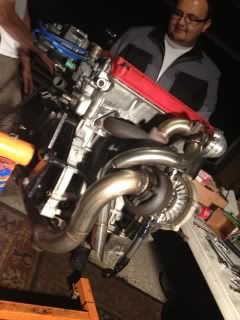
The 5 bolt down pipe, I just made a little longer to compensate for the clearance between the Pipe touching the oil pan because of the GSR's longer deck height which obviously raised the head a couple of millimeters above; ruining piping geometry..
Unfortunately when the B16 head mated to the GSR, the DP didn't want to seat properly. A little fabrication was just the remedy to this conflict. Little chopping and Welding did the trick for the most part. Same schedule piping equivalent to that of the DP is an addition to such surgery to link both of the chopped up pieces together in the aim of having the DP avoid coming in contact with the pan itself.
Stay tuned people..
:]
Anyways! I have gone long ways in the last couple of days, and I am finally getting ready to approach a conclusion towards my build. I haven't had the time to update because work put a burden on internet activity, but not hands on time with the car propped on jack-stands, and the b series attached to my engine stand inside my Honda gravel pit.
With that being said... read on honda-tech, and I hope you guys enjoy my thread. Cheers!
Previously continued blueprinting...
Piston Ring Filing:
Did some research on Piston Ring filing, and when I heard somebody mention a "smooth mill file" on one of the domestic threads, I just wanted to register on that forum and chew him out with a N00b one post reply!
Seriously, I cringed when such words escaped from his mouth. Surprised to see that the V8 guys on there were actually being positive about his remark. Anyways...
Usually I would have a machine shop file the piston rings to their proper spec proportional to the cylinder bore for a moderate street/turbo application. I took matters in my own hands.
The tool that I purchased for the job...
Summit Racing nailed it right on the spot! They had the best tool on the planet available for the average backyard mechanic/DYI engine builder when gaping piston rings.
My piston ring gap formula for the following setup: Cylinder bore x .0050(Moderate Street Turbo setup)
The conclusion to the b18c1 bottom end!
I always take extra caution in all of my bottom end builds that high quality tools are the absolute main priority to when it comes down to nailing the exact torque spec given! I don't know much about you, but I sure don't wanna' do a job twice. Git' ir' done right the first time.
Snap on! That's right!
Bottom end finished!
Planning out small updates for the current setup to secure safety and avoid any leading failures in the near future is prior to establishing power. Like I said, someone as busy as myself would hate to do the whole thing all over again.
B16 head, and turbo goodies back on engine itself. I had to re-tig the 5 Bolt down pipe and make a new bung for the GSR Oil Pan.
The 5 bolt down pipe, I just made a little longer to compensate for the clearance between the Pipe touching the oil pan because of the GSR's longer deck height which obviously raised the head a couple of millimeters above; ruining piping geometry..
Unfortunately when the B16 head mated to the GSR, the DP didn't want to seat properly. A little fabrication was just the remedy to this conflict. Little chopping and Welding did the trick for the most part. Same schedule piping equivalent to that of the DP is an addition to such surgery to link both of the chopped up pieces together in the aim of having the DP avoid coming in contact with the pan itself.
Stay tuned people..
:]
05-14-2012, 06:31 PM
#13
Honda-Tech Member
Thread Starter
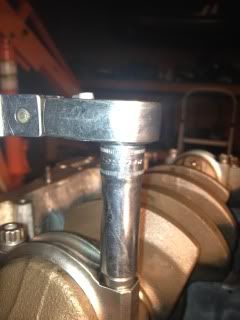
I've read up about that. But my friend who owns a performance shop and whos been building these little puppies for the longest right now gave me an idea if I was unable to find a rod bolt sretch wrench tool to use the method of torqueing down the rod bolts to spec. First 20lbs, then 40 finally, then break em loose, and do it again.
He said a repetition of 5 times should be more than enough for this kind of procedure for those ARP rod bolts to maintain their strength, and stretch.
He said a repetition of 5 times should be more than enough for this kind of procedure for those ARP rod bolts to maintain their strength, and stretch.
05-15-2012, 09:27 AM
#16
Honda-Tech Member
wheel hop....psht
with a decent set of mounts and slicks the wheel hop will go away...traction bars will also help.....
i do 2nd gear burn outs, but i will have a decent amount more power this year and if i find i need a third gear i will....
pull into the water box...ignore the dude telling you when to stop, he will pull you completly out of the box....stop at the leading edge of the box (as you would be pulling out of it)...rip your ebrake up....drop the clutch at full throtal, when the tires start spinning good let it pull you out of the water box(about when my rear tires enter the box) release the ebrake and and let the burn out fade out and hit the brake before you pass the lasers for the tree....you have now successfully scrubbed your tires and heated them nicely
as for launch preload or risk snapping an axle or grenading your diff....to preload you again rip up the ebrake(remember to hold the button in) rev to lauch control or anti-lag play with the clutch just enough it wants to grab and go but dont let it, this is where the skill and practice come in...slip to much and you red light, not enough you risk damage, the point is to load up the gears in the trans, diff and axles to take out all the slop....on the last yellow drop the ebrake and clutch and go
most trees are .5 sec lights...the average human brain takes .5 sec to react to a change....this is the trick to treeing a mother f-er and also winning no et events
05-28-2012, 02:38 PM
#17
Honda-Tech Member
Thread Starter
wheel hop....psht
with a decent set of mounts and slicks the wheel hop will go away...traction bars will also help.....
i do 2nd gear burn outs, but i will have a decent amount more power this year and if i find i need a third gear i will....
pull into the water box...ignore the dude telling you when to stop, he will pull you completly out of the box....stop at the leading edge of the box (as you would be pulling out of it)...rip your ebrake up....drop the clutch at full throtal, when the tires start spinning good let it pull you out of the water box(about when my rear tires enter the box) release the ebrake and and let the burn out fade out and hit the brake before you pass the lasers for the tree....you have now successfully scrubbed your tires and heated them nicely
as for launch preload or risk snapping an axle or grenading your diff....to preload you again rip up the ebrake(remember to hold the button in) rev to lauch control or anti-lag play with the clutch just enough it wants to grab and go but dont let it, this is where the skill and practice come in...slip to much and you red light, not enough you risk damage, the point is to load up the gears in the trans, diff and axles to take out all the slop....on the last yellow drop the ebrake and clutch and go
most trees are .5 sec lights...the average human brain takes .5 sec to react to a change....this is the trick to treeing a mother f-er and also winning no et events
with a decent set of mounts and slicks the wheel hop will go away...traction bars will also help.....
i do 2nd gear burn outs, but i will have a decent amount more power this year and if i find i need a third gear i will....
pull into the water box...ignore the dude telling you when to stop, he will pull you completly out of the box....stop at the leading edge of the box (as you would be pulling out of it)...rip your ebrake up....drop the clutch at full throtal, when the tires start spinning good let it pull you out of the water box(about when my rear tires enter the box) release the ebrake and and let the burn out fade out and hit the brake before you pass the lasers for the tree....you have now successfully scrubbed your tires and heated them nicely
as for launch preload or risk snapping an axle or grenading your diff....to preload you again rip up the ebrake(remember to hold the button in) rev to lauch control or anti-lag play with the clutch just enough it wants to grab and go but dont let it, this is where the skill and practice come in...slip to much and you red light, not enough you risk damage, the point is to load up the gears in the trans, diff and axles to take out all the slop....on the last yellow drop the ebrake and clutch and go
most trees are .5 sec lights...the average human brain takes .5 sec to react to a change....this is the trick to treeing a mother f-er and also winning no et events
05-28-2012, 02:38 PM
#18
Honda-Tech Member
Thread Starter
**LOG UPDATE**
Had a great holiday over the weekends, but now it's time to jump back to my feet, and take actions dealing with the car once again.
Had taken the head off over the weekdays to check where the minor coolant leak was coming from. Thank god the bottom end, and head didn't take any pre-mature damage during the short running interval. It came down to the conclusion that the head bolts were loose. Briefly while taking the head bolts off, only 3 of them had the potential to actually grab. Guess re-using used old ARP headbolts is a mistake that's well noted for my next builds. Here are some pictures:


My predicament is that the ARP Head bolts seem to lose their strength for the second round maybe because of the fact they have a tendency to stretch.
Or maybe!! The guys at ERSinc had lied to me about a job being complete(head resurfacing.)
This is all based on my experience, so who knows if I am correct, I'm just assuming.
In addition to my head installation, I did not use any additives such as lock tite, molly lube, only the preferred torque specifications that I have found on a team-integra website since the original instructions are lost somewhere in my garage. I had ran into some trouble with my previous machine shop after I had my head re-checked. So my guess is, they never actually re-surfaced the head for a proper seal to mate with the block itself. So with this being said, I have found a more convenient machine shop next to my house who are actually acknowledge by the local shops, and individuals I have spoke with. Preferably, I am going to take the risk and see what the upcoming results are going to be. -Crosses fingers.-
next step: I am going to a local performance shop to get another set of fresh ARP headbolts, and install them. :?
Had a great holiday over the weekends, but now it's time to jump back to my feet, and take actions dealing with the car once again.
Had taken the head off over the weekdays to check where the minor coolant leak was coming from. Thank god the bottom end, and head didn't take any pre-mature damage during the short running interval. It came down to the conclusion that the head bolts were loose. Briefly while taking the head bolts off, only 3 of them had the potential to actually grab. Guess re-using used old ARP headbolts is a mistake that's well noted for my next builds. Here are some pictures:
My predicament is that the ARP Head bolts seem to lose their strength for the second round maybe because of the fact they have a tendency to stretch.
Or maybe!! The guys at ERSinc had lied to me about a job being complete(head resurfacing.)
This is all based on my experience, so who knows if I am correct, I'm just assuming.
In addition to my head installation, I did not use any additives such as lock tite, molly lube, only the preferred torque specifications that I have found on a team-integra website since the original instructions are lost somewhere in my garage. I had ran into some trouble with my previous machine shop after I had my head re-checked. So my guess is, they never actually re-surfaced the head for a proper seal to mate with the block itself. So with this being said, I have found a more convenient machine shop next to my house who are actually acknowledge by the local shops, and individuals I have spoke with. Preferably, I am going to take the risk and see what the upcoming results are going to be. -Crosses fingers.-
next step: I am going to a local performance shop to get another set of fresh ARP headbolts, and install them. :?
07-01-2012, 08:02 AM
#19
Honda-Tech Member
Thread Starter
No me gusta the way things are turning out.
It's frustrating achieving problems before goals. Not just tuning dilemmas, but mechanical as well. Seems like the engine rebuild failed quiet well and hit me hard.
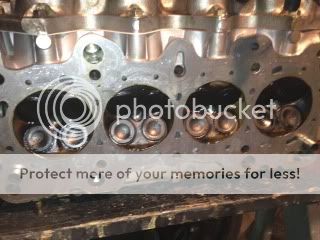
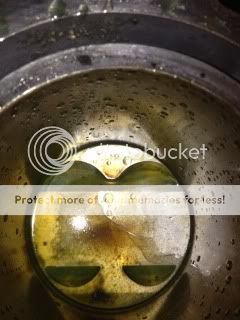
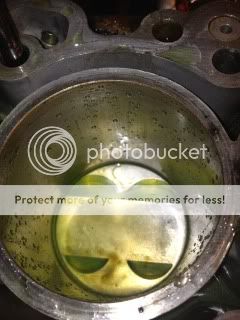
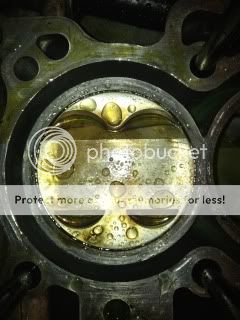
Let's first start off with these bad boys..
Cyl 1:
Cyl 2:
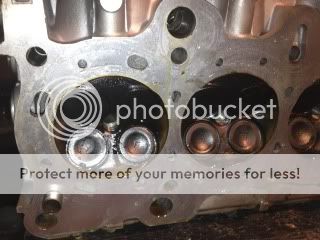
Cyl 3: Yuck! Looks like somebody needs valve guide seals.
Cyl 4:
My judgement becomes more clear because of a leakdown test, and a compression test I performed to base my final answer on valve guide seals.
Compression Test: 210-220 across the boards
Leakdown test: Drained the oil completely. Started off with 80 psi at the regulator. Plugged in the leakdown tester into the hose coming from each cylinder and verified psi drop. Only about a 5-6 psi drop occurred, not much. Based on these results, I knew it had to be the valve guide seals. I didn't replace the valve guide seals since I had them done last year on my b16 build.
Can valve guide seals go bad once used for about 1000 miles? Also if a head is disassembled off the block and sits on a bench for about 6-7 months?
The other problem that I ran into was my alternator. In addition, it tweaked with battery voltages causing AFR drops/spikes in which I didn't like. Taking off the ground strap, the car died. I purchased an alternator from a local parts store, installed it, and resolved the issue. At least I was a bit happier then, but then again my checklist hasn't met it's standards to cover up the frown on my face.
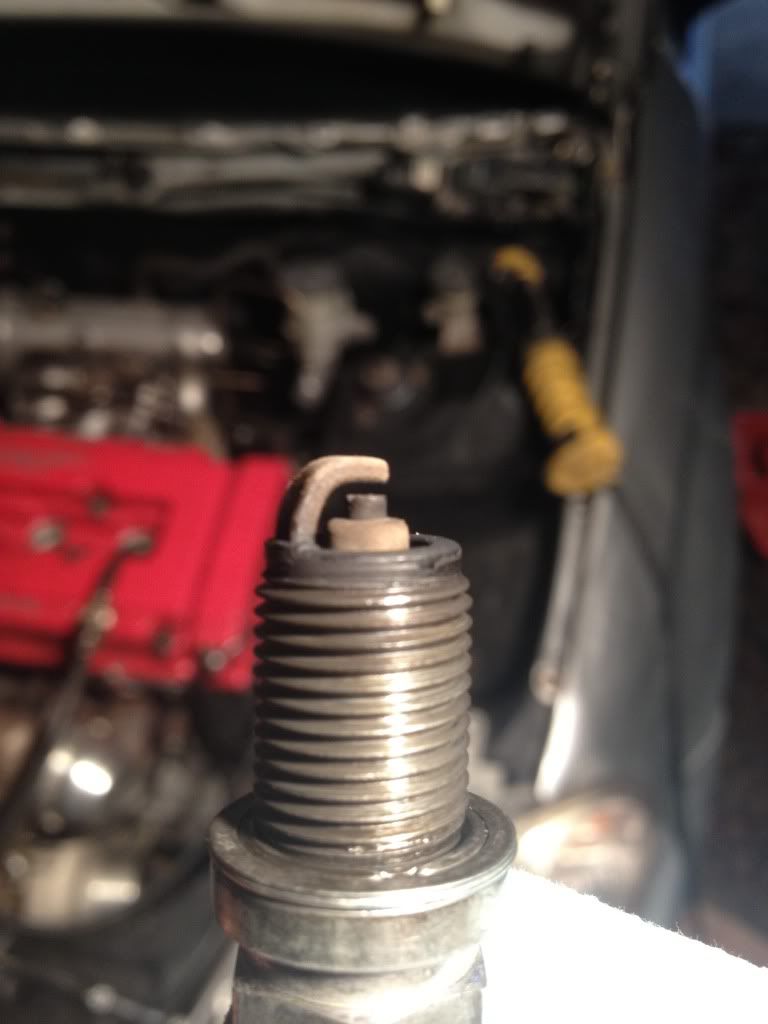
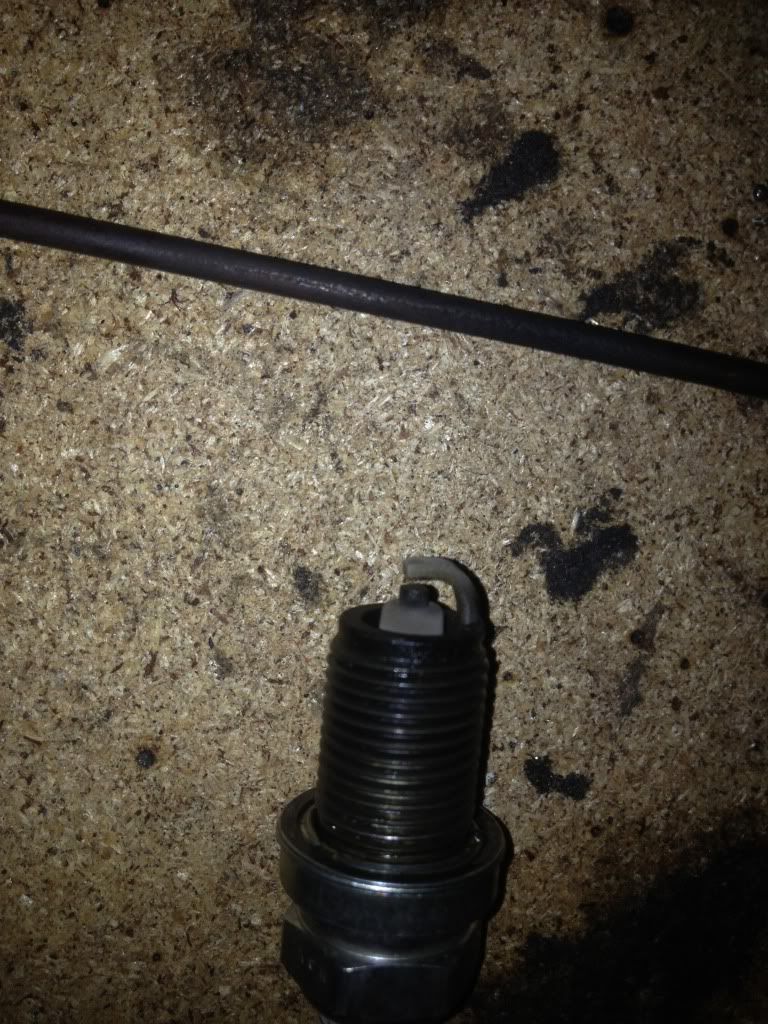
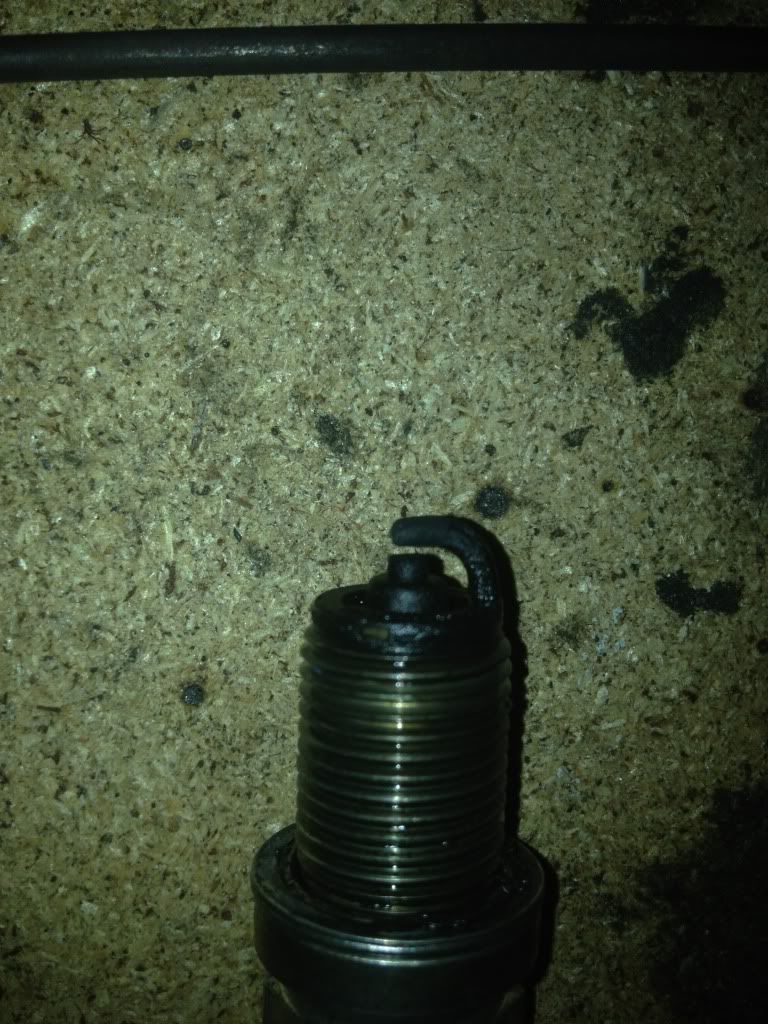
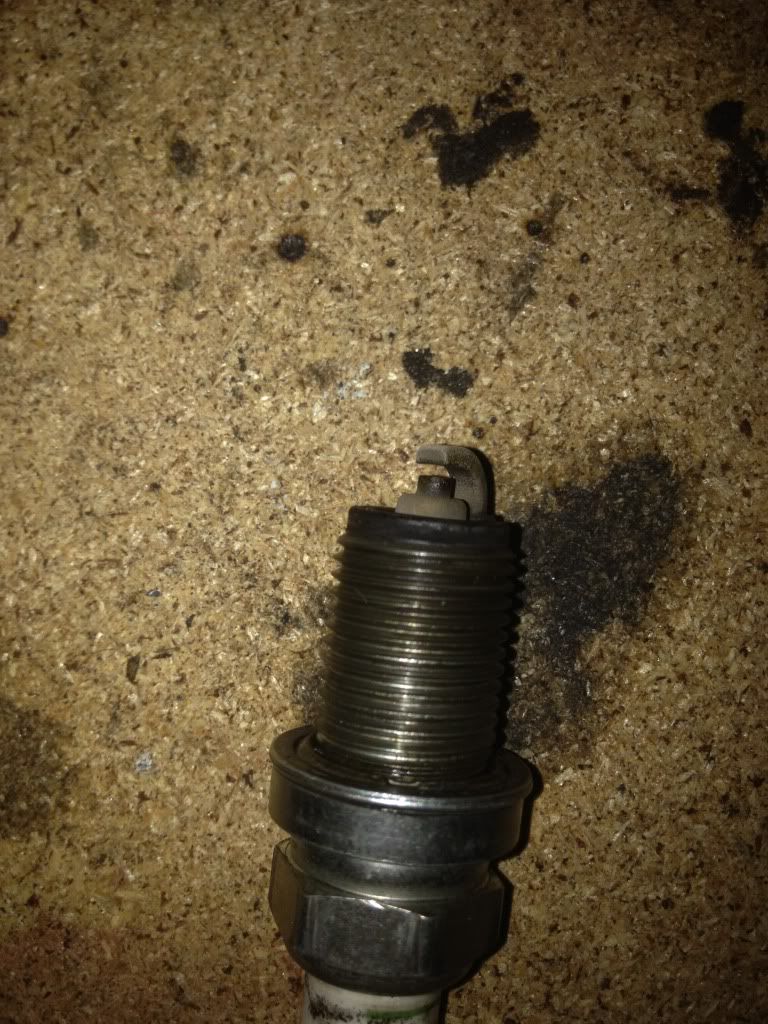
Oh btw, inputs on my spark plugs would be nice too. :]
It's frustrating achieving problems before goals. Not just tuning dilemmas, but mechanical as well. Seems like the engine rebuild failed quiet well and hit me hard.
Let's first start off with these bad boys..
Cyl 1:
Cyl 2:
Cyl 3: Yuck! Looks like somebody needs valve guide seals.
Cyl 4:
My judgement becomes more clear because of a leakdown test, and a compression test I performed to base my final answer on valve guide seals.
Compression Test: 210-220 across the boards
Leakdown test: Drained the oil completely. Started off with 80 psi at the regulator. Plugged in the leakdown tester into the hose coming from each cylinder and verified psi drop. Only about a 5-6 psi drop occurred, not much. Based on these results, I knew it had to be the valve guide seals. I didn't replace the valve guide seals since I had them done last year on my b16 build.
Can valve guide seals go bad once used for about 1000 miles? Also if a head is disassembled off the block and sits on a bench for about 6-7 months?
The other problem that I ran into was my alternator. In addition, it tweaked with battery voltages causing AFR drops/spikes in which I didn't like. Taking off the ground strap, the car died. I purchased an alternator from a local parts store, installed it, and resolved the issue. At least I was a bit happier then, but then again my checklist hasn't met it's standards to cover up the frown on my face.
Oh btw, inputs on my spark plugs would be nice too. :]
07-01-2012, 11:35 AM
#20
Honda-Tech Member
The seals should not go bad in that mileage.
If you have the head apart. those seals should be replaced.
Penny wise, dollar stupid is the phrase that comes to mind.
You need to think about the outcome of trying to save money and not doing a complete job.
The 2 center plugs have issues. are the injectors good ?
Once the head is completely checked out by a good shop and you start the engine, keep an eye on those plugs.
Is your Tune good ?
07-01-2012, 03:13 PM
#21
Honda-Tech Member
Thread Starter
Yeah. I took the head back off the b16 block I had blown up. Got me a GSR and rebuilt that. Put the b16 head on the GSR block. Over the winter, the head sat for like 6 months. I'm going to go ahead and replace those seals. The tune is still not complete. Ive just done fuel maps, no parameters yet. Been trying to mess around with it and ive never tuned anything regarding an ems. Being cautious, I make sure I read up about it before I take any affirmative action that could cause engine failure, or damage.
Based on the Leakdown/compression test, don't you agree with me that the valve guides are toast ?
Dude the injectors are brand new!! I.D. 1000's.
Based on the Leakdown/compression test, don't you agree with me that the valve guides are toast ?
Dude the injectors are brand new!! I.D. 1000's.
Last edited by EF9_TryMe; 07-04-2012 at 07:01 AM.
07-04-2012, 06:14 PM
#22
Honda-Tech Member
Thread Starter
update..
Arghhhh! Trial and error.
With current available problems present, summer was
definitely not the time for me to hold back.
Discovering that the valve guide seals are bad,
there was little hope for me to continue tuning the
darn thing. Besides, my IAT wasn't even hooked up.
Last year, when one had no knowledge about tuning, EFI,
turbos, etc. - the tuner at the performance
shop in which did the fabrication & tuning cal. on
my b16 setup said, "You don't really need that."
"Performance Fuel injection system" by matt cramer
was a handy read for that. Acquiring a little bit of
more knowledge about tuning Parameters, I think my
next move would be to order the aluminum IAT flange
from xenocron before continuing to ignition.
The idea of not having to properly replace the valve
guide seals was really a lesson during my rebuild.
Aware of such discovery, exemption is a lazy mans
choice in which shall never again be tolerated.

At least I get to consume more time to tackle down
other aspects, read up on how to symbolize spark
plugs, and more ... before playing with fire.
Starting with: Soldering in my P.W.M components, in which will give me an ability to experience higher boost threshold.
Arghhhh! Trial and error.
With current available problems present, summer was
definitely not the time for me to hold back.
Discovering that the valve guide seals are bad,
there was little hope for me to continue tuning the
darn thing. Besides, my IAT wasn't even hooked up.
Last year, when one had no knowledge about tuning, EFI,
turbos, etc. - the tuner at the performance
shop in which did the fabrication & tuning cal. on
my b16 setup said, "You don't really need that."
"Performance Fuel injection system" by matt cramer
was a handy read for that. Acquiring a little bit of
more knowledge about tuning Parameters, I think my
next move would be to order the aluminum IAT flange
from xenocron before continuing to ignition.
The idea of not having to properly replace the valve
guide seals was really a lesson during my rebuild.
Aware of such discovery, exemption is a lazy mans
choice in which shall never again be tolerated.
At least I get to consume more time to tackle down
other aspects, read up on how to symbolize spark
plugs, and more ... before playing with fire.
Starting with: Soldering in my P.W.M components, in which will give me an ability to experience higher boost threshold.
07-04-2012, 09:23 PM
#23
Honda-Tech Member
Thread Starter
update: pwm component install
Being granted with a little bit of spare time before
having to respect human stamina and fatique due to
hard work today around the house(even though it was
4th of July), I was able to solder in the following
P.W.M components into my p28 like so:


2 Resistors, 2 directional transistors, and 1
Diode(cathode facing the plug side of ecu)
successfully soldered in will exceed the
current boost limitations.
Being granted with a little bit of spare time before
having to respect human stamina and fatique due to
hard work today around the house(even though it was
4th of July), I was able to solder in the following
P.W.M components into my p28 like so:
2 Resistors, 2 directional transistors, and 1
Diode(cathode facing the plug side of ecu)
successfully soldered in will exceed the
current boost limitations.
07-19-2012, 04:44 PM
#24
Honda-Tech Member
Thread Starter
Update:
Don't know if you guys have been keeping up with me, but this is what's been
happening with the car so far.
Didn't replace the valve guide seals since last year, when I had the head completely off.
The head sat on a bench inside my garage over winter, and my guess is
that the valve guide seals took a crap due to contamination and time.
Being a cheap *** and putting blame on my anxiety, the cams, rails, etc. has been
removed to tackle down the guides.

Luckily, being able to get in contact with my matco dealer that stops by the shop
every Thursday is great news. An order has been placed on a overhead valve spring
compressor tool to oppose the head removal process. That's right! Valve Guide seals
will be removed prior to the unnecessary head removal that is if my compressor fails
me and the valves drop. Lol.
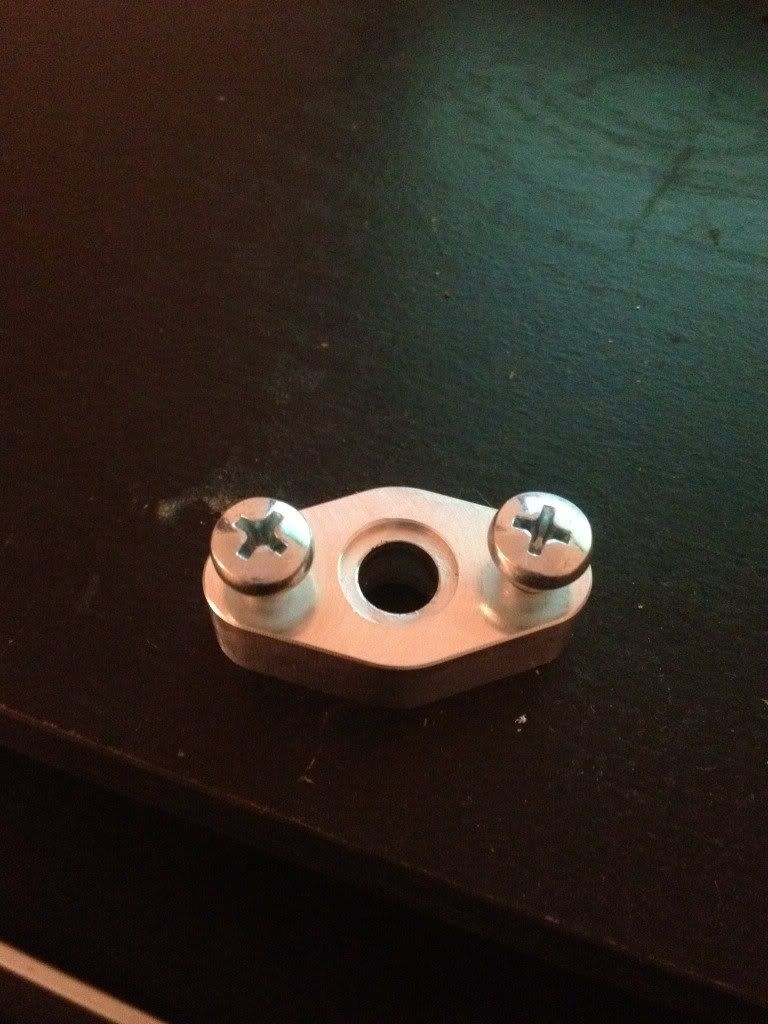
This came in the mail today as well ...
Xenocron IAT Flange for Charge Pipe
Don't know if you guys have been keeping up with me, but this is what's been
happening with the car so far.
Didn't replace the valve guide seals since last year, when I had the head completely off.
The head sat on a bench inside my garage over winter, and my guess is
that the valve guide seals took a crap due to contamination and time.
Being a cheap *** and putting blame on my anxiety, the cams, rails, etc. has been
removed to tackle down the guides.
Luckily, being able to get in contact with my matco dealer that stops by the shop
every Thursday is great news. An order has been placed on a overhead valve spring
compressor tool to oppose the head removal process. That's right! Valve Guide seals
will be removed prior to the unnecessary head removal that is if my compressor fails
me and the valves drop.
Lol.This came in the mail today as well ...
Xenocron IAT Flange for Charge Pipe

Thread
Thread Starter
Forum
Replies
Last Post