
My $50 rustoleum paint job
 05-05-2013, 06:05 PM
#1
Honda-Tech Member
Thread Starter

Join Date: Jan 2002
Location: Portland, OR, USA
Posts: 1,161
Likes: 0
Received 0 Likes
on
0 Posts
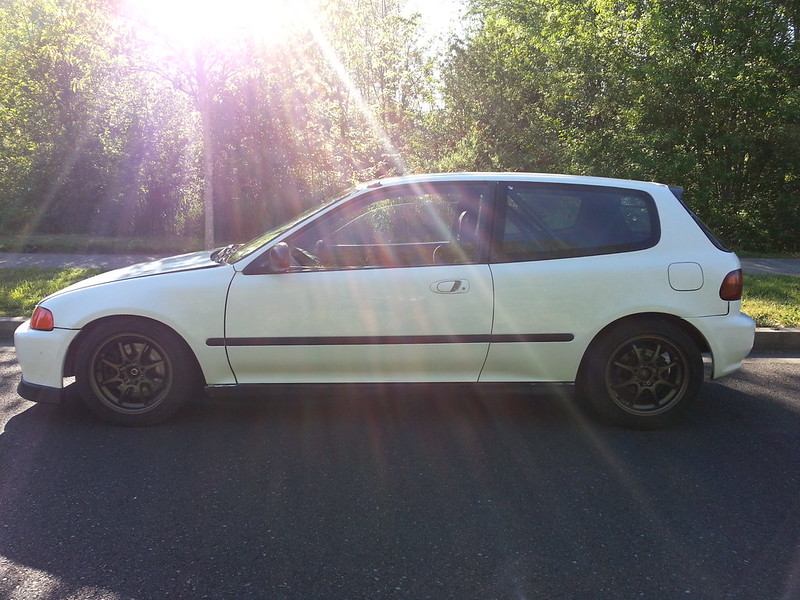
Decided to give one of the $50 roll-on paint jobs a whirl. Ended up costing closer to $100 with all the sandpaper and a bottle of Meguiar's 105. I think it looks fantastic for the money.
Decided to try my hand at one of those $50 rustoleum roller paint jobs. I think it ended up pretty nice for rolled-on paint.
http://www.flickr.com/photos/41506912@N05/8711732553/http://www.flickr.com/photos/41506912@N05/8711732553/ by http://www.flickr.com/people/41506912@N05/, on Flickr
http://www.flickr.com/photos/41506912@N05/8712867044/http://www.flickr.com/photos/41506912@N05/8712867044/ by http://www.flickr.com/people/41506912@N05/, on Flickr
http://www.flickr.com/photos/41506912@N05/8711740931/http://www.flickr.com/photos/41506912@N05/8711740931/ by http://www.flickr.com/people/41506912@N05/, on Flickr
http://www.flickr.com/photos/41506912@N05/8711745893/http://www.flickr.com/photos/41506912@N05/8711745893/ by http://www.flickr.com/people/41506912@N05/, on Flickr
http://www.flickr.com/photos/41506912@N05/8711738095/http://www.flickr.com/photos/41506912@N05/8711738095/ by http://www.flickr.com/people/41506912@N05/, on Flickr

 05-05-2013, 06:24 PM
#3
B*a*n*n*e*d

Join Date: Oct 2011
Posts: 1,022
Likes: 0
Received 0 Likes
on
0 Posts
Good job. I was gonna do that but decided maaco would be better. I don't know though cause I may not afford it. Macco will do the enamel for 3 times that much.
My question is how in the world did you get it to not run when you applied it.
My question is how in the world did you get it to not run when you applied it.
05-05-2013, 06:25 PM
#4
Honda-Tech Member
You serious? That looks extremely good for $100!!!
You just used one of these?
http://hardwareandpaints.com/images/paint-roller-7.jpg
Any clear coats or anything?
You just used one of these?
http://hardwareandpaints.com/images/paint-roller-7.jpg
Any clear coats or anything?
 05-05-2013, 07:21 PM
#6
Honda-Tech Member
Thread Starter
Join Date: Jan 2002
Location: Portland, OR, USA
Posts: 1,161
Likes: 0
Received 0 Likes
on
0 Posts
Nope, no clear coats or anything. Just go old rustoleum paint from home depot.
Here is the process I used....
wetsand existing paint with 320
1. apply 2-3 coats of paint
2. wetsand thoroughly with 600 grit
3. apply 3-4 coats of paint
4. spray a VERY fine mist of flat black paint over the surface and wetsand that with 1000 grit. the black paint gets in all the low spots which allows you to sand the surface pretty smooth. this step is key; if you don't spray the black you'll have a ton of orange peel. the black also allows you to sand out any runs.
4. apply another 2-3 coats. now that you're applying paint to a smooth surface, you'll notice that the paint flattens out and dries much smoother than before.
5. spray another fine coat of flat black and wetsand with 1500.
6. buff to a shine using a rotary buffer (got mine at harbor freight), a wool cutting pad, and meguiar's 105.
7. buff again using a foam cutting pad, and then a soft foam polishing pad (this is per the 105 directions from megs). I used a DA buffer for this step but you'll still get good results with a rotary, just might have some holograms in the paint.
8. wipe down and enjoy
Some pointers...
1. this whole process takes some time to figure out, so I recommend practicing on a spare door to get the hang of each step.
2. i used a roughly 60/40 mixture of paint to mineral spirits.
3. a lot of the tutorials say to put on extremely thin coats. i tend to disagree with this. the coats are going to be thin by nature because of the amount of thinner in the mixture. however, you need to get enough paint on that it can flatten out. if you don't put enough on it can't flatten and the paint will dry with a rough texture. basically you want to put as much on as you can before it runs.
4. you will get some runs. one trick i found was to wait around for 5-10 minutes after each coat to find any runs, at which point you can go back over them with the roller to smooth the area out. after about 10 minutes the paint shouldn't run any more.
5. as you apply the paint it should look wet as it goes on. if it isn't wet looking, you need more paint.....i should really make a video about this as the process will go a lot faster once you get this right.
6. if you have to buy a buffer and or DA polisher (i have a porter cable 7424), your cost will increase. at the minimum, buy a harbor freight buffer, a meguiars wool cutting pad, and a polishing pad. you simply can't get similar results doing this by hand.
7. i used oil-based rustoleum paint and the hard white foam rollers from home depot.
8. IF YOU DON'T KNOW HOW TO USE A BUFFER WATCH A BUNCH OF YOUTUBE VIDEOS. IF YOU DON'T DO IT RIGHT IT'LL LOOK FUNKY!
9. the megs 105 is, in my opinion, kind of finicky to work with. some of the videos i watched said to make 2-3 passes with a cutting pad, and then another 2-3 passes with a polishing pad (decreasing pressure with each pass). i found that using a wool cutting pad first (3-4 passes) followed by a foam cutting pad (2-3 passes) followed by a foam polishing pad (3-4 passes with decreasing pressure to the point where there is barely any pressure by the last couple passes) worked pretty well with this type of paint.
That's about it. I'll try to answer any questions I can. If you're in the Portland area and would like help learning how to lay the paint flat let me know.
Thanks for the positive comments!
Trending Topics
05-08-2013, 08:48 PM
#8
Honda-Tech Member

Join Date: Apr 2013
Posts: 2
Likes: 0
Received 0 Likes
on
0 Posts
looks pretty solid dude. can you get shots on the side where the sun is hitting it? Honestly debating whether i should go white or grey. buddy did grey and his turned out pretty solid. Pics if you can bro
05-08-2013, 08:59 PM
#10
Honda-Tech Member
Thread Starter
Join Date: Jan 2002
Location: Portland, OR, USA
Posts: 1,161
Likes: 0
Received 0 Likes
on
0 Posts
05-08-2013, 09:00 PM
#11
Honda-Tech Member
Thread Starter
Join Date: Jan 2002
Location: Portland, OR, USA
Posts: 1,161
Likes: 0
Received 0 Likes
on
0 Posts
Are you looking for a shot of the sun hitting the paint? Sorry, not sure I understand exactly what you're asking for.
05-09-2013, 08:54 PM
#12
Honda-Tech Member

Join Date: Jan 2012
Posts: 196
Likes: 0
Received 0 Likes
on
0 Posts
You need a contrasting color to show you what parts need more sanding. When all the black is gone, you're done. It's called a guide coat.
Op the results look good. Def a lot of time went into it. Just please if you ever sell the car, let the next owner know its rustoleum. If anybody tries to repaint that car without stripping all that paint off, they're in for a nightmare.
Op the results look good. Def a lot of time went into it. Just please if you ever sell the car, let the next owner know its rustoleum. If anybody tries to repaint that car without stripping all that paint off, they're in for a nightmare.
05-10-2013, 08:15 AM
#13
Honda-Tech Member
Thread Starter
Join Date: Jan 2002
Location: Portland, OR, USA
Posts: 1,161
Likes: 0
Received 0 Likes
on
0 Posts
Originally Posted by 98ekb18c
Quote:
Originally Posted by EL1.8T
and why flat back paint? why not white?
You need a contrasting color to show you what parts need more sanding. When all the black is gone, you're done. It's called a guide coat.
Op the results look good. Def a lot of time went into it. Just please if you ever sell the car, let the next owner know its rustoleum. If anybody tries to repaint that car without stripping all that paint off, they're in for a nightmare.
Of course! No way I'd try to pass it off for normal auto paint.
Posted from Honda-tech.com App for Android
05-10-2013, 11:06 PM
#15
Honda-Tech Member

Join Date: Feb 2013
Posts: 9
Likes: 0
Received 0 Likes
on
0 Posts
Looks like an awesome paint job for the price! Considered doing it on my Chevelle years ago but I'm too scared to sand the paint on my car now since it's my daily driver and I only work part time and don't have much money to fix it. Never dealt with painting either, if you started out with absolutely nothing, no tools etc, could you still do this for $100? How long did it take you and how difficult was it?
05-11-2013, 05:41 AM
#16
Honda-Tech Member
Join Date: May 2008
Location: asheville, nc , u.s.
Posts: 589
Likes: 0
Received 0 Likes
on
0 Posts
You need a contrasting color to show you what parts need more sanding. When all the black is gone, you're done. It's called a guide coat.
Op the results look good. Def a lot of time went into it. Just please if you ever sell the car, let the next owner know its rustoleum. If anybody tries to repaint that car without stripping all that paint off, they're in for a nightmare.
Op the results look good. Def a lot of time went into it. Just please if you ever sell the car, let the next owner know its rustoleum. If anybody tries to repaint that car without stripping all that paint off, they're in for a nightmare.
why would the OP need to notify new owners of the type of paint used?
why couldn't they just sand it down and paint over the rustoleum paint?
why would they need to take it down to bare metal?
05-11-2013, 05:54 AM
#17
Honda-Tech Member
Join Date: Jan 2012
Posts: 196
Likes: 0
Received 0 Likes
on
0 Posts
The rustoleum will cause a reaction with any automotive paint sprayed over it. The new paint will just wrinkle, bubble and peel due to incompatible materials being used. It wouldn't need to be stripped to bare metal, but if you're taking the time to strip the rustoleum off, you may as well just strip it bare.
Same thing goes for any of these cheap paint jobs, spraypaint, rustoleum, house paint etc which is why so many people hate on them.
Same thing goes for any of these cheap paint jobs, spraypaint, rustoleum, house paint etc which is why so many people hate on them.
05-11-2013, 10:34 AM
#19
Honda-Tech Member
Thread Starter
Join Date: Jan 2002
Location: Portland, OR, USA
Posts: 1,161
Likes: 0
Received 0 Likes
on
0 Posts
Originally Posted by mattbatson
did you take any pics of the process?
or video?
or video?
Posted from Honda-tech.com App for Android
05-11-2013, 10:42 AM
#20
Honda-Tech Member
Thread Starter
Join Date: Jan 2002
Location: Portland, OR, USA
Posts: 1,161
Likes: 0
Received 0 Likes
on
0 Posts
Originally Posted by 1997JDMLS
Looks like an awesome paint job for the price! Considered doing it on my Chevelle years ago but I'm too scared to sand the paint on my car now since it's my daily driver and I only work part time and don't have much money to fix it. Never dealt with painting either, if you started out with absolutely nothing, no tools etc, could you still do this for $100? How long did it take you and how difficult was it?
Do you know anyone with a buffer?
So $80 or so plus the cost of the 105 and buffer/pads.
All in all I'd say it took me around 50 hours total. It's annoying work wet sanding over and over again, but if you're willing to spend the time you can get good results.
Also one nice thing about going this route is that you can do it little by little as you have time while still driving the car everyday. Just wipe down with mineral spirits everytime you're ready to paint to get the surface clean.
Posted from Honda-tech.com App for Android
05-11-2013, 05:31 PM
#21
Honda-Tech Member
Join Date: May 2008
Location: asheville, nc , u.s.
Posts: 589
Likes: 0
Received 0 Likes
on
0 Posts
thx, but I think your tutorial/write up was pretty thorough and it seems very doable by even an amateur like myself.
I'm not looking for show car finish, and if it comes out even close to what you accomplished, then I will be very happy
thanks for the write up
05-11-2013, 09:01 PM
#22
Honda-Tech Member
Thread Starter
Join Date: Jan 2002
Location: Portland, OR, USA
Posts: 1,161
Likes: 0
Received 0 Likes
on
0 Posts
Good luck man. It's really just a matter of being willing to spend the necessary time. Grab a spare door or hood from the junkyard and practice on that.
Posted from Honda-tech.com App for Android
Posted from Honda-tech.com App for Android
 05-13-2013, 09:26 AM
#25
Honda-Tech Member
Thread Starter
Join Date: Jan 2002
Location: Portland, OR, USA
Posts: 1,161
Likes: 0
Received 0 Likes
on
0 Posts
Originally Posted by Eg->sean
How durable is the paint against chips or scratches?
Posted from Honda-tech.com App for Android